The
Production of Numbered Grids for the
Display and Identification of Foraminifera
and other Organisms and Particles.
Text and Diagram by Brian Darnton (G.B.)
Images by David Walker (G.B.)
INTRODUCTION.
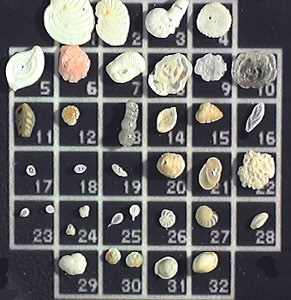
Many years ago I chanced upon a laid slide of Foraminifera by Mr Firth of Belfast. I carefully dissected the masterpiece and probed under the paper covered edges. It was a numbered grid of 32 squares mounted with forams together with a hand written listing of the organisms and their land of origin. The grid consisted of white lines on a black background.The shells were in superb condition but one of two were discoloured. This led me to suspect that this chemical deterioration might be due to the decay of photographic chemicals. I suspected that the grid was a product of photographic reduction from a much larger artwork. I tried to create a grid from black scraper-board and white lay-on lettering, but the results were not very impressive. After a variety of approaches I eventually realised that the computer might be of assistance.
COMPUTER DESIGN OF THE ARTWORK.
The squares can be produced in a variety of ways. Little squares can be copied and compounded using the "Paint" software or the grid of "Micrographx" may be used with the snap-to-grid feature, to build up the network of lines. This software can be purchased with packs of Avery labels at W.H.Smiths for under £10, it is really good value. Incidentally it is also useful for labels and calling cards of course and layouts for exhibition.
The general idea is to produce black lines and letters on a white background as a bitmap image. The grid can be numbered as required. It's a good idea to surround the thing with a neat circle. Next the whole image must be captured and a mirror image can be created by flipping in the horizontal plane. This is then printed from the computer. The finished work should be not larger than four inches in diameter.
PHOTOGRAPHIC COPYING OF THE IMAGE.
A text copying machine can be used, or better still the image can be laid onto the base-board of an old enlarger, but one in which the lamp, lens and film support is replaced by an old pentaprism 35mm camera, (Zenith or Pentax) at about 50 inches high. With a little luck the camera will fit into the old lamp bracket.The function of the enlarger apparatus is thus reversed and it becomes a reducer. In the darkroom the photographic paper is cut up into 35mm strips and placed where the film is normally exposed emulsion down . Cutting out the negative stage, makes for a much clearer print. The artwork can be illuminated by two 40 watt bulbs on either side at an inclination of 45 degrees. Manual sharp focusing can then take place using the viewfinder of the camera with the f number set low at f2. An exposure is then made from 10 to 25 seconds with the f number at 16 or better. A high f number is essential for clarity. The paper is developed in a darkroom using paper developer and paper fixative in jam jars under a red light, to be followed by washing. Test strips are a useful preliminary operation.
LAYING THE RING.
The 19mm diameter rings depend upon the subject material. 1.5mm thickness is ideal for the rather large Mediterranean species but 0.75 is probably better for run of the mill North Atlantic. After drying the photographic paper, a 19mm aluminium circular ring, is stuck on the emulsion side by laying it on centrally and by leaking a minimal amount of "Super-glue" around the outside of the ring. This restricts the mess to the area outside the ring, which is cut away when quite dry. The artwork is then stuck to a black ringed 3x1 inch slide to conceal any further mess using a little more "Super-glue"! The emulsion surface is absorbent but ideal for gum tragacanth which leaves less of a smear than most adhesives.
LAYING THE TESTS.
The gum tragacanth is best mixed fresh because degenerated material merely adds to the mucilage and adds nothing to adhesion. It is perhaps useful to note that many of the Norman cells that I investigated that were lined with black paper, had already been smeared with gum which was still tacky when moistened many decades later. (see Homepage at http://www.darnton.freeserve.co.uk/library)There are various options in gumming: When mounting small numbers, a minute blob can precede each laying or a much diluted gum can be applied to the whole of the grid area. This is a matter for ones own preference.
A thinned 0000 brush is a useful tool for the transfer of tests. When large numbers of forams are to be laid, then the use of store slides is a useful intermediate stage. NBS sell some green or black plastic slides with deep cavities which can be fitted with a protective cover-slide which come from Australia. The tests can be gathered in drops of distilled water in the labelled cells which can be later dried out ready for the ultimate selection.
When the laying and drying is quite complete, the coverslip can be stuck on a nearly dry layer of goldsize and then a day later ringing over the junction of glass and aluminium can take place. Since these deep type slides can only be used with low power magnification there is little point in using very thin cover-slips and size 3 is quite suitable.
SHELLAC RINGING.
The older mounters invariably and wisely used a glossy black shellac that at the same time covered any irregularities in their work. Shellac besides being an excellent protective waterproof ring, is soluble in alcohol, a solvent that will evaporate quickly. It will not re-dissolve the more common mountants which are normally xylene or toluene based. It will also resist the effects of immersion oil.
It is possible to produce the ringing cement from shellac flake and isopropyl alcohol. The consistency of the fluid is the great problem. If the liquid is too dilute in the alcohol then it will run, obscuring both the slide and the coverslip, if it is too saturated in shellac then it will become lumpy and uneven in application.
Preparation of this material is a 14 day business at the very least. A stock jar of flake shellac is half filled with isopropyl alcohol and left at room temperature for about a week. The liquid is poured off , labelled stored and tested. If it is still rather fluid then leave the lid off the jar until the correct consistency is reached by testing on a blank slide. After frequent use it does become lumpy and uneven from evaporation and a few drops of alcohol will be required from time to time.
Remember that the brush should be stored in a small bottle of alcohol through a tiny hole in the lid. The stem of the brush may supported by a cork to prevent the bristles from flattening on the bottom.
BLACKENING.
Shellac is normally golden in colour and I have spent many months trying to find a blacking agent. The most suitable product has been black technical ink sold for stiletto pens. It is miscible in alcohol and does not interact with xylene or toluene based mountants providing that they are dry.
NBS in the UK do produce and sell a shellac ringing material but it has a slightly purple hue. They also produce a wonderful golden shellac called Bioseal No 2 which is an alcohol based shellac. This is what I use nowadays, but I blacken it with the technical black ink by Faber Castell. Only a few drops are required and then one must leave the lid off until it passes the consistency test on a blank slide.
APPLICATION.
The brush (No.1)should be dipped in the alcohol storage bottle and then in the stock solution of black shellac. Its better to apply the ring with a generous covering in one session so that any bits may fall to the bottom never to be seen again. When several applications are applied over a few days the uneven features tend to be amplified rather than be obscured.
Black ringing for those who may find it dull, may be ornamented at a later stage with a thin ring of white zinc paint when dry, or coloured model paint coded for subject may be used i.e. blue for marine, green for freshwater etc.
Shellac is very useful in the process of conservation but one must beware of using it on alcohol based mountants of course. The uncovered alcohol saturated mixture is inflammable and although the very small amounts represent only a small hazard, the jar must be stored in a ventilated protected area.
There are details and variations but that is the general idea.
Required:
Old 35 mm camera like Zenith
Old B+W enlarger
Paper developer and fixer
Jam jars for fluids
Red light
Gum tragacanth
Dark days of winter
WIDTH=1Black and white photographic paper. The paper should be first examined under the microscope for texture. Matt is the best material, but straight gloss is better than the modern papers that have all manner of reflective bits in the surface.
SUMMARY.
Although a grid may be drawn with traditional drawing instruments under a hand lens, photographic reduction offers a greater degree of neatness. Computer assisted design is now quite simple using the software "Micrographyx" to create numbered grids within a four inch circle. The negative phase of reduction can be avoided if the image is reversed by flipping in the horizontal plane before photography. After attaching an aluminium ring the completed grid can be stuck onto a prepared 3x1 inch slide and the tests can be laid within the squares using diluted gum tragacanth. After drying the cover-slip can be applied, sealed and a black shellac ring applied. Labelling must not be neglected.
Comments to the author Brian Darnton welcomed.
Safety note: some of the chemicals described above are flammable and/or irritants and should only be used with the appropriate safety precautions. Children should not use them.
Microscopy UK Front Page
Micscape Magazine
Article Library
© Microscopy UK or their contributors.
Published in the November 1999 edition of Micscape Magazine.
Please report any Web problems or offer general comments to the Micscape Editor,
via the contact on current Micscape Index.Micscape is the on-line monthly magazine of the Microscopy UK web
site at Microscopy-UK