Dave Walker presented an
excellent introduction to test diatoms in his recent MICSCAPE
article. Furthermore, he was
MICSCAPE-wise enough not to finish the topic completely by
himself but to challenge further contributions.
A short look at test
diatom discussions in literature
Leave your splendid microscope in the case for a moment and
share a short look at 19th century literature first. In
Germany one of the microscope bibles used is the
"Dippel"1 which has about 1030 heavily
illustrated pages (2nd ed. in 1882). Diatom resolution tests
are described on pages 393 to 408. Dippel says e.g. that
resolution tests generally should be performed with white
daylight only (!) as e.g. blue filters were not
representative for daily routine work2. In fact I
must admit that I have always used a green filter (see
below).
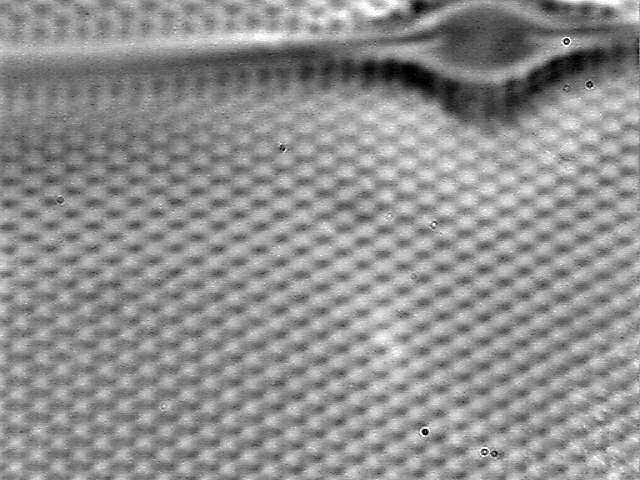
Dippel states also that Amphipleura pellucida was
the most difficult diatom test object used at his time.
According to Dippel Amphipleura pellucida should be
resolved to line level with a "N.A. equal to 1.16 at
least" and "very oblique illumination" and
should appear chain-like "by means of the finest
homogeneous (i.e. oil) immersions".
Dippel remarks that Frustulia rhomboides var. saxonica
should be resolved to lines by means of oblique light and a
water immersion of at least N.A. 1.08.
Furthermore there is a very interesting discussion of the
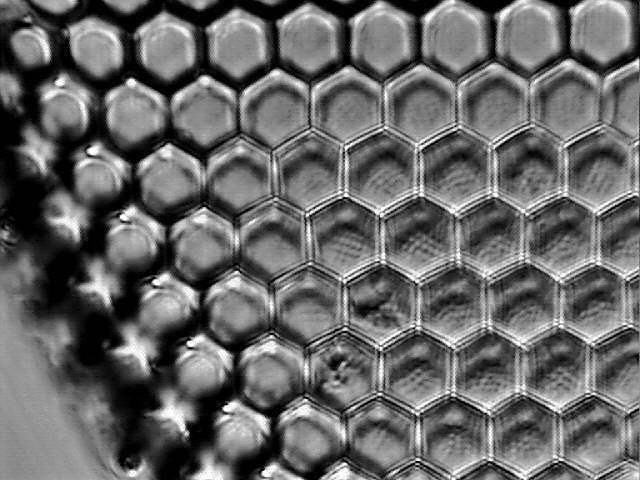
real visual appearance of Pleurosigma angulatum.
Dippel and e.g. French microscope builder Nachet were aware
that light diffraction might give a false visual impression
of real structural details of very small objects. They came
to the conclusion that the characteristic structures in the Pleurosigma
shell were disc shaped and not hexagon shaped. The
interpretation of light microscopic diatom photographs has
been subject to harsh disputes even in the 80s of our century3.
Dippel quotes Abbe and Stephenson which reported a line
within the round pits of Pleurosigma angulatum. As
far as I am informed this comes very close to modern scanning
electron microscope images which show Pleurosigma
shells made up of a two layer system which has round pits on
one side and small slits on the other (but no hexagons)4.
When Dippel refers to test diatoms he always mentions the
corresponding line group on the famous Nobert5
test plate.
Later on many other artificial test specimen designs have
been developed. But even today most amateurs tend to stick to
the old-fashioned diatom test specimens because the diatoms
in general are much cheaper.
What you might do in order to get optimum visual
results
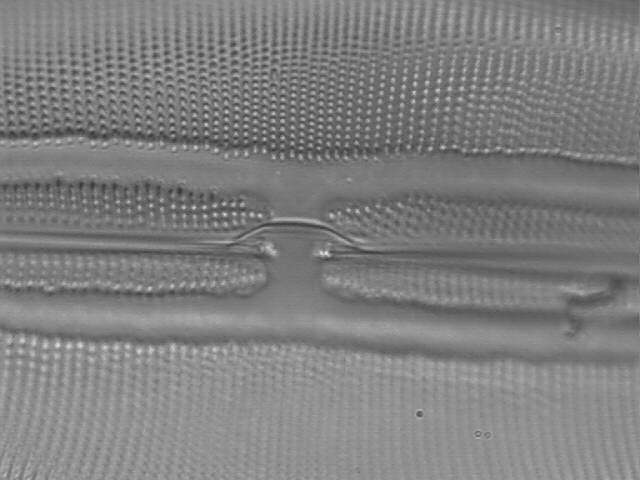
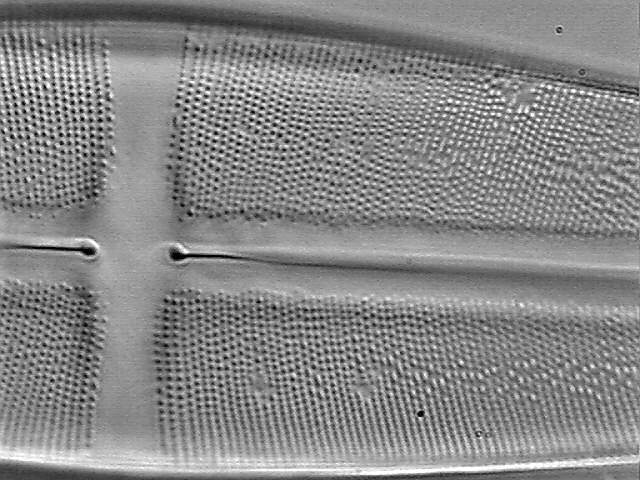
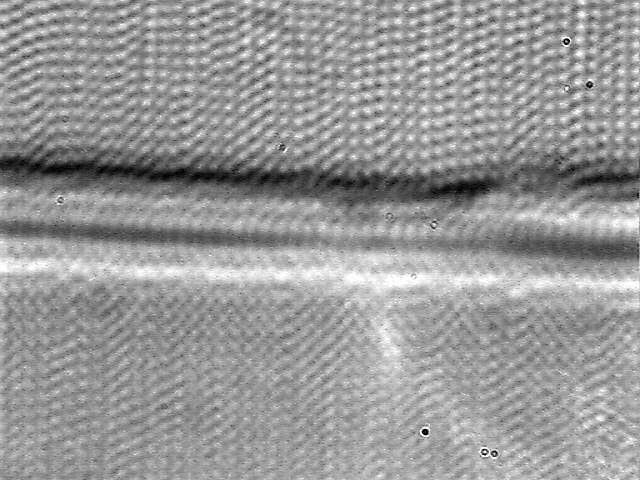
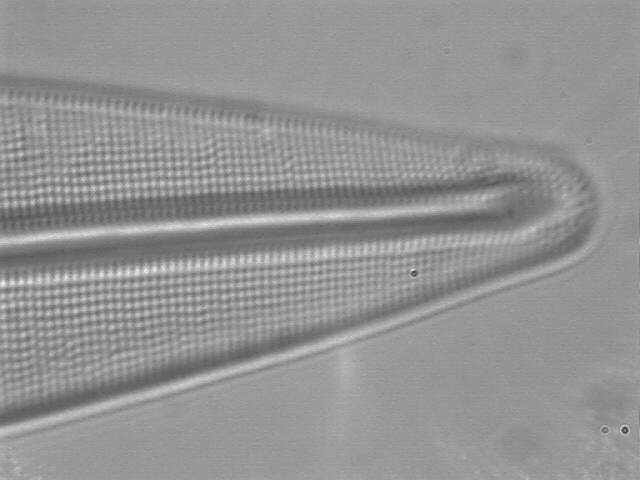
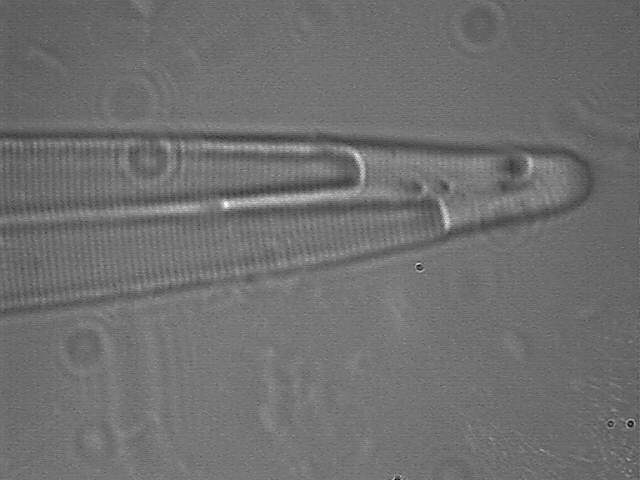
Below you will find eight test diatom species portraits and a
typical detail photo for each of them. The objective used for
the high-resolution pictures is an achromatic no-name oil
immersion 100x / N.A. 1.30 which I have bought about 30 years
ago with my first self-earned money6.
I think that you will be able to get very similar or even
better visual impressions through your own microscope in case
you have a microscope with an achromatic oil immersion with
N.A. 1.30 or similar, a condenser with a N.A. of 1.2 or
better and an eyepiece of at least 15x magnification. In my
opinion it is definitely not necessary to own one of those
hyper-expensive planapo-fitted-differential-phase-contrast
microscopes just in order to see all important test diatom
details.
To be honest, I wasn't successful at all from the very
beginning, I couldn't even perceive the dots of Surirella
gemma which might be resolved with a 60x objective (see
article by Dave Walker). Some of the test diatoms used7
have a very modest size and really meager contrast. But
meanwhile I know some tricks that will be helpful for visual
investigation :
-- use a so-called strict green transparent filter (no matte filter). Everything will appear in green colour. The image turns dark but details come out very clearly.
-- place a small black paper disc (about 1 cm in diameter8) just below the center of the bottom lens of your condenser. If you have a filter holder below the condenser put the black disc on the center of the green filter.
-- in case you have only simple equipment (no Köhler illumination) you might use a so-called aspherilux torch which gives a very bright light which is restricted to a small, well-defined circle.
-- it is unavoidable to oil the condenser front lens with lots of immersion oil. If you oil the objective only, the condenser aperture will not reach a value beyond 1.0 which is not sufficient for very fine diatoms like Amphipleura pellucida. (There must be two oil bridges, one between the condenser top lens and the bottom of the slide and the other one between the top of the slide and the front lens of your oil immersion objective. The quantity of oil on the condenser must be big enough to follow small movements of the condenser and the slide).
-- Most important: After focusing you should remove the eyepiece from the microscope and have a look at the rear lens of the objective. The diameter of the bright light disc in the rear lens of the objective should be maximized by careful adjustment of the condenser (and the light source) in order to illuminate the full diameter of the rear lens.
-- All pictures shown here have been taken with full aperture (condenser iris wide open). The iris was just not visible when looking at the objective rear lens.
-- Try to achieve some oblique illumination. In order to do this you can either move the light source a little or shift the condenser or filter holder slighty aside. When image quality turns worse you have to maximize the light disc on the rear lens again.
How the photographs
were taken
The pictures were taken on a massive vintage Czech MEOPTA
microscope, a black monster with 5 cm diameter focusing
wheels. I really like this instrument very much. It has a
three-lens condenser with N.A. 1.40. In order to take the
photographs I have used a CCD computer camera (PS39 camera by
the COMPRO company, price less than 100 UK pounds in
Germany). The camera objective was removed and the camera was
positioned just above the phototube of a Russian LOMO
trinocular tube fitted to the MEOPTA microscope. The image
can be caught by a mouse click and immediately transferred to
the computer. The LOMO trinocular tube can be switched to a
position where it shows a magnified image of the objective's
rear lens. This is very helpful in order to check the
illumination as described above. There is almost no
difference between the visual impression and the photographs.
When you have a look at the high-resolution photograph of Amphipleura pellucida you might admit that the famous dot-pattern is already coming out, in particular when you turn the picture 90° counterclockwise. But possibly this is just a symptom of a severe dottitis after continued dot-searching activities and at the same time a warning signal to return back to a more real world with nice but totally undotted friends and family ...
Comments and
corrections to author Martin Mach welcomed.
Click
on each image to see < 60kB images showing resolved detail
using an oil immersion 100x / N.A. 1.3 objective.
|
|
|
|
|
|

|
|
References
1) Leopold Dippel: Das
Mikroskop und seine Anwendung. Braunschweig 1882.
2) Dippel, p. 368.
3) See e.g. the dispute between diatom specialist Kurt
Krammer and Theodore Rochow published in MIKROKOSMOS 70
(1981) p. 164-169. The publication contains a comparison of a
scanning electron microscope photo and a light microscope
photo of the diatom Cymbella aspera: The light
microscope shows oval dots or pits whereas the scanning
electron microscope reveals slim slits. One might continue
this dispute even today because the light microscope
sometimes shows details which are several microns inside the
object and therefore cannot be visible by means of the
scanning electron microscope.
4) See e.g. Kurt Krammer: Kieselalgen. Stuttgart 1986 (with
many scanning electron microscope photographs of diatoms).
5) Friedrich Nobert (1806-1881) had invented a machine which
was able to create sets of parallel lines with tiny distances
down to 0,1 microns. The most difficult Nobert line sets were
not resolved before 1966(!). At this moment people were able
to look at lines which had been created "blindly"
by Nobert, had been sold to all over the world but had
remained invisible for about 100 years (I have this
information from:
Jeremy Burgess, Michael Marten and Rosemary Taylor:
Microcosmos. 1990).
6) The objective used for the high-resolution pictures has no
trade mark inscription and no serial number. There is only a
minimum technical inscription "100:1 Oel N.A.
1,30". Overall it looks like a West German product which
failed a quality check and therefore had to be banished to
the no-name area. Furthermore I have tried a pre-war
achromatic oil immersion objective on a Hensoldt company PROTAMI pocket microscope (with
objective inscription "P. N.A. 1,34"). The light
source used was a torch with green filter. As the trinocular
tube could not be mounted on the tiny body of the PROTAMI it
was not possible to get an extremely high overall
magnification for photographic documentation but the lines of
Amphipleura pellucida were clearly visible.
7) The test slides used were bought from Klaus D. Kemp in
United Kingdom and BW Optik in Germany. The same diatom
species of the different slides differ somewhat in size but
give a very similar visual impression and resolution.The
diatom species names in the captures were taken from the
descriptions included with the slides.
8) E.g. as shown for diatoms by Hans-Jörg Dethloff in
MIKROKOSMOS 86 (1997) pp. 53-56.
Microscopy UK Front Page
Micscape Magazine
Article Library
© Microscopy UK or their contributors.
Published in the November 1999 edition of Micscape Magazine.
Please
report any Web problems or offer general comments to the Micscape Editor,
via the contact on current Micscape Index.
Micscape
is the on-line monthly magazine of the Microscopy UK web
site at Microscopy-UK