LONDON, November 1677A Dutch merchant's startling claim that thousands of tiny monsters frolic within a single droplet of water was verified at the Nov. 15 meeting of the Royal Society of London.Society Fellow Robert Hooke, who made the decisive confirmation, describes the wonders as "perfectly shaped" with "such curious organs of motion as to be able to move nimbly, to turn, stay, accelerate, and retard their progress at pleasure."
A correspondent of the society, draper and haberdasher Antony van Leeuwenhoek of Delft had described miniature creatures in a letter published in the March Philosophical Transactions. To see the cavorting creatures, Leeuwenhoek fashioned a device of the type called a microscope. It uses a bit of glass to enlarge the view of an object.
Myriad Monsters Confirmed in Water Droplets, S. Milius, Science News Online, Vol 156.
A Review of The PS-150 PocketScope(TM) by Jim Harper, Spartanburg, SC, USA
While surfing the Internet for some information about portable microscopes, I discovered a fascinating new microscope, the PS-150 PocketScope(TM). The description of this truly unique microscope was so incredible that, being somewhat of a skeptic, I had to investigate.By applying 21st century technology to Antony van Leeuwenhoek's 17th century brilliance, PocketScope claims to have created a quality single lens microscope that
Provides 150x magnification at a resolution of less than 2 microns.
I obtained one of the microscopes and upon opening the package and found a extremely well-built plastic storage case which contained the microscope, two vials for samples, a collection of plastic 1 inch x 3 inch slides, plastic coverslips, a disposable polyethylene pipet, and plastic tweezers. With the possible exception of the plastic tweezers, all of the accessories were useful and the plastic slides and coverslips were a nice touch for the safety of the children.Is safe and easy to useespecially for children.
Uses any ambient lighteven candles or campfires!
Is pocket-sized.
Is practically indestructible.
And costs less than a dinner out for my family of five at a decent restaurant.
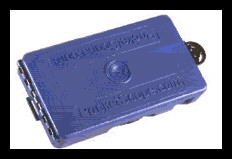
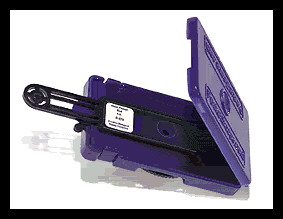
As I looked at the scope in its storage box, my first thought was that the "eyepiece" was awfully small. There was a mysterious little device protruding from the side of the box which I quickly deduced was a stage movement. I pressed the tabs that open the box from the closed position to discover its contents.
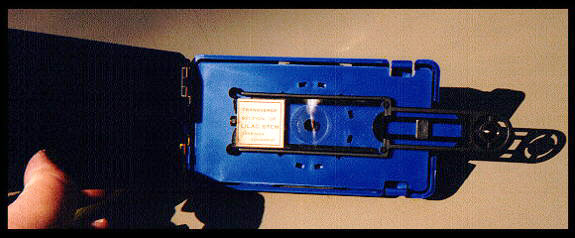
The interior of the microscope revealed a slide holder with an incredibly simple but functional design. The slide edge fits neatly under a small tab (label end of the slide shown below). The other edge of the slide fits under two small tabs and the slide is snugly held in place. This "Slide Guide(TM)" slide holder extends beyond the edge of the case so that you can move the slide around when the microscope is closed.
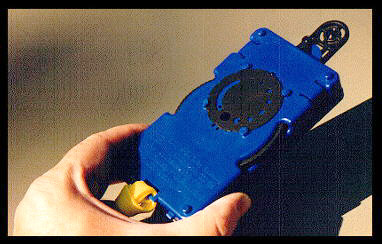
The back side of the microscope revealed the focusing wheel (protruding at the edges of the microscope) and the aperture disk. The focusing wheel moves the entire stage up and down. It works smoothly and allows for quite delicate focussing. A thorough diagram of the microscope's anatomy is available at the PocketScope website.
It was time for the microscope's first test. I placed my flea slide on the stage and centered the flea over the stage aperture. I snapped the cover down and peered into the tiny lens. WOW! This is what Leeuwenhoek felt when he looked through his first good lens! It was a little awkward at first since the eye must be placed very close to the scopein fact the cheek and the forehead are in contact with the case. I suddenly understood the shape and size of Leeuwenhoek's microscope. It was ergonomically designed to get as close to his eyeball as possible.
I spent the next couple of days looking at different preparations, from pond water to fibers. Every slide that was observable using transmitted light gave great results. I was able to see the motions of rotifer cilia, the feet of fleas, and pigment particles in textile fibers.
Illumination is achieved by pointing the microscope at some source of incident or reflected light. I used illumination sources ranging from bright clouds on a sunny day, to reflected sunlight from my house, to a frosted incandescent light bulb, to a cigarette lighter. Everything seemed to work great. By using light reflected from different colors of backgrounds you can alter the wavelength of the incoming lightthe effect is much like using gelatin filters. Different wavelengths of light provide contrast suitable for different types of subjects. The only complaint was the aperture disk is somewhat difficult to rotate, however, this was a minor complaint since there is no real need to change its position frequently.
The Slide Guide(TM) slide movement is probably the best feature of the microscope. Since the slide is inside the microscope, there has to be an easy means of moving the slide around during viewing. The Slide Guide is easy to use and since the image is not reversed, you don't have to move everything backwards to get it where you want it. It is possible to "follow" little beasties around on the slide by carefully moving the slide while viewing. Best of all, there is a locking mechanism on the stage motion so that once you find an area of interest, you can lock it in place, pass the microscope around, use with different light sources, etc. and the slide stays put.
In short, I was impressed. So far, every claim was true, but could a child use it? I took my seven year old son out in the yard and showed him step-by-step how to use microscope. I limited the instruction to two minutes and let him give it a try. Not surprisingly, he mastered the microscope as quickly as any video game.
One last test of the microscope: photomicrography. Would it be possible to take pictures using this little marvel?
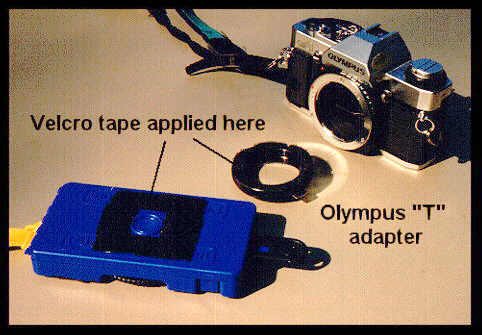
The PocketScope web site suggested a method for taking photographs using a 35mm SLR camera. Working from that starting point, I came up with a portable simplified solution.
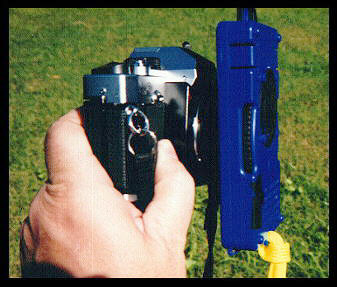
I had a microscope T-adaptor (available from Edmund Scientific) for my Olympus 35mm camera. I added Velcro tape to the area around the microscope lens and to the surface of my adaptor as shown below. After searching for an area of interest on my slide, I locked the Slide Guide and simply pressed the microscope against the adaptor and looked through the camera viewfinder.
Assembled:
Using the focus wheel to find critical focus and the internal exposure meter of the camera, photography was straightforward. I used 200ASA speed Fuji film and had the local grocery process the 4 x 6 inch prints. I found that the best illumination was from brightly reflected outdoor surfaces or frosted incandescent bulbs. Outdoor lighting gave better color balance and faster exposures for the daylight film used. A 60 watt incandescent frosted light bulb allowed for 1/2 sec exposures and outdoors exposures were as fast as 1/500th of a second. The prints were scanned using a Logitech Pagescan scanner.
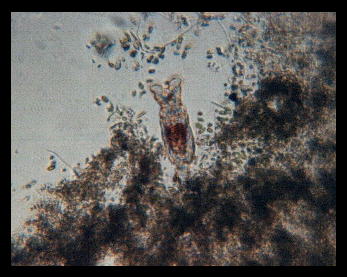
The first two images are the same rotifer using reflected sunlight (top) and incandescent light (bottom). In the top photo one can resolve the blur at the mouth of the rotifer which are the cilia moving.
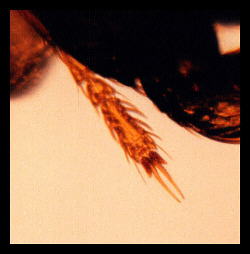
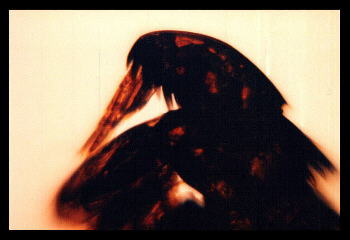
Next, the flea and flea parts. The tips of the "pinchers" measure approximately 3 microns across.
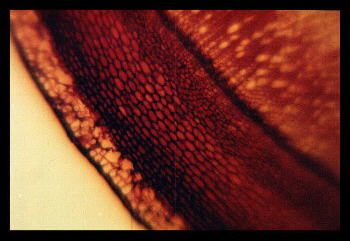
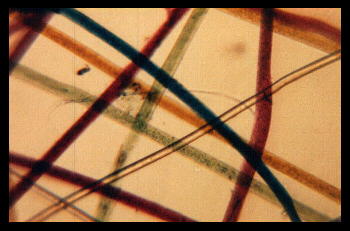
And finally, some textile fibers and a lilac cross-section. The pigment particles are almost resolved in the colored fibers. The color fibers are typically 25 microns across and the pigment particles are 0.5 - 1.0 microns across. The lilac photo shows the critical focusing area of the lens and distortion at the periphery.
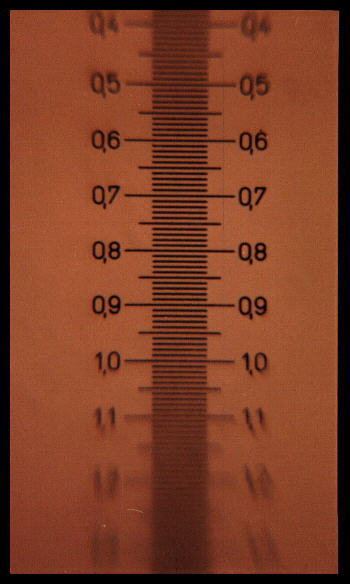
The final image is of my stage micrometer so that I could determine photograph magnifications. This photograph with divisions at every 0.01 mm allowed me to calculate the photograph magnification of (coincidentally) 150x when printed to 4x6 inches. It also shows the critical focus at the center of the lens and decreasing focus at the periphery.
In summary, the PS-150 PocketScope is a remarkable, inexpensive instrument that even Antony van Leeuwenhoek of Delft would have been proud to own. First grade children can master its use instantly and the locking mechanism will let a teacher pass around a scope to a group of children without losing the object to be viewed. Given the low cost, each student in the classroom can have his or her own microscope for a field trip. For the amateur microscopist the PocketScope is a great device for outdoor, portable microscopy. A device for photomicrography can be made and PocketScope has plans for a commercial version. I cannot discredit any claim PocketScope makes about their microscope. With the minor exceptions mentioned in the article it is a great product.
Comments to the author Jim Harper are welcomed.
Note: I have no financial interest in PocketScope and this is an unsolicited review. It was published solely to inform the microscopist community about a new microscopy resource. I am also including contact information with the permission of PocketScope:
1246-A Old Alpharetta Road, Alpharetta, GA 30005-3986
Toll Free: (877) 718-6357 Phone: (770) 772-6357
Fax: (770) 663-4726
Please report any Web problems or
offer general comments to the Micscape
Editor,
via the contact on current Micscape
Index.
Micscape is the on-line monthly magazine
of the Microscopy UK web
site at Microscopy-UK