| Post
Photographic Improvements (1)
Some thoughts about the digital enhancement of photomicrographic imagery By Paul James (UK)
|
| Post
Photographic Improvements (1)
Some thoughts about the digital enhancement of photomicrographic imagery By Paul James (UK)
|
I think the art of optimising microscopic imagery, using well understood manipulative techniques for live viewing, has been a vital part of image enhancement for many decades. Recently the PC's ability to manipulate photo imagery has been recognised by many individuals, who realise that when conservatively used, the relevant software can genuinely aid their desire to clarify images captured either on film or by the CCD.Image enhancement can be used in all sorts of ways, but basically there are a number of forms of manipulation which are of importance in microscopic imagery :-
1) The alteration of tonal values 2) colour correction 3) sharpening modes 4) image sizing/resampling 5) cropping 6) Also cleaning up untidy backgrounds and removing unwanted details if deemed necessary.
Tonal Values
This is perhaps the most important single facet of imaging manipulation, and where an image can be improved considerably with a little understanding of tonal scales, and the relevant use of software.
Brief thoughts on tonality
In purely tonal terms, i.e.. without considering colour, an image can be made up from a range of greys between white and black. In reality of course the intensity of tone between two values is limitless, but because of technical problems, digital imaging at present limits this range to a commonly accepted range of about 255 equally diminishing shades from white to black. It is best to think of colour imagery in terms of just greyscale , as this makes the understanding of tonal correction much easier to deal with.
 |
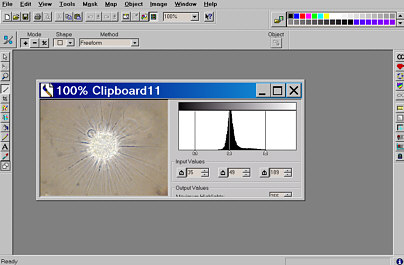
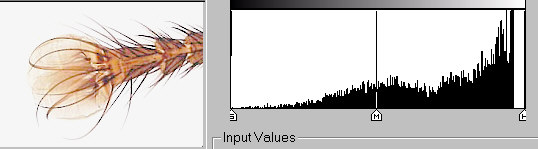
Here's a typical example of an image straight from the digital camera, which has been reduced in size for convenience in this article. You will notice also a graph displaying the proportions of light intensity present in this image, which contains basically two areas of tone. Firstly, the black field boundary and some darker leg parts show up as the the small peak at extreme left ( S ), and secondly, the field's lighter tone cast is recorded strongly between ( M ) and ( H ) near the righthand side. Notice that there is little evidence of any information in the mid tone areas.Subjectively, the image appears a little on the dark side, so by dragging with the mouse in the first instance the highlight or white boundary ( H ), so that it meets with the outer edge of the lighter field tones, we will have raised the tonal value of the field to a more realistic level :-
 |
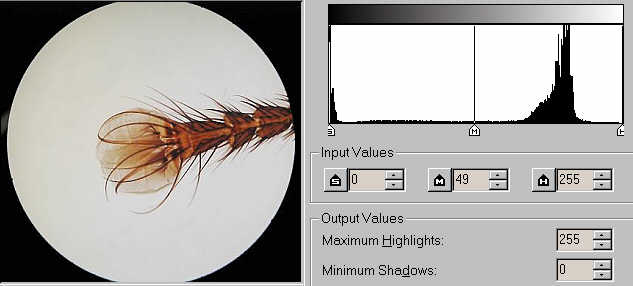
In any bright field imagery, the field is always going to be the brightest component of the image and therefore we are going to make this appear as such. As an aside, notice how the total number of individual tones have now fallen to 210. In practise this is not too noticeable. Though the image of the field looks more like the original, some tonal alteration on the specimen itself is needed, which is still too dark. Since the darkest parts of the leg are tonally identical to the original image, we must raise the value of the middle tones, and this can be done by dragging the ( M ) cursor to the left :-
 |
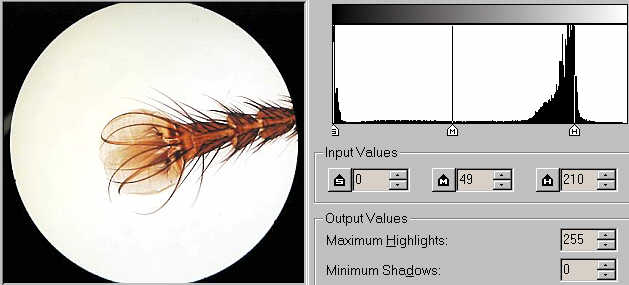
The degree to which we move this medium tone cursor depends on the subjective assessment of the user, as there are no absolute values involved. There is a strong temptation to overdo things in the first attempts of image manipulation, and it takes a little while to understand just what is actually going on when we move these cursors about.
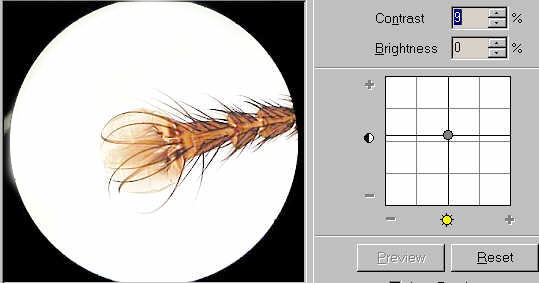 |
I've also raised the contrast by 9 %, but left brightness alone, so we now have a fairly realistic image, which is similar to the original view through the microscope, although the most difficult part, that of maintaining an evenly lit field in this example required some 'handiwork,' involving the need to mechanically 'sweep' away any faint yellowness on the left edge of the field boundary. This was accomplished quickly with the 'air brush'( Subject of another article )Some individuals would rather that the field was cropped in the first instance, and I've
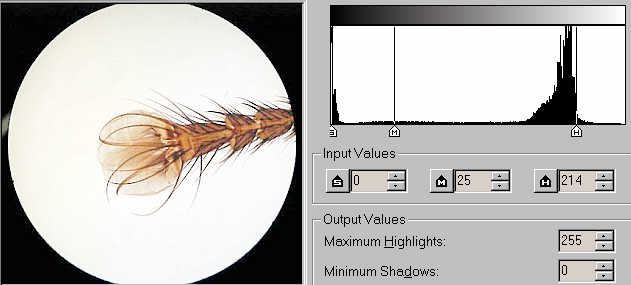
shown below the tonal scales of the resulting image :-
 |
Notice the minimal presence of darker tones, and progressive intensity of medium to light tones. The background field brightness is shown at the extreme right of the graphic display, which reveals the gap caused by the loss of full brightness from the previous stage above. This basic tonal 'shaping' of the graphic display is fairly common in most BF microscopic imagery, though it must be emphasised that wide variations will occur ; subject to the variations of specimen density and also the presence of a black field boundary of course.Phase Contrast imagery
Those images captured from phase contrast set-ups do require some thought when enhancing, as their tonal values differ significantly to those of BF. The principal difference is seen in the field itself, which appears as a darker hue, and the bulk of the light output in this sort of image is devoid of intense light tones as in BF.
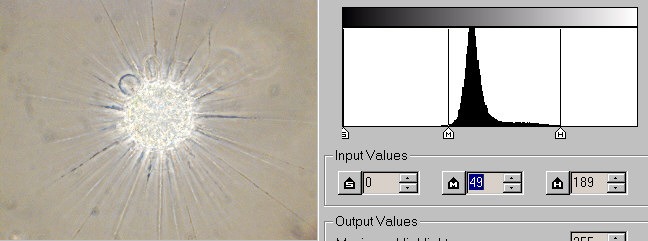 |
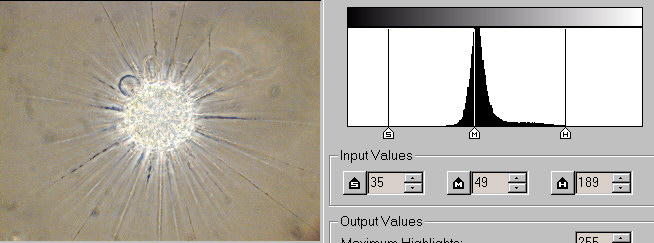
Here's a typical raw digital camera image of Actinophrys in phase contrast. Note the tonal values, the limitation of highlights and the virtual absence of the dark tones. The range of tones is restricted in fact, but there is a very small presence of dark features in the axial filaments, the sum total of which is so small that they are only apparent as an isolated thin black line hard against the left side of the graphic display. Moving the (S) cursor towards the left edge of the peak mid grey output on the graph as might be done for a BF image results in :-
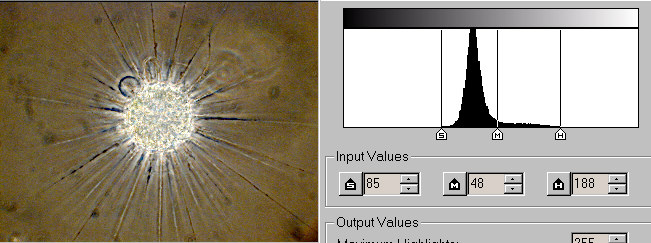 |
The result is not surprising since we have put the peak output of light closer to the dark tone extremes.
 |
A more realistic image is obtained by partially moving the cursor as shown, and yields a reasonably faithful copy of the original imagery as seen through the 'scope. The mid grey cursor (M) can safely be left.Darkfield imagery
This requires more consideration and expertise at the image capturing stage and therefore will be dealt with in a later article.
Summary
The manipulation of tonal intensities is very important in any photographic image, and though the examples I've shown above are somewhat limited, and do not cover the full spectrum of either microscopic imagery, or that of the software variations themselves, there is I hope sufficient information above to get a new comer on the road to understanding the processes involved.
I hope to cover the remainder of the post enhancement techniques in later articles.
Please report any Web problems or offer general comments to the Micscape Editor.
Micscape is the on-line monthly magazine of the Microscopy UK web site at Microscopy-UK