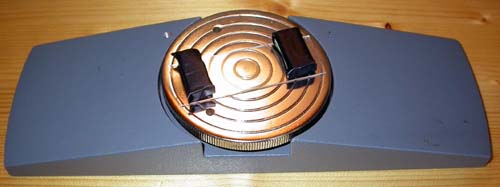
Fig 1. Ringing table from Brunel Microscopes (England). The slide is held in position by 2 small magnets, with adhesive tape all around.
Making selected
diatom slides
|
Introduction
Diatoms have long since been a popular subject for microscopic studies. Every microscopist has probably seen (photographs of) these beautiful old British and German slides by renowned makers like Watson, Firth, Möller and Thum, or recent slides by Mr. Klaus Kemp from East Brent, Somerset England 2.
Making a rather simple arranged diatom slide is actually not that difficult. But please do not expect to give Klaus Kemp serious competition within a few weeks’ time! With the proper set of tools, a few tips and a certain amount of patience and perseverance however acceptable results can be achieved fairly quickly. My hope is that the guidelines below will provide interested readers with enough information to just give it a go.
Many of the techniques mentioned are hard to describe in writing. Some however will turn out to be obvious and natural once you get started. Just take the plunge!!
Necessary Equipment
Preferably also:
Fig 1. Ringing table from Brunel Microscopes
(England). The slide is held in position by 2
small magnets, with adhesive tape all
around.
The micromanipulator
Maybe you are blessed with a very steady hand and you do not need one; for most people (including myself) a suitable micromanipulator is a necessity. (Fig. 2).
Basically all the manipulator has to do is to move precisely “up and down”. Every other manipulation is done not by using the manipulator itself, but to move the slide around the microscope stage using your fingers.
At the very end of the manipulator’s arm a very fine glass needle has been attached with some paraffin. These needles are made by pulling a fine glass capillary tube in an alcohol burner’s flame.
The micromanipulator in Fig. 2 is based on a modification of the Klaus Kemp design 7 , and was skilfully fabricated by Mr. E.A.M. Seyfarth.
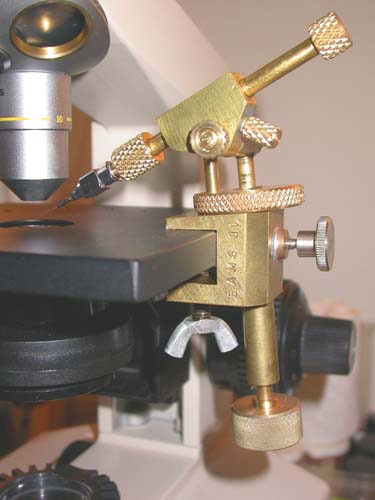
Fig. 2. Micromanipulator
As mentioned before, it all comes down to an “up and down” motion. A DIY enthousiast should be able to construct a useful improvised manipulator.
The manipulator in Fig. 3 for example is just an Olympus attachable mechanical stage partially taken apart, and clamped on its side to the microscope table. The manipulator’s arm is a stretched paperclip, which has a single hair from a fine sable brush glued to the very tip.
It does not look very sophisticated, but I can assure you that it actually worked quite well. Anyone blessed with some basic construction skills (I myself am not, obviously!) should be able to put together a much improved design.
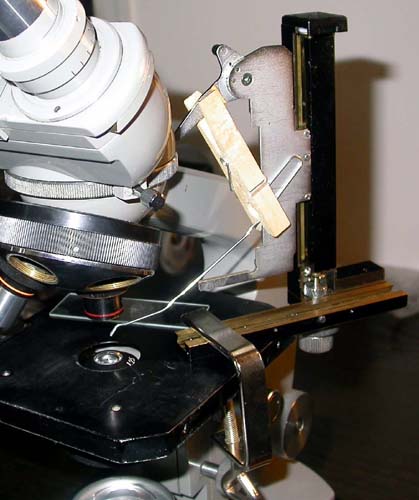
Fig. 3. Makeshift manipulator
Picking the diatoms
Carefully clean a slide. Do not assume the slides are clean and ready for use when the pack says so. Pay attention to little fibres and dust specks left on the slide after cleaning and drying it. A single tiny fibre can completely ruin a slide. Do certainly not wear a lambswool sweater; I once found a bright blue wool fibre in the middle of an arrangement! Obviously the slide should be kept covered as much as possible to prevent contamination.
Center the slide on the ringing table, and use the fineliner pen to apply a circle with a diameter of about 2 mm. This circle will make it a lot easier later on to place the diatoms in the exact center of the slide. It is also advisable to apply a larger ring with a diameter about the same as the diameter of the circular coverglass you will be using. This particular circle will assist in placing the cover glass in the center of the slide. Use an ink with a color different from the ink used for the ring that is applied around the diatoms later on in the process.
Turn the slide upside down. The circles applied earlier are on the underside of the slide from now on. Use a wooden toothpick to apply the smallest drop of fixative on the center of the slide. The drop should not be much larger than say a needle head.
Hold the slide between the thumb and index finger of one hand, and rub the drop of fixative into the slide with the (clean) thumb of your other hand; the thumb should be pressed flat against the surface of the slide. Now rub the fixative into a thin layer making semi-circular strokes. Keep rubbing until you can feel some friction building up. Do not stop rubbing too soon; in the beginning you will have the tendency to apply the layer too thick.
Now take a clean, lintfree cloth and rub the slide several times from one side to the other. I use a folded piece of lenspaper for this job; I usually rub the slide five times with it. Keep the cloth dustfree in a ziplock bag or something, and use it for this purpose only. Rubbing with the cloth serves to remove fine lumps from the fixative out of the field of view, and to create a pattern of very fine parallel lines across the length of the slide. If all went well, then you will be able to see these lines under the microscope, especially if the condenser is lowered a bit or the condenser aperture is closed slightly too much.
Applying the fixative is a tricky business. It takes some experience to get the thickness of the layer just right. Too thick a layer, and you will see fixative creeping into the diatom frustules. Sometimes this is still visible after mounting. There is also the risk of diatoms immediately sticking to the slide beyond the point where they can be moved around.
The target slide is now ready. Place it on the microscope table, together with your strew or storage slide. Use a low power objective like a 4x or a 10x and scan the strew slide for diatom specimens you want to mount. I always use a 10x objective (with 10x eyepieces) for picking a diatom. Sometimes the diatoms are sticking firmly to the glass; it then takes some gentle force to “free” them.
To do this place the needle right next to the frustule. Lower the needle to the point where it starts to bend a little. The needle stretches, pushes against the form and usually breaks it free (Fig. 4).
Care needs to be taken of course. Too much force applied, and you will see the frustule being shattered to pieces or ejected beyond the field of view, or the needle breaks.
Sometimes a frustule just won’t come loose; forget about it and try to find another.
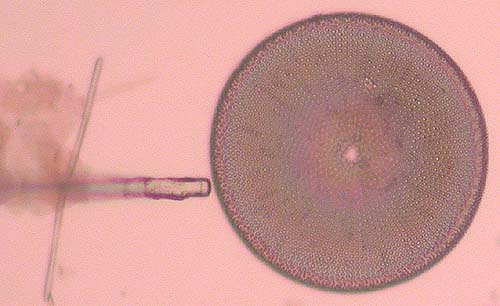
Fig. 4. Freeing the frustule…
Lower the tip of the needle onto the form once it has been freed, and keep fiddling until the form attaches to the needle. (Fig. 5). Sometimes the needle can be shoved underneath the frustule.
When loose forms do not want to attach themselves to the needle, lower the needle onto the target slide well beside the center, and move the slide back and forth a few times. A small amount of fixative will stick to the needle. Go back to the strew slide and try again; hopefully the fixative on the needle will do the trick.
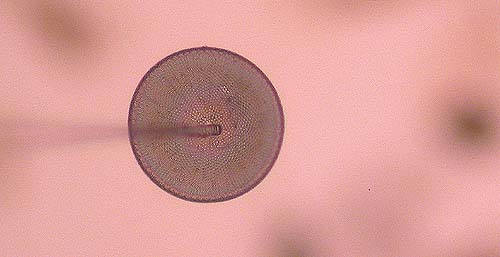
Fig 5. The
frustule sticks to the tip of the
needle.
If it does not, then a small drop of fixative can be applied to one end of the target slide. Dip the very tip of the needle in this drop and try again to pick up a frustule. Use this only as a last resort, since chances are that some of the fixative is transferred onto the frustule, glueing it to the strew slide and making it impossible to ever pick it up. You will also have a lot of unwanted debris sticking to the needle.
Once a form is picked up, raise the needle and bring the target slide into view. Lower the needle above the spot where you want to place the frustule (here the small circle applied to the underside will be very helpful), and bring it down until the frustule touches the surface. The frustule is now placed in the center of the slide. Adjust the position of the frustule if needed: place the tip of the needle right next to the frustule and lower it to have it push the frustule in the desired direction. Reposition the slide and repeat if necessary, until the frustule is placed the way you want it. This pushing and shoving also helps to create a good bond between frustule, fixative and slide.
The next step is mounting. Place the slide onto a moderately warm hotplate or slide warming table, covered to prevent dust particles landing on the slide. Leave it to dry well for half an hour or so.
Heating to dryness is very important. Traces of water left on the slide will cause some blurry white areas in the mountant after mounting.
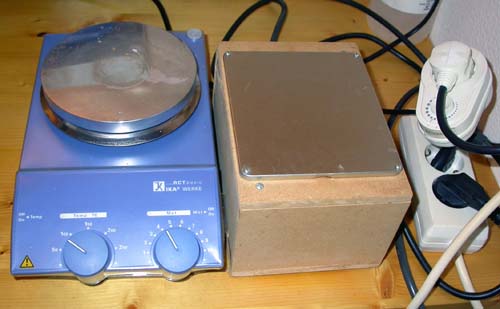
Fig. 6. Hotplate
(l) and slide warming table (r).
Now you could apply an ink ring around the diatoms. (see Fig. 7). This will facilitate getting the diatoms into the field of view quickly when you later want to study them under the microscope. I use a technical drawing pen, filled with waterproof Indian Ink. This ink is not recommended for use with these pens, because it contains fine particles which can ultimately block the nozzle; therefore filter the ink before filling the pen’s reservoir. I tried several brands of fineliner pens with “permanent” ink, but these turned out to be useless. The ink always (partially) dissolved because of the presence of toluene in the mountant. Applying a good circle takes some practice.
Leave the slide to dry again on the hotplate for a short while. Once it is dry, let it cool and very carefully apply the smallest possible drop of toluene onto the diatoms. The toluene serves to expel air from the frustules, and to facilitate the mountant penetrating them. Let the toluene soak for an instant, but do not let it evaporate completely. It is advisable to quickly check under the (stereo) microscope for remaining airpockets inside or under the frustules. Airpockets show up black and are easily visible. When air remains inside or under the frustules, the mounting is bound to fail. The air will expand during heating, and will cause the frustules to move or completely float away.
Now apply a small drop of mountant. The toluene will make the mountant penetrate the frustules easily. Then place the slide covered, but still without coverglass, onto the hotplate for 15 minutes or so to let the toluene evaporate to a degree, thus thickening the mountant. After that use a pair of tweezers to put a coverglass onto the mountant and heat the slide carefully on the hotplate (the heat turned up a little) or with an alcohol burner. The mountant will “melt” and spread out. Continue heating it until you see small toluene bubbles appearing, slowly migrating to the edge of the coverglass. Continue until no more bubbles seem to appear. Be very careful and work slowly; overheating will cause some violent boiling and splattering, most likely ruining the slide. Allow the slide to cool once all bubbles are gone. The slide is now ready to be put under the microscope to check the end result. A night on the hotplate on a slightly lower setting will be sufficient to complete the hardening of the mountant. Prolonged heating will not do harm.
Tips & tricks
After the slide has been heated long enough to sufficiently harden the mountant, scrape off excess mountant, clean the slide and label it. Ringing is not necessary, but it will give you a good looking slide.
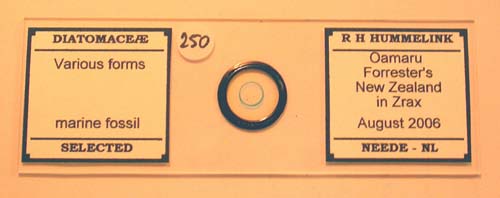
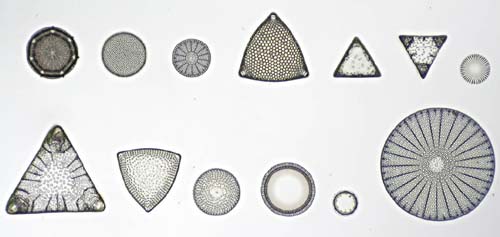
Fig. 7. Finished and numbered
slide
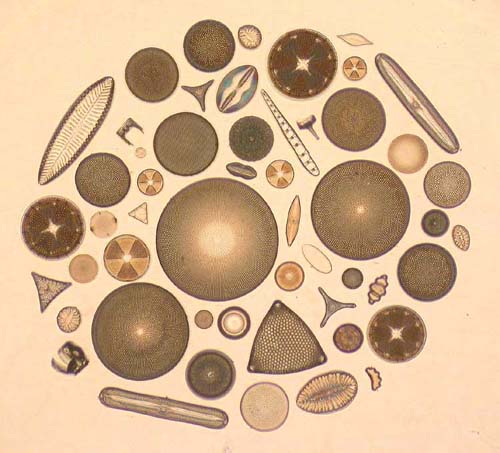
Fig.
8.
Fig
9.
Fig. 8 is a photograph of a circle slide with fossil forms from Palos Verdes peninsula, Newport Back Bay, Utah and Dunkirk Md (U.S.A), Mors (Denmark) and Oamaru (New Zealand), and with recent forms from Hoofdplaat (province of Zeeland, Netherlands) and from a nearby pond. Fig. 9 is a photograph of a slide with fossil forms from Oamaru, Forrester's Hill.
I sincerely hope that the above will encourage you to start making your own selected diatom slides. Develop your own method, and modify it by experience and by insights picked up as you go. The method described above is just a method, not the method. Do not despair if your first efforts are not successful. Try to learn from failures and soon you will be able to produce nice selected diatom slides. A big thanks goes out to the people who have kindly helped me out along the way!
Comments
to the
author
are welcome.
1 http://www.xs4all.nl/~hummelrh/index.html Click “contact” for email address
3 A very good article on cleaning diatoms can be found on the MicrAP Enterprises website: http://www.sas.upenn.edu/~dailey/micrap.htm (See “How to clean diatoms” in the downloads section). [Editor's note: article also hosted in Micscape Article Library.]
4 Meakin’s fixative: (Meakin, S.H., ”The Study of Diatoms”; IV: Selected Slides): “A small supply of fixative must be made by dissolving half an ounce of Dextrine flour in a quarter ounce of water on a water bath and adding 1½ ounces of glycerine. When dissolved, preserve the fixative by adding about 3 per cent Carbolic Acid.”. I added some glacial acetic acid and some sodium benzoate as a preservative instead of carbolic acid.
5 http://www.sas.upenn.edu/~dailey/micrap.htm (See “Mounting Media”)
6 A Faber Castell TG1-S pen for example, with 0,18 mm or 0,35 mm tip.
7 http://www.sas.upenn.edu/~dailey/micrap.htm (see “Kemp Micromanipulator”)
Published in the October 2006 edition of Micscape.
Please report any Web problems or offer general comments to the Micscape Editor .
Micscape is the on-line monthly magazine of the Microscopy UK web site at Microscopy-UK
© Onview.net Ltd, Microscopy-UK, and all contributors 1995
onwards. All rights reserved.
Main site is at
www.microscopy-uk.org.uk
with full mirror
at
www.microscopy-uk.net
.