Topical Tips - Making accurate circles large and small.
Examples: Reusing fragments of broken filters; filter supports for small filters;
making stops for condensers; camera support for high eyepoint eyepieces.
compiled by David Walker, UK
The microscopy enthusiast often wishes to make accurate circular holes or discs to specific sizes in various media such as opaque card and clear / coloured plastic film. Typical uses are for supports and stops for darkfield, phase, annular oblique, Rheinberg. Various cutting methods have been described by Micscape contributors and on other enthusiast resources. Below is a summary of some common cheap techniques which both my brother and myself have found useful, with comments on their relative merits. Some recent examples of the tools in use by the author are shown.
Cork borers?
In principle, with their availability in a range of suitable sizes, cork borers seem to have potential for accurate stop making. But a cork borer has a press and twist action and high accuracy isn't usually vital for the deformable corks / rubber bungs, they are used with. Unless the set is of high quality, very sharp edged and circular to good tolerance they can give rather messy stops. This can especially be the case if my modern but quite expensive set (ca. £25) is typical. They weren't sharp enough, in the larger sizes they were misshapen and the cutting edges not rigid in the larger sizes. There is a special tool for sharpening cork borers but not worth the effort if some aren't circular.
A pity as the set bought came in a good range of sizes from small to large. If readers know of modern high performance sets I'd be interested to hear about them; but venture to suggest the alternative methods below are potentially cheaper and better.
A modern cork boring set giving in principle 3.5 - 17.5 mm discs. This set was expensive and poorly made.
Compass cutters (for ca. 10+ mm circles)
My brother has shown how effective compass cutters can be in his Micscape articles and worth repeating here. They are cheap (< £5), effective and accurate. They usually come with a pack of spare blades and sharp enough to tackle plastic film and card to quite some depth. Even tricky subjects like thick rubber mousemat, see below.
Most have a minimum cutting diameter of ca. 10 mm but can need more care in use at this lowest setting as the blade and needle can be some difference in height (a deformable cutting mat helps). The size range where they are most effective are those typical for supporting filter stops of various types e.g 10 - 30+ mm diameter. A drawing compass can be used for some material and then cut neatly circular with knife or scissors, but the accuracy of a compass cutter ensures repeatable and close fitting filters where centring is important. The 1 mm rule on most cutters allows diameters to about one third of a mm to be set.
A proper cutting mat (< £5) is vital in the author's opinion both for compass cutters and the punches below; they provide a firm but slightly deformable surface for none slip placing of needle and so as not to blunt blades or punches. When cutting both clear and opaque media, it's worth experimenting with the media thickness i.e. just sufficient for support and/or total opaqueness, this should give more accurate results and save blade wear. The author uses thin card envelope for opaque stops and a clear document wallet for clear stops. For polar work the polariser may need to be inserted above such discs if they create an undesired tint plate effect.
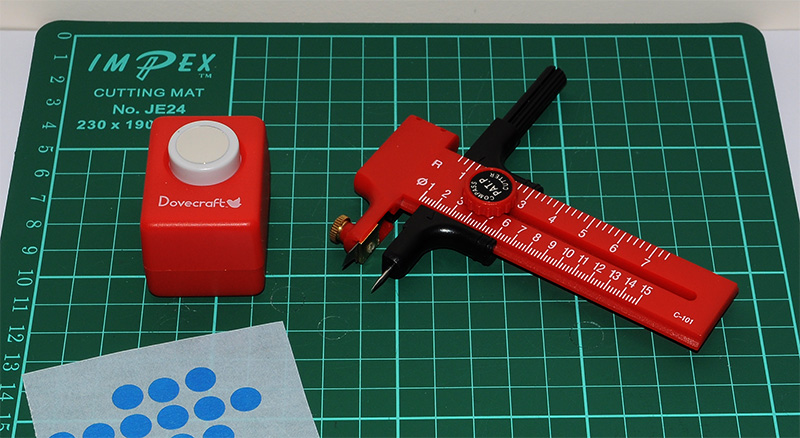
A good quality compass cutter (circle cutter) with mm rule and cutting mat. The diameter is set directly on the rule, not radius.
Some craft shops also sell fixed diameter punches; the Dovecraft one shown gives 14.5 mm diameter discs but haven't found a wide range of sizes to date.
eBay is a good source of craft tools.
If a stop and support are both being made with a compass cutter, the central pin hole is useful for accurately centering them when gluing. Opaque sticky labels can block off the central hole where required.
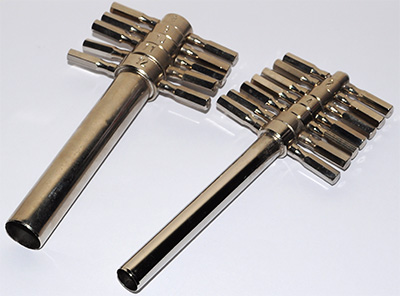
Hollow punches (for ca. 2.5 - 10 mm, or larger)
These are sold under various names depending on seller outlet; tool shops tend to call them 'hollow punches', craft outlets may call them leather, wad, belt or card punches. I'm uncertain if the quality of these varies, but the unbranded set I bought from Axminster Tools (UK) seems remarkably good value (£4.95 + VAT) and extremely well made. Unlike the cork borers above, they are precisely circular and sharp. The punch action using a small hammer potentially gives more accurate, clean edged circles than the press and twist action of a borer. The nine piece set bought offered 2.5, 3, 4, 5, 6, 7, 8, 9, 10 mm punches - an ideal
set for the central stops for many of the microscopist's filter requirements. I haven't to date found a need for an intermediate 0.5 mm size; slight defocussing of a condenser may achieve this size if required.
Sets are also available in larger sizes e.g. 10 - 20+ mm, but at typically 2 mm apart in size they may not offer the exact size desired for a snug fit of filters in trays. Larger sizes also need a much harder hammer tap, already noticeable in the larger punches in the smaller range. A tip for their use: place cutting mat and punch on a very firm surface like linoleum over concrete floor, the give of a desk may make them less effective (and also loud!).
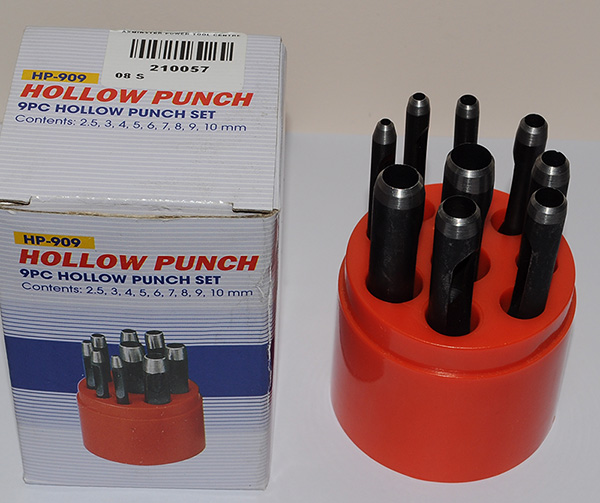
A nine piece hollow punch set e.g. from Axminster tools. Good value for money and excellent.
A flexible plastic rod e.g. from a cotton bud with buds removed safely can push out the discs from port behind punch face without damaging them.
For users who appreciate superb engineering and wish to invest in tools for life, one of the finely crafted sets e.g. by Boehm may be of interest, some of the sets can make annular rings. Spike Walker illustrates an example of the versatility of these sets for microscopy in his own website article 'Colour phase contrast with a simple condenser'.
Examples of use
Reusing fragments of broken filters:
Accidents with microscopy glassware can occasionally happen, especially for innately clumsy folk like myself. I've been using a near IR blocking glass filter (49 mm diameter) for some years in visible light with the near IR sensitive monochrome digital C-mount cameras. This thin filter fractured into about six fragments in a loud, dramatic fashion because of rapid overheating, despite less than one minutes use, when I forgot to place a heat absorbing filter before
it when using closer than normal to a 100W tungsten halogen lamp. (A salutary reminder that near IR wavelengths are shorter than the thermal wavelengths of infrared!).
After quietly cursing my momentary carelessness, it struck me that as most fragments were large I'd just created at least three new filters of the same type at no cost! The diameter of the light beam at typical sites for filters on a microscope e.g. on the top of field iris can often be quite small, especially at higher objective mags. This is the case for the author's Zeiss Photomicroscope III. All the fragments comfortably fitted this light beam diameter.
Rather than attempt to cut the fragments into neat circles, they were just safely sandwiched in between two annular card discs with a suitable thickness spacer. A light craft glue holds them together.
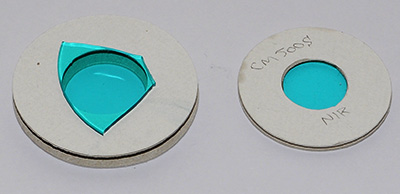
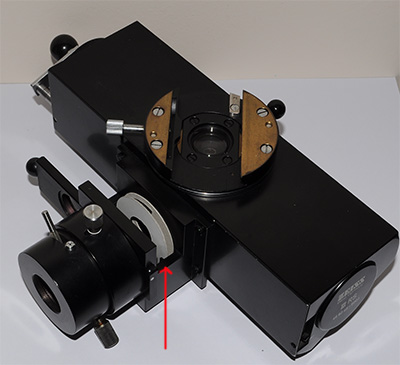
Left: Reusing filter fragments in sandwich of annular card and spacer cut with compass cutters. The spacer can be thicker card or foam sheet depending on filter thickness.
Right: A filter in use on the field lens of Zeiss Photomicroscope. A small heat filter for brightfield work to protect optics is also supported on single annular card disc in filter tray (see below). (The NIR filter is safe on field iris with 100W lamp, it was its very close proximity to lamp for some incident light work that caused the fracture.)
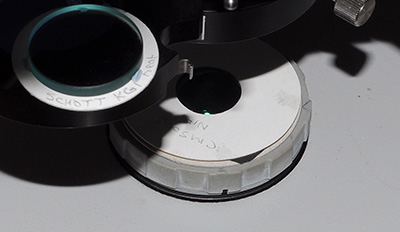
... or support for small filters
Annular card supports are also useful for using undersized filters in larger holders. The cost effective heat absorbing strengthened filter Schott KG1 is 25 mm in diameter from some outlets (e.g. Knight Optical) but is a little small for the filter holders on a Zeiss stand. For brightfield I use a KG1 heat filter on a single annular card in the filter tray. Or for epi work with the III RS head, the small filter sits vertically in a double sandwich card holder with a half circle spacer to support the filter centrally.
A card annular disc with space to vertically support filter too small for the epi head filter slot.
Additional stops for the spare ports in the Zeiss phase condenser or filter trays of other condenser designs.
The design of phase condenser with rotating discs as adopted by many makers e.g. Zeiss and Leitz is very versatile, a typical Zeiss model having two phase rings, a darkfield stop and open port for brightfield. Unless it also incorporates DIC, there can be spare ports; there are three spare in one of the Zeiss phase condensers the author owns.
The versatile annular oblique technique described in use by enthusiasts like Paul James and Ted Clarke (see Micscape Library - Oblique lighting) can sometimes be created for lower to medium mag objectives by using a suitable phase stop with an objective of correct NA. Failing that a homemade stop can be used. One of my favourite objectives is the Zeiss 40X NA0.75 Neofluar (phase) but don't have a suitable stop for COL to exploit its full aperture (the 100X phase ring is too small and the darkfield 'D' setting too large). A compass cutter and suitable hollow punch can make an accurate clear support and central stop respectively. I use trial and error for simple stops like these, or a simple 'rule' on clear film can be used first in the condenser stop housing to read off the size required in the back focal plane of objective (see this article).
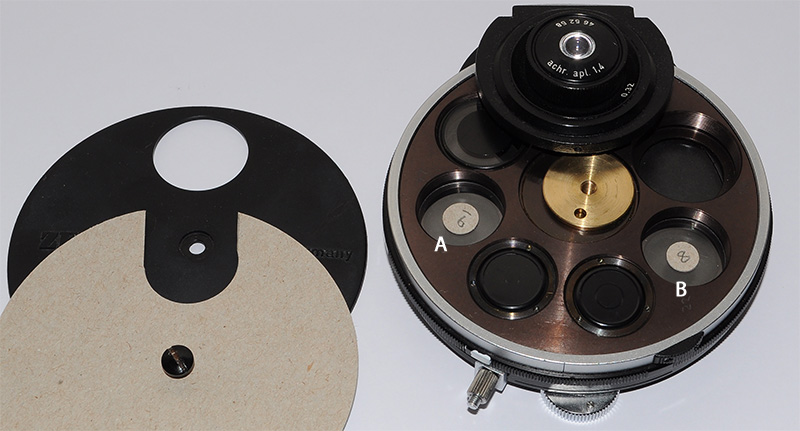
Zeiss phase condenser with two annular lighting stops 'A' and 'B' cut with hollow punches inserted in spare ports. One stop is 8 mm, the other 9 mm for thick and thin annular rings (COL - circular oblique) respectively with the Zeiss 40X NA0.75 Neofluar objective. A clear acetate film disc a fraction under 22 mm diameter set on the compass cutter gives snug flat supports for the stops. A light craft gluekeeps them in place. A larger 28 mm ID port is still available, useful for e.g. Rheinberg.
Very accurate centring of the stops isn't essential as the phase centring controls will make accurate adjustments. Although ideally they should be parcentral with the phase stops to minimise repeated recentring. They can intentionally be set off-centre to create a pseudo annular / off-axis oblique effect.
These annular stops focus well in the back focal plane when sitting on the port bases as shown. If making phase rings by this method, the discs must be flush with the top face, as are the Zeiss supplied examples, so that the annular rings focus in the plane of the objective phase ring.
Initial removal of the condenser dustcover (black disc left above) on the Zeiss is awkward as the optical module needs removing (via two screws at back) to release the cover. An identical one made in card using a compass cutter with cut out for optical module, allows quicker disassembly if experimenting with stops.
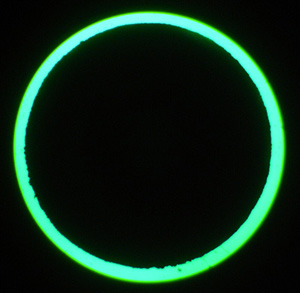
Back focal plane of the Zeiss Neofluar 40X NA0.75 phase objective (the phase ring can't be seen in this image) using the 9 mm and 8 mm stop respectively in the spare phase condenser ports to give thin or thick annular ring as desired; the external border is the full aperture of the objective, allowing the full resolution of the objective to be used. The magnification shows the good standard of stop which the hollow punch can cut (a finer grade of card would have given an even superior edge).
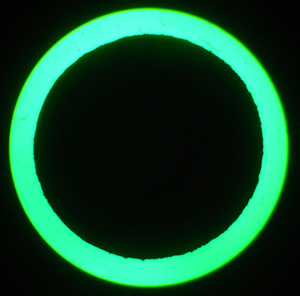
Below: Diatom Stauroneis phoenocenteron, Klaus Kemp '8 form test plate', Hyrax. Zeiss 40X NA0.75 objective. Green filter.
Phase contrast; the annular ring reduces the full NA of the objective, giving rather indistinct resolution of the punctae and shows the edge artefacts of phase.
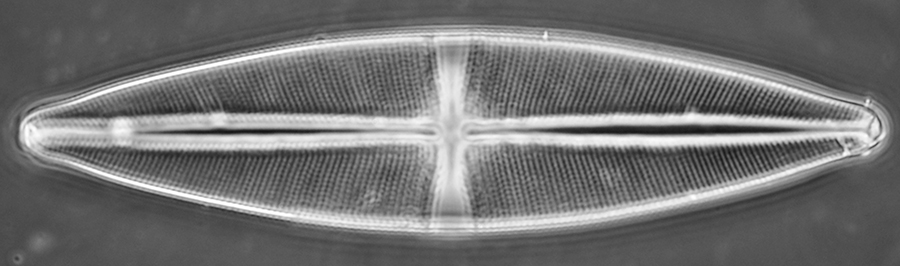
Brightfield, full NA of the objective. Older objectives such as these coupled with the optically complex Photomicroscope III, gives glare producing flat images and hard to see the resolved detail. (Modern microscope objectives coupled with simpler optical paths on stands from makers like Leitz, Olympus and better Asian clone models are much better in this respect at full aperture from the author's and brother's experiences, sometimes to a striking extent.)
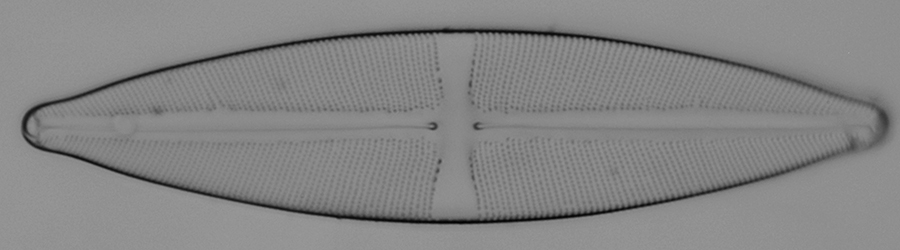
Annular lighting with the homemade 9 mm stop and objective at full aperture. With this contrast enhancement, the full aperture of the objective is utilised to give good resolution and better tonal range than for brightfield.
Camera support for high eyepoint eyepieces
Compact consumer digicams with a small diameter lens and modest optical zoom can often work well when supported over a suitable eyepiece. For brightfield work, handheld is often possible as shutter speeds can be fast. Some eyepieces, particularly the more modern designs can have such a high eyepoint that the camera needs to be held some way off the eyepiece to optimise the image circle size. In this case it is useful to make a custom annular disc to provide a firm support
for the front of the camera mount. It can also be useful to obtain the correct spacing quickly if using a mechanical support.

A modern Olympus high eyepoint eyepiece (from brother's microscope) with annular foam ring cut out of a thick mousemat with compass cutter. This sits snugly in the rubber eyecup to provide a firm face for handheld brightfield photography with a consumer digicam such as the Sony P200.
Comments to the author are welcomed.
Published in the October 2010 edition of Micscape.
Please report any Web problems or offer general comments to the Micscape Editor .
Micscape is the on-line monthly magazine of the Microscopy UK web site at Microscopy-UK
©
Onview.net Ltd, Microscopy-UK, and all contributors 1995
onwards. All rights reserved.
Main site is at
www.microscopy-uk.org.uk.