 |
| The
Poorman's Photomacroscope (part 2) An unexpected change of direction By Paul James |
Though I'd had expectations of moving onto photographic matters in this month's article, I was always conscious of the fact that the camera objectives I experimented with were not ideally sited at their designated working distance from the specimen, and therefore not quite imaging at their very best. I had no obvious reason to condemn the imagery so far, for it was most acceptable, save for some asymmetry of the image each side of the critical focus point.......a sign of something not quite right. Other than that the field coverage and the image quality was genuinely very satisfying and importantly very consistent throughout the amplification range. This article is a report on how this concern of trying to extract the very best imagery from the camera objective eventually led me to explore a different optical technique, which eventually paved the way to another stand configuration altogether. But first...........
A Change of Plan
Despite being entirely satisfied with the basic macroscope for visual usage, I soon became aware that there were some flaws with the initial Zeiss photo assemblage. A serious problem was caused by the beam splitter's photo output port issuing unintuitive image orientation which wasn't important in its originally intended role of compositional and focus checking prior to capturing the image, but I'd wanted to mount the binocular head from there and put the camera on top of the phototube. Pity as I'd really liked the Zeiss gear.
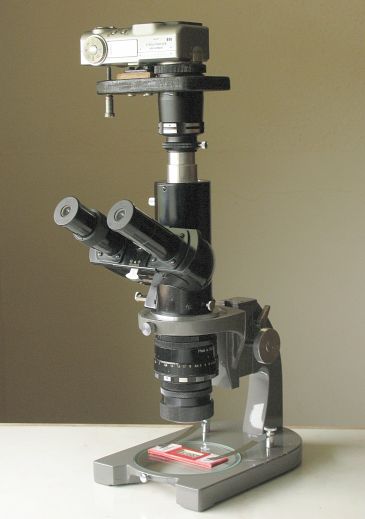
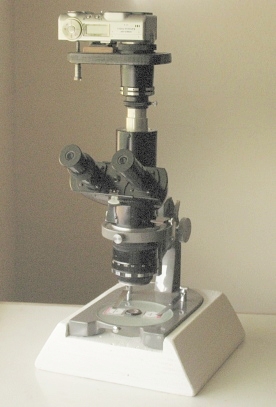
By a stroke of good fortune the coupling ring I'd made for the Zeiss binocular rig also fitted the Leitz trinocular head I had (SM), with just a few more turns each of the 3x120 degree screws to secure it firmly. And so within minutes I was similarly experimenting with it together with its standard 23mm photo port insert :-
|
This was a more compact setup in which the imaging light could be transferred from the binocular head piece to the photo port by Leitz's traditional slider. Although this blanked out visual imagery during photographic exposures, it does have the very distinct advantage of allowing all the imaging light from the objective to arrive at the eyepiece/camera without any diminishment of intensity, as well as being completely untainted by any intervening glassware. Since the binocular head itself is higher on this trinocular rig it does not obstruct the focussing mechanism in the same way the Zeiss binocular head did when rigged with beam splitter and photo port, so allowing the user the option of viewing position beside the stand. The height of the eyepieces too was more akin to normal compound microscope practice, and yet would still allow me to raise the whole stand with a base unit to improve stability and perhaps in house transmitted lighting.
And so with some misgivings I'd swapped allegiances within 5 minutes, being completely unaware of the latent advantages this move was to bring about........but first I'll finish off this phase of my enlightenment with this first configuration of the macroscope with the trials concerning the use of a macro camera lens in place of the standard type I'd being toying with so far.
The Macro Lens Option
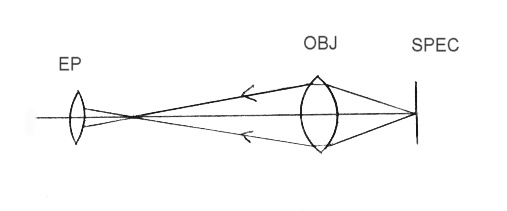 |
Since the dedicated 35mm SLR macro lens is designed to image subjects at close quarters and project their images onto nearby film planes, it would seem to be the ideal optic to employ as the prime objective in this version of the macroscope, as both eyepiece's and specimen's proximity to the objective are similarly disposed as illustrated above.The working distance between the specimen and a given objective is governed directly by the distance between the eyepiece and objective which is around 200mm ( 160mm tl plus a little more ). With this in mind I was able to borrow an Olympus SLR f3.5 50mm macro lens and found that it did indeed image very well, but the difference between this macro and the standard 50mm lens is a subtle one though nevertheless evident especially regarding field flatness where it just pipped the standard lens . In so far as whether the average cost of the macro lens today at around £125 can be justifiably employed in this situation is another issue entirely. For about £5-10 the Helios 58mm and other slightly higher priced SLR lenses definitely do not disappoint.
Some enlarging lenses work extremely well too as they are in effect macro lenses , but the general problem with them is they lack the practical convenience of being able to be adapted to hang from the coupling ring AND also not too easily attached to converter/spacer rings beneath them. The SLR camera lens can be adapted far easier both ways.
The Leitz Tube lens and Consequences..........
The general imaging capability of the Leitz setup was similar to Zeiss's since both shared the same 160/170mm tl binocular head characteristics. The Leitz's image was however noticably dimmer which I found to be caused by its inbuilt tube lens : the device in keeping with many of Leitz's stands of the period, which brings the objective's light in the compound 'scope precisely to the plane of the eyepiece. This facility which is rarely employed in other 160mm tl stands gives Leitz the advantage of being able to implement different optical designs in the single stand. The tube lens is quite small and so obstructs the outer margins of the ray bundle passing through from the objective. It simply didn't matter in this macroscope design because the objective's iris was reduced anyway for optimum imaging clarity.
The Infinity Imaging Principle
The presence of the tube lens in the Leitz trinocular head rig triggered the notion of experimenting with an infinity tube lens along the lines of the infinity microscope. I thought it seemed a good idea to collect the standard camera lens objective's output as a parallel beam instead of a converging one because it would place the camera objective at its designed WD, replicating precisely its working condition in the original camera it was designed for. All that I had to do was fix an infinity tube lens in the trinocular head piece in place of the original 160mm finite tube lens, in order to converge the objective's parallel light output precisely onto the plane of the eyepiece :-
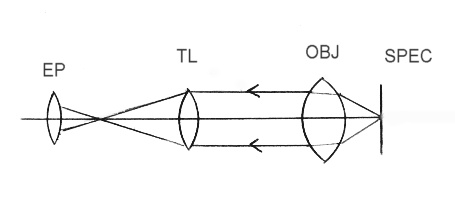 |
Note the parallel rays now emerging from the camera lens objective above require it to be closer to the specimen and thus incurring a more oblique, higher na cone than formerly. This should in theory generate finer image quality beside other factors.
Enter the Infinity Tube Lens
By another stroke of good fortune...I already possessed a Leitz infinity tube lens which came from a Leitz Ortholux/Metallux stand which had employed infinity corrected objectives. It brought the parallel rays from the objective to focus at a point 223mm further up the trinocular head coinciding precisely with the eyepiece. To test this premise in my particular Leitz trinocular headpiece (SM), I held it with eyepieces installed and pointed it at a distant scene whilst holding the infinity tube lens temporarily in situ. The light from a distant tree entered the tube lens at the open end of the trinocular head piece. Through the eyepiece the image of the tree appeared in near focus. So I adjusted the tube lens's position on the optical axis until it gave a sharp rendering of the tree. When this occurred I knew that the tube lens was at its designated position. Thus the parallel light from the tree was focussed by the tube lens onto the imaging plane of the eyepieces.
It worked perfectly, and so I accurately gauged and marked its position in the bottom of the trinocular head where it was to be sited in place of the original finite system optic.
The next task was to make an externally threaded spacing sleeve to accurately fit this slightly narrower infinity tube lens. It could then be screwed into the original finite tube lens's socket at the bottom of the Leitz SM trinocular head I'd now adopted for the macroscope :-
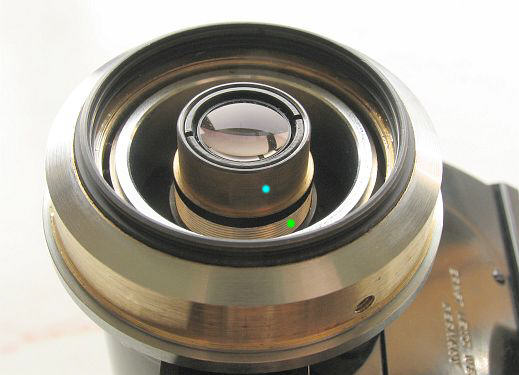 |
This was no mean task as the thickness of the sleeve wall from the root of the thread to the inner face was a mere 0.5mm making the machining and subsequent handling of the sleeve a delicate matter. Also, as a precaution I removed the skylight filter glass from the original coupling ring to make way for the infinity tube lens . Fortunately the top element of the camera objectives that were to be hung there, were a few millimetres below this level.
The Infinity 'Corrected' Macroscope
The effect of the tube lens on the macroscope was as hoped : it brought about a significant reduction in the working distance between the camera lens objective and the specimen, but not so much as to make lighting difficult. Through the eyepiece the image of a given specimen was now significantly larger than when raised without a tube lens, but on the plus side its 18mm clear aperture matched perfectly the f4 aperture stop setting of the camera objective. Now as I also hoped the image's characteristics on both sides of the focus setting were almost perfectly symmetrical.
The 'Infinity' Macroscope's Imagery
The general effect was similar from all 3 lenses (Nikon/Olympus/Helios) each easily resembling an average quality x 5 compound microscope's achromatic objective in both magnitude, and general detail. The camera lens's renditioning of the field was commendably flat and sharp, despite its intrinsically lower NA compared with similarly magnifying compound microscope objectives. This is to be expected because of its greater working distance. It speaks volumes that these photographic lenses which have been designed to cover a vastly larger area than an equivalent microscope objective can raise comparable imagery. The big surprise for me was that the Helios 44 58mm was overall the more practical option since its image's deterioration at lower aperture values down to f11-f16 was significantly less than the others, and so it was perhaps the more versatile option in the photomacroscope where the tussle between DOF and resolution often has the former calling the shots.
Implementing a temporary brightfield source had me testing this infinity configuration :-
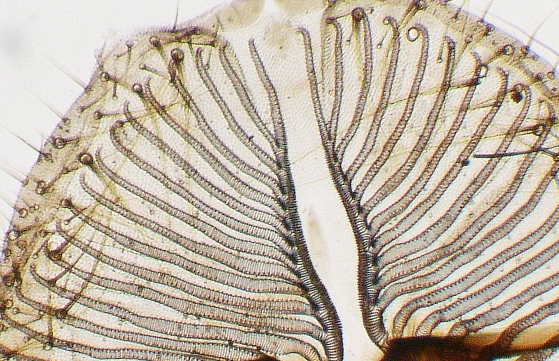 |
| The 58mm Helios's renditioning
of the classic Blow Fly's proboscis at around f4-f5.6 its amplification here on screen is equivalent to viewing its normal 24x36 mm image as a print approximately 3 metres wide. If we accept its onscreen resolution as being 0.5 mm, which is conservative I think, then its resolution at specimen level is around 70 lpmm. I do sense however that the aerial image is charged with significantly higher resolution. |
The effect of the infinity system on general usage
Having established that the quality of imaging was as good as it could be in this infinity setup, I employed the converters I'd used before to see if they would still work in the satisfying way they had performed in intial trials without the infinity tube corrector in place. They did, but the basic difference now was that the extent of field coverage I enjoyed previously was biased more towards a smaller range. At best, using just the single 58mm objective I had to employ 2 converters in tandem in order to extract the widest possible field ratio. So now within the stand's focussing compass I found the field covered a maximum of 34mm down to 6mm with a combination of 1 or 2 converters, and without the latter the 58mm camera objective alone raised a diminutive field of view at around 4.5mm. So the overall effective amplification ratio was still a very respectable 7:1.
The reader might justifiably reason that the addition of one or two converters might seem likely to impair image quality, but I employed quality multi element forms, plus the fact that they reduce image scales which naturally lessens any slight deleterious effects on the image anyway. Subjectively speaking the imagery appeared to be excellent throughout the range.
No sooner than I'd finished experimenting with the converters, I found I could now employ much longer focal length camera lenses to increase the field coverage than I could in the non infinity setup. The stand was thus capable of imaging specimens with any lens up to about 150mm fl. But unfortunately, the property of longer focal length lenses of being larger all round tends to reduce their field of view capability within the stand's focussing range.....a catch 22. Nevertheless I could mount, if I felt it necessary, a lens of around 75-80mm fl as the standard, to reduce the amplification to suit my needs , and use the converter principle with that lens as I'd previously employed with the 58mm Helios.
 |
MEANWHILE........As a complete break from image snooping I fashioned a base by gluing up 4 layers of 18mm ply into a block , then shaped it as shown above to add stability and raise the eyepieces to a more comfortable level. I'll install some sort of permanent BF illumination either using the compact features of the quartz halogen lamp or perhaps the cooler leds.
Time for introspection
By this time I'd arrived at a watershed of sorts. No doubt the infinity system seemed to extract as good as or even better quality imagery from a given camera lens than with the simpler finite system, but produced unexpectedly higher amplification of the image, which was originally deemed a little higher than desired anyway. I'd cobbled together an excellent imaging device, but it was becoming clear to me that the principle camera objective would now need to have a focal length of around 80-90mm in order to reduce the general amplification to a level I'd find most useful in a principle objective. The problem was that beyond the ubiquitous 50mm range of SLR camera lenses there wasn't much of a choice of affordable lenses until you arrive at the mountain of obsolete 135mm 'portrait' optics, ( I'd already tried mine which raised excellent imagery but found it was too low in magnification for the principle optic ). Clearly I'd much to think about and decide upon, but it was still too early to make decisions of that nature for I had one more option left to try, and a rather bizarre one at that.
Enter the Experimental Photomacroscope-Zoom Stand
It seemed fairly obvious that a suitable SLR/Digital ZOOM camera lens might be the ultimate optic to mount onboard the stand....in theory at least. But there was a distinct problem with that. Zoom lenses in this instance are rather large, warranting a much larger stand to enable it to elongate to its maximum length whilst maneuvering through its zoom range. But the less obvious problem is that it cannot be hung from its filter thread in the same way the fixed focal length optics were. The reason is that in zooming the optic, its change in length would disturb the working distance/focus setting every time. In use this would be most tiresome and frustrating , even if mounted in a very large stand. But there was I believed, a guaranteed way of doing the job, but it was a little unorthodox to say the least.
I reasoned that if the zoom lens was mounted in the reversed way as the other camera objectives have to be, but not attached from above........... but below, utilising its screw fitment/bayonet, then it could be usefully employed so long as there was room for it to expand and that there was a platform below to support the specimen under observation. Of course the infinity principle is vital in this situation because the zoom's optics would be continually engaged in lateral shifts along the optical/physical axis of the stand. In this configuration the specimen to bayonet spacing (ie WD) would remain constant as it does in camera. It should therefore work.....and it does !
In theory this would incur a complete change of stand...........however, the very stand that sported the Leitz trinocular head I used for this macroscope was in fact ideal for zoom lens experimentation because it had the largest objective turret to stage distance of any 'scope I have ever worked with. All I had to do to implement this idea of attaching and imaging with a zoom lens was to strip down the stage to a bare minimum to maximise this already largish gap, and below I simply removed the condenser rack to accommodate the specimen. It was a simple as that. I didn't need to irreversibly alter or change anything at all to start imaging with the zoom lens.
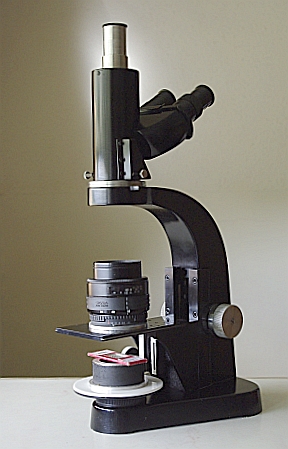 |
Note the complete absence of turret and its support system from the upper limb allowing a maximum air gap twixt stage and limb of 134mm. My only zoom : a 35-70mm Nikon SLR version sits on the stripped stage as shown at its maximum extension. The specimen slide rests on a temporary support at its WD.......... Or it can rest on the condenser support ring and be focussed independently of the main coarse focus control. In the latter situation the main coarse focussing has no effect whatsoever on the image throughout its entire range simply because the whole assembly of zoom objective/specimen ensemble rises en mass through the emerging ray bundle which is of course perfectly parallel and does not change one iota as the specimen/zoom combo floats along the optical axis........a strange phenomenon to witness after spending years focussing the conventional 'scope.
Surprisingly no obvious flare was seen in this experimental setup despite the absence of a light shield in place around the exposed glass between the top of the zoom and infinity tube lens. In a permanent setup of this nature a tubular bellows would be ideal.
Of course this is an experimental setup with which I only wanted to verify a principle I was toying with. I'd no intention of adapting the stand unless I was absolutely certain that it would raise first class imagery with convenient handling etc.. its potential of offering smooth, rapid zooming through its magnifaction range is ideally in its favour, provided a suitable zoom optic, necessarily the modern compact form, could fit into the 134mm gap. However, there is a fly in the ointment : The cost of a suitably high quality SLR zoom lens of around the ideal focal range of 50-250 mm would almost certainly be prohibitive. The catch 22 here is that the money equivalent of the high quality zoom might well equate to that asked for a decent quality used lower power stereo 'scope, rendering this particular configuration of imaging entirely pointless, unless such a quality zoom can be acquired which has a faulty or defunct focussing motor etc etc and otherwise optically sound.
Conclusions so far
Without doubt the old SLR camera objective is more than capable of projecting an excellent macroscopic image. It's basically a Planachromat yielding flat fields, and the secondary colour spillage along the axis isn't at all obvious and only manifests itself into consciousness each side of focus, albeit very, very faintly. It's also cheapish as are its optional attendants : the converter. Achromatic eyepieces too abound and do not have to be exotically specified to raise competent imagery. So the necessary glassware can be sourced either from spares or from the likes of eBay etc..
Of course if the reader has any doubts about this line of action, it will more likely relate to the sensibility of attempting to cobble together all the bits and pieces into a macroscope in the first instance, when for relatively small money a modest stereo low power stand can be acquired. I understand that for I have experienced this. It was only when I began imaging with the old camera lenses that I questioned the quality of the stereo imagery I'd experienced formerly in affordable second hand stands. Having now seen the so called monoscopic imagery raised from the camera lens objective through a binocular head, I find its subtle qualities more attractive than the imperfect stereoscopic representation I'd experienced to date. On reflection too it seems that the stereoscopic effects are somewhat exaggerated with too wide a spacing of optical pathways from the principle objective in the parallel system. But that's my perspective entirely..........
I hope to conclude the whole affair in next month's article.
| All comments welcome by the author Paul James |
Microscopy UK Front Page
Micscape
Magazine
Article
Library
Published in the October 2010 edition of Micscape.
Please report any Web problems or offer general comments to the Micscape Editor.
Micscape is the on-line monthly
magazine of the Microscopy UK web
site at
Microscopy-UK