|
|
| A Macro 35mm Slide Copier
To DX digital Format From Scratch Plus the modification an old 35mm film copier for DX digital format By Paul James, UK |
I'd put off the task of transferring my 35mm colour slide/ B&W negative collection into digital format for far too long because the whole process of operating my flatbed scanner ( no names no packdrill ) was so long winded that the notion of sitting beside my PC for a week didn't appeal one bit......... Even dedicated 35mm film scanners incur significant operational times, so it seemed a sensible move to employ the digital camera which has improved dramatically in recent times. Their obviously welcome snapshot capture times plus the automatic transference of each image file onto the SD/CF card without further ado makes for a potentially efficient way of archiving 35mm colour slides and negatives that is too irresistible to ignore.
The original 35mm transparency slide copier.....the sort that projected its imagery onto a 36mm x 24mm film plane in an SLR works just as well with something like a Nikon D700 FX format camera since the optical arrangement suits the full framed digital camera as did the older film SLR. For the DX format digital camera with a sensor about half its size the old copier doesn't work since it projects an image which is far too large.
As I see it there are 3 options for the DX format photographer wishing to copy slides with their camera:-
1) Cobble together an assemblage of extension rings, taking lens and makeshift slide holder to perform the task.
2) Modify a traditional slide copier to suit the DX format.
3) Buy a ready made contemporary slide copier that fits onto the camera's lens's filter thread.
1) The Makeshift Version
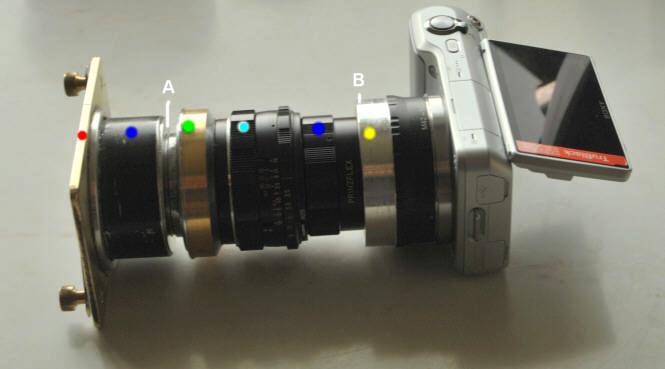
My first efforts started with the Sony NEX body and an M42 Pentax 35mm f3.5 film camera lens plus extension rings.
After some experimentation with various lengths of M42 extension rings I finally found the correct slide/lens/sensor relationship to cover the sensor and no more. The arrangement of parts is depicted below:-
|
|
The pieces are: Slide support plate : M42 Lens mount from an old enlarger : Macro M42/to lens filter thread coupler to the Pentax 35mm lens : M42 extension : Sony E-mount/M42 adapter. ( Note that an M42 thread at 'A' & 'B' above allows lens reversal potential to optimise field flatness if deemed necessary ).
The taking lens is roughly in the middle and was able to reduce the 35mm film frame onto the NEX's sensor without wasting too many pixels. The focussing collar of the Pentax lens allows some leeway of adjustment in this setup which is devoid of any subtlety that a bellows extension could afford the photographer. Fortunately I managed to achieve the scaling of image onto the sensor with just a little room to spare. I'd luckily possessed several M42 rings from different manufacturers, so that no 2 rings were exactly the same length. This allowed more subtle control of the taking lens's position which was more likely to be successfully resolved than would have otherwise been the case had I just a single set of rings.
|
|
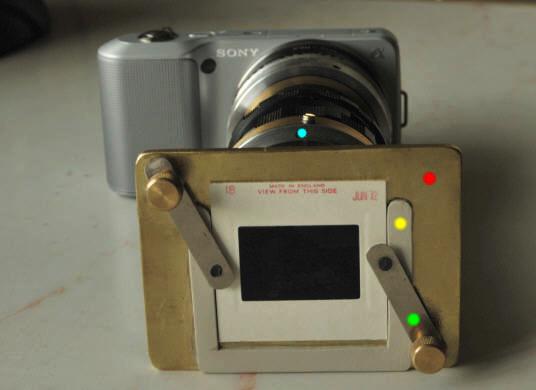
The front plate that supports the slide was fashioned from a scrap piece of brass which was epoxy bonded to the first coupling tube. A plastic alignment piece was cut from scrap and also epoxy bonded to this plate, and simple microscope styled stage clamps allowed easy slide insertion but with some adjustment slippage too. The front assembly yaws either way by loosening one screw of the lens coupler to facilitate accurate parallel frame edging to sensor edging, and also allows subtle centering adjustment. The assemblage squats securely on the bench enabling most forms of illumination to be employed in front of the slide plate in preference to daylight if that is preferred.
2) The More permanent Version
For very small money an old redundant 35mm film slide copier can be obtained. The principle task is to reduce the image scale so it fits neatly onto the DX sensor. The distance therefore from internal lens to sensor plane must be reduced AND the distance of the 35mm slide holder to the lens must be increased. Since the balanced optical see saw symmetry in the original 35mm SLR copier is going to be upset after adaptation, the zooming mechanism the copier might have originally sported will become defunct. However it will by default become an accurate fine focusser of the image onto the sensor.
|
|
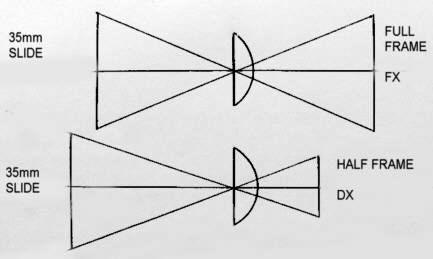
The diagram above shows a simplified ray diagram of the original symmetrical 35mm to 35mm layout and that required for the 35mm slide to the smaller DX sensor. Note the relative changes of the position of the slide plane and camera DX sensor plane. The principle is quite simple, but the gauging of the distances requires sub-millimetre accuracy by careful measurement. Any deviation of the image size on the camera's sensor from inaccurate measurement cannot be corrected later by the shifting of the internal lens.
|
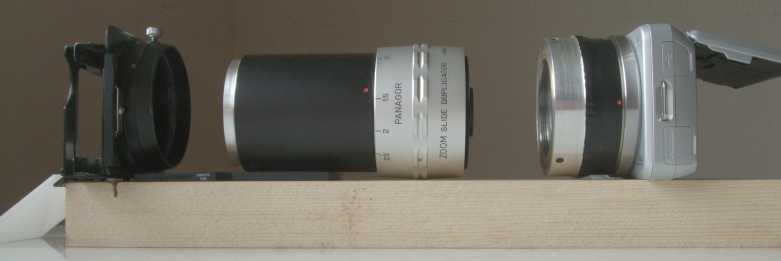
|
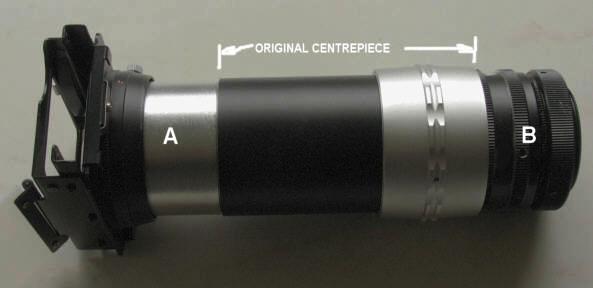
The above image shows a "Panagor" zoom 35mm slide copier made for the old film SLR after modification. The original centre piece with its internal shifting lens remains unaltered, but the camera end ( B ) has been shortened by simply 'losing' any part of the internal/external tubing which is of no use by means of hacksawing and filing to finish, or by basic lathe work. All that matters is that this shortened fixture 'B' can be still attached to both camera and centre piece as originally made. I employed epoxy resin to bind all the modified interlaced circular rings firmly together.
In order to extend the slide holder distance from the internal lens I simply inserted a piece of alloy tubing ( A ) which I'd rebated at both ends to suit both the centre piece and slide holder respectively.
Determining the lengths of 'A' and 'B'
This is of course the critical part of the modification. Placing the slide/lens/camera in situ, and then altering their relative positions whilst monitoring the live view/screen on camera in such a way that the 35mm slide's image is captured in its entirety on the live view screen of the camera seems the easiest route to success.
|
|
I biased the set of the internal lens towards the camera, but not all the way, and then PVC taped the adjusting ring to the body so that it couldn't shift during the measuring phase. I should emphasise the simple fact that once these measurements are determined and the alterations carried out, the size of the image on the camera's sensor cannot be changed by the shifting of the internal lens afterwards: the latter will now only alter the image's focus condition. I'd also advise anyone to refrain from 'gluing' up any alteration until they are completely satisfied that the combination will raise the desired image size on the sensor. Being mindful of keeping the pieces 'square faced' whilst gauging and measuring the important A & B distances ensures more accurate results.
3) The contemporary DX slide copier
I've no knowledge or experience of this device other than that it presumably works by insertion of a close up auxillary optic between the slide and front element of the camera's normal zoom lens. Its obviously a very convenient way of doing the job at a fair price, but I wonder about the quality of the internal optic which must by necessity be large enough to cover the relatively wide front element of a modern 52mm filter threaded zoom lens?
In Use/Handling
I started trials by pointing the copiers toward the sky through a window to provide sufficient illumination. With such a simple technique I found myself experimenting with various illumination setups then discovered that a sheet of white paper resting on the window ledge beneath a bright sky was much easier to cope with over an extensive period of time. The results were consistent with a given white balance setting. Because of the inherent rigidity of the assemblage there was no need for steady hands during a longish exposure time..............though I confess that a lifetime of camera usage had me subconsciously trying to hold the combo motionless during the slow exposures!
Potential Problems
Field/Film flatness: As many readers will be aware, the flatness of mounted colour slide film varies considerably, often tending to dish out either side of the film plane. Since all taking lenses have inherent curvature of field to a greater of lesser degree, it seemed perfectly logical to mount the slide orientated to make use of this characteristic. So regardless of the correct viewing side I arranged each slide so the peak of its bellied film was furthest away from the taking lens. This aids flatfield imaging, and any reversal of the image thus incurred could easily be corrected later in software.
Depth of Field: I was rather surprised by the apparently larger depth of field in this setup than I had expected. I say apparently because the lens doesn't elicit the same crisp in and out of focus experience of conventional photography, since both the subject and back focus distances are similar. The effect is to physically draw out the focussing process. Stopping down the taking lens's aperture exacerbates this and so DOF problems shouldn't cause any problems at all. Incidentally the aperture value of most of the internal lenses installed in 35mm slide copiers of the past is around f11-16 or so. This not only increases DOF but also decreases production costs in one stroke.
The issue concerning the taking lens quality and its effects on post processing
In photographic days of old the silver grain particles of B&W film imagery formed the bedrock of an image. An enlarged print from that era revealed the quality of imagery projected by the camera lens as well as the quality of the imagery of the grain structure that the enlarging lens generated in the printing stage. Of course both were influential in controlling the character of the final print. I mention this because there is one dissimilarity between film and digital imagery which I believe important enough to raise here. Silver halide grain particles and the granular appearance of noise inherent in digitally processed imagery are entirely separate entities, though they may look vaguely similar. But the discreteless process of optical enlargement cannot be imitated in digital imagery other than by mathematical algorithms. Thus the resizing of digital imagery for onscreen presentation incorporates both the original pixel information intermingled with infiltrated noise. If the original subject is a film colour slide there will be some indication of its grain structure to be taken into account too, which inevitably prejudices the image's quality during resizing, assuming of course that the taking lens's quality is sufficient to reproduce the grain structure in the first instance.
Fortunately, the process of creating an acceptable digital image from a colour slide or B&W negative can be successfully accomplished by using a half decent lens, then stopping it down a fair way to ensure the whole imperfectly flat film emulsion is captured in even focus. After resizing, the image can be sharpened to create a credible result with fewer artifacts than might have otherwise been the case had the resizing algorithm dealt with totally unnecessary detail involved in resolving the film's grain structure and the inevitable electronically generated noise too. The results from this simple process comfortably exceeded my expectations from both slide copiers described above in 1) & 2). Incidentally the quality of the inbuilt taking lens of the professional slide copiers is more than adequate, projecting even into the corners an image which won't disappoint.
Illuminating the slide
For most slides that have been properly exposed a simple reflective light source such as a sheet of white paper resting on a flat surface next to a window is adequate with appropriate white balance control.
Contrasty slides can be partially tamed by a more immediate diffuse light source, which incidentally many professional copiers employ. There is also a very useful secondary curative property of this diffusion screen: It helps to suppress the imagery of small dust particles and fine scratches as well as fungal growths embedded in the emulsion layers. It does this by drowning the high contrast diffraction patterns that surround the minute particles of opaque detritus by virtue of its oblique light pathways. The main pictorial information is essentially unaffected since the dye layers that generate the image do so by colour differentiation and varying density only. The efficiency of the diffusion screen in this scenario is determined by its proximity to the colour slide. The closer it is to the rear of the slide, the more effective it seems to be.
| All comments welcome by the author Paul James |
Microscopy UK Front Page
Micscape
Magazine
Article
Library
Published in the October 2011 edition of Micscape.
Please report any Web problems or offer general comments to the Micscape Editor.
Micscape is the on-line monthly
magazine of the Microscopy UK web
site at
Microscopy-UK