 |
|
(PART 1 - Lighting corrections) |
|
||||
| I like to observe microscopic marine organisms and the species of algae and zooplankton I find vary rapidly during a season. Sometimes I come back with a few of these organisms, at other times a small jar may contain more than a hundred animals. Unfortunately, living marine organisms are delicate and they don't live for long, even if they are kept in jars with a large surface area (to oxygenate the water) and kept cold in a refrigerator. Not all of them are of equal interest: some are very common, others are rarer. Often there is one and only one rare specimen in a large sample. In this case, I try to take as many pictures as possible. But it is frequently late in the day, the evening meal hour arrives: my wife is saying for the third time 'it's ready!'..., and I must work rapidly... |
| Why don't microscopists have
FOUR hands? One for X stage adjustment, one for Y, one for focusing, the
last one to move the mouse for capturing images on the computer. A fifth
hand would be also very useful to adjust the illuminator! I am sometimes
too busy to optimize these settings and after I have taken pictures (and
released the rare organism!) I realize that the lighting field was not
uniform.
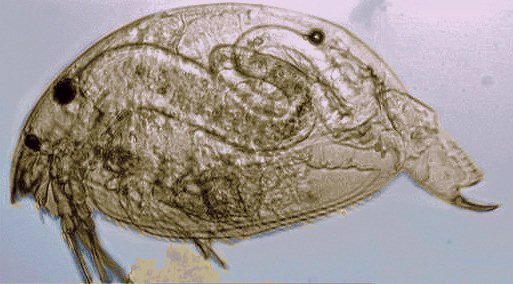
This defect is reinforced by the video camera which has a more restricted range than the human eye, and I obtain pictures like those below. The animal shown (a water flea) is not very rare, but it moves rapidly in all directionsmainly when it is illuminatedand it becomes difficult to correctly adjust all the controls. Another frustration is when you work with low power objectives: the illuminated field is often smaller than the field of view (especially with my x 2 or x 2,5 objectives). At other times, the living organism is trapped near the edge of the water drop, (i.e. when I am working without a coverslip, trying to avoid to crushing the animal), and the drop acts like a lens, refracting the light outside the objective. |
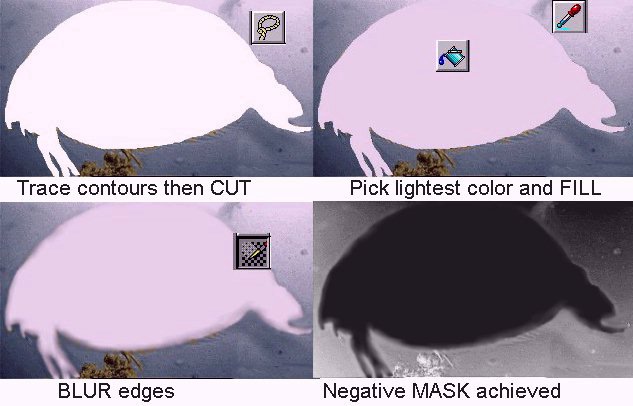
| So how can we improve less than perfect images? Within image processing software, brightness, contrast and gamma settings work on the WHOLE picture. However, another often unappreciated feature can help us. This feature is called: MASK (or similar feature according to the software). The MASK can be extracted from the picture you want to process: it represents a black and white picture with the same tonal range as the main picture. It has the SAME size and can be superimposed precisely on the original. When the mask is ADDED to the picture, all settings (e.g. brightness, contrast or gamma ...) are affected by the mask: in the dark zones of the mask, these settings will only have a very slight effect, but in the lighter zones ones, the effect will be at a maximum. The mask also works with filtering controls. This process is often difficult to understand even when I explain it in French! An example will make this more clear. |
| On the water flea image
below, it is very dark on the left. I am going to make an INVERTED (or
negative) mask where the left hand side will become lighter and then superimpose
it onto the original image. But WITHOUT modifying the water flea image
itself. This is easy, I must CUT it (another image software feature), following
the water flea's outlines before creating the mask: if the outlines in
the cut mask are too sharp, I blur it with the appropriate BLUR tool. (NOTE:
you can also apply controls to the mask which are often used on the main
image eg. brightness and contrast, if you want to reinforce/reduce the
mask's effect).
|
|
|
|
When the modified and inverted mask is ADDED to the initial picture above, I set the BRIGHTNESS control very high to obtain the final result shown below. Note that the brightness of the subject itself has NOT been modified. |
 |
 |
The final result, with only INCREASE BRIGHTNESS applied to the negative MASK above before superimposing it on the original image. |
| This trick with masking may also be used when you concentrate the lighting on an opaque object (like a foraminifera shell), by removing the condenser lens intended for high magnification objectives. (Pictures below show 'before and after' correction). |
 |
 |
|
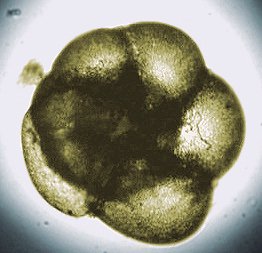
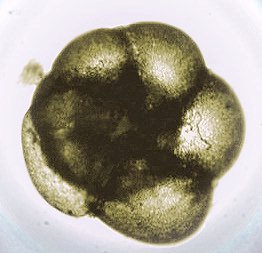
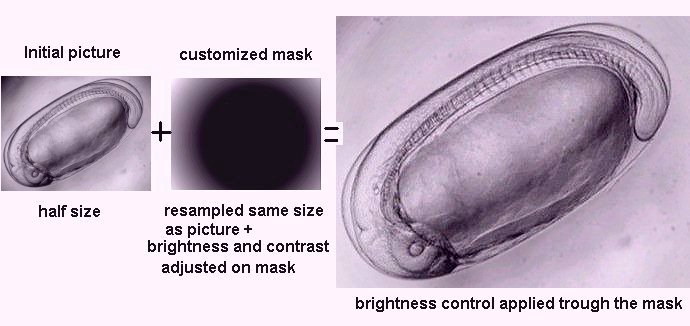
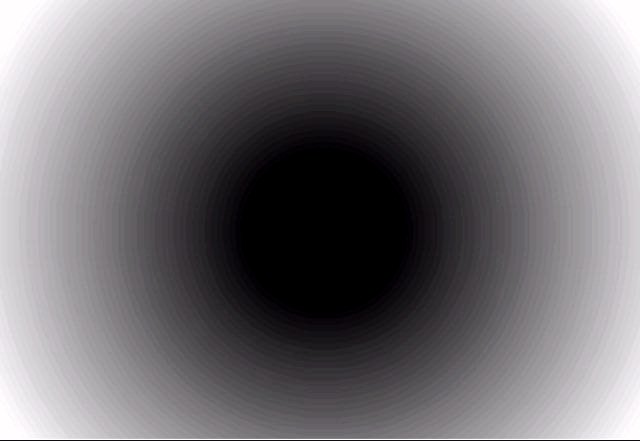
To remove vignetting, a customized mask can also be used: see the pictures below of a fish egg. The mask has been made with 256 grey levels and it can be modified by adjusting brightness and contrast before adding to the picture. (Note: it must be cropped if only one part is useful, or resampled to suit if the original picture dimensions are different to the mask. The mask size used here is 320 x 240 pixels: if you can create higher resolution pictures, you may like to try the 640 x 440 pixel MASK I've created. This is free to download by clicking HERE). |
 |
|
It's magic isn't it! All the procedures described above took less than 5 minutes to implement! In a further Micscape issue, we will see how to increase the field of view by creating a montage from a series of images. |
| Note: The names and icons of the image processing tools shown above are from Paint Shop Pro® (PSP). |
Comments to the author Jean-Marie
Cavanihac are welcomed.
All photographs © Jean-Marie Cavanihac 2000
Published in the September 2000 edition of Micscape Magazine.
Please report any Web problems or offer general comments
to the Micscape
Editor,
via the contact on current Micscape Index.
Micscape is the on-line monthly magazine of the Microscopy
UK web
site at Microscopy-UK