I remember as a young child squinting at two near identical photo's placed side by side and trying to follow the instructions of how to combine those two photo's in the mind to induce a stereo image. I eventually got it to work, but for a while after I couldn't understand why I saw 3 images ! Now I know a little better.
For those of you who are not familiar with this method I can recommend it since all you need is :-
A camera to input images into your PC, a subject, your eyes and an organic visual intelligence unit- your mind !
If you can simultaneously bring both eyes gently into focus as if looking at a close object then this experiment should be accomplished easily. Some individuals may find difficulty in achieving this initially, but should find success after some practice .
The Theory
Basically we take two photo's of a subject, one of which has been taken with the camera slightly shifted to one side. Our two photo's are slightly dissimilar in that some lateral displacement and parallax can be noticed when viewed in turn. Ideally, when taking the second photo, the camera should be displaced by a distance similar to the interpupillary spacing between our eyes, ......say about 65mm or less, but no more.
The two images can then be sized and enhanced identically if necessary, so that they can be framed side by side on screen and viewed comfortably.
Now the tricky bit begins. Essentially we have to look at these two images, and at the same time bring our eyes together to converge on an imaginery subject about half way to the screen.
Here's a way of trying it for the first time
At a distance you find comfortable to view the screen, and whilst looking at the screen, raise your thumb in front of the two images and about 7-8" from your face and you'll notice that there are now two thumbs, although blurred. Whilst concentrating on the images move your thumb in any direction necessary to bring the tips of 'both' to coincide with the bottom edges of the images, ideally touching the centre bottom edge of each image. You may have to rock your head slightly from side to side to achieve this.
|
|
The next step is the critical one. With the thumb in this position change your attentiveness to the 'real' thumb in front of your face and notice that there appears to be a central image now neatly sandwiched between one on each side. That is, you can see three identical images, the central one more clearly.
At this critical point some observers may automatically see the stereo effects in the central image, others may see the central image, but find it blurred because they are 'focussed' on the thumb. This is an entirely natural state of affairs of course, because we have evolved to co-ordinate crossing of eyes and close focussing.
Try again, and vary the way you do things to see if you can 'draw' these two images together by crossing both eyes whilst maintaining screen focus. Try also doing the same procedure at a greater distance from the monitor screen.
After a while this becomes an easy task, and the fusing of the two images into a 'central' one follows automatically, as does the constant though slight head movements necessary to 'fine tune' the image to illicit the best stereo effects. It's like learning to swim; you never forget what to do once the skill has been acquired.
If you find this difficult try the following :-
In order to become adept at this eye control procedure, I think some simple practice can be beneficial. Look at both thumbs at arms length about 1-2" ( 25-50mm ) apart, preferably facing a plain background such as a carpet or wall. Whilst looking at them bring the eyes together as if focussing on a closer subject, ie gently 'cross' both eyes. You will notice that four thumbs will 'appear' as soon as this is done, and when the two inner images will merge we have brought the eyes to the correct angle. Now we have three identical thumbs in line in front of us, the middle is of course a combined image of both left and right hand thumbs. Whilst doing this move your thumbs apart slowly and your eyes should automatically maintain the necessary angle. Younger individuals will be able to separate the thumbs by up to about a foot or more, older folk less so. Repeat this often and notice that you will become adept at this, and should be able to achieve the merging of the two on screen images almost automatically.
Still no success?? Don't give up, here's another way that might do the trick :-
Place two similar coins on a desk in front of you, spaced about 2-3" ( 50-75mm) apart side by side. Bring your thumb up near your face, a little below the coins and look at it, and notice what has happened to the coins? There are probably four images, and if your thumb is moved a little nearer or farther away from you, the two inner images of the coins will merge. This is exactly what we want to do with the two images on screen, whilst maintaining focus on the screen.
 |
 |
Reminders
Be constantly aware that the head must be square onto the screen, in the mid position between the two images, and that you'll need to 'tweak' the 'ear to ear' levels to enjoy comfortable viewing with the minimum of fatigue and best stereo effects.
Effectively, the eyes are doing something which is in actual fact unnatural, that is focussing on the screen but crossing together to as if focussing on a plane somewhere between the screen and your eyes. There is no harm in this provided you do not get close to the screen, or strain in an attempt to achieve the desired result. When mastered, there is absolutely no conscious effort involved and it's quite safe.
 |
 |
Experiments
If you've found that the stereo effect is easily obtainable, try the following whilst being attentive of the stereo images :-
1) Move your head as if indicating the negative or 'no', and also 'yes' ......notice that this does not effect the illusion ?
2) Now try moving bodily left and right and notice the illusion of the foreground moving with you ?
3) Move toward and away from screen slowly, notice that your eyes automatically compensate for the crossing angle and focus ?
4) Try swopping the left and right images around using your graphics software and observe the effects.
 |
 |
Displacements and Angles ??
| There are two ways of implementing the different exposure positions. Either by the distance the camera is displaced ie. Lateral Camera Dispacement (LCD) for the second shot, or the angle that the subject has effectively turned through. I will use both terms so as to cater for reader preferences. |
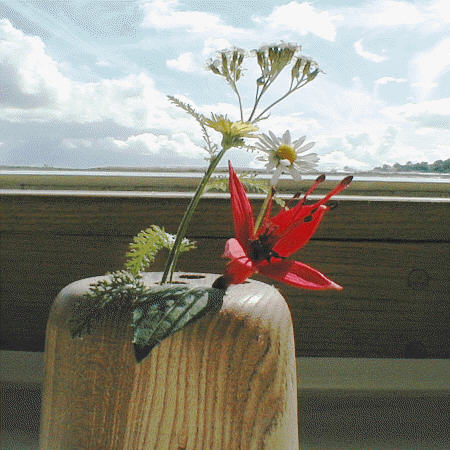
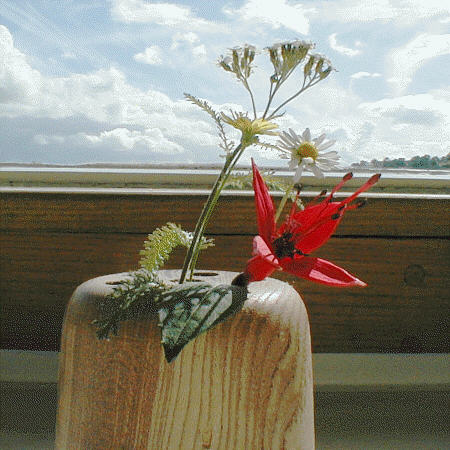
The photo immediately above has been taken using a 1" supplementary lens over the camera which allows close positioning of the flower head of herb robert. The lateral displacement of the camera ( LCD ) between the exposures for the two images was about 45mm, that is less than the normal interpupillarly separation, and yet it appears to me to be exaggerated? The reason could be that the stereo effect is limited in these 3D images anyway, so perhaps the angle should be reduced significantly ?
Our visual processing of two images into a stereo entity has evolved with an angle of no more than about 14 degrees between the eyes, ie when observing at the closest comfortable viewing distance of about 10" (250mm) :-
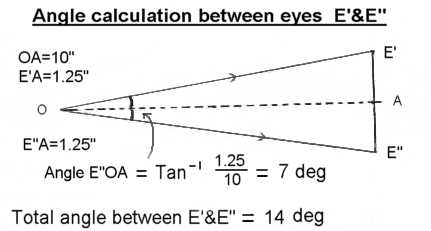 |
If the LCD exceeds this angle, the stereo images appear exaggerated and distinctly unatural. For interest, the LCD in the image of the flower is slightly too much, and shows! I believe that the LCD should be much less when imaging subjects at closer ranges than 10", for more natural looking results, since the parallax between the two images can look gross.
So the golden rule appears to be..."Use less LCD between shots the closer we get to the subject"
*See final pair of images below which have an angular separation of only 3 degrees yet have convincing stereo effects.
Masking ( a very effective method of enhancing the experience and is highly recommended )
The diagram below shows how a cardboard mask with aperture, placed between the monitor screen and the eyes, can suppress unwanted imagery and extraneous light, so dispensing with the complexity of three images. Notice how the image at I' can only be seen by the eye at E 2, and I" only by E 1. An aperture of approximately 50x50 mm (2"x2") cut out of a sheet of cardboard about the size of a cereal packet will block out unnecessary visual distractions such as the unwanted outer images.
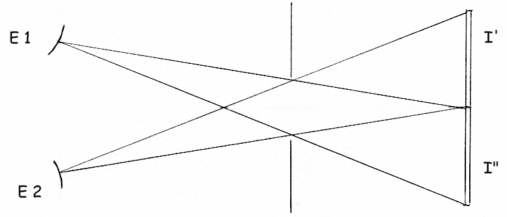 |
The mask to eye distance has to be determined by trial and error, and can be accomplished quite quickly. For my situation the mask produced the best effects at approximately 100mm (4") from my eyes, but this depends on the viewing distance from the monitor, your interpupillary spacing, and the size of the cut out. When the size of the cutout and distance have been determined, you will notice that if the mask is closer to the eyes, the 'whole' monitor appears, albeit somewhat reduced in width, with only the one stereo image neatly displayed on the screen! This is of course an illusion, but nevertheless is very effective and convincing, and I always use the mask because it is easier on the eyes, and gives the illusion that the the image is larger since it appears to be covering the entire monitor window. Try this at about 8-9 feet (3m) from the screen, with the mask having to be further away from your eyes, and notice an even narrower 'monitor'!
Finally, after getting used to using the mask so that by averted vision you are conscious of the 'narrow' monitor screen with the single 'full width' stereo image, try scrolling the images in this article from top to bottom whilst maintaining your concentration and mask position. With some effort and care, a whole collection of stereo image pairs saved to hard disk could be seen comfortably in this way.
Alternative methods of photographing close subjects
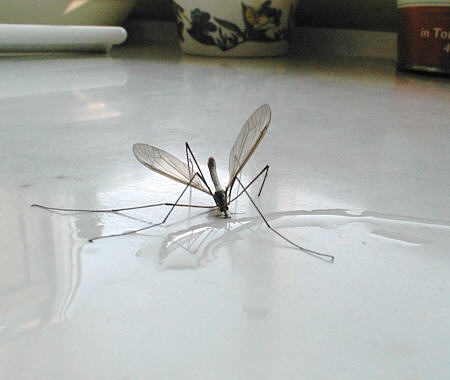
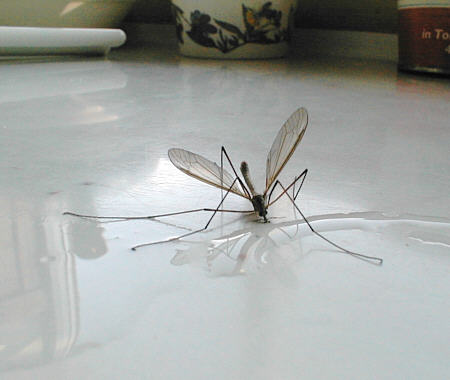
1) If we want to photograph an isolated subject such as an insect, the easiest method is to turn the subject instead of moving the camera, using a cork and pin.
 |
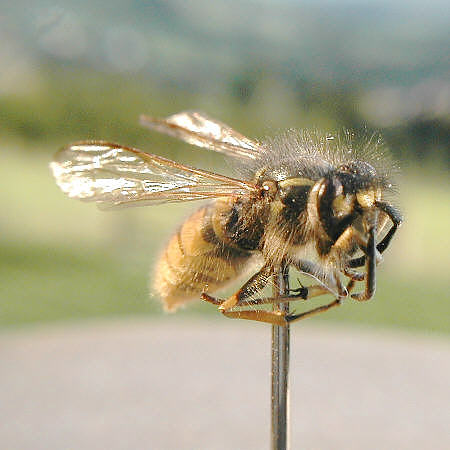 |
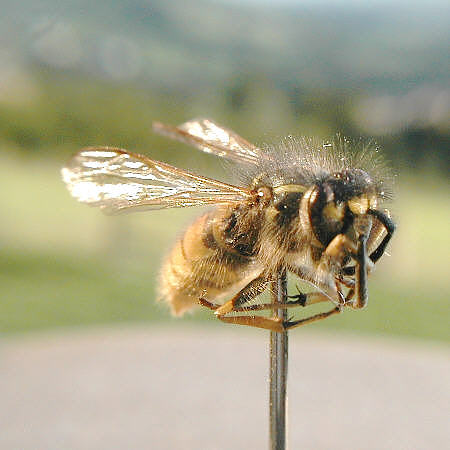
The two photo's above were taken with the camera remaining static, but the wasp was turned slightly, 2-3deg. for the second photo and creates the necessary effect. This is a simpler and more reliable method of creating the necessary angular change.
2) The use of a turntable as used for ringing slides would make an ideal base for specimens, being capable of providing the necessary angular rotation without having to use supports such as the pin shown above.
3) Those who possess circular stages to their 'scopes have an ideal platform on which to photograph subjects, because the angle can be accurately implemented between exposures:-
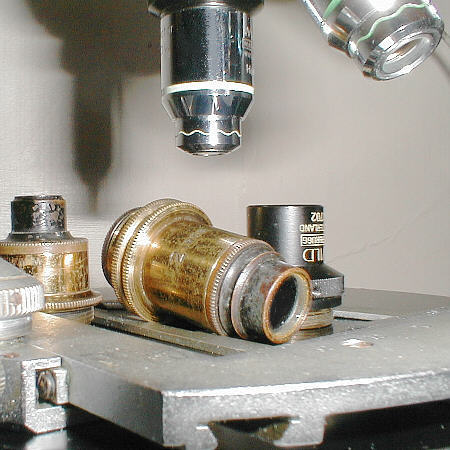 |
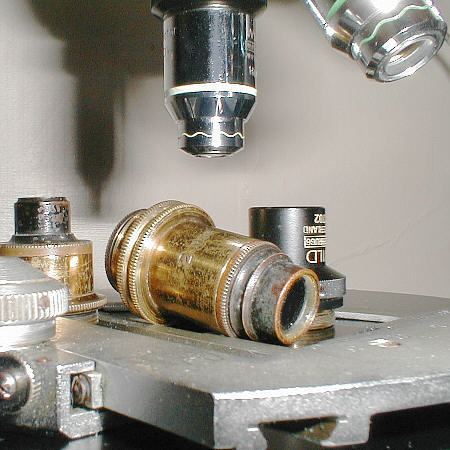 |
*These two images taken of the top of a circular microscope stage with a static camera using flash and delayed action, to avoid any camera movement, were given a subtle but effective stereo effect by turning the circular microscope stage only 3 degrees between exposures. Notice that the foreground shows considerable side shift, and the use of a greater angle or LCD would exaggerate this unnecessarily. Since the two objectives on the changer at the top of the photo did not move between exposures, they do not show any stereo effects.
Tips
1) The sequencing of exposures is best done with some methodology, and whichever method you use remember that the imaging sequence is reversed on screen ie., the left hand photo of the subject is placed on the right hand side of the pair on screen. An error here will be glaringly apparent as the image will appear 'depressed' or psuedo-stereoscopic .
A lengthy but certain way of finding out about angles/stereo relationships, is to take a series of photo's increasing the exposure angle by 1 deg at a time, (or LDC of 2-3mm or so?) After enhancements and sizing the left hand on-screen image can be compared with a number of the right on-screen images set out vertically in a table, so whilst observing the pairs can be viewed in sequence as the scroll bar is brought down in an 'A - B like' test comparison :-
| L | R+1deg |
| L | R+2deg |
| L | R+3deg |
| L | R+4deg |
| L | R+5deg etc |
Web download time restrictions prevent me from illustrating this interesting experiment, however I can say that the subject matter, and the proportion of foreground/background detail have a bearing on the realism of the stereo effect as well as the angle. In the final analysis, subjectivity is the order of the day !
2) Cropping the images when all the enhancements and sizing is completed is not as easy as it looks, because the reference points in the image tend to change from the left hand to the right hand image, so we are left making a compromise. Subjects having blank backgrounds and static camera positions are a little easier to crop. The images used in this article were sized to 640x480 pixels, and the final cropping of 450x450 was accomplished in the 'crop-constraint' mode and judged to be central to the frame by eye before clicking the mouse.
3) Some images appear to be more realistic when viewed either nearer or further from the screen. This is probably due to the fact that the LCD or angle separation between shots is not ideal, and so the image/angle computations in the mind provide more convincing illusions of reality at particular distances from the object/screen.
4) Finally, a very important point..........No matter what LCD or angular separation is used, it is essential in macro to keep the subject at exactly the same distance from the camera lens in both exposures, and failure to do so will spoil the stereo effects. This is why I think the best method is to rotate the subject and leave the camera static.
Conclusions
A simple, accurate, convenient and very effective method of inducing stereo imagery, provided the angular separation between exposures is controlled, and for macro work is reduced somewhat. The experimental possibilities are numerous both in the choice of subject matter, lighting and positioning, whilst the graphically enhanced imagery options are endless !!
All photo's were taken with an Olympus 830L digicam using supplementary close up lenses were necessary