Topical Tips 11:

Adding a lamp diaphragm (or field stops) to 
a modern microscope without one

tip contributed by Ian Walker, UK


Some new budget to mid-priced microscopes with built-in lighting don't have a field diaphragm on the lamp. Presumably the makers save a few dollars by leaving it off, but this is a pity as it's a useful and sometimes vital feature to help optimise the image quality.

At mags up to about 20x, the lack of a lamp diaphragm may only have a small effect on the image, especially if the microscope's internal tubes are well blacked. But at higher mags, or if using immersion objectives, there can be a marked increase in glare which will degrade image quality.


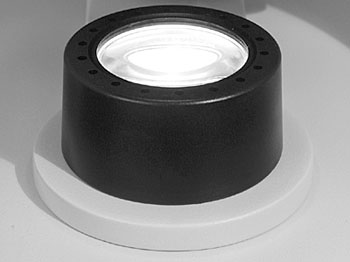
This built-in lamp on a current mid-priced microscope has no diaphragm, so the illuminated field will always be 35 mm wide (in this case) for all objectives. Only the 3.5x objective really needs a field this wide.

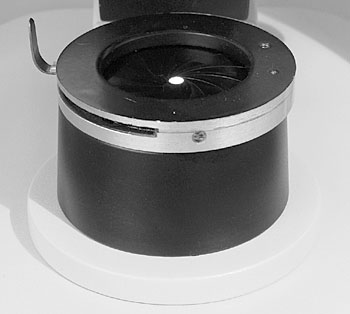
A lamp diaphragm when present should usually be adjusted so that the iris blades just clear the visual field of the objective (with subject in focus and with condenser focused on iris edge). 

For this microscope, these were typical measurements.

  • Lamp field diameter - 35 mm 
  • Ideal stop size for 10x objective - 11 mm
  • Ideal stop size for 40x objective - 5 mm
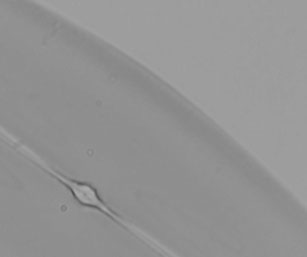
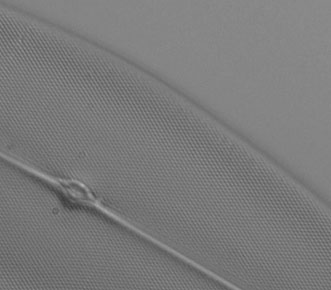
The test diatom Stauroneis pheonicenteron under a 50x NA1.0 oil immersion objective using the microscope above (with correctly adjusted Abbe condenser). The resolution is there but the contrast is poor. The lack of contrast is more marked in the visual field.

'As captured' crop of video still from a security camera.

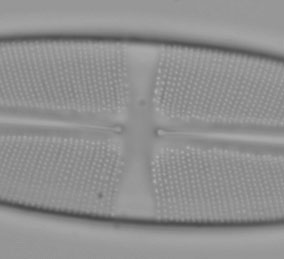
Exactly the same set-up, except an iris diaphragm was placed on the lamp base stopped down to limit the lamp field to just outside the objective's field of view (see below).

'As captured' crop of video still from a security camera.


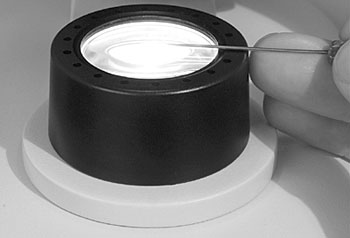
However, it's extremely easy to remedy the lack of a lamp diaphragm, so here's two approaches to improve a microscope with built-in lighting which suffers from this.

 
1) Just add a diaphragm
Iris diaphragms can often be found in camera shop 'junk bins', science surplus stores etc. So for a few dollars one may be found of the right diameter. At its simplest it can just sit on top, but a neat support collar could be made if desired.

It's best to slightly oversize the support as this allows some centring of the diaphragm with respect to the lamp fitting in case the lamp isn't exactly centred on the microscope's optical axis. (At higher mags the alignment only needs to be a few mm out for the diaphragm not to be centred).


The iris is set for the ideal stop size needed for a 40x dry objective.
 
2) Make simple fixed field stops for each objective
An iris can be borrowed to measure the size of field stops required. Or alternatively, with the condenser in focus and while viewing through the microscope, a sharp point can be brought into the field at the lamp base to judge what diameter hole is needed. The stop can then be made neatly from stiff material. The external diameter of the disc can be made slightly larger than the lamp base diameter for centring.
The lamp house may get quite warm so card stops will probably curl. But a thin sheet of perspex or even aluminium can be used.

The field stop shown was made of thin perspex. The round discs were cut with one of the drills designed for cutting circles in wood. 

Drill slowly if using plastic to avoid the plastic melting. The inner hole can be drilled using successive sizes of normal drills until the correct size is achieved. The perspex field stop shown was sprayed with a few coats of matt black paint to give a neat opaque disc, and the objective mag it was designed for stencilled on the disc.

In practice, for a set of say 10x, 20x and 40x objectives, it's not vital to have a stop for each as the majority of the glare for the 40x is reduced by using the 20x field stop. So two or even one carefully chosen field stop will probably be fine.

A secondary benefit of a lamp iris or field stop is that it provides an edge on which to focus the condenser. Otherwise there is nothing to focus on except the coarse structure of the lamp diffuser, which should be defocused anyway!


Thus, in use, when each objective is selected, it's a few seconds work to put the correct disc on the lamp house. To check the condenser is focused, the disc can be moved off-centre a little so the condenser can be focused on the disc edge.

(An added lamp diaphragm/field stop may not be in the ideal plane for condenser focusing. But for the simple lamp design often used in these sort of microscopes, the plane of the iris probably won't be critical.)


A third benefit stumbled on when using the field stops, is that a simple form of variable oblique illumination can be easily created without using the more commonly used condenser filter tray stops. 

The images below are the same small crop 'as captured' from a video security camera (640x480 pixel) using a 40x NA 0.65 objective. They show the classic test diatom Pleurosigma angulatum, which benefits from contrast enhancement to see the frustule detail.

Brightfield with condenser iris set correctly (ca. to 3/4 of back focal plane of the objective) with lamp field stop in place.

Oblique lighting created by opening the condenser iris fully with the field stop moved slightly off axis.

Contribution by Ian Walker, comments welcomed.

Acknowledgement:
The diatom images were from an eight form diatom test slide prepared by Klaus Kemp.

Microscopy UK Front Page
Micscape Magazine
Article Library


© Microscopy UK or their contributors.

Published in September 2002 Micscape Magazine.

Please report any Web problems or offer general comments to the Micscape Editor.

Micscape is the on-line monthly magazine of the Microscopy UK web site at Microscopy-UK

WIDTH=1


© Onview.net Ltd, Microscopy-UK, and all contributors 1995 onwards. All rights reserved. Main site is at www.microscopy-uk.org.uk with full mirror at www.microscopy-uk.net.