My Olympus BHA Microscope from eBay
by Robert Pavlis, Chicago, USA
Some time ago I noticed an Olympus BHA microscope for sale in an eBay auction. The description stated that it had a superb set of objectives—all plan apochromats, 4x, 10x, 20x, 40x, and 100x. It also stated that it lacked the slide holder, and it implied that it needed some maintenance. I bid somewhat over the minimum bid, confident that half a dozen of the eBay "sniper" bidders that only bid in the last ten seconds of an auction would certainly outbid me. However, no one else bid on it at all! It arrived in the mail about eight days later.
I brought it home and removed it from the shipping box. The seller had packaged it extremely well. All of the parts were wrapped in bubble wrap, and the whole box was filled with styrofoam "peanuts"
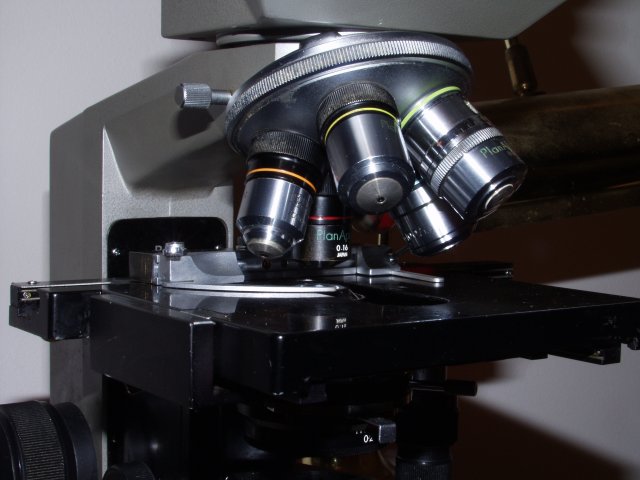
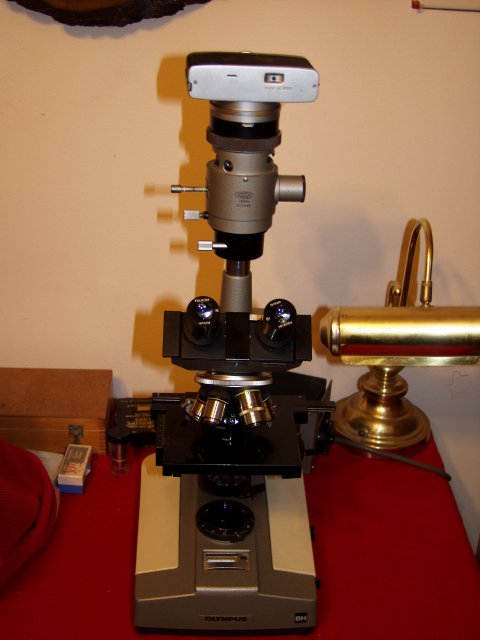 The first thing I removed from the box was the objective turrent which was wrapped in a huge ball of bubble wrap. The seller certainly did a good job of wrapping this most important part of the system. I carefully unwrapped it, and immediately tested the objectives out on my old Nikon microscope. (Which I have in like new condition at this point, even though it is about forty years old.) I had some prepared slides with a lot of detail. I carefully checked each of the objectives with these. The two lowest power objectives had wonderful flat fields. Because the objectives I had were already top rate achromats already near the limits of visual resolution, they were really not much better than these. The 20x was noticibly better than any 20x I had ever used before, and the 40x and 100x were amazing! I have generally used ordinary fluorites and apochromats for 100x. They have fantastic resolution near the centre, but that have strong curvature of field. This 100x flat field apochromat was sharply in focus across the full field at once! The 40x with its 0.95 numerical aperature provided flawless resolution and flat field. I was very happy with my purchase at this point, and if the rest of the microscope had been junk I realised I would still have an amazingly good deal! (Absolutely the only downside of these objectives is that they are JIS rather then DIN parfocal. That only matters if I were to want to use other objectives in the system.)
Now it was time to continue assembling the microscope! I took out all of the parts and laid them on the kitchen table. I began to assemble them. As I did, it became apparent that the microscope, unlike the lenses, needed substantial work.
Problem 1. The first thing I noticed was that the focus mechanism did not work. In fact, the fine focus knob was nearly frozen. I worked on the mechanism for perhaps half an hour, cleaning it, and straightening out the fine focus shaft. When I finished it worked flawlessly.
Problem 2. I continued assembly. I attached the lamp house and attempted to turn on the illuminator. I noticed that the built in voltmeter said 10 volts, but that the lamp did not light up. I examined the bulb and discovered that the filament holder inside the bulb had come loose. Amazingly a virtually identical bulb was available in department stores. I got one, installed it, and solved problem 2.
Problem 3. It was time to place a trial prepared slide on the microscope and see if the other optical parts were okay. The slide holder was missing, so I simply placed a slide on the stage and moved it around. (I immediately discovered just how important mechanical stage devices are!) I put the object under the lens, and attempted to focus it. It was apparent that I needed to adjust the condenser. I turned the centring screws and nothing happened. I then noticed that the spring that holds the condenser was stuck. I removed it with a screw driver, cleaned it, and replaced it, and this problem was solved in all of 5 minutes! The microscope really was quite good, I thought, even though it had these problems.
Problem 4 I decided it was time to check out the photographic apparatus which came with the microscope. I assembled it onto the trinocular head port, and noticed that there was obviously a problem with the shutter. I took apart the tube holding the shutter and discovered that someone had disassembled it at some point and had put it back together incorrectly. I also discovered that the polyurethane foam used to dampen vibrations had deteriorated into a sticky mess! It took me at least 20 minutes of careful cleaning using a chop stick to remove the last traces. Instead of putting more polyurethane foam in the shutter housing, I supported it instead with felt pads. I put the thing back together—correctly—and discovered that all the rest of the camera system was perfect. But, then I noticed the most severe problem the microscope had!
 Problem 5 When I moved the slide in the trinocular head to the position that diverts part of the light into the camera I noticed that it was very difficult to move. After I moved it back and forth a few times it froze completely. This was serious. I removed the trinocular head, and noticed that someone had obviously disassembled it before, and had lost one of the housing screws, and had completely stripped another. I obtained two replacements from the hardware store, and drilled out the stripped head. The dovetail fitting for the slide was held in place with three screws. All three were seized! I decided that because they seemed to be very specialised screws I had better not drill them out, so I soaked them with WD40 for an hour or so, and then they came right out. I was then able to remove the prism assembly and dovetail. I noticed someone had cracked off the tip of the prisms, but it was far from the optical path. I disassembled the dove tail assembly. (It is not the usual dovetail cut with a milling machine, but instead is a two piece device. I removed the screws holding it together, and then I discovered the reason for the problem. Someone had attempted to lubricate the slide with a lubricant incompatible with the one already there! I carefully cleaned it, put a light layer of non-volatile lubricant on it, and reassembled the dovetail. It now worked perfectly. Before reassembly I had to remove all the traces of the WD40, and I also cleaned all prisms with 2-propanol. I put it back together and it worked perfectly!
Problem 6 The original eBay description stated that the microscope did not have a slide holder. I discovered that Olympus no longer supplies these. I thought about the problem a long time. I remembered that I had had an old microscope that was stolen when I was living in the Virgin Islands. The thief missed the mechanical stage, and I still had it! I got a piece of 8x16mm brass bar stock and cut it to the same length as the slide holder from the old mechanical stage, and drilled two holes with a drill press to match the two holes in the top of the mechanical stage. The slide holder was held on the original mechanical stage with four 1.2 mm screws. I attempted to drill holes this size in the bar stock, but decided I would likely break off the 1.2 mm tap in the holes, so I drilled the four holes out to 1.4 mm, and filled them with epoxy cement. I put the slide holder on the bar stock, and stuck the screws into the epoxy and waited for it to cure. Since it was fast cure epoxy, that was only a few minutes. I sprayed the brass bar stock with black epoxy paint, assembled the "tongs" on the holder, and put the assembly on the stage. I had drilled the holes in the bar stock in such a manner as to make impossible to drive the mechanical stage into the thickest objective. As far as I am concerned my design of slide holder both looks and functions better than the ones originally produced by Olympus!
At this point the microscope really is in good condition. There still, however, was a problem with the photographic system. There originally were exposure metering devices sold with the photo accessory. This device was missing from this microscope and such a system really is essential for photography. Thus there really was a seventh problem with the microscope:
 Problem 7 The photographic system originally had a metering system. It is very difficult to get good exposures without one. I made a simple exposure meter by taking a 25mm diameter aluminium rod and fabricating a piece of metal that looks externally like an ocular using a lathe. I originally made one from brass, but it seemed to heavy. It has mounted inside it a CdS photo cell. I poured epoxy resin inside the device to hold the cell in place. At this point I simply attach a multimeter to leads coming from the CdS cell. I could do this more elaborately and make some sort of device that would allow a computer to give me the exposures directly, but this works fine.
I can imagine the life history of this microscope that had brought it to the condition that it was when I obtained it. Twenty five or so years ago when it was new it was obviously purchased as a research instrument. It was an absolute state of the art instrument at the time. After the research project that utilised it terminated it was obviously placed in storage and forgotten until someone noticed it years later and decided to sell it as surplus property. Eventually it ended up on an eBay auction! It's many years in storage caused virtually all of its problems as otherwise the instrument is flawless.
At this point this is a very impressive instrument! New instruments with this good of optical systems cost a small fortune!
All comments to the author Robert Pavlis are welcomed.
Microscopy
UK Front Page
Micscape
Magazine
Article
Library
Please report any Web problems or offer general comments to the Micscape Editor.
Micscape is the on-line monthly magazine of the Microscopy UK website at Microscopy-UK