Polarising microscopes must have two polarising filters, one located below the stage in the condenser assembly and a second one placed above the objective of the instrument. The one in the condenser is commonly referred to as the "polariser" and the one above the objectives is called the "analyser".
Older polarising microscopes used Nicol prisms. These special optical devices are fabricated from large calcite (calcium carbonate) crystals using a design that was developed in Scotland in the early nineteenth century by William Nicol. Calcite is remarkably birefringent, with indices of refraction of 1.6583 and 1.4864. By cutting two pieces of this material and cementing the pieces together with Canada balsam a device can be produced that passes light vibrating in only one plane so that it is essentially perfectly plane polarised.
Other devices similar to the Nicol prism have been developed more recently. The Glan-Taylor design is one example. Devices like this can also be produced from other high birefringence materials.
Nicol prisms and similar devices are expensive, and they are also rather thick, making them difficult to incorporate into microscope designs.
In 1929 Edwin Land developed a polarising filter that was based on a very different principle: pleochroism. When a beam of ordinary light passes through a material that exhibits pleochroism the light that emerges from the material is strongly polarised because the material absorbs all the light whose electric vector is vibrating in one plane while it transmits the light vibrating perpendicular to that plane.
The original material, called J sheet Polaroid, consisted of iodoquinine sulphate crystals that were embedded in a nitrocellulose film in such a way that the crystals were aligned in the same direction. Nitrocellulose is somewhat unstable; it deteriorates fairly rapidly in storage and can be detonated by shock.
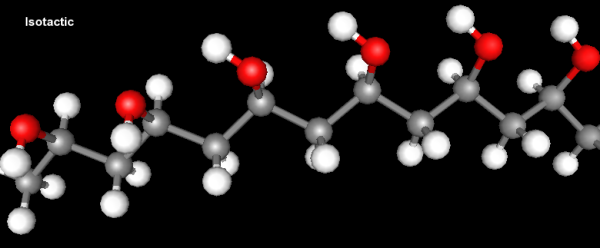
Edwin Land and his associates later developed other materials that were more stable and also easier to produce. The so called H-sheet Polaroid is made by taking polyvinyl alcohol and impregnating it with iodine. Polyvinyl alcohol consists of long carbon chains in which every other carbon atom contains an hydroxyl group. The carbon atoms that have hydroxyl groups are asymmetric in the same way that gloves are. This results in a peculiar property of many polymers called tacticity.
When all of the handed atoms (those that have an hydroxy group attached) are all of the same handedness, the material is said to be isotactic. The image below shows a drawing of a small section of isotactic polyvinyl alcohol:
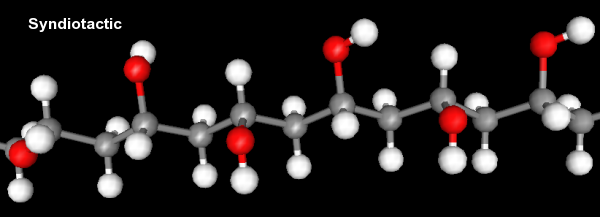
Instead of having all of the handed atoms have the same handedness, they can also alternate. A polymer with alternating handedness is described as syndiotactic. The image below shows a small section of syndiotactic polyvinyl alcohol.
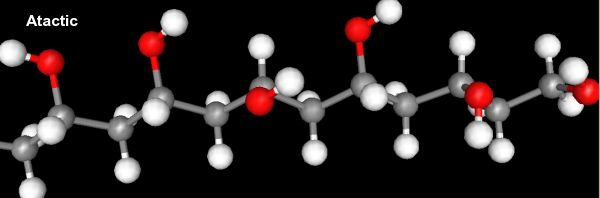
Finally the handed atoms can have random handedness with no organised pattern. A polymer of this sort is referred to as atactic. The image below shows a small section of atactic polyvinyl alcohol. Most polymerisation processes produce atactic polymer, because there generally is nothing to create a preference for one handedness over the other.
Crystals are three dimensional organised molecular structures. Syndiotactic and isotactic polymers are very often crystalline because their molecular chains are very organised so that they can fit readily into organised crystal lattice structures. Since atactic polymers do not have such a regular repeating geometry along their molecular chains, few atactic polymers are crystalline. Atactic polyvinyl alcohol is extremely unusual in that it is crystalline.
When films of polyvinyl alcohol are produced under conditions where they are stretched during manufacture the polymer crystals that form are oriented in a single direction. Land and his associates found that when this stretched material is treated with elemental iodine dissolved in aqueous iodide solution the polymer exhibits extreme pleochroism so that virtually all the light vibrating in one plane is absorbed, whilst most vibrating in the other plane is passed.
Similar materials have been developed from other polymers.
These polymer film polarisers are very thin, and they are much easier to produce than Nicol prisms and similar devices.
Using them, however introduces a great many new problems:
Cementing Polaroid filters between glass sheets solves the optical flatness problem and also solves the scratching problem. It introduces a new problem too: delamination. The glass and polymer layers eventually separate.
Polarising microscopes are generally built to extraordinarily high mechanical standards. The high quality ones should easily last for a century even with some abuse. The Polaroid filters used in them will NOT last anywhere near a century. Microscope manufacturing companies do not keep spare parts available for decades after they stop manufacturing a given model. Thus there is a potential very nasty problem that develops with old polarising microscopes. The polarising filters become unusable decades before the rest of the instrument does.
At the present time it is possible to obtain small optical quality polarising filters sandwiched between flat glass sheets in several small standard sizes: 6.25, 9, 12.5, 15, 20, and 25 mm.
When polarising microscopes need replacement polarising filters it is apparent that the simplest, and probably best, source of a replacement is to adapt one of these standard sizes to the instrument.
In many cases one of the available filter sizes may be literally a "drop in" replacement. In other cases it may be much more difficult so that it may be necessary to machine Polaroid filter holdersitems that must be fabricated with great precision.
Case Study: Wild M21
Some time ago I described building a LED illuminator for a Wild M21 that I have. This decades old instrument is in superb overall condition, practically "like new." It has five first rate objectives, a good set of oculars, a binocular head, a monocular head with Bertrand lens, a mechanical stage, as well as a quarter wave plate. It now has two light sourcesthe original incandescent bulb system and a LED system.
One day we were going to use this instrument at a chemistry seminar describing how geologists use microscopy to identify minerals. When we put slides on the stage it looked like someone had smeared grease on the lenses! The image was, to put it charitably, terrible. We checked out the binocular head, oculars, and objectives. They all provided superb images when placed on other polarising microscopes. Then we looked at the analyserthe upper polarising filter. It was severely delaminated. This had to have happened all at once, because a few days earlier it was fine.
The analyser of the Wild M21 is very easy to remove, one simply turns it until the angle scale says 100 degrees, and it can then be pulled out. I removed it and examined it carefully. It looked even worse out of the instrument! The delamination formed a peculiar pattern that looked like a footprint left by a bird. At least 20% of the filter area was delaminated.
The filter itself was housed in a threaded metal mount that screws into the analyser body. It was very difficult to remove because it had almost certainly never been removed since the instrument was made decades ago. I measured the diameter with a micrometer and found it to be exactly 15mm. I decided my options were to find a 15mm filter or else machine a new holder from brass stock to hold another size.
I retired for the night, and suddenly I remembered that I had a small LOMO filter that, for some odd reason, was provided with a LOMO microscope I had had for many years. I jumped out of bed, measured it and found that it was exactly 15mm in diameter too!
I took the bad Wild polarising filter in its mount and pressed the glass out with an arbor press. This of course pulverised the glass. I cleaned the resulting ring and used it for a retaining ring to hold the LOMO filter in place. It was an amazing perfect fit! I had some difficulty aligning the LOMO filter so that its plane of polarisation was correct but after several attempts I got it virtually perfect. (vide infra)
I placed the analyser that now had the LOMO polarising filter back into the Wild M21 and tested it out.
I immediately recognised something else! Although the old Wild analyser filter had always given sharp images until its sudden delamination, it had certainly deteriorated badly chemically before this. With crossed polarisers the field was MUCH darker than before. Furthermore, the level of illumination was much higher because the LOMO filter was much more efficient than the old Wild one.
It seems to me that original Wild design was a bit odd. Instead of mounting the filter in a threaded mount it would have made more sense to hold it in place with a retaining ring so there would not be potential strain on the glass of the filter.
Alignment
There are two different polariser alignments that must be achieved in a polarising microscope. (1) When the analyser is rotated it should bring about extinction of the field when its rotating scale says either 0 or 90 degrees, depending on the manufacturer. Errors here are caused by incorrect alignment of the analyser polarising filter in its mount. (2) The plane of vibration of the light should be parallel to the axis of the microscope. Errors here are caused by incorrect alignment of the sub stage polariser.
How to determine whether extinction occurs at the 0 or 90 degree analyser scale setting is obvious: simply start the illumination system and rotate the analyser and read whether or not it extinction occurs at the correct scale setting.
Determining whether the plane of vibration is parallel to the axis of the microscope is a bit less obvious. Polarising microscopes utilise wave plates and quartz wedges. These contain birefringent materials mounted so that their axis is parallel to the body of the wedge or plate frame. First be sure that the stage scale is aligned properly. If the microscope has a mechanical stage, the rotating scale graduations should say zero when the slide holder would be aligned with the microscope. If you put a quartz wedge (preferred) or a wave plate in the slide carrier with the polarisers crossed, and allow light to pass through the wedge of plate, the field should go dark when you rotate the stage through 0 and 90 degrees and be brightest at 45 and 135 degrees.
If the first alignment should be incorrect, it can be correct by rotating the analyser filter in its mount. If the second type be incorrect, it will require rotating the sub stage polariser in its mount. (This will then require readjustment of the analyser to get it synchronised with the polariser.)
The Wild M21 was built with amazing precision. Until the analyser filter delaminated extinction occurred perfectly with the analyser scale reading exactly 0 degrees. The polariser was also aligned within a fraction of a degree to perfect.
The new filter is kept in place by using the old metal threaded filter mount. The fit of the filter was so precise that it probably would not have been necessary to use anything to hold it in place to prevent its rotation. However, to prevent any possible problems of this sort, I placed a single tiny drop of model cement at the very edge of the new polariser after I was sure that I had the alignment exact. (I used a very small drop so that the filter could still easily be removed from this mount if it were ever necessary to do so.)
An Interesting Demonstration
Polyvinyl alcohol is not used as an industrial plastic or synthetic fibre material because it is quite soluble in water.
Obtain a small sample of polyvinyl alcohol and dissolve some of it in water. It dissolves very slowly at room temperature, but will dissolve more rapidly if heated to boiling with stirring. Place a drop of such a solution on a clean microscope slide. Allow the slide to sit undisturbed until all of the water vapourises. Place the resulting slide on the stage of a polarising microscope with crossed polarisers at low power. Examine the polymer film that has formed on the slide. The resulting images have a resemblance to the appearance of gaseous nebulae and comets. The image below has a few dust particles on it that enhance this impression even more because they look like stars.
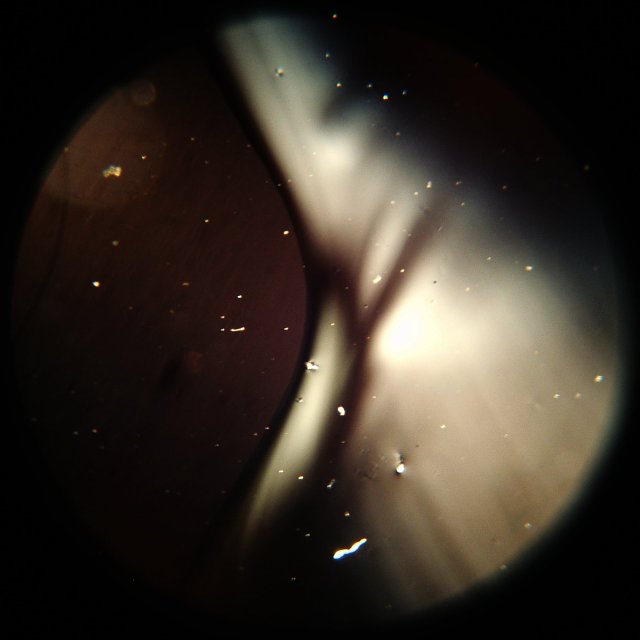
The objective used for this image was a Leitz 4X plan. If one rotates the stage the material will appear dark one in every 90 degrees of rotation like any other crystalline material.
Even films of this material obtained by this simple method are strongly birefringent!
Now switch to an high power, high numerical aperture objective. There are no sharp crystal faces visible. Examine the preparation with a Bertrand lens. It will show a strong "Maltese cross" interference pattern.
If one places a slide prepared in this fashion in a closed container containing elemental iodine the iodine vapours will stain the film brown, but the dark complex that absorbs light in the Sheet H polaroid does not form.
When a slide prepared in this fashion is dipped in aqueous potassium iodide-iodine mixture it instantly turns very dark, nearly black. It is this material that exhibits the strong pleochromism when the polymer that forms this complex is crystalline. However, only a small portion of the polyvinyl alcohol in films made this way is crystalline. Thus material made this way shows only a slight pleochrome effect.
All comments to the author Robert Pavlis are welcomed.
Microscopy UK Front Page
Micscape Magazine
Article Library
Please report any Web problems or offer general comments to the Micscape Editor .
Micscape is the on-line monthly magazine of the Microscopy UK website at Microscopy-UK