 |
The Poor Man's Photomacroscope Breathing New Life into Redundant Lenses (part1) By Paul James |
I'm not too sure whether I've remained photomacroscopeless because of a lack of surplus funds over the years, or perhaps it was because I couldn't justify the expenditure involved. What I am certain of is that my perspective of things macro has been sharpened considerably by my efforts to try to make a simplified version of something like a Wild M420. A very lofty thought I must admit, but thinking costs nothing, and with a little fortuitous help from having a wheelbarrow full of redundant optical components from a lifetime's hobbying, plus the essential will to proceed regardless, eventually found me with a measure of success. This first part is a report on my attempts to fashion a basic macroscope for visual use.
First Notion
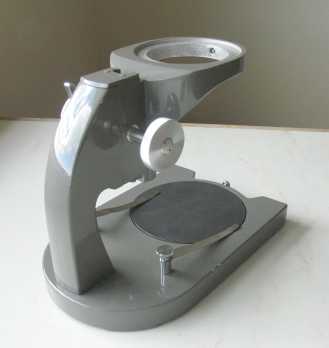
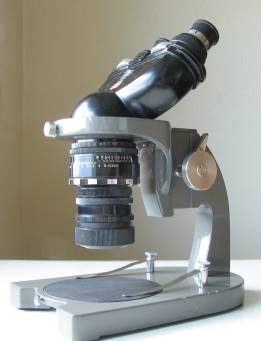
It occurred to me that if the standard trinocular configuration worked well in compound microscopy, then surely the same arrangement could be used with a little modification if necessary in the realm of macro imaging and photography. All that would be required in principal is an eyepiece, a beam splitter, objective and camera, all supported of course on some sort of stand. The very first temptation was to use an existing trinocular compound microscope stand, but the vast majority of stands don't provide sufficient distance between turret and stage for extensive macro imaging. I decided therefore to buy a used low power stereo microscope stand cheaply at eBay. It was, as it turned out, a good starting point because it coincidentally matched almost perfectly the bits of gear I had as spares for this venture.
|
Now that I had the stand I could more easily foresee how I could mount the necessary parts. But first I had to make some decisions. In this instance I didn't even consider stereo imaging as the problems would be far too difficult to surmount. I therefore accepted monoscopic imaging using a binocular headpiece ( vis Wild's M400 series ).
I had in effect 2 options : The first utilising the Zeiss Photomic spare optics I had and the second employing spare parts but from a Leitz trinocular stand. I made a start with the Zeiss gear first because it was the simpler of the two setups. The 160mm tube length factor which is of great importance in compound microscopy was now irrelevant, though other factors governing optical performance were to come into play and therefore were given some thought.
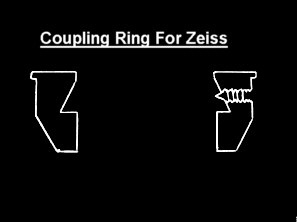
First : The Coupling Ring
The task of joining the salient parts together required some thought. I realised I had to fashion a simple coupling device which would fit into the stereo stand's 60mm pod aperture. This 'coupling ring' would support the Zeiss binocular headpiece using Zeiss's intermodular circular dovetail fitment above and an imaging objective directly below. But before I could complete the coupling ring in the lathe I had to decide on how to hang the objective(s). The image below shows the basic ring in section which is 60mm wide to fit the stand's pod aperture plus a retaining lip. The under surface was temporarily left to be modified until it was decided how to hang the imaging objectives :-
 |
The Imaging Objective
I had several redundant 35mm SLR film camera lenses of varying focal length as well as some enlarging lenses from that era. I knew that the objective(s) required to produce the amplification I theoretically reasoned to be useful for macro imaging, would have focal lengths of between 35mm and 80mm. (It seemed reasonable to assume that since the 35mm film photographic lens was designed to project a sharp, high resolution, distortion limited image covering a circle of around 45-50mm, then when used to project an image in reverse as it were, these factors of image quality might still hold true. In theory this might only be valid when the lens's back element is at the designed working distance from the specimen (formerly the film plane). In this macroscope venture I was embarking on, the working distance would be greater than the ideal because the projected image would have to focus at the eyepiece which in a binocular head is only about 200mm distance from the lens plane and not infinity or somewhere nearer. Such a short distance incurs the necessity of the lens being further away from the image source...the seesaw effect. This is good news for working distances in a macroscope, but not so good news image quality wise.......in theory at least. What would have been ideal of course is a genuine macro lens which I didn't have. I'd soon discover of course whether this would turn out to be a working proposition ).
One of the potential problems that might have been encountered was the limitation of the stand's compass when trying to focus these lenses. Fortunately this stand has a 2 tiered rack/slide, so the range was extensive enough to cope especially with some optical help which I'll refer to later.
Mounting the Lenses
Having decided on the lenses that I could utilise, the next problem was how to mount them on the underside of the coupling ring. But as many of you will already know standard camera lenses image best in macro mode when reversed. The optical situation regarding lens orientation in this 'macroscope' I was making was in principal similar, and so attachment of any lens to the coupling ring would be by its filter thread. As luck would have it, most of the more useful spare camera lenses in the range I wanted to try had either 49mm or 52mm filter threads. All I had to do therefore was to mount one filter ring in a circular rebate machined into the underside of the coupling ring and use an adapter ring permanently mounted on any other lens as deemed fit for the purpose. The image below shows the coupling ring with the filter thread's stout rim epoxy bonded intimately into its matching rebate. Now any 49mm or 52mm filter threaded lens with adapters could be housed there :-
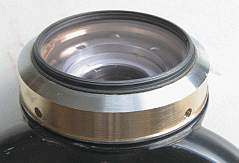 |
(The ring I bonded to the coupler is a skylight filter which has no effect on imaging but stops dust and potential harm to the cameras lens's surface especially during the early stages of experimentation )
First Imaging sessions
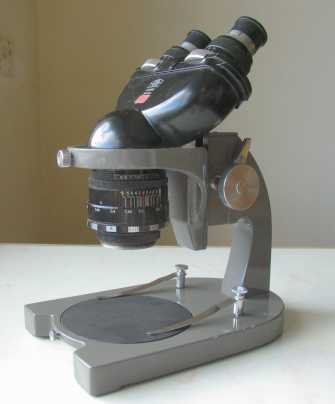 |
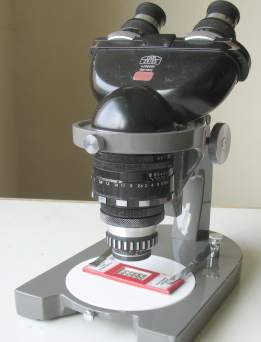
With the standard Zeiss binocular head in place (without a beam splitter beneath), and an ex SLR camera lens screwed in below, I could start assessing the capability of this setup. First impressions were very favourable, as I soon realised that by reducing the camera lens's aperture to around f 5.6 or so, promptly optimised imaging quality. Despite the greater than ideal working distance for these camera lenses they all imaged extremely well revealing crisp imagery and commendably flattish fields. So far so good. But there was one unexpected surprise : the amplification using the 50mm lens was higher than I'd envisaged at around x 18 with standard x 10 oculars. This was in part attributable to the inherent 160mm tube length of the binocular head as well as the eyepiece combination. Lower power eyepieces helped, but field diameters stubbornly refused to expand significantly with the usual range of 23mm oculars, which I will raise later.
I initially employed camera lenses from the likes of Nikon/Olympus/Zenit/Pentax/Soligor/Sigma etc., and so began to get the measure of this homespun macroscope. A 35mm Pentax F3.5 M42 lens imaged very well indeed, eliciting the fly's proboscis detail easily enough at around f5.6, but it's amplification still seemed excessive to me at the time and reminded me of the compound microscope's imagery which was understandably superior. The NA of the microscope objective is intrinsically much higher because it's designed to work in close proximity to the specimen. In the arrangement I'd fashioned the bottom lens of the camera objective is much further away from the subject/film plane than say a microscope's x5 objective, so its effective NA is therefore reduced, regardless of any other consideration. Despite this I felt no disappointment because this was compound microscope territory after all and I only wanted more modest amplification. Nevertheless I concluded that a useful range of field diameters could be raised from 8mm to about 22mm using lenses from 35mm to 80mm focal length in the way I'd configured the setup on this particular stand.
Time For Thought
At this juncture I had absolutely no doubt that the inherent imaging quality was good enough to be able to proceed further with the task of adding photographic capability. But there were obstacles ahead, not least of which was controlling the overall amplification of the image. Every microscopist knows that when the eyepiece is withdrawn a little, the magnification increases slightly. So it follows that when the beam splitter is inserted beneath the binocular head the amplification rises also : in this instance by about 30% . This was bad news as it seemed a little too high for my purposes already. Increasing image scales is easy enough in macro mode, it's the expansion of field which is problematical. Then I remembered writing an article on Micscape many years back when I found that by inserting a negative lens ( x2 Tele-Lens- converter) between specimen and low power objective the field expanded considerably without image degradation. I soon realised that this might work here in similar fashion.
Enter 'The tele Converter'
In fact the 'Tele-Converter' did save the day extending the field considerably so, almost doubling it. its proximity to the objective is fairly critical, but can be adjusted to suit the observer's preference easily enough using either ready made extension rings, or by making a sliding tube fitment coupled to the lower thread or bayonet of the objective. The tele-converter works best in this situation with its widest element facing the specimen : similar in fact to its position in film photography, but further away from the objective. Initially I used the M42 Zenith Helios 58mm f2 camera lens as my standard objective because it amplifies the subject slightly less than the 50mm lenses, and it also has the M42 thread which couples easily with M42 extension rings I already had :-
 |
The above image shows the 'pod' which includes the tele converter optic housed at the end of the series of coupling rings attached to the camera objective which appeals simply because its imaging capability in this situation is only a whisker's difference to the slightly superior Nikon 50mm f2 or Olympus 50mm f1.8, but importantly sports the convenient M42 thread which I could use with my multi element teleconverter.
 |
The field of view raised with this combo shown above through standard 23mm x10 achromat eyepieces now ranged from 31mm to 11mm, which made all the other lenses effectively redundant save perhaps the 35 mm Pentax M42.. This revelation changed things dramatically as it was beginning to look like I'd be able to use just the single camera lens for most occasions with the aid of the teleconverter lens as a supplementary add on. This was almost perfect for my needs as most of what I had anticipated observing would image comfortably within these field limits. A distinct advantage of this arrangement is that the camera lens's own focussing mechanism can be used to alter the lens's proximity to the converter in more subtle stages, by virtue of the fact that the outer lens body is fixed to the stand allowing the actual lens assembly to 'float' along the axis between itself and the eyepiece within the scope of its focussing range. This welcome coincidence with the various combinations of coupling rings in place makes for a comprehensive and more gradual overlapping change in field coverage. For photography this fine tuning of image/field size would be an added convenience.
Of course this method of changing field coverage isn't as ideally convenient as a contemporary zoom on a stereo low power microscope. However to make life easier using my simple macroscope I have drawn a series of circles on a reference card each commensurate with a given setup of objective and teleconverter spacing. I can therefore rapidly forecast which optical combination is required for a given specimen by simply gauging its size against the appropriate sized field marked on the card. This saves time and works very well.
Enter the Image Multiplier !
If a negative lens combination like the tele-converter reduces image amplification, then a positive combination of glass should do the opposite. And so placing an old 75mm f4.5 enlarging lens ( Willon : Wetzlar ) directly under the Helios 58mm lens increased the amplification approximately to that yielded from the 35mm camera lens used alone. No big surprise there, but I was more than pleasantly surprised by the quality of the image so produced by this unorthodox coupling of lenses, particularly field flatness. So much so I didn't bother to try alternative combinations. I modified a standard M42 coupling ring so this little gem of an optic could be easily screwed below the Helios-44 objective :-.
 |
 |
| Above left the 75mm supplementary +
58mm objective at WD. There was just enough rackwork to allow focussing on the base plate. Right image shows same but with the 35mm objective which required an elevated platform as shown. WD here was about 18mm. |
The only flaw remained outside the realm of optics where the working distance was reduced to about 28mm and 18mm respectively, so lighting became a trifle difficult under the smaller gap...........but not insurmountably so. Now I could with these supplementary lenses raise field diameters from 31mm down to 4mm or so from just 2 camera lenses : the 58mm and 35mm. At this point in the proceedings I really felt I was getting somewhere, because not only was the coverage more than adequate, but the image quality surpassed my expectations by quite a margin. This field coverage now ranged by almost 8:1 !
Other Matters
For purely visual use the choice of suitable eyepieces is a matter of trial and error and personal preferences of course. The best I found in this situation were B&L x15 23mm fit stereo low power widefield types, which raised truly flat fields........very satisfying. But I found a pair of G&S x10 moderately wide field achromats with 23mm fitting which became the favoured pair thereafter as I'm not too keen on wide field observation. Compensating oculars were of no use as this was basically an achromatic system, nor of course standard 30mm fit low power high eyepoint eyepieces which can't be squeezed into the 23mm sockets of the binocular head piece. No matter as the B&L's and G&S's could not be significantly improved upon.
In fact the quality of imagery gleaned from this adhoc combination of unlikely parts was noticeably superior in some respects to that produced by my Vickers low power stereo microscope. Which reminds me that I wasn't conscious of looking at a non stereoscopic image through this unlikely setup, simply because there was some semblance of depth and spatial perception despite contrary opinions which state that monoscopic imagery cannot illicit any stereo scopic effects at all. It was clearly obvious to me that the slight side to side swaying of the head induced slight changes of parallax in biological matter which was obvious and gave depth to the image. This phenomenon was very apparent at the objective's widest aperture, most especially when employing the faster lenses. Of course in one way there's no comparison between this and proper stereoscopic imagery, BUT I do wonder what purpose the stereoscopic effect serves other than to seduce the observer into imagining being immersed in the macro world. This is fine, I admit to finding this impressive as most observers do, but it comes at a cost. The massive depth of field inherent in many low power stereo 'scopes is a product of narrow light pathways to each eyepiece since only a small aperture on each side of the principal objective can be (is) utilised. This home spun macroscope's visually perceived image is a little crisper and virtually distortion free across the entire flat field, and chromatic aberration is much less evident too ( subject to eyepiece compatibility ). In short the overall image quality of the camera lens objective is superior which isn't surprising since only the on axis central zone is being employed and there are no conflictions between separate overlapping images raised from each side of the objective in the low power stereoscope, most especially in the affordable ranges where optical compensation is not an option.
The Zoom Lens Objective
Despite all the work done with fixed focus conventional camera lenses so far, I was becoming intrigued by the imaging of a fairly modern Sigma 35-70mm zoom lens which I'd been disappointed with in film photography days. However when inverted beneath the coupling ring like the others its imaging was on par with the rest of the fleet of optics I'd tried. Good news, especially as its range of focal lengths neatly fits into my idea of what I wanted. Yet though it does image very well in the macro stand, there is a confliction of requirements as well, since its length alters during the zoom process complicating the matter of mounting which I have therefore deferred for the time being. So whether it'll become the single optic on the stand remains to be seen. What is in no doubt at all is that its mounting will have to be a very robust attachment to the main body and not left rattling from its filter thread. This can wait because I do like the compactness and rigidity of the single objective even with the add on supplementary lenses.
Concluding thoughts so far
I now feel that the very first hurdle has been successfully negotiated. I have a truly excellent imager in this low power macroscope which works within the various limitations imposed by the stand and optical parts. That it takes a little time to change field diameters is for me part of the hobby : like adjusting the controls on a compound microscope is an integral part of compound microscopy.
What was starting to seem feasible at the end of all this experimentation was the possibility that only one imaging objective need be used, accompanied with the 'add on' pos and neg elements..........or the just the single zoom objective option ? Time will tell. I guess the only similarity so far between this home made macroscope and the iconic Wild M450 with its zoom objective is their similar field coverage !
In fact this low power stand would also suit beginners as an introduction to microscopy, since much of what can be observed with it can at least be made sense of beforehand with the naked eye, unlike the average slide in compound microscopy which invariably harbours what appears to be no more than a faint smudge within the circular ringing of the slide.
So whatever was going to transpire regarding photographic adaptation to this stand, successful or otherwise, I knew I had a simple, compact, self contained working macroscope which was an excellent imager in its own right.
Part 2 will cover the ideas and problems incurred trying to put the prefix 'photo' into .........macroscope !
| All comments welcome by the author Paul James |
Microscopy UK Front Page
Micscape
Magazine
Article
Library
Published in the September 2010 edition of Micscape.
Please report any Web problems or offer general comments to the Micscape Editor.
Micscape is the on-line monthly
magazine of the Microscopy UK web
site at
Microscopy-UK