The Brunel Rocking Microtome review.
Stanislav Antonov.
Introduction.
The rocking microtome is a device for cutting thin sections of wax-embedded material of either animal or plant origin. The rocking microtome was developed in workshops of Cambridge University at the end of XIX century. Though it is an old model, it is still very effective for producing series of good quality 6-20 micron thin paraffin sections. As with other microtome types (sledge and rotary), the name comes from principle of movement of the sample holder: the sample holding arm of this microtome performs repetitive rocking motions while advancing towards a fixed knife. This method of cutting produces sections from a slightly cylindrical surface, but the effect of curvature is negligible. The sections become evidently non-planar only when very large objects (more than 10 millimeter in height) are cut.
The simple design of the rocking microtome makes its production cost relatively low, and these microtomes are manufactured today and available online from several sellers, namely Brunel Microscopes (UK) and Radical Instruments (India). To my opinion, these microtomes are an ideal choice for hobbyist histologists interested in thin-section cutting device at an affordable price.
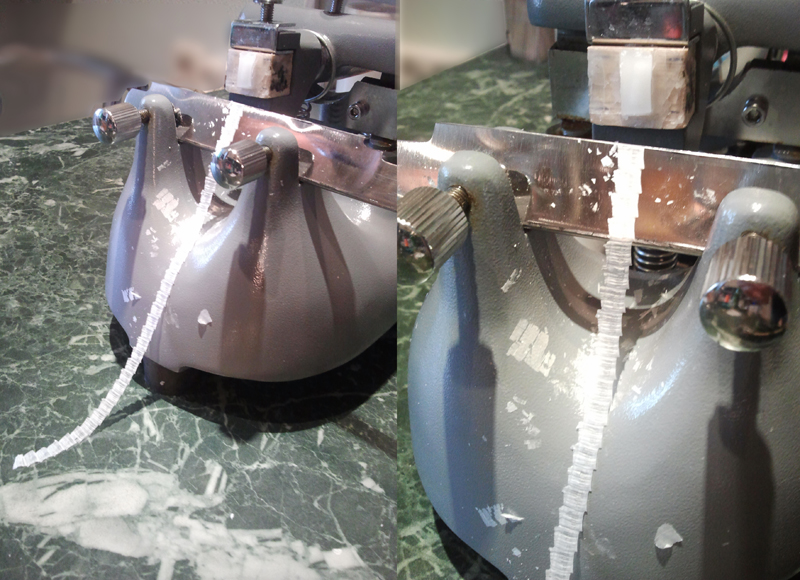
Figure 1 – Ribbons of the 7 micron sections obtained using the rocking microtome while trimming the paraffin block.
The rocking microtome is able to produce very long ribbons of 5-20 micron sections without interruptions.

Figure 2 – Example of sections produced by Brunel rocking microtome. These are hematoxylin-eosin stained sections of embryoid body (EB) formed by mouse embryonic (ES) stem cells. These cell aggregates are formed by 500-1000 ES cells cultured together in a hanging drop of nutrient media. The approximate diameter of EB is only 200 micrometers, and this small clump was processed, embedded in paraffin and cut at 7 micron thickness by the rocking microtome. Such small objects are perfect for this instrument, producing long “cartoons” of sections without any evident distortion.
The quality of sections of wax-embedded material produced by rocking microtome is competitive with the sections produced by modern rotary and sledge microtomes (see figure 2). It is especially good for cutting small and relatively soft objects. The rocking microtome is unable to cut hard material like wood or bone. The maximum sample size that can be cut without problems using the rocking microtome is rather small, compared to modern models, but this is rather a specialization than disadvantage.
Description of the mechanism and theory of operation.
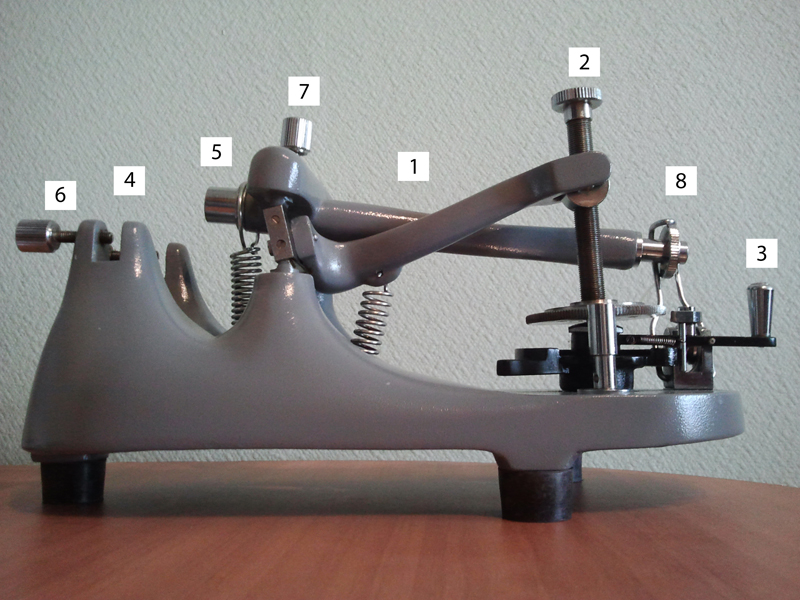
Figure 3A – Brunel rocking microtome main parts 1 – Rocking arm; 2 – Micrometer screw; 3 – Operation lever; 4 –Knife holder; 5 – Sample holder base (the holder absent); 6 – Knife holder tightening screw; 7 – Sample holder screw; 8 – The safety lock mechanism.
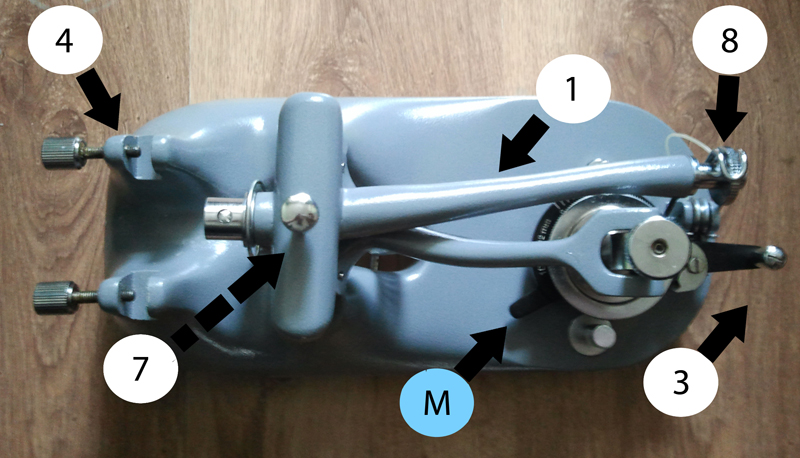
Figure 3B – upper view. “M” – is the lever for controlling section thickness. All the rest symbol designations are identical to the previous figure.
The microtome consists of the rocking arm (1) and the micrometer screw (2) operated by the lever (3) installed on a cast-iron base.
The sample is mounted on a holder and the holder is attached to its base (5) at the end of the rocking arm (1) and tightened using the screw (7). Then the knife is fit into the holder (4) and locked by the screw (6). The rotation of micrometer screw (2) advances the rocking arm (1) holding the sample toward the razor knife fixed in a knife holder (4) by a screw (6). Knife and sample holder are intentionally absent on figures 3A and B, to display their housing. Movement of the operation lever (3) back and forth causes the rocking motion of the sample holding arm, simultaneously rotating the micrometer screw. Pulling the lever lifts the sample holder above the knife, while the micrometer screw makes the single rotation at the operator defined angle. The rotation of the micrometer screw advances the rocking arm toward the knife during each upstroke on a set depth. Pushing the lever forth depresses the arm bringing the paraffin block surface into contact with knives edge.
The lever (M) (Fig 3B) serves for setting the section thickness from 0 to 20 micron, one scale division values 2 micron. This lever defines the rotation angle of the micrometer screw that is caused by pulling the operation lever (3).
The tension coil springs ensure the tension of the rocking arm and the force of the cutting stroke. The locking mechanism (8) serves to hold the rocking arm in upper position when setting up the microtome and attaching the sample and the razor, and when the device is not used. Below this locking mechanism you can see the screw, which is connected to the operation lever via the fishing sea-line (not visible on the Figure 3). This is the least wear-proof part, and much attention must be given to thread’s condition: if any defects due to abrasion are noted, it must be instantly replaced. If the thread (or sea line) will tear or unbind from the rocking arm during the cutting, the arm will come down to its lowest position, beneath the knife. That is ok, but in case you will be using the wooden block holders, the falling holder will hit the knives edge, causing severe damage.
The microtome knife.
The rocking microtome uses the A-type biconcave razor knives. These knives are quite easy to sharpen but also quite rapidly get blunt. I believe this is the only type of the knife that can be used in this microtome model. The other types of knives, like old shaving razor or other microtome knives do not have the appropriate height – they are either too tall, or too low.
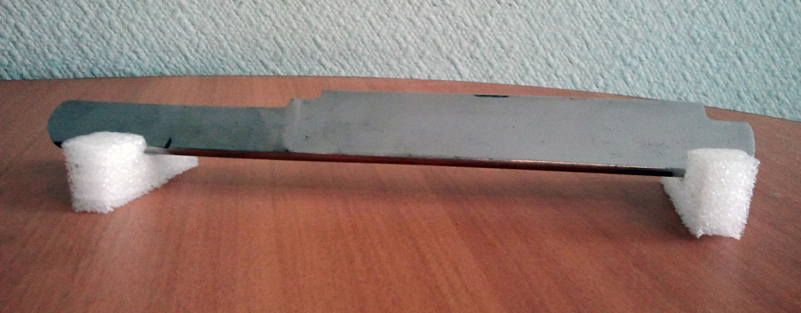
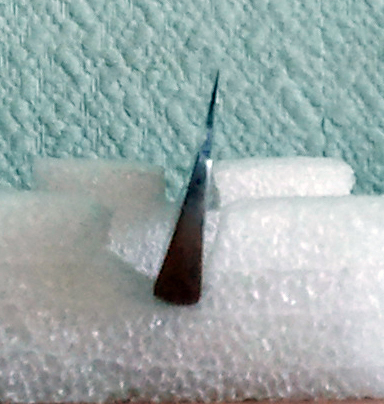
Figure 4. Side and front view of the rocking microtome razor knife.
The main disadvantage of the Brunel rocking microtome is the absence of the knife angle adjustment screws. If you simply put the knife into the holder and tighten the screws you will get the zero clearance angle of the knife. While the knife is in this position you would not be able to produce any sections, since the sample paraffin block will be compressed against the edge and not cut. The theory of this process is described in most microscopy technique. Shortly it should not neither too steep nor too obtuse. As for the current model, the solution for adjusting the knife angle, approved by the Brunel specialists is the use of the wedges. You can either use metallic items of a specific size or if you can access the metal processing factory you can order the metallic gusset with desired angle. Without this small update you would not be able to produce any sections with Brunel rocking microtome, thus finding or making the wedges for knife is inescapable. It is important for the wedges to be made of tough material, since they should sustain the pressure during cutting process without slightest movement or deformation. The use of wood or plastic is unacceptable, only metal wedges are good. The original Cambridge rocking microtome had two additional screws, opposite to 6 (Fig 3), so you would not have to bother about wedges if you’re using the old Cambridge model.
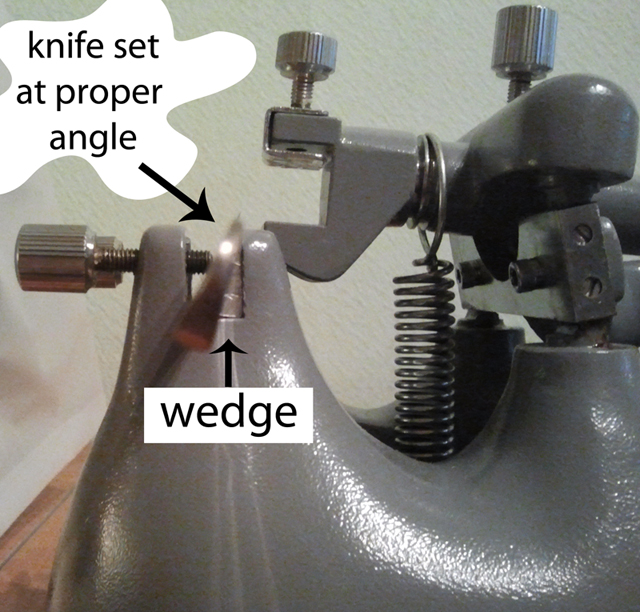
Figure 5 – setting up the knife.
Sharpening the knife is one of the most difficult parts of the process. Without a good previous experience, an attempt to sharpen the knife using the stone and bare hands is doomed. To say the least of it, controlling the stroke angle, while sharpening the microtome knife is anything but simple for an untrained person. If your intention is to produce the sharpest knife for very fine sections, instead of wasting the precious knives steel, experimenting whether there were metal craftsmen between your ancestors, you can ease your task several fold by purchasing the sharpening device. The only sharpener conveniently I found suitable for microtome knives is manufactured by Edge Pro Inc., . This is the only device I have found on market today that allows you to sharpen the knife at a fixed yet arbitrary angle. All other devices allow sharpening only at a factory defined angles, which cannot be altered. These may be good for kitchen knives but the special knives like microtome or ceramic knife that consist of precious brittle material and have quite steep edge angles can only be blunted by those.
There are special automatic sharpeners for microtome knives, but even the used ones are threefold more expensive on ebay than the rocking microtome itself. They are also not suitable for the knife of the rocking microtome, due to a specially designed knife holding/locking mechanisms, which is made to fit the brand knives manufactured by the same company. The automatic sharpeners are by no means universal. Because of their high price I will not discuss these further.
There are also several designs of self-made sharpeners, but their production requires skills, tools and time. If you are not in love with joiners work or kitchen routine, I strongly recommend you to purchase the easy to use semi-professional sharpener Edge Pro Apex and save your time for section cutting.
The detailed description of the sharpening process using Edge Pro Apex can be found on YouTube, just type the name, so there’s no use to describe it here in detail. The main feature of this device, that you can make your knives very sharp with very little experience in this process. The Edge Pro Inc. produces several abrasive grit stone types for their sharpening system. For sharpening the microtome knives you will need the finest ones. Unless your knife has severe nicks from falling or cutting very hard material, I recommend you only use the 1000 grit and finer abrasives. The Edge Pro Apex makes the 1000 grit sharpening stones, and 2000,3000 and 6000 grit polishing tapes.
If you want to get the perfect sections you should consequently sharpen your knife using the above mentioned abrasives. If you have a new or a used knife you must first remove the coarse irregularities on its edge carefully using the 1000 grit stone. Do not apply any force to the sharpening stone, this will preserve the thin edge from accidental damage. Then proceed to polishing consequently with 2000, 3000 and 6000 girt polish tapes. The original carriers for the tapes are made from metal, but Edge Pro Inc. also produces the glass blocks for polishing tapes. These are much smoother than the default metal blocks. I especially recommend you to use glass blocks for 6000 grit polish tapes. The ideal knife is a key to success with the section cutting.
The sample holders.
Several holders are available with Brunel rocking microtome for attachment of paraffin blocks to the rocking arm. I will briefly review them below.
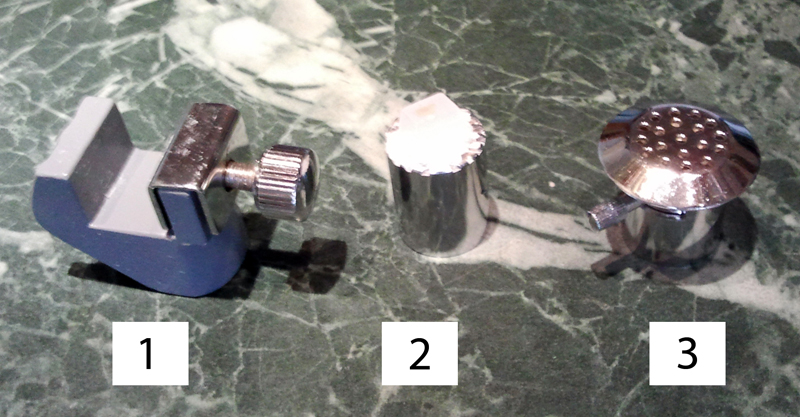
Figure 6 – the sample holders for Brunel rocking microtome.
1 – The wooden chuck holder; 2 – The metal block holder with a sample attached onto it; 3 – The adjustable metal holder with orientation lever visible.
The holder (1) is designed for wooden blocks and this is the most convenient one. You can use any size of a hardwood chuck that is fits for your sample, and if you have several wooden chucks you can quickly replace samples during the cutting process. You can see it mounted on the microtome on Fig. 1. The maximum size of the wooden chuck that can fit into the holder (1) is 17 x 23 mm (height/width). The paraffin block should be smaller especially its height. If the width is too high the block will suffer compression during the cutting and the sections will be uneven. If the block is too high, then the upper and lower parts of the section will lie in different planes. The ideal size for the paraffin block is somewhat around 5 x 7 mm.
The holder (2) is much less convenient, firstly due to its inappropriate length. Even when it is installed at maximum depth on the rocking arm and the micrometer screw is in its lowest position, there’s still a large distance between the holder and the knife. That holder (2) requires for the sample paraffin block to be very high, as the lower samples mounted on it cannot reach the knife’s edge. The holder (3) was meant to be used for orienting the block during the cutting process. I have no idea why one can need to rotate the sample on the holder, since the sample holder itself can be rotated after freeing the tightening screw. In terms of length the holder (3) bears the same problem as the holder (2). I personally only use the holder (1).
Final notes.
After mounting the sample on a holder and installing the sharp knife in the proper position one can proceed to section cutting. The process of cutting itself is very simple. However the tricks necessary to obtain the best quality sections deserve a separate paper, since the result of this depends both on a sharp knife and properly processed and embedded samples.
The microtome requires minimal service. Besides sharpening the knife, the owner also needs to care about protecting the open mechanism from air moisture and dust. When not in use, the microtome should be stored always under a dust protective cover, which is included with the Brunel rocking microtome. There are several types of greases available on the market. The silicone grease and the biodegradable-oil based ones should not be used with the microtomes, these do not repel moisture and/or oxidize with time changing their properties. Only petroleum-based grease is good for long use. Mineral butter is a bad substitute for the grease. The mineral butter is too thick at fist glance but it liquefies at heating produced by friction of mechanism and leaks. It does not hold long on the metal surface. The oils used for motors do not hold at metal surface at all. In my opinion it is a best to use a combo of universal spray for dust and rust protection of surfaces, and white lithium grease for parts that suffer friction. These greases are available under many brand names, for example WD-40 and Lubrimatic from USA.
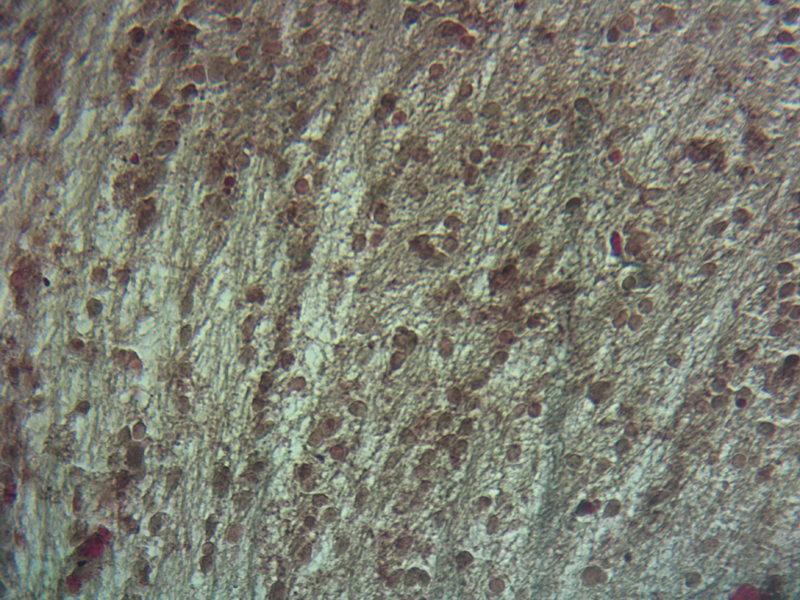
Figure 7 -Newborn rat basal forebrain 7 micron paraffin section made with Brunel rocking microtome. Section was stained with Masson’s trichrome to reveal the neuroglial fibrous network.
First published In www.microbehunter.com
online microscopy magazine. Republished here with kind permission of Stanislav Antonov.
Mic-UK co-ordinator note: A wax embedding tutorial, in part, is here.
The author can be contacted here.
The Brunel Rocking Microtome can be purchased here: info and/or buy
Microscopy UK Front Page
Micscape Magazine
Article Library
© Microscopy UK or their contributors.
Published in the September 2014 edition of Micscape.
Please report any Web problems or offer general comments to the Micscape Editor .
Micscape is the on-line monthly magazine of the Microscopy UK web site at Microscopy-UK
©
Onview.net Ltd, Microscopy-UK, and all contributors 1995
onwards. All rights reserved. **Any following links are redundant **
Main site is at
* The following links are redundant * www.microscopy-uk.org.uk.