CLEANING
AND ADJUSTING THE OPEN UNIVERSITY
McARTHUR MICROSCOPE: NOTES AND
RECOMMENDATIONS
by Guido
Santacana, Puerto Rico
|
About two years ago I received an OU plastic McArthur
Microscope from Mr. Brian Adams in the UK. This was a microscope
that he had cleaned and readjusted. I have been so impressed by
the performance of this unit that when he recently announced an
OU microscope sale on the Microscopy UK web-site I went ahead and
bought several more.They are sold in pairs and I have found that
both can be refurbished. The ones on sale have not been restored
by Mr. Adams but he will send well written instructions on how to
clean and adjust the microscopes. Using his instructions, I have
refurbished my microscopes and at the same time have gained some
insight into the process. Here is an account of my experiences in
working with these microscopes and some photos of the various
procedures as they were carried out.
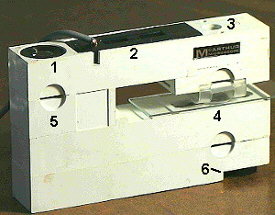 Open University (UK) students microscope based on
the McArthur design. (Image by Dave
Walker)
Open University (UK) students microscope based on
the McArthur design. (Image by Dave
Walker)
1) fixed eyepiece
2) selector for external or internal battery lighting
3) light port (for daylight viewing)
4) slide holder (slide sits upside down)
objectives are below slide in case
5) slits for filters eg polarisers
6) focusing knob
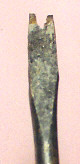 The first thing
to have in mind is the correct tools, specially the screwdriver
for the slotted nuts that hold the three sections of the
microscope together. The blade of the screwdriver must have at
least 5mm in width. In the center of the blade you must file a
2mm slot. I did this with a Dremel tool but a good file and some
elbow grease should do just as well. Fig.1 (right) shows the
results on my small screwdriver. You may have to play a bit with
the file until a near perfect fit is found. It is very important
to have a good fit into the slotted nut to be able to hold it
firmly for removal.
The first thing
to have in mind is the correct tools, specially the screwdriver
for the slotted nuts that hold the three sections of the
microscope together. The blade of the screwdriver must have at
least 5mm in width. In the center of the blade you must file a
2mm slot. I did this with a Dremel tool but a good file and some
elbow grease should do just as well. Fig.1 (right) shows the
results on my small screwdriver. You may have to play a bit with
the file until a near perfect fit is found. It is very important
to have a good fit into the slotted nut to be able to hold it
firmly for removal.
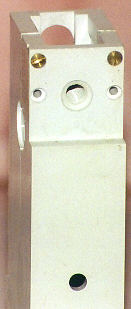
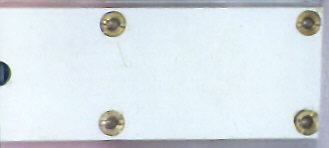 The next step is
removal of the 4 slotted nuts. These are located in the bottom
part of the microscope toward the back and well covered with
white lacquer in some microscopes. The lacquer must be carefully
removed by gentle scraping with a pointed tool being careful not
to scratch the bottom of the microscope. When the slotted nut is
reached, clean the slots out of all the lacquer for a good fit of
your prepared screwdriver. Fig.2 (above) shows the bottom of the
microscopes with the slotted nuts exposed. Now place a cloth in
your working table and turn the microscope with the bottom up.
Grasp firmly with your hand and insert the prepared screwdriver
in the first slotted nut. Make sure that there is a good fit. If
not, go back and work on the screwdriver again until it fits. If
the fitting is good, press a bit with the screwdriver and turn it
firmly. The slotted nut should start to move with some difficulty
at first and then much easier. Go slowly but firmly. Remove the
four slotted nuts.
The next step is
removal of the 4 slotted nuts. These are located in the bottom
part of the microscope toward the back and well covered with
white lacquer in some microscopes. The lacquer must be carefully
removed by gentle scraping with a pointed tool being careful not
to scratch the bottom of the microscope. When the slotted nut is
reached, clean the slots out of all the lacquer for a good fit of
your prepared screwdriver. Fig.2 (above) shows the bottom of the
microscopes with the slotted nuts exposed. Now place a cloth in
your working table and turn the microscope with the bottom up.
Grasp firmly with your hand and insert the prepared screwdriver
in the first slotted nut. Make sure that there is a good fit. If
not, go back and work on the screwdriver again until it fits. If
the fitting is good, press a bit with the screwdriver and turn it
firmly. The slotted nut should start to move with some difficulty
at first and then much easier. Go slowly but firmly. Remove the
four slotted nuts.
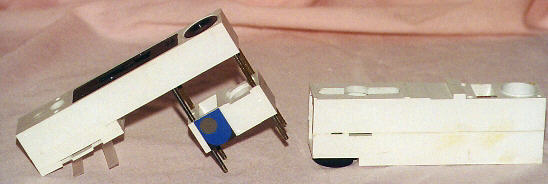
Figure 3
The three parts that form the microscope body are now loose.
These parts are (see Fig.3 above), the top section with the
eyepiece, the center section with the lower eyepiece lens and the
lower section with the focusing mechanism, objectives and
mirrors. Now grasp the microscope firmly at the bottom with one
hand and the two upper parts with the other. Carefully separate
the bottom section from the top ones. You may have to move the
upper parts a bit while sliding them out of the two long screws.
See Fig.3 to see what happens as you separate them. Don’t
force them, just go about it slowly. After the separation you
will have the bottom section that contains the objective and
mirrors and the top and middle sections with the light unit,
eyepiece and condenser as shown in Fig.3. Now place the bottom
section in a safe place.
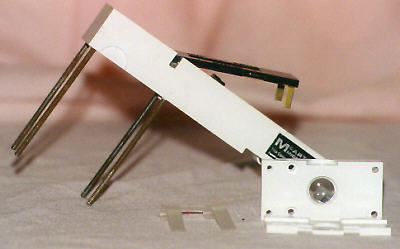
Figure 4
Take the top and middle sections and separate the
middle section from the top one by sliding it out of the long
screws. The middle section contains the bottom lens of the
eyepiece. Put it aside for a moment. In the end opposite the
eyepiece in the top section you will find the condenser lens
Fig.4 (above).
 You are now
ready to start cleaning. Use a bit of mild household cleaner to
clean the plastic body in each section. For the lenses use a
50/50 mixture of isopropyl alcohol and distilled water. Small
cotton tipped applicators can be used to clean the lenses. Start
with the eyepiece (Fig 5 right). Wet a cotton tipped applicator
with the 50/50 alcohol solution and gently pass it over the
surface of the lens on both sides. Dry with another applicator
but very gently. Clean the top lens and then the bottom lens of
the eyepiece (in the middle section).If the lens in the middle
section is held by a black plastic ring, you may remove the ring
and take the lens out for cleaning. Just make sure that when you
put it back the flat face of the lens looks up toward the
eyepiece.
You are now
ready to start cleaning. Use a bit of mild household cleaner to
clean the plastic body in each section. For the lenses use a
50/50 mixture of isopropyl alcohol and distilled water. Small
cotton tipped applicators can be used to clean the lenses. Start
with the eyepiece (Fig 5 right). Wet a cotton tipped applicator
with the 50/50 alcohol solution and gently pass it over the
surface of the lens on both sides. Dry with another applicator
but very gently. Clean the top lens and then the bottom lens of
the eyepiece (in the middle section).If the lens in the middle
section is held by a black plastic ring, you may remove the ring
and take the lens out for cleaning. Just make sure that when you
put it back the flat face of the lens looks up toward the
eyepiece.
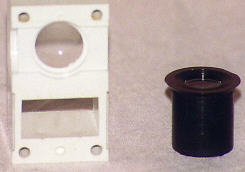
Now check the condenser lens. If it is firmly in place clean
it as you did with the eyepiece. If it’s loose, then gently
separate both sections of the condenser holder by removing the
four screws and then two small ones that you will find as the
plastic frame that holds the plastic slide holding clips is
lifted. Be careful so that the lens don’t fall off. Take the
lens out and clean with the alcohol solution (Fig 4). This lens
has square corners. You will have to carefully place some nail
polish in each corner and center the lens in the top part of its
mount (the one with the bigger hole).
 Now place the
bottom part of the condenser mount in place and replace the whole
section on the top section of the microscope using the reverse
procedure for removing it. Since now all the lenses in the top
section are clean, take the top and middle sections and slide
them back together. Refer to the figures above. Place this
section in a safe place and take the bottom section of the
microscope that contains the objectives and mirrors.
Now place the
bottom part of the condenser mount in place and replace the whole
section on the top section of the microscope using the reverse
procedure for removing it. Since now all the lenses in the top
section are clean, take the top and middle sections and slide
them back together. Refer to the figures above. Place this
section in a safe place and take the bottom section of the
microscope that contains the objectives and mirrors.
Remove the focusing knob by unscrewing it completely (Fig 6
right). Now take the objective carrier (Fig 7 below) and push it
out once, twice and a final and third time in which it should
slide out of its mount. You may have to push a bit firmly at the
end. Place the objective carrier in a safe place. Turn the bottom
part and remove the two screws at the end near the focusing knob
(see Fig 6). Separate the two parts that form the bottom section
(see Fig.8 below). Now you can see the main part of the focusing
mechanism. Look carefully for two springs at the top of the
objective mount in Fig 8. You must be careful not to loose them
in the next step.

Figure 7
Remove the four screws that hold the objective
mount (be careful with the springs!). Cut a small rectangle from
a post card and fit it in the place were the two front screws of
the objective carrier go See Fig. Replace the objective carrier
being careful to place the springs in their correct hole. Now the
bottom of the carrier should be almost flush with the white
plastic border. This will return the focusing mechanism of the
microscope to normal. The mirrors in the bottom part of this
section (Fig. 8) should be cleaned just by blowing some air on
them. If a mirror is loose, just refit it in by applying some
nail polish to the back and getting it carefully back in its
place. Try not to touch the mirror surface.
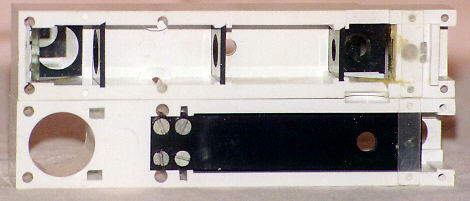
Figure 8
Take the objective lens carrier and clean each objective lens
with the cotton tipped applicators and alcohol solution. You
don’t have to remove the lenses from the carrier to do this.
Just go first on one side and then the other. Replace the
objective lens carrier into its mount in the bottom section by
gently pushing it in place. Now put together the two parts that
form the bottom section and make sure that the plastic strips
that go over the hole left by removing the focusing knob are back
in place (see Fig.8). Replace the front screws that hold the
bottom section together.The bottom section is now ready.
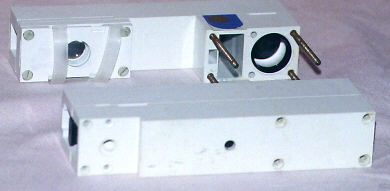
Figure 9
Take the bottom section and align it with the four screws
holding up the upper sections (Fig 9 above). Slide the bottom
section into the four screws and make sure that the three
sections attach together well. Replace the slotted nuts. Screw
back the focusing knob. It should screw back easily. The
microscope is now ready to be tested. Place a slide on the stage
with the cover slip looking down. Focus and look at the image.
There should be a clear image at both low and high powers. In
some cases the microscope will be almost parfocal. This means
that when you change from low to high power, the focus will be
retained. Some problem areas that I have encountered include:
Loose mirror - A loose mirror can be easily refitted in its
place but the exact position may be tricky. It will be in the
correct place if, when you look at the microscope field, there is
no sign of a black crescent anywhere. If a black crescent is
observed you need to refit the mirror in a lower or upper
position. This is the reason for using a mild cement like nail
polish. Don’t use a permanent cement like epoxy or
cyanoacrylates!!
Plastic strips - There are two little plastic strips where the
focusing screw protrudes inside the lower section. Make sure you
don’t lose them!
Hard to move objective carrier - This problem is usually
solved by cleaning the objective carrier mount with a bit of
household or plastic cleaner or by checking if any of the
objectives protrudes too much from the bottom of the carrier. Old
cement over an objective lens- I found this in one of the
microscope objectives. It was easy to remove with a bit of Xylol
in a cotton tipped applicator. Make sure that you don’t go
over the plastic with the Xylol.
Misaligned objectives - This requires a very careful
procedure. Contact me if this is the case.
In the end you will have two excellent and very portable
microscopes. They are also great as a first microscope for an
inquisitive young mind. Please feel free to contact me for any
doubts. I’ll be glad to help.
Comments and queries to Guido
Santacana welcomed.
© Microscopy UK or their
contributors.
Published in the September 1999
edition of Micscape Magazine.
Please report any Web problems
or offer general comments to the Micscape Editor,
via the contact on current Micscape Index.
Micscape is the on-line monthly
magazine of the Microscopy UK web
site at Microscopy-UK
WIDTH=1
© Onview.net Ltd, Microscopy-UK, and all contributors 1995 onwards. All rights
reserved. Main site is at www.microscopy-uk.org.uk with full mirror at www.microscopy-uk.net.