Introduction
Hi there. I'm Larry Legg and I guess if you're dropping by it's because you want to have a go
yourself at getting started in Amateur Microscopy. Yup, I know - it's a bit of a mouthful but that's about
the worst part of actually getting to grips with this AMAZING past-time. I hope to show you how to get
started, and how to get really involved without a lot of fuss, cos - if you're like me - you just want to get stuck in without
having to spend hour upon hour learning complex issues bottom up.
We've gotta get a few things straight right away though if we're gonna be working together: first of all - I aint no scientist or purist. I like a beer, I like to do a lot of other things besides messing around with looking into small stuff... so if you would prefer to hunt around the web and find yourself a 10 year lesson on how to suss out this Microscopy stuff, then that's fine by me. But I'll tell you something right away, it just aint necessary. If you don't believe me then hang on in thru this first lesson and see how easy it is to make a REAL specimen slide yourself. Now most of the super Amateur Microscopists spend years before they try this so if you stick with me, you'll slip into the fast lane and get your first slide made about 365x quicker than most people and without doing a degree in chemistry.
One more thing... I like to write how I speak so you might find my use and distortion of the old Brit language a bit strange. I hope you stay with me though cos (er... that means 'because') there's lots to learn and I aint the kinda (kind of) guy to hang around doing things slowly.
A lot of very small things just have to be prepared (more on this later) and 'mounted' onto a glass slide to even be able to study them at all: they are just too small or unsuitable for examination by any other means.
Another possible solution is to put the house into a glass container and replace the air with
something else - a chemical or a solution of some kind which would not react with any of the materials
that the house was made of. Some of the problems with this is that the house is made of many different
substances: brick, cement, wood, ceramics, glass, paint, etc., Whatever solution used would have to be
chemically inert (non-reactive) with a wide range of materials. Also, structures such as bricks, are porous;
that is - they contain tiny bubbles of air. Our solution needed to fill the container would have to be
able to seep into the tiny spaces in the bricks and push the air out of them. We would have to make certain
too that the solution filled the INSIDE of the house or else the pressure from the weight of solution outside
would be greater than inside - effectively smashing the windows and possibly distorting the roof structure
through pressure and weight.
If we were unable to find a PERFECT solution or liquid to cater for all these problems, we would have to find
one which suited best and find additional ways of preventing some of the problems from happening. For example, lets
say we had this MAGIC chemical called 'MOUNT-IT' which seemed like it would do most of the things required except
it has a peculiar trait of melting paint. Could we use it?
We could, providing we first coat the paint with something which would FIX it so that it would no longer react
with our magic 'MOUNT-IT' solution. Possibly a varnish of some kind.
What has all this to do with mounting specimens on a slide?
Well there is NO difference! A tiny, microscopic, thing is itself made of different materials and forms a structure
much like (and often more fragile than) our example house. Similar problems exist. Some specimens need hardly any
major preparation at all, while others need a lot of work involving various chemical treatments. It is unfortunate
that many of these techniques involve substances which are considered likely to cause hazard to health or safety if not
used properly.
To make our first slide quickly and safely, I will show you now a way of mounting a wide variety of things
using safe commonly found materials which are either completely safe or not so threatening to your health and safety.
I also propose to dismiss some aspects of preparation for our first ones knowing that this will create less than perfect
specimens for some subjects. Don't worry about this because you'll still create something worthy of looking at time
and time again.
Preparation - general
Imagine for a moment that you want to preserve a delicate thing for a period of time;
for example - an item of clothing, a boat, a car or something even bigger: a house!
As long as any of these objects are exposed to the air, wind, rain, dust, and sunlight
they will continue to be affected by interaction with these variable conditions. Let's consider the
house. To KEEP it safe and in the same constant condition, we would need to enclose it within
something which will act a barrier to all the external things that would slowly transform it.
One way would be to put the house in a big container and take all the air out, effectively
creating a vacuum inside of it. The container would need to be made of glass or plastic though if
we still wish to look at it and enjoy its structure. We might encounter a small problem when removing
the air because as it was drawn out of the container, the windows might break due to the sudden rush of air
and the forces it creates as it leaves the box.
Preparation - stages
Just for the record, these are the stages you would normally have to consider in the process of preparing
specimens for permanent mounting of PLANT material on glass slides. We will NOT be doing the majority of these
when we make our first slides together!
Where do you get 'em from?
Well this is the part where you just have to contact a small company that sells them.
You can't pick them up from your local shop so you need to order some. We have
some of these small businesses in our Professional Services Section so
take a look in there first.
If any of you know some place in your country where you can get glass slides and cover slips from,
let me know! and I'll update this page to give a more
comprehensive list.
You need a bit more stuff to get going but I'm gonna show you now how to use things easily
available. So as soon as you're ready Let's move on to the next page!
Removal of air
Dehydration (removal of water)
Removal of oils (getting the mucky stuff out of the way)
Staining (adding color to reveal different structures and processes)
Fixing and preserving (to prevent interaction with 'mounting' agents)
![]() The QUICK START way!
The QUICK START way!
Materials - basic needs!
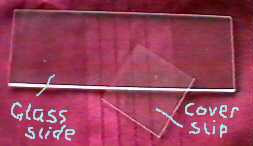 You need some glass slides. After all is said and done, you can't escape
this requirement. Glass has a 'see-through' trait despite the fact that
it is considered a material that can easily cut and cause injury. You just have to
be careful how you handle it. You also need cover slips. These wafer thin
'slips' of glass will be used to cover the specimens you place on the larger
glass slides. I'm currently using cover slips which are 22mm square
and glass specimen slides 76mmm long, 21mm wide, and 1mm thick (3 x 1 inch).
You need some glass slides. After all is said and done, you can't escape
this requirement. Glass has a 'see-through' trait despite the fact that
it is considered a material that can easily cut and cause injury. You just have to
be careful how you handle it. You also need cover slips. These wafer thin
'slips' of glass will be used to cover the specimens you place on the larger
glass slides. I'm currently using cover slips which are 22mm square
and glass specimen slides 76mmm long, 21mm wide, and 1mm thick (3 x 1 inch).
Ask Larry something
NEXT PAGE
Microscopy UK Front Page
Micscape Magazine
Article Library
Vanessa & Larry's web site
© Onview.net Ltd, Microscopy-UK, and all contributors 1995 onwards. All rights
reserved. Main site is at www.microscopy-uk.org.uk with full mirror at www.microscopy-uk.net.