![]() A few more materials
A few more materials
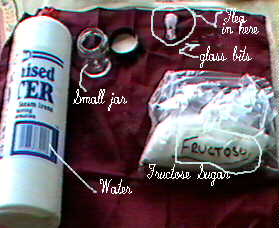 Here's a little picture of some extra things you need to make your first slide.
There's one more thing, not shown here, that I'll explain to you in a moment... but first of all,
let me talk you through these items. Most of them are easy to obtain from around the house
or a local store so don't panic about how you're gonna get them. It's easy!
Here's a little picture of some extra things you need to make your first slide.
There's one more thing, not shown here, that I'll explain to you in a moment... but first of all,
let me talk you through these items. Most of them are easy to obtain from around the house
or a local store so don't panic about how you're gonna get them. It's easy!
WATER
This is not ordinary water! It is De-ionised water - the type used in car batteries and electric
steam irons. You can normally buy it cheaply at a garage or a motor shop or from a super-store.
It is perfectly safe in every respect and differs only from normal water by the fact that it is
very pure and clear. We're gonna use it to help make a really safe mounting solution. I hope you
recall from page1 that this is used to support and hold the specimen in an air-free condition
on the glass slide.
GLASS BITS
Not so safe! I got my glass bits by breaking up a cover slip into smaller
pieces. These will be used to hold the cover slip in position just above
the specimen, effectively acting as 'spacers' between the glass slide and
the cover slip. I'll show you as we progress how you can use something safer than
bits of glass to do this.
A SMALL GLASS JAR
The jar is very small. We'll use it to make-up and hold the mounting solution we
are gonna make. When we make the solution, we will make enough to make loads of slides
and since we won't use it all at once, we need a place to keep it.
![]() You could wash out one of those small jars used to hold fish or meat paste. If
you don't have one, what about one of those tiny jars you can buy jam in - you know -
they look like samples rather than jam jars. Take a look in the larder or fridge and
see if you can find a small container you can adapt. You must wash it out properly and make
sure it has an air-tight cap or lid.
You could wash out one of those small jars used to hold fish or meat paste. If
you don't have one, what about one of those tiny jars you can buy jam in - you know -
they look like samples rather than jam jars. Take a look in the larder or fridge and
see if you can find a small container you can adapt. You must wash it out properly and make
sure it has an air-tight cap or lid.
A SPECIMEN
What are you going to mount? I managed to find a flea on my dog and popped it in a jar
while I thought about how I would kill him without hurting him.
this is exactly how I found him (her?).
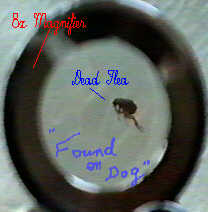 By luck, he just went
naturally... honestly! I opened the little container the day after I put him in it, and
he was just laying there dead. I know you don't believe me so let me show you the evidence.
By luck, he just went
naturally... honestly! I opened the little container the day after I put him in it, and
he was just laying there dead. I know you don't believe me so let me show you the evidence.
![]() Some of you may not wish to kill little
animals, so why not choose something else like some pollen from a flower, hairs from a nettle,
or something else. The smaller the specimen, the easier it will be to make your slide.
I'll show you how I mounted pollen and some plant hairs too as part of this lesson so
you can see how easy it is.
Some of you may not wish to kill little
animals, so why not choose something else like some pollen from a flower, hairs from a nettle,
or something else. The smaller the specimen, the easier it will be to make your slide.
I'll show you how I mounted pollen and some plant hairs too as part of this lesson so
you can see how easy it is.
![]() FRUCTOSE SUGAR
FRUCTOSE SUGAR
Our first shared secret: Fructose! This is a type of sugar found naturally in foods like fruit.
Natural Health food shops sell it by the box quite cheaply as an altenative to cane sugar.
It is useful to us microscopists because it provides a clear sticky liquid, when mixed with
the right quantity of water, which by complete coincidence is ideally suited as a mounting
medium for a lot of microscopic specimens. It is safe, not toxic, and cheap! It will not
enable you to make a slide that will last for ever, but it will allow you to make one which will
last at least a year and maybe much longer (a few years) with little deterioration.
SOME THINGS NOT SHOWN
If you do not wish to use a broken cover slip as a spacer, there is a better way if your specimen
is nice and small and flat. You need to purchase some
Once you know what you need from this page, let's move on and get started on
making our Fructose Mounting Solution
There are a few items not shown in the picture. The first is a bottle of nail varnish, the type used
by women to paint there nails. You can borrow some from your mum, girlfriend, wife etc., if you
don't normally use the stuff yourself. I went out and bought some CLEAR nail varnish rather than
be stuck with a coloured one. Yuu will use this to seal the edge of the cover slip to the glass
slide.
![]() You will need a small artists type
You will need a small artists type
![]() One more thing which you don't absolutely need (but it helps to make a nice job) is a small tin of
One more thing which you don't absolutely need (but it helps to make a nice job) is a small tin of