|
Searching for the
Best Petrographic Microscope: The Olympus BH-2 BHSP
J. Gregory McHone, Canada |
Introduction
The decade of the 1960s surely fits the ancient Chinese curse of "May you live in interesting times." It was also my time to start a major in geology as an undergraduate student at the University of Vermont. At last, school work became something really interesting! My class was fortunate to have a talented graduate student as an instructor, who not only was patient with us but knew and appreciated hard-rock petrology and microscopy. Our introduction to the geological microscope was during a second year course called Optical Mineralogy and Petrography. A big part of geology (some of us would say the most important part) is the examination of minerals in rocks, which quite literally comprise the Earth. For this, you need a petrographic polarizing microscope.
This article relates my personal connection with such microscopes in geology, which I now look upon as humankind's greatest expression of art and science. OK, maybe that goes too far -- but I admit to being somewhat obsessed with them, especially the wonderful Olympus BH-2 BHSP. My path to obtaining this microscope will be described herein, as well as some others I had along the way, and various parts too. I have used it to illustrate my website about geological microscopes. Some other pol scopes I have used and like are described in an earlier Micscape article.
School Scopes
The first task in optical mineralogy is learning to quickly identify the common "rock forming" minerals, using various optical accessories unique to polarized light microscopy. With further practice, a mineral of a solid solution series might even have its chemistry determined by its optics. We had already put a lot of effort into identifying minerals in hand samples during the previous semester. Using both microscopy and macroscopy, observations of mineral types, structures, textures, and their sequence of formation will identify the rock and also tell quite a lot about its history. Rock history is earth history! Both stereo and compound microscopes are prime tools to use after field observations, with close up study of the rock samples you have collected and cut into thin sections for petrographic work. Our instructor explained the various functions of the geological microscope as we practiced with thin sections of rocks, with samples in front of us. We were aided by fine classic textbooks that I still have and use, and there are now several good websites about optical mineralogy.
Our teaching lab was equipped with some Zeiss Standard petrographic microscopes, which for a long time were among the best available for teaching as well as regular benchtop use (see my earlier article on student petrographic microscopes). However, there were not enough of them (no doubt due to cost), and I was assigned an older Vickers M14. This English brand of student scope was well made and perfectly useable, but without the superior status we attributed to Zeiss. As usual, "student" meant monocular, which is unfortunate because for most people, binocular viewing is so much better that I believe it would encourage more students to appreciate and understand science.

The Vickers M14/2, a common student teaching microscope of the 1970s.
The Vickers, of course, had all the requisite accessories of a polarizing petrographic microscope: polarizing filter beneath the condenser, rotating circular stage, centering mechanism for the stage (or for objectives in this example), in/out analyzer (2nd pol filter) above the objectives, in/out Bertrand lens (a small lens to focus on the back lens of the objective), and an eyepiece with a cross hair reticle (or graticule). All optical parts were made or chosen for their absence of any extra polarization that can be caused by strained glass or internal reflections. Like some other models marketed around my college years, the M14 was an older design that was already surpassed by Zeiss and Leitz, including its horse-shoe foot stand, difficult centering and optical adjustments, narrow view optics, and minimal illumination. But it worked, and after many evenings in the petrology lab I became comfortable with it. And ever since, petrography has been a critical tool in my research interests.
Upon finishing graduate school in 1978, I was hired as project geologist for a small consulting company that had a government contract under NURE (National Uranium Resource Evaluation). My boss believed that hand specimens were sufficient and micro-petrography would just confuse us, but I wanted to see how uranium minerals were correlated with metamorphic mineral fabrics and structures, When a Vickers M14/2 came up in a college equipment auction near where I was working, I bid and bought it for $300 USD, which was well below its real value then and now. Unlike many college lab instruments, this one looked nearly new, not beat up or abused like so many. It took some time to re-acquaint myself with its functions and many possible adjustments (especially aligning the light path with the condenser, stage, and Bertrand lens), but then the instrument became a real workhorse with its solid construction and decent optics. Happy was I to have it, even though my boss still didn't like my micro-observations.
After two years of that very interesting work, I accepted an assistant professorship at a mid-western university, with responsibilities for teaching optical mineralogy (among many difficult tasks assigned to junior faculty members). With access to modern research and teaching microscopes, my Vickers had less and less use. The next position in 1985 at an even larger university included "my" new academic microscope, which was a Zeiss Standard WL set up for benchtop research, with wide-view oculars in a trinocular head, an automated film camera, and a fine intermediate tube with rotating analyzer. In addition, I had permission to use the chairman's Leitz Orthoplan Pol, a large and awe-inspiring machine with a super-wide (FN 26) view that almost made me dizzy.

Not the Zeiss Standard WL Pol I had as a faculty member, but similar to it.
A few years later I joined the enemy to become a science program administrator, and to my regret they soon told me that I was not being paid to actually do science. But with my trusty Vickers at home, at least I could putter along on my own time. Finally, after too many years of wrangling with the endless, mindless, problems of people and paper pushing, I gave it up to work for myself on things geologic, as well as adjunct teaching. This also allowed time to construct a studio shop and lab at home, and delve more deeply into things microscopic. And before long, it was clear that I deserved (needed? wanted?) a really good research-quality petrographic microscope. But, how to do that on a small and tight budget?
Build it Yourself
Years of research and teaching in geology programs gave me a fair amount of experience with using and maintaining microscopes. I also knew that new ones were expensive: when the university obtained my "starter" Zeiss in 1985, it cost more than a new car we bought the next year. But by 2000, similar and also older major brands of microscopes were appearing on an expanding used microscope market, especially on eBay. Many were incomplete or disabled microscopes, along with an amazing variety of parts and pieces, often at very attractive prices. I remembered the great deal for my Vickers at the college auction. Maybe this could be the path: sell my good old Vickers on eBay, and use the money to build up something bigger and better, starting with a decent used stand, and adding parts as I could find and afford them. A Standard Pol by Zeiss was a possibility, but perhaps something else would come along that was more "modern."
Olympus was not a brand I had used in geology programs, and there was still some relict bias against such "pac rim" (what an ugly phrase) microscopes from the days when we believed Zeiss and Leitz (and Wild) were far superior -- and who wants inferior? But at the university where I was teaching as an adjunct professor, several faculty members had Olympus BH-2 polarizing microscopes, which (I learned) first appeared in 1980, with production continuing well into the 1990s. They were really, really, nice. I wanted one, but how could I possibly afford it? The BH-2 line was developed from Olympus BH models that started back in 1974, and which were similar in size, function, and even some parts to the BH-2. These are true modular microscopes, so that by swapping out a few parts, you can convert a basic stand to various uses such as dark field, phase contrast, fluorescence, metallurgy, and polarizing microscopy. It seemed like this earlier model should be about as nice yet more affordable than the newer BH-2. And it looked more modern than a Zeiss Standard.
So, by using my Vickers sale money, I would shop for an incomplete Olympus BH microscope stand and the parts I need on eBay, being as frugal as possible, and then assemble them into a fine research-quality petrographic microscope. Any parts left over could be cleaned up and re-sold on eBay. With care, work, and luck, I hoped and expected to not spend much, yet end up with the microscope I wanted, and also have a lot of fun! The project got underway in 2003.
My BHA "Pol" Scope
The first task went very well. I carefully photographed and described my Vickers, complete with accessories and wooden case, and put it up on eBay. The final sale price was more than I expected, well above twice what I paid many years earlier. Money in the bank! But step 2 was going slowly. I knew polarizing microscopes and parts were much less abundant than biological types, but I did not appreciate the extreme rarity of BH polarizing models. The BH came in A, B, and C versions, but all of the ones I found were purely biological (later I learned only the BHA was available in a polarizing petrographic version, called the BHAP). Eventually I did find and buy a nice looking BH (version A) stand, and over a few months I added useful matching parts such as trinocular head and an automated camera; film being still common at the time. The BHA also had nice features such as a quick-removable nose turret, a bright 30 watt lighting system, and adjustable parts to achieve true Koehler illumination. Some pieces are not too critical for me: regular achromat objectives usually work about as well as the rare and expensive pol (strain-free) versions, for example. The standard Olympus BH monocular/binocular/trinocular heads and eyepieces are also used on their polarizing model, so I assume they are all made to be free of strain (unlike most other brands of that generation). I also found a nifty reflecting light tube, which was powered by the same internal transformer as the transmitted light, with a switch in the back to toggle between them. It was all very nice in function and quality, although I was not too happy with the hammered metallic finish that Olympus called "warm gray" -- it looked more like left over WWII battleship paint to me.
Because so many buyers only want a specific part, incomplete microscopes or collections with a piece I was looking for often received fewer bids. So there were many extra parts and pieces from the collections that I bought, which I re-sold on eBay. Because I had cleaned them up, described them well, and provided good photos, most actually brought pretty good prices. I soon expanded into rebuilding other microscopes, which were interesting to assemble and restore to good operation, and very educational. Then I sold them in my new eBay store, putting the money toward the next project. This became a major hobby that expanded and continues today, along with my real work of geological and other professional activities. However, my project to build a new research microscope was going astray, and not because of quality issues with the Olympus BH. You may recall the September 2005 Micscape article by Robert Pavlis about renovating his BHA. I was lucky to have fewer problems than he faced, but after fixing up a few other eBay microscopes, I can sympathize! After a few months of collecting and assembling parts as they became available (including more recent versions of objectives and oculars), my "new" Olympus BH looked and worked like a fine biological and metallurgical instrument. But with the lack of appropriate parts it was still far from petrographic, which is what I was struggling toward.

The Olympus BHA with reflecting light and camera attachments.
My attempts to adapt non-Olympus parts such as a circular stage failed miserably. Different makers use quite different sizes and attachments for these pieces, and it is not just a matter of tapping a few new bolt holes. Other parts I needed, such as an intermediate tube with analyzer and Bertrand lens, were also nowhere to be found. The microscope worked very well for normal bright field observations, and it was also good for examining uncovered rock slides with reflecting light, using a couple of "M" type objectives, but it was far from the petrographic microscope system I wanted The best I could do for it was to add a couple of Olympus polarizing filters, made to fit over the field lens and under the head (the same ones fit both the BH and BH-2):
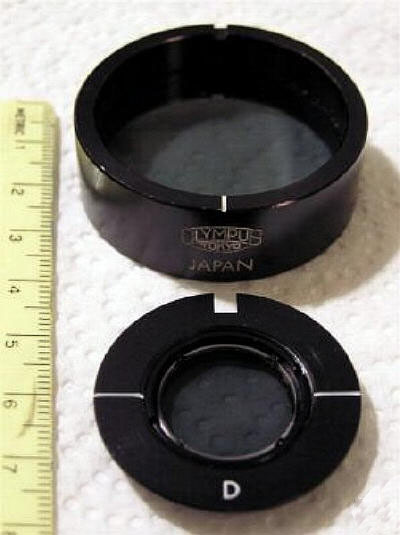
Olympus BH simple polarizing filters
Notice how the polarizing directions are marked -- they need to be perpendicular to one another as well as E-W and N-S, so that complete extinction of light can be achieved, and when a compensating wave plate is inserted at 45 degrees it will properly add or subtract part of the light spectrum. Such pol filter accessories are fairly common among biological or "bright field" microscopes, and almost any stand can become "simple polarizing" this way. They work very well, producing strong interference colors in my thin sections, and useful contrast effects for biological slides.
I decided to sell this fine BH microscope and keep searching for a model that could have the correct geological polarizing parts and accessories, either with it or available on eBay. I had learned a lot, but the project was becoming more expensive than initially planned. Because of my cost of buying all those parts and pieces, I had a somewhat high starting price for this BH, and no one wanted it. Finally I took it apart and sold it piece by piece, ending up with a lot more than I had asked for the complete system. Old microscope parts are worth more than old microscopes, but I would much rather build up than tear down.
My BH-2 BHTP Polarizing Microscope
If you watch patiently, you can find interesting and valuable things on eBay that don't stay available for long. The number of items for sale with the word "microscope" in the title has increased tremendously in the past 10 years, reaching almost 10,000 items in August of 2009 just for the USA site (apparently at the height of the economic recession). By the way, it is also worthwhile to search for items on eBay websites of other countries, but many sellers will not ship out of their country. A few months after I started the project, I noticed a "buy it now" Olympus BH-2 BHTP polarizing microscope soon after it was listed for $1050. It was a lot of money but still a low price for a fairly complete model, and the important parts were visible in the muddy photo. The seller seemed to know little about it, so I emailed him first to ask the usual questions about objective identifications, scratches, stiff movements, etc. I don't recall that he reassured me too much, but I took the plunge and bought it. By now I was far beyond my Vickers sale money, naturally.
When it arrived a few weeks later, I was happy to find most of it in good shape, although dirty and in need of lubrication. One of the pins that hold the head on the intermediate tube was broken, apparently in shipment and because of poor packing (he did not remove the head for shipping). I was able to fasten a new pin with epoxy that worked well enough, although it was probably fragile. Cleaning and adjustments took some time, but then what a pleasure it became to use this microscope, with wonderful viewing and smooth operation. I added accessories for it from eBay and a few dealer websites. One of the best (but pricey) pieces was a trinocular head, Olympus part BH2-TR30, which is the same for pol and non-pol versions. More parts included a McCrone dispersion staining objective, other powers of eyepieces, a snap-on filter carousel, compensating wave plates, a quartz wedge, and a digital camera (Nikon CP 990) with adapter.
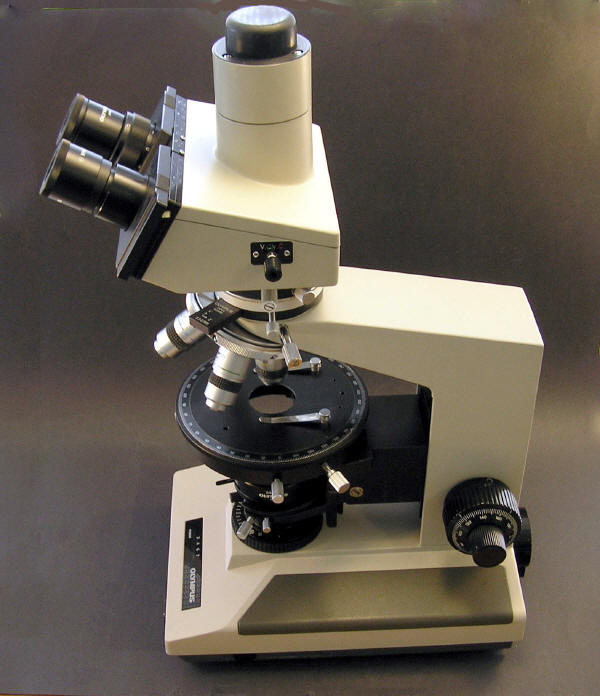
The BH-2 BHTP with trinocular head, a nice looking machine!
The intermediate pol tube BH2-PA has a graduated rotating analyzer (upper polarizing filter) with locking screw, a slot for a 6x20 mm wave plate, and a Bertrand lens that rotates in and out, with its own focusing dial. This piece by itself can fetch more than $400 on eBay -- no wonder my initial quest was doomed! Typical objectives for petrographic work are DPlan PO 4x, 10x, 20x, and 40x. A 100x PO objective sits unused in my accessories box on a spare centering turret, which also holds a 2x SPlan objective and the McCrone DSO. Olympus also made non-planar achromats in pol versions. These are part of the "long barrel" or 45 mm focal length objective lines developed with the new BH-2, and also used on research AH-2 and student CH-2 models. There was also a CH-2 CHTP or polarizing version, which must be extremely rare as I have not seen one after years of watching. I have used regular DPlans in polarized light and cannot see any difference from strain, although their price is about half of the ones designated PO. SPlans work fine too, but not the higher-end Apo objectives, which have too many layers that can cause unwanted polarizing effects.
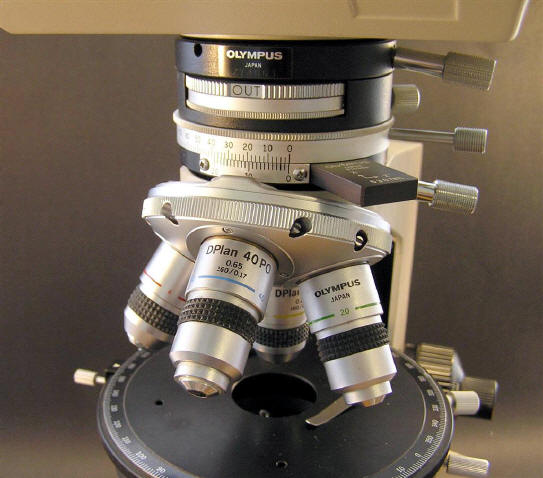
BHTP intermediate tube, centerable nose turret, and stage, with DPlan PO objectives
This one had the circular stage BH2-SRG with permanently attached centering bolts, and it clips onto the same round stage holding frame used for several biological stages (the BHT stage and nose turret are easy to remove for different uses). Olympus also made a larger circular stage BH2-SRP, which is one piece with its stage holder frame and includes a lever-controlled clicker for every 45 degrees of rotation. However, it requires two removable centering wrenches, which are easy to lose and hard to replace. They are the same wrenches for centering the objectives, but two small screwdrivers can be also used if the wrenches disappear. Once set, the stage and objectives tend to stay centered pretty well.
The BHTP was a home run hit, and I used it a lot with my large and growing collection of petrographic thin sections. The WHK eyepieces provide a nice wide FN20 view, the DPlan objectives and achromat pol condenser are reasonably sharp and bright, and the machine is large enough to allow my hands room to move things. It is all very well made and functions smoothly. In addition to decent optics, you must have good mechanics, materials, design, and reliability to have a good microscope. That is what defines quality.
About the only shortcoming of the BHTP is its lighting system, which has a 20 watt halogen bulb in a plastic lamp holder plugged into the back of the base. The older BHA system was actually better with its 30 watt filament lamp; 20 watts is enough for normal viewing, but when you switch to a high power and flip in the Bertrand lens for a conoscopic view of the interference figure on the back of the objective, it can be a little dim. It is also not very bright for the rare use of the 100x oil objective. It helps to keep the mirrors and glass along the light path very clean, but Olympus should have made it 30 watts (perhaps that is too hot?).
After several more years of happy polarized light microscopy, I saw a bare BHS stand for sale on eBay. Looking closely at the photo, the model code on the inside of the frame showed BHSP. From the literature I knew the BHSP was the polarizing version (the BHT stand has no special designation). Moreover, the stand included a working lamp house, which is hard to find and expensive when you find one. The BHS version of the BH-2 is similar to the BHT stand I already had, except it has a wider base (more stability is claimed) and a large metal 100 watt lamp house, still powered by a transformer inside the base. Here was the solution to the minimal lighting I had with the BHTP. Got it.
My Almost-Final BH-2 BHSP Polarizing Microscope
I transferred all the parts and pieces from my BHTP to the new BHSP stand. The only difference I can see between a BHS and BHSP is a metal sticker near the field lens, showing polarizing filter orientations. But the powerful lighting is more than needed for any technique, which is very nice. It does require a bench or desktop that is deep enough for the stand plus large lamp house.
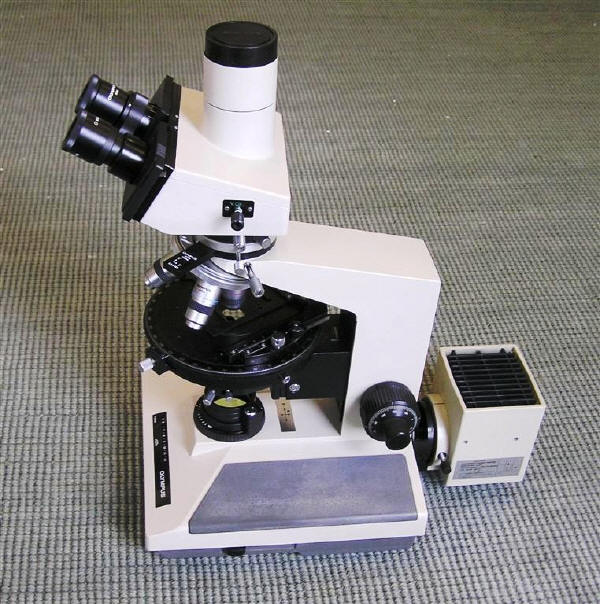
The BHSP fit and ready for duty
On another partial stand I found the larger BH2-SRP circular stage, which I installed on my BHSP. I like its smooth ball-bearing movement, although the lever to make it click every 45 degrees does not release properly. Before long I bought a mechanical stage for it on eBay, a considerable investment, but I like to move thin section slides this way. The accessory is made to fit the curve of the circular stage, and it has low knobs to avoid the objectives when the turret is turned (but they can hit it anyway if I am not careful). Some petrologists find it easier to move thin section slides around by hand. This one can hold glass slides of several different sizes (petrographic slides are usually short), and it is a thing of beauty.
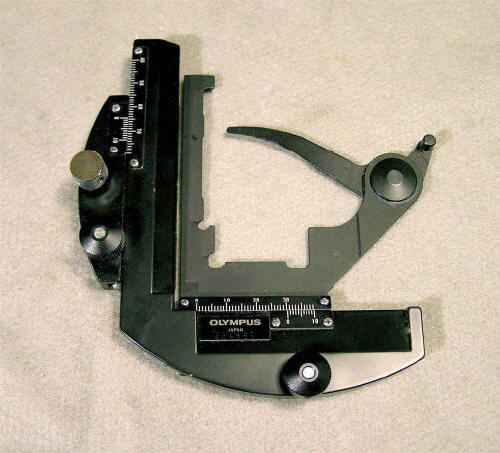
Olympus mechanical stage A-FMP.
A year ago I obtained a super-wide trinocular head, part BH2-SW, which looks like the normal TR30 head but takes 30 mm diameter eyepieces (SWHK10x), so that a field number of 26.5 can be achieved. My eyepieces for it had frozen diopter threads, and unlike the normal heads, this one has no diopters built into the eyepiece tubes, so the oculars had to be disassembled, cleaned, and relubricated. It was also necessary to replace a photo reticle with a crosshair type. That process was described in this Micscape article. Rubber eye guards were added from extras made for my stereo microscope, which are nice because I often take off my glasses to use the microscope. At last, I have a view like the Leitz Orthoplan from many years earlier, but on a much newer microscope design with parts that can actually be found.
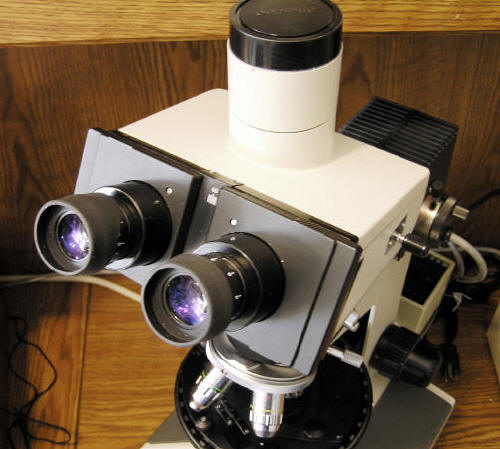
Super wide field trinocular head and oculars.
Transmitted light observations are by far the most common for me, but they do little to help with opaque minerals (called accessory minerals in most rocks). These are usually oxides or sulfides, which sometimes show characteristic crystal outlines, but better clues are color and birefringence. For those you need reflected (incident) light, and I recalled that nice accessory tube from my BHA years earlier. I already had a similar tube made for the BH-2, but without a proper light source or transformer, or special metallurgical objectives such as the MSPlan and MDPlan lines. These appeared to be designed for infinity tube length optical systems, while the BH-2 transmitted optics are all for the 160 mm length. Also, the metallurgical objectives have no cover slip correction, although my slide collection does include a number of uncovered thin sections and polished chips. Olympus had a BHM model for reflected light work, with a solid stage. I assumed that the two systems could not mix well, and that I would need a separate stand dedicated to reflected light observations. That's do-able, but it would mean a lot of bench space and system parts for a seldom-used extra microscope.
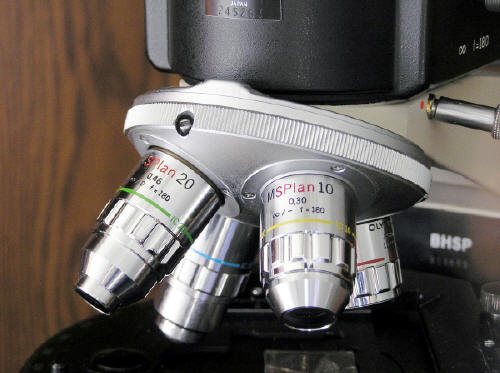
MSPlan objectives, infinity or 180 mm
My Final Final (for now) BH-2 BHSP
But then I obtained a catalog of BH-2 polarizing microscopes and parts, and the same reflecting light parts are listed as accessories for the BHSP transmitted light microscope, so they went back into consideration. Eventually I bought MSPlan and MDPlan objectives (they mix well) and put a 5x, 10x, 20x, and 50x onto a spare centerable nose turret, ready to swap with my PO objective set. My original 6 volt 20 watt halogen lamp for the reflecting light tube did not cut the mustard in regard to brightness, but eventually I found a 12 volt 50 watt lamp house and type TGH transformer to power it. The tube has a slider plate for bright field work, and slots for a polarizing filter, while the analyzer and Bertrand lens remain in their tube above it. This all makes a tall microscope! Somewhat to my surprise, the MSPlan objectives work very well for transmitted as well as reflected light, so long as the condenser and diaphragms are properly adjusted. No parfocal or strain problems are evident (although I am not too picky about it). On the other hand, the DPlan PO objectives do not focus properly, presumably from the extra length with the reflecting light tube. So, now the metallurgical objectives stay in place full time, although I still wonder what compromises exist. Perhaps another camera upgrade will occur (it sure is hard to keep up with that digital technology), but with more years of fine service promised, this BHSP is everything I could and did want, and I am very fortunate to have it.
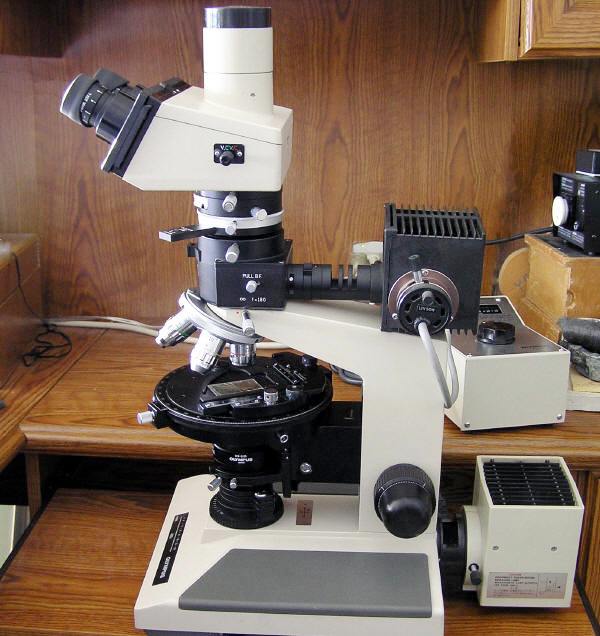
The BHSP complete with transmitted and reflecting light capabilities.
Last Comments
After seven years of buying and selling parts to get this far, I don't really know my total cost for this magnificent microscope. It certainly would be difficult to come up with enough money for a single purchase of the system as it is now; possibly $8,000 USD or even more from a dealer. But it was a huge amount of fun along the way, and that's worth something too, not to mention learning so much. Everyone needs a hobby, although we microscopists might have trouble explaining to more normal friends and family why this one is so compelling.
Comments and other opinions are always welcome: contact the author Also see my website http://earth2geologists.net/
Microscopy UK Front
Page
Micscape
Magazine
Article
Library
© Microscopy UK or their contributors.
Published in the February 2010 edition of Micscape Magazine.
Please report any Web problems or offer general comments to the Micscape Editor .
Micscape is the on-line monthly magazine of the Microscopy UK website at Microscopy-UK .
© Onview.net Ltd, Microscopy-UK, and all contributors 1995 onwards. All rights reserved. Main site is at www.microscopy-uk.org.uk with full mirror at www.microscopy-uk.net .