 |
TECHNICAL TIPS ON THE USE OF THE PRECISE DOUBLE
RAZOR BLADES
SLICER
|
|
|
| |
TECHNICAL TIPS ON THE USE OF THE PRECISE DOUBLE
RAZOR BLADES
SLICER
|
|
|
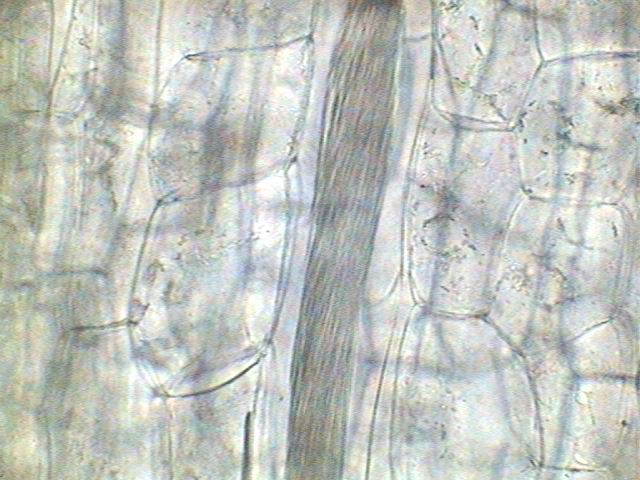
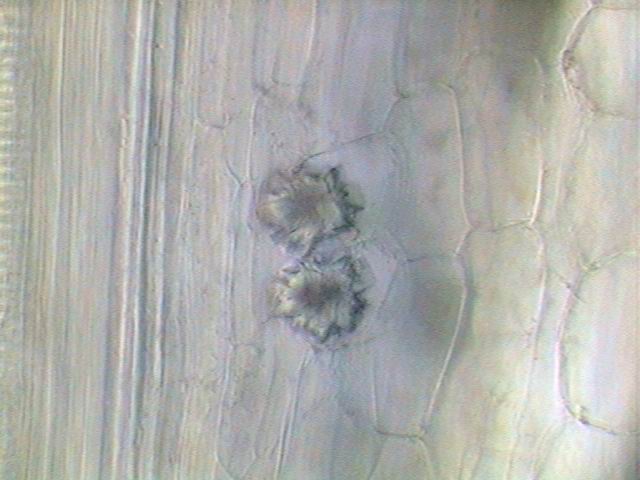
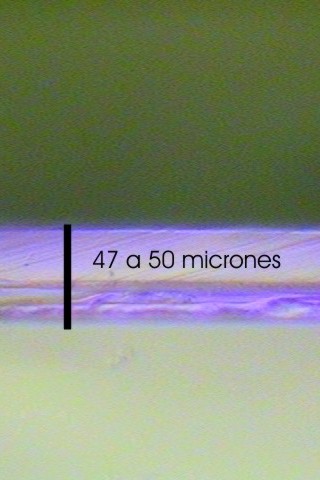
On
the nature of the separators.- I have tried four kinds of separators. The
self-adhesive
paper labels, one
black plastic electrical insulation tape, one brand of clear adhesive
so-called
“Scotch” tape and the razor blade itself. To determine their thickness
I stick
a sample of the tapes to the edge of a glass slide, and cut it level
with a
razor blade. I take pictures with the 10 x and 40 x objectives using
the COL-D3
contrast disc that gives a very good optical separation of the
components, and
I measure the thickness with the calibrated measuring tool of the
camera
program. The razor blade was broken into two halves and one half was shaped as a V
that can be put
upright over a
glass slide to offer the sharp edge to the objectives. The
results are confusing, not about the materials but about the
thickness of
the cut materials.
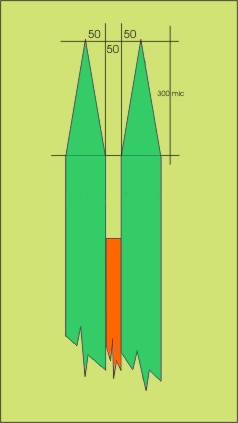
I make one more measurement: the width of the cutting edge (not its thickness). It turned out to be 300 microns wide. So the sharp edge is an isosceles triangle with a base of 100 microns, and a height of 300 microns. The edge is at 50 microns from each side of the blade. But only
rarely have plant sections been under 100 microns, and normally they
are
of 125 to
150 microns. I think this is
the
result of the sharp edges being V-shaped. Thus the edge is in the
center
of the
100 microns blade (50 microns away from any face). If you put in a
separator of
50 microns the gap between the sharp edges (not the blades) are
50+50+50 =
150 mic. Theoretically this is the thinnest section you can cut if the
blades
are parallel (and were not flexible, thus allowing thinner or thicker
sections). Do not
think of putting the blades together without a separator. Most sections
are not
hard enough to separate the blades. I tried
several methods to make the internal sides of the sharp edges more or
less
parallel and closer, but not one of them was successful. The most
easily cut and thinnest sections were obtained using half a razor blade
as a
separator. And this turned out to be also the easiest way to build the
slicer. But
some materials, and especially the longitudinal sections of stems, cut
better if
the separator is the adhesive tape. So as
stated in the first part of this article, now I currently use two
versions
of the
slicer. The
best razor blades. These are
the
most rigid ones. Try several
trade marks if you can. Flexible blades can be separated by the
incoming
section. This ends in a wedge profile. To study the anatomy of a plant
this is
not important. But it is for photographic recording. Anyway,
even with
flexible blades and by making 3 or 4 attempts with different pressures
and
speeds, should give you a useful section. Appropriate
materials. Highly lignified
materials need to be
sliced very slowly and with a firm pressure. You may experience great
difficulties trying to make sections of Gramineae stems that are very
hard. Very
soft materials tend to collapse if the blades are too close. The best
materials are the medium lignified ones. Generally the thinnest section is the best.
But
after several attempts you should be convinced that a medium thick
section
is
perfect for many tasks. If it is cylindrical (not wedged) the surface
can be
studied at high powers successfully. And it allows a good use of the
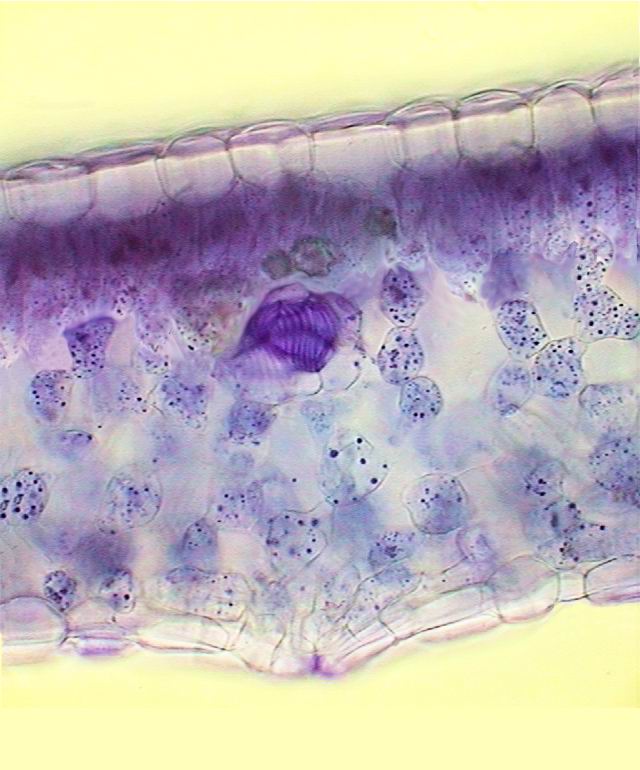
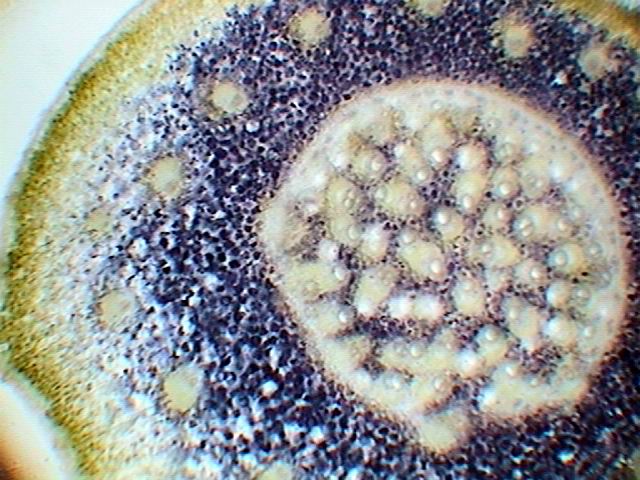
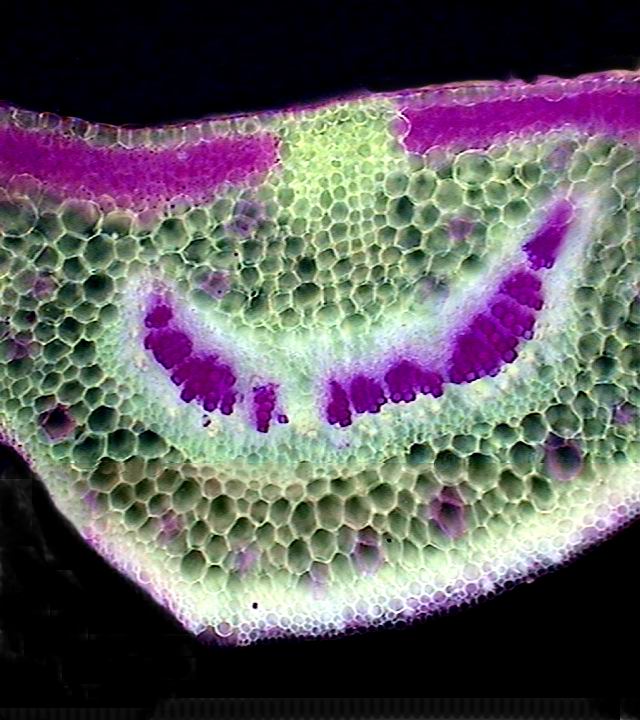
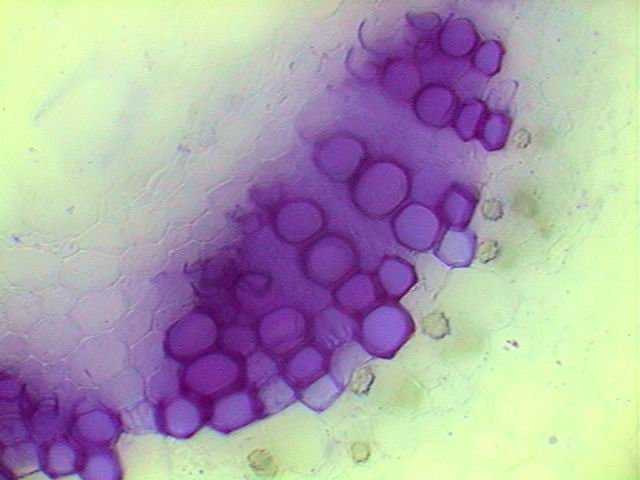
I have found that a very common and easy to buy
dye is gentian violet, a former disinfectant for the babies “mugget”,
and other
infections. Here it is sold as a one percent solution in water. It is
very
stable; 20 ml is a provision for all your life, because it is used at a
drop
for every 10 or more milliliters of water. This working solution, which
also keeps
very well, stains the schlerenchyma and fibers a dark violet, the xylem
a
more deep color with a red tinge, and the cambium, phloem and the
collenchymas a slight purple. The cuticle of the epidermis is also deep
colored. As
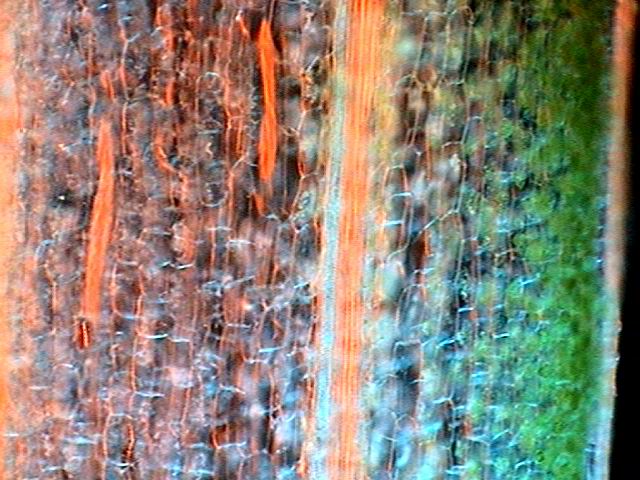
discussed later, also methylene blue can be resorted to. Contrast Discs.- If you cannot get gentian violet
(also known as crystal violet) you do not need to renounce
technicolor. Your
best choice is to take recourse of the contrast discs. The
“dispersion staining”
that Ted Clarke has
appropriately described for DF contrast disks at
high
powers, is a common characteristic well known to amateurs working at 4
or 10x. The behavior of the contrast discs is so
dependent on the thickness and the nature of the materials that you
must play
around with your own discs to try the best effect. I have more than 30
different
ones. I never know which of these will do the best job with a
particular
section. But the darkfield stops, some Rheinberg filters and some
modifications of the Nomarski simulation filters proposed by Wim van
Egmond
give outstanding images. The
The original van Egmond filters are black discs,
with a marginal transparent crescent and a circular blue or purple
center. They
are a combination of darkfield with Rheinberg and oblique lighting and
give
its best results with discrete objects like fibers, spicules, sand and
the
like, especially if they are of high refractive indexes. I replace the black backgrounds for colored
ones (deep blues and deep reds for example) and make the centers of a
diameter
similar to the darkfield disk for the objective in use, in a
contrasting
color.
I leave the transparent crescent unchanged. Its best performance is
with
relatively thick sections. These contrast discs (darkfield, Rheinberg
and Nomarski simulators) allow the optical differentiation of the
different
tissues, in medium thin sections, simulating stained sections. They are
really
very useful (for the 4x and the 10x and with limitations up to the 40x
objectives) to give variety and gaiety to the photographed sections.
Resolution
suffers a little with the 40x. A word of
warning: the colors most useful for the visual rendering of
sections are
aggressive for the sensor of my photographic camera and gives a very
bad
rendition when compared with the visual image. But they behave very
well in
direct
view. My Col-D3 with a yellow background gives strange results. I see
the image
in yellow nuances, but the camera records them as many different blue
tints. So
be prepared, in case your camera behaves in the same way. Judging by
published
comments most cameras, including the high priced ones, share this
problem. Anyway the difference between a brilliantly
colored section and a gray and more opaque one is really outstanding.
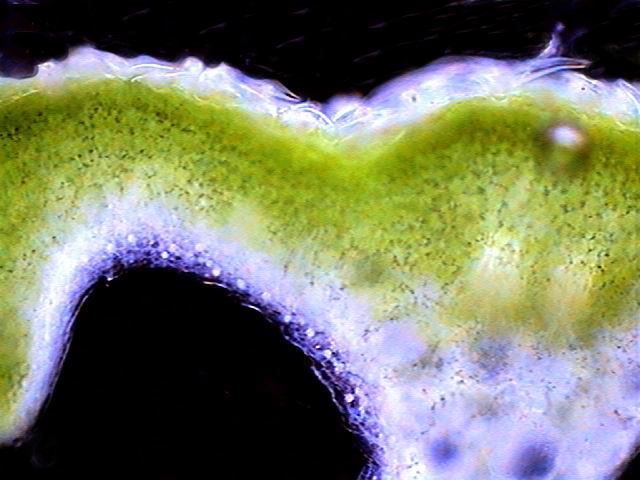
Uncolored sections.- If you mount your
just made sections without
any subsequent treatment in glycerin or PVA-G you can make a profound
and
informative study of the anatomy of an almost living material. Glycerin
and
PVA-G act as preservatives and even the chlorophyll lasts for many days
unchanged.
All vegetable tissues are easily recognizable by their morphological
traits, and the arrangements of the studied organs are very
characteristic. You
can
discover the idioblasts with its secreted crystals, see even the
nucleus of
many cells, and the plastids containing oils and starch. If you
add to the
glycerin a trace of iodine, the
starch will be colored blue and you can easily discover the areas of starch
production. All this is lost if you void the cells of its contents with
hypochlorite. Note: don’t try to add iodine to sections made from
materials recently
exposed to high levels of sunlight; you risk having a mostly blue
and illegible
specimen.
Try materials exposed to low sun intensities. Microwave ovens use. - Mounting in glycerol, or even in PVA-G can exert on the living cells an excessive osmotic pressure. Delicate materials, like algae, tender hairs, epithelium cells, fungal hyphae and fruiting bodies, and so on, can collapse. You can of course use some fixatives and dehydrating routines for a lengthier mounting in glycerin. But a useful rapid technique is to put the materials or sections, collected in a small Petri dish, or even the recently made slides, on the turntable of the microwave oven and apply a 12 to 20 seconds period of radiation at full power. This enhances the infiltration of the mounting media, evaporates water, gets rid of air bubbles, and the cells become turgid again. Experiment to find the best timing for your own oven. Mine is a 700W model. You can extrapolate suitable times for your oven wattage.
|
Please report any Web problems or offer general comments to the Micscape Editor.
Micscape is the on-line monthly
magazine of the Microscopy
UK web
site at Microscopy-UK
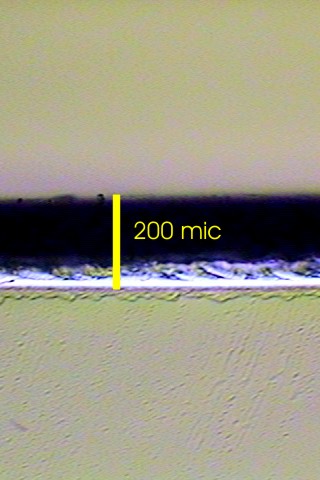
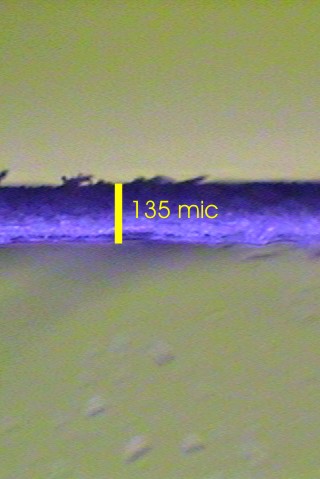
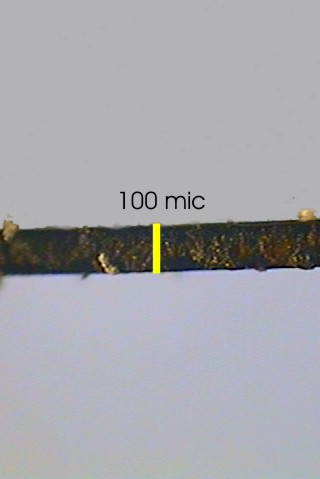
 The limits for the
thickness of the sections.-
The limits for the
thickness of the sections.- 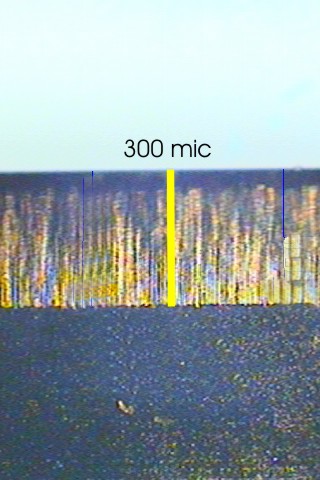 insulator tape is
roughly 200. And
the thickness of the razor blade itself turns out to be 100 microns.
insulator tape is
roughly 200. And
the thickness of the razor blade itself turns out to be 100 microns.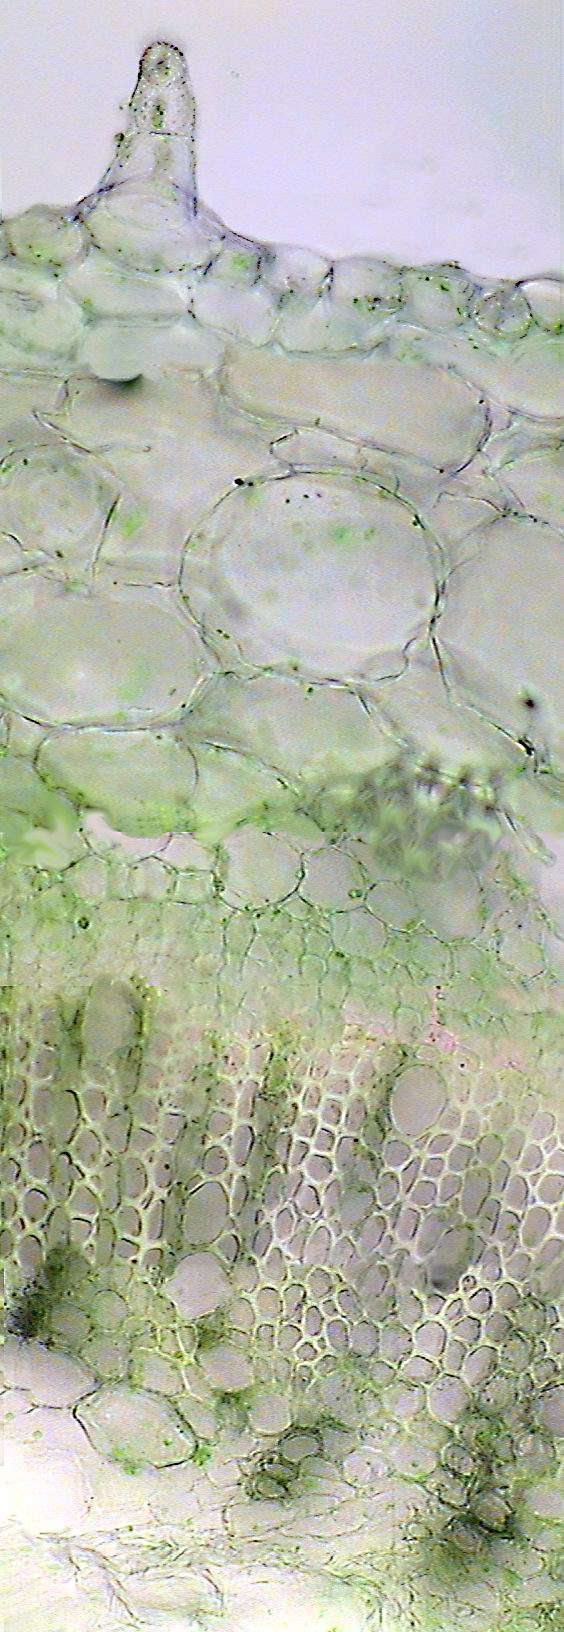 Preserving
materials.
Preserving
materials.