Notes on the trial repair of a microscope objective ca. 1860's.
by David Walker, UK
|
Notes on the trial repair of a microscope objective ca. 1860's. by David Walker, UK |
|
Attempting to repair a microscope objective is something I wouldn't normally contemplate. The lack of specialist knowledge, cleanroom conditions and tools for disassembly / assembly / alignment required for most objectives would make it unlikely that an enthusiast like myself could improve mattersif not make an objective irreversibly worse. That's assuming I could keep track of how the multiple elements were aligned before disassembly.
However,
a very sad specimen of a 19th century objective was found in a recent acquisition
which after careful inspection I decided was worth a hobbyist level trial repair.
If it had been of potential historical significance e.g. a famous name or had
unusual features I also would have left well alone. It was externally a
typical lacquered brass objective ca. 1860's with RMS thread in an unsigned
can labelled 1/4 inch for a ca. 10 inch tube length. The three other objectives
in the same set were in good usable condition but an inspection of the
optics of this one showed they were almost opaque and totally unusable. If it was just to be part of a 'brass and glass' display, its optical condition
wouldn't have mattered, but it's fun using old microscopes and their
optics (e.g. see my brother's April 2005 article).
1) Assessing the problemdid a repair look doable?: One useful feature of some old objectives, unlike most modern ones, is that their construction may allow them to be partly and safely disassembled by hand to inspect the optics without losing alignment or the elements falling out. With any luck the dirt may be limited to the internal element glass/air surfaces which can be carefully removed and the objective reassembled. This objective unscrewed / push fit to three units each of which held a doublet. Unfortunately, inspection of the outer elements of all three showed that the problem didn't lie on the external surfaces, presumably the doublet cement had crazed and/or decayed badly in eachor worse the glass had deteriorated.
However, this construction method looked promising for a repair attempt as at any one time just a doublet was being worked on thus permitting a greater chance of accurate realignment. Being of intermediate power the elements were also relatively large (ca. 4.25 mm in diameter) unlike the tiny front elements likely to be found in higher mags.
I came
to the conclusion that a repair was doable if the problem lay just in the cements
as there was nothing to losebut only if two criteria were kept
in mind during a repair trial i.e. that no further damage had to be
caused and that any reassembly could be reversed.
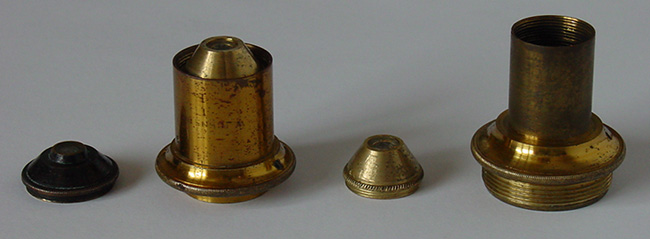
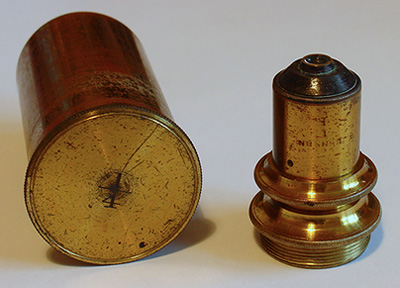
Disassembled
objective. Left to right, top element which screws onto second element in external
lacquered case.
Third element screws into case far right which is a push
fit into external case.
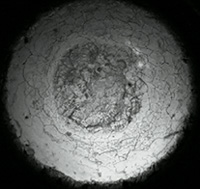
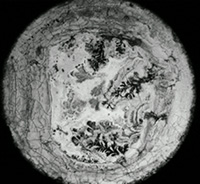
Left
to right, transmitted light view through each of the top, middle and rear doublets.
For the
assembled objective 'as is' barely anything was seentotally unusable!
2)
Removal of doublets from brass housings: The nature of the cements was
uncertain, so two of the three units that were of untreated brass
were immersed for a few days in each of isopropanol, acetone and toluene.
In this case it was the toluene that loosened the mounting cement to allow a
gentle push with a plastic rod to remove each doublet from its housing. One
doublet's housing was difficult to remove from the external lacquered case so
was left 'in situ' and required greater care to remove the glass
as didn't want to lose the lacquer finish. So the outer case was liberally
coated in Vaseline and solvent was dripped in from within the case and
allowed to leach through to allow the
solvent to act on the optic cements without attacking the case lacquer,
this was successful.

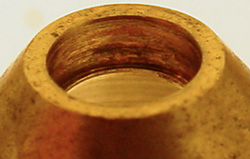
Left:
A doublet, to the eye all three appeared identical but were carefully kept apart
and in correct sequence.
Right: A ledge in each brass mount allowed positioning to be set accurately after cleaning.
3) Splitting and cleaning of doublets: Each of the three doublets and their housing was carefully kept together to avoid mixups. The removed doublets were each soaked in toluene for a few days when it could be seen that the cement had been softened to the extent that the elements slid apart without force. The bottom element of each was plano-concave, the second was bi-convex. Although each looked symmetrically bi-convex, a spot of ink insoluble in the solvents used was put on the external surface to ensure the right internal surface was mated to the plano-concave element after cleaning.
Gentle cleaning of the elements of each doublet in toluene removed all old cement and showed the glass elements to be bright and clear, so the faults did as hoped lay only in the cements.
4) Reassembly: Before undertaking a semi-permanent repair, I was keen to try a temporary reassembly to check alignment was possible and to assess the objective's performance. The original cement binding the elements of each doublet was likely to be of a Canada Balsam type of similar R.I. to the glass. But as an experiment I tried a tiny drop of objective immersion oil instead, just enough to spread to the element edges but not overflow. This held the small elements together well enough by surface tension to retain alignment.
To hold each 'oiled' doublet in its respective brass mount a tiny drop of clear nail varnish on a needle was smeared into each housing and the tiny ledge at base. The brass mount was then gently pushed onto each doublet and to a large extent was self aligning when the doublet butted onto the ledge. A final inspection with hand lens ensured the front element was flat in its forward mount. (Any slight interaction of nail varnish and oil at the optics edge was minor and unlikely to affect the objective of this vintage which had a significant internal stop.)
 5)
Inspection and in use: Inspecting the objective under a low power microscope
showed the objective now had usably clear optics.
5)
Inspection and in use: Inspecting the objective under a low power microscope
showed the objective now had usably clear optics.
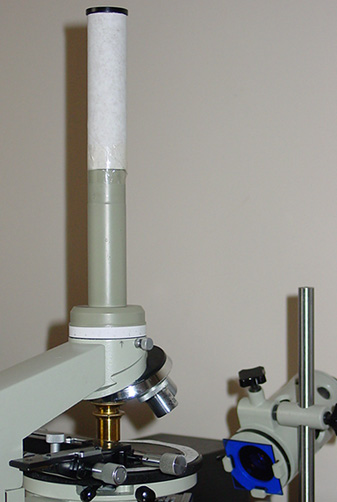
Although I did own an English microscope of the period to assess the objective, initially I wanted to assess it on a modern stand with good alignment and condenser substage. The LOMO Biolam shown right was used with the tube length adjusted to ca. 10 inches by the simple expedient of the cardboard roll from Tesco supermarket's aluminium foil. Its internal and external dimensions were a perfect match to the monocular tube!
Focussing tests suggested alignment was good and images showed no gross distortion, so seemed to have been a successful repair.
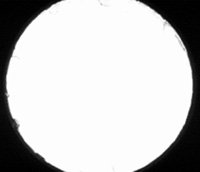
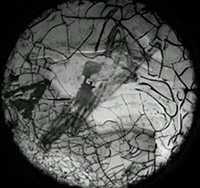
Above:
transmitted light view through rear of the reassembled six element objectivea
considerable improvement from the original!
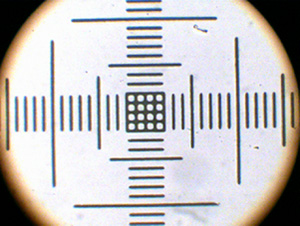
Below left: Motic 0.01 mm test slide, showing full field through Baker 5x eyepiece. Acceptably good image. The dirt is mainly in the eyepiece emphasised by the relay lens.
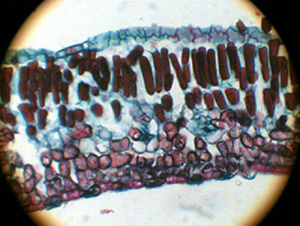
Below
right: T/S stained cashew leaf (Biosil slide), full Baker 5x eyepiece view.
It's a usable objective with good images for the vintage. Its mag from field
of view tests is ca. 40x as the ¼ inch focal length suggests. The ca. 2 mm working
distance is higher than a typical modern 40x NA0.65 which may reflect its fairly
low NA. This sort of lowish spec objective would often be used with a student
stand with just a diaphragm stop substage so would not have had its full
NA met.
As remarked earlier, the immersion oil 'cement' for the doublets was intended to temporary, but a month after fixing, the oil still seems to be intact with only minor pulling away from optics edges, so have left 'as is' for the present.
A cautionary note: In case this article is read as widely encouraging objective repair it's very much to the contrary! As Paul James emphasised in his July 2004 article, if an objective is giving acceptable imaging 'leave well alone'. He showed that problems limited to accessible glass/air surfaces e.g. like fungal growth may be tackled without element disassembly. Damage limited to the front element of an otherwise good objective, even if quite extensive, can still work remarkably well as Paul James has also demonstrated (see his June 2004 article).
The author's example was in the 'nothing to lose category' as it was beyond any use at all without full disassembly of the elements. Its simple construction allowed careful cleaning and reasonably accurate realignment. If it had been a higher power (or NA) of this vintage the increased number of elements, smaller size and higher tolerances would probably not have permitted an acceptable repair. But I hope that it does show that apparently unusable objectives of certain designs may with care be brought back to a usable state with the caveats mentioned in the text.
Comments to the author David Walker are welcomed.
 Footnote
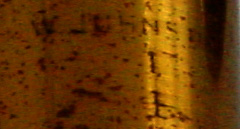
on the objective maker: At first the objective
was thought to be unnamed, but just visible in the lacquer spotting is 'W JOHNSON'
and below it '14'
(shown right).
Footnote
on the objective maker: At first the objective
was thought to be unnamed, but just visible in the lacquer spotting is 'W JOHNSON'
and below it '14'
(shown right).
Perhaps
this is the 'William Johnson' listed in 'Websters'
Instrument Makers Database' as an 'Optician and spectacle maker' working
in London from 1830-60 which seems about the correct date. Coincidentally in
early March 2005 a microscope signed 'W. Johnson & Sons London'
was sold on UK eBay
for £73 which looked to be of the period. Whether this is the same maker as
'W Johnson'
and if so whether a true microscope maker, optics maker only or dealer is unclear.
A sketch of the objective construction is shown left approx. to scale. The 1/4 inch objective comprises a set of three near identical doublets to the eye, (each doublet plano-concave, all plane side down, with bi-convex element cemented to each, element diameter ca. 4.25 mm).
Published in the March 2005 edition of Micscape.
Please report any Web problems or offer general comments to the Micscape Editor .
Micscape is the on-line monthly magazine of the Microscopy UK web site at Microscopy-UK
© Onview.net Ltd, Microscopy-UK, and all contributors 1995
onwards. All rights reserved.
Main site is
at www.microscopy-uk.org.uk
with full mirror
at www.microscopy-uk.net
.