 |
| Introducing the Halogen
bulb to Old Lamphouses An even cheaper route to replacing traditional light sources in the older microscope By Paul James |
Last month's article was concerned with adapting the relatively cheaper more easily obtainable incandescent light bulbs into the lamphouse of an older stand. But there is of course another, albeit more radical route around this problem of searching for a more economical replacement light source : That of employing the unique properties of the capsular tungsten halogen light bulb. You may reasonably ask why I haven't raised this topic formerly, and in answer to that I have to confess a strong dislike of their highly intense, piercing output in the domestic lighting situation. This prejudice lingered for years until recently when I became aware of their very low cost. Then after coming home with some examples and their respective mounts, there followed some experimentation. Now I see why they are considered to be suitable for brightfield microscopy. Costing as little as £2-3 or so, it would be rather foolish to ignore their potential.
I've recently tried a halogen bulb with great success in the Zeiss Photomic 1 , initially to see if it could be done without too much effort as a precautionary measure regarding the supply of replacement bulbs. The desire to experience the field of view raised from a different source like the tungsten halogen bulb was also of interest, and indeed it proved to be the case with an added bonus that this adaptation was easily reversible.
So what advantages if any has the halogen bulb got over its earlier cousin? The small 'capsule' forms are capable of insertion into small spaces, have commendable life expectations, and are significantly cheaper than their forebears. But are they suitable replacements in the lamphouse? Emphatically speaking......yes, with only one significant proviso when installing one into your microscope's optical train, which is that these capsular halogen bulbs need to be mounted at right angles to this axis, because the small glass capsule has a pinched top quite unsuitable for the microscope's lighting system :-
|
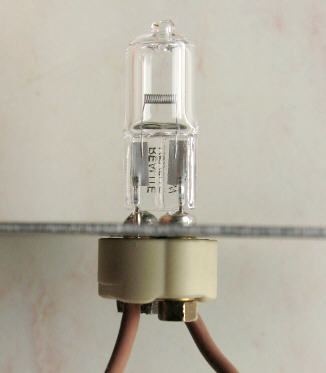
The image above shows a typical Tungsten Halogen bulb capsule. This particular one is a 50 Watt 12 Volt AC version with a 2 pin G6.3 base fitment. Though the filament has no potentially troublesome spot welds as found in the traditional incandescent bulbs, its elongated shape isn't quite the ideal microscope light source for Köhler or Critical illumination, but fortunately most 'scopes sport diffusion screens which can cope with this. So I mounted the bulb on a platform giving the filament the necessary elevation to meet the exact spot where it should lie at the focus of the lamphouse condenser. This essential requirement was conveniently realised by siting the mounting plate between the bulb and its ceramic mount as shown above.
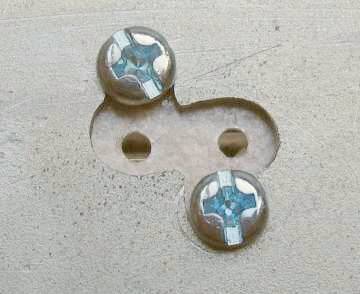 |
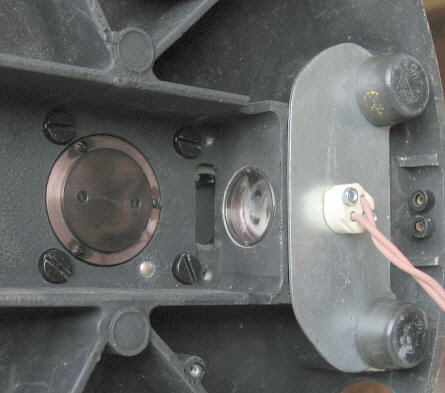
View of the ceramic mount's 2 socket base secured to the steel plate with 3mm fastenings, and the oddly shaped aperture required giving enough clearance to prevent electrical shorting etc.. Of course the ceramic mount could be positioned on top of the plate, but this would have put the filament too high up in the lamphouse condenser. As it was, the combination as shown worked perfectly......... more by coincidence than design.
Basic Installation
Fortunately the Photomic stands have enough room below decks in which to mount a new halogen source, with the near ideal feature of having the original removable lamphouse tube vented with large slots, one of which needed a little filing to allow easy access and elbow room for the halogen bulb's filament to be stationed onto the optical axis of the lamphouse condenser, and then of course be precisely located at its focal point.
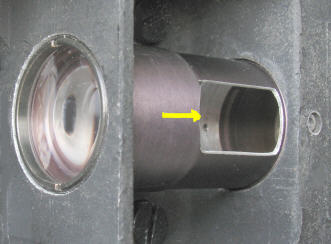 |
The above image ( with field diaphragm removed for clarity ) shows a ventilation slot in the lamphouse condenser unit after widening. Its front edge was also filed back a couple of mm's so as to make certain that the bulb had sufficient clearance all round when finally in situ with its filament at the condenser's focus.
The Base Plate Support
A cardboard template was cut first to gauge all the necessary constrictions for a mounting plate. When satisfied with this I fashioned a flat steel plate which was approximately 1.3mm thick and profiled it to match the cardboard cutout, which finally took on the shape shown below. The bulb/ceramic mount unit was bolted onto this having made the appropriate sized holes for the bulb's mount and the plate's fixing holes :-
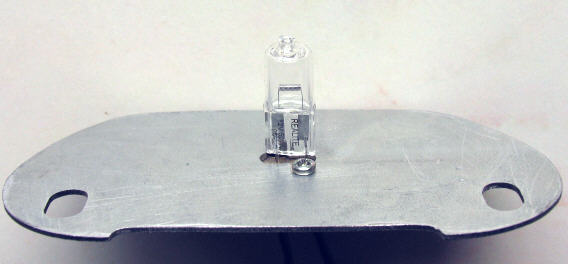 |
The method of rigidly fixing the plate to the underside of the stand relied on the clamping effect of the 2 rear rubber feet of the 'scope, and allowance was made for the important few millimetres of fore/aft/lateral adjustment to site the filament at the prime focus of the lamphouse condenser. Elongating the 2 holes into larger slots in the plate gave the necessary assurance of movement. The focal point of the lamphouse condenser's optic, where the filament must be situated, can be gauged by reinserting an old incandescent bulb there and make a note of its filament's position in relation to the frosted first element of the condenser. In this particular case the glass envelope of the halogen bulb is sufficiently narrow enough for the filament to get close enough, without hindrance, to the frosted first optic face of the condenser.
 |
The image above shows the plate in situ, held firmly by the clamping effect of the 2 back feet of the stand. In all a very simple mounting method, which it must be admitted was facilitated greatly by the physical characteristics of the bulb and its ceramic mounting. Fortunately there was adequate ventilation within the lamphouse chamber as an aperture already existed there which cannot be seen in this image. A couple of 10 mm holes were drilled in the chamber's upper surface to allow the warm air to escape into the spacious hollow limb, which in my example of the Photomic is now totally void of it's interior assemblage of optics and shutter mechanism etc..
Odds and Ends
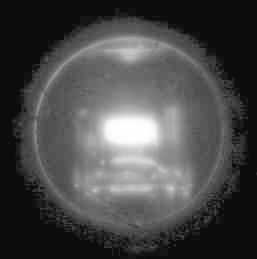
Assessing the position of the bulb's filament in the initial investigative stages is straightforward in the Photomic because it can be observed at the stand's rear through the empty aperture of the lamphouse condenser tube where the original bulb holder slots into. So from there the first stages of trial and error can be directly scrutinised, and verified more accurately later through the eyepiece and phase 'scope employing a x10 objective without the substage condenser. An image of the latter view of the bulb in its final centered position as depicted through the Optovar's Bertrand lens is shown below :-
 |
Though fore/aft/lateral positioning of the bulb is made possible by the elongated slots in the bulb plate support, the filament's height adjustment can be made by subtle variations of the bulb's position in its ceramic base holder......ie pushed further in or out of its 2 pin base. This is of course limited to about + or - 1.5 mm but should be more than sufficient if the original basic measuring up is done properly. Because of the solidarity of the support feet and their associated mounting, no problems have yet arisen with the stability of plate and therefore the filament's on axis position.
Wattage and your Lamphouse and AC Power Supply Limitations
Though I've installed the 50 watt 12v AC version of the tungsten halogen bulb as illustrated above and found it could easily be driven by my original 0-10 volt AC Wild M20 power supply, the fact is that the 6-8 volt setting gives enough light of a refreshing whiteness through a blue daylight filter to more than satisfy the eye. At 10 volts, the bulb, still under loaded, issued more than enough light I'd have thought to satisfy anyone's needs. The power units I used for trials all coped easily enough without any over heating when loading the bulb to about <70% of full working voltage . The Zeiss photomic's lamphouse's ability to cope with increase heat output above its 'designed' 15 watt norm has in my case been extended by increasing its ventilation. In the case of a 'sealed' lamphouse bulb holder, where heat dissipation relies almost entirely on conduction through the casing's fins then I believe it would be unwise to introduce another bulb with a higher wattage rating than it was designed for without adequate modification to ensure greater heat loss. Common sense should prevail. If in doubt increase ventilation.
Which Bulb to Use ?
For a given microscope, choosing a suitable bulb is obviously important, not so much regarding the actual light intensity, for even the 10 watt example can issue sufficient light, but because of their varying physical sizes and shapes which should ideally fit into the lamphouse without too much reconstruction. The image below illustrates a sampling of the more economic range available, which in total is very extensive :-
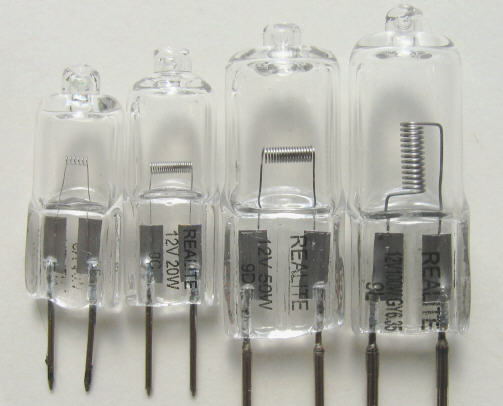 |
| ........6v 10 watt.....12v 20 watt........12v 50 watt........12v 100 watt......... |
Shown above are 4 examples of capsular halogen bulbs which cover the range of light output that most amateurs require from around 10-100 watts rating. The most noticable feature of this selection is the significant variation in their filament size and shape. Despite this they are all perfectly capable of providing a bright even source for Köhler/Critical illumination. Though it must be said that the smallest, the 6volt 10 watt example which surprisingly yields plenty of light at its rated maximum voltage, can have difficulty filling the source uniformly as its filament is rather open and small. This can be dealt with by frosting the side of the bulb's glass envelope which outputs the light toward the lamphouse condenser elements :-
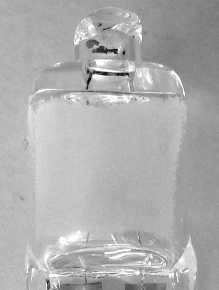 |
This process, taking less than a minute to accomplish using an old microscope slide wetted slightly with a charge of fine carborundum grit, makes all the difference in succeeding to raise a homogenous field source without absorbing too much light. If required, the light reduction from this frosting enhancement can be compensated for by installing a higher wattage bulb.......say from 10 to 20-25 watts ? For a given voltage there is usually a common sized mount, so experimenting with a couple of 6 volt bulbs is easily accomplished, though patience is required as these bulbs soar rapidly in temperature, and can take longer to cool than expected, so its not a rapid process trying a couple of different bulbs.
Frosting the bulb's envelope is probably frowned upon by the manufacturer for reasons of 'safety'. So far I've not found any problems from breakage owing to uneven thermally induced mechanical stresses that might have arisen. Winding up the voltage gradually over a few seconds minimizes thermal stresses a little, and should maintain bulb longevity.
The 6 volt range's principal virtue is that they are physically the smallest of the bunch but not necessarily the cheapest. However I have experimented with this particular example and find its diminutive size ideal when considering alternative light source strategies in the smaller lamphouses.
The final job of securing the wiring safely and neatly to a couple of banana sockets in the stand's base is all that is required. Whether you take the bull by the horns and drill 2 holes for these sockets, or utilise existing connections is of course your prerogative.
A few words about the halogen bulb
There is little point in me preaching the gospel about halogen lighting as there is so much information available on the web via a Google search.
You will note that the colour temperature of the average capsular halogen bulb is around 2700 Kelvin. Higher temperatures of the filament output 'whiter' light, but this comes at greater cost and shorter life spans. Appropriate field colour to satisfy the eye can be filtered through easily enough with any one of the many daylight screens available. The problem if any after conducting a search is that you will be spoilt for choice!
Though my method of utilising an existing 0-10 volt AC low power supply works for me when underloading a 12 volt 50 watt halogen bulb with suitable daylight filter, your situation might be different. By all means experiment. The halogen capsular bulb is cheap enough for experimentation. My notes have been written with the notion that the reader has at least a basic grasp of electrical theory and has some practical experience, to the extent of being aware of the inherent problems involved regarding personal safety and overloading the PSU AND is aware of the increased heat output of higher wattage bulbs and the need to be concerned about sufficient ventilation in the lamphouse.
My unusual practice of under loading a given bulb is based upon my subjective appraisal of its light after filtering through a daylight screen. and has the great advantage of utilising a larger filament which makes the job of generating an even source so much easier, as well as reducing heat output which can be high with these bulbs. Under loaded bulbs should also have a very long life too......hopefully.
Concluding Thoughts
There is something mildy liberating about severing the need for dependence on specific and often expensive light bulb replacements by installing a tungsten halogen dosmetic bulb/ holder into your own lamphouse. The early microscopists relied on their own devices filling their fields of view with the meagre light output from the humble candle and paraffin lamps......few neither had household electricity nor could afford the acme brilliance of the electric carbon/tungsten filament sources of the day, let alone the majestic carbon arc lamp for the photomicrographer. I note that a Beck 100 candle power 'mains' electric light bulb in the 1920's cost £9-0-0d . Their cheapest stand of the day cost around £10 and their binocular stand £35. Today the ratio of cost between the humble halogen bulb and a quality contemporary stand would be in an entirely different league........ so fortunate are we !
So on a personal level, the irritating point source domestic lighting glare that halogen bulbs emit seems to me to be entirely suited to provide the light in the lamphouse, where diffusion screens play their part in the majority of microscopes to yield a pleasing homogenous, yet useful field. It appears therefore, that these very cheap and extensively ranged readily obtainable tungsten halogen bulbs have few rivals in brightfield microscopy ?
| All comments welcome by the author Paul James |
Microscopy UK Front Page
Micscape
Magazine
Article
Library
Published in the April 2010 edition of Micscape.
Please report any Web problems or offer general comments to the Micscape Editor.
Micscape is the on-line monthly
magazine of the Microscopy UK web
site at
Microscopy-UK