|
Looking further and keeping a record
You don't need a camera or fancy equipment to get a record of a private look into the
world of the very small. How do I know..? Well, like most folks without a foundation in microscopy or related science
discipline, I stumbled through my ignorance and the fog of inexperience - driven by nothing less than curiosity
- to discover that much can be achieved by working to such limitations.
A start
A while back (let's call it 4 years ago), I decided to write some software - more as an
exercise to relieve myself of boredom from the mundane chore of going to work and earning money - rather than from
any other more exciting objective. The software took a lot of time and effort to write but I found the more I worked
on the project, the more I experienced wonder and awe. My work took me down fresh roads and challenged my
perceptions and pre-conceptions about the world at the small end of the spectrum.
The software
aim was to produce a virtual microscope, yet I had no such real instrument...
nor had I actually ever looked down such a device. I was entering fresh experiences, like a virgin - naive to the
real world and the people who had matured down this route of discovery already.
Stupidness is bliss... and sometimes the key to new experiments!
One of the most important aspects of my software creation was that the user should be
able to see images on their computer just as though they were looking through a real microscope. This presented
a bit of a problem. First of all, I didn't actually have a microscope (nor had I ever looked down one before) and
secondly... I didn't have a clue as to how you actually record an image if you had one in the first place!
Toys are an entry point
Whoever you are... please... please... don't mention to anyone that my first experience
of a microscope was by way of a visit to 'Toys-are-us' - a big store catering for children's toys! I found this
plastic ''thingy'' which really looked to all intent like a microscope. Fifty pounds fled from my wallet, like
moths escaping the dark to seek their most desired mate in the blind night.
It was much later down the path of discovery that I realised there were better tools
to be purchased for looking at the small-scale world, but for now, this was what I had. I must admit though
that those first blurred visions inspired me sufficiently to seek a 'real' microscope so maybe that 50.00 pounds
were not so badly spent after all.
First photos
Ignorance is a great teacher. Imagine for yourself a 44 year old man trying to hover
a camera over a thin length of plastic tubing and trying to 'snapshot' what lay at the end of the wobbly tube as
though he was out for a Sunday stroll 'snapping' swans in the local park. Now you know how really stupid I was
back then.
Needless to say, it isn't quite that simple to get an image of the small-scale world.
Unfortunately, there was no-one there to teach me... and no internet full of other peoples' experiences to help
me.
I would love to show you some of my early attempts but the photographic processors
simply thought I had tried to photograph something with the camera in my pocket. They returned a set of prints
covered with labels stating they had not made any mistakes in the processing and that the foggy, blurred works
of art I had tried so hard to make, were abominations due to my own fault !
'Need' finds a way
Obviously, without a camera, without budget, without experience or contact with experienced
people... my hopes of getting some initial images for my software project looked pretty hopeless. I must
admit - I thought for a moment that I had taken on more than than I could achieve... but then panic and fear
set in followed by cold reason and careful thought.
I sat and pondered for some time until I realised I had approached my objective all
wrong (excuse the pun). I started to realise that my plastic microscope was not *just* a microscope: in its own
unique way - it was a camera too!
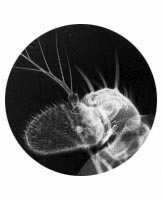
Fruit flies on the ceiling
I had this idea. I blacked out my study as if it were to be a photographic darkroom and
put a slide of a fruit fly under my toy microscope. Instead of looking down the 'tube', I looked up
at the ceiling. Sure enough, a faint, glimmering image of my fruit fly was being projected onto the white 'roof'
of my room. A little bit of focusing on the microscope and the image became sharp and clear, although somewhat
distorted due to the angle of the microscope. I used a few books to prop the microscope up in such a way that the
projection was perpendicular and the ellipse of light became a perfect circle.
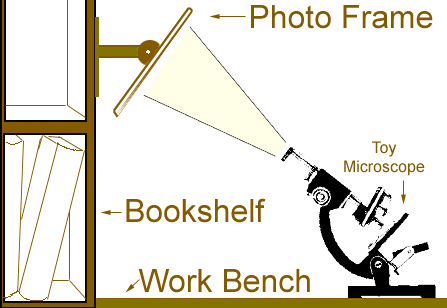
Projection screen
I thought the idea of pinning photographic paper to the ceiling was not really on. What
was needed now was some kind of projection screen on which I could affix photographic paper to project an image
onto. The solution was very simple. I adapted one of those cheap photo-frames, you know - the type that has a thick
hardboard back with a sheet of glass held to it by 4 removable clips. I found an old swivel type bracket which
would allow me to adjust the angle of the frame and hot-glued it to the hardboard backing.
I think a picture is easier than explaining, so this should give you
a better idea:-
Trial & error exposure
Placing an ordinary piece of paper in the photo-frame, I sat in the dark and focused my
'microscopic projector' onto my home-made screen. When I was sure that everything was lined up and focused correctly,
I switched off the microscope lamp and - with the aid of a 'safe' red light (used in photographic darkrooms)
- replaced the ordinary paper with a sheet of photo-sensitive paper.
I turned on the microscope lamp and let the beam project an image onto the photo-paper
for a predetermined time. It is important to record how long you expose the paper to the light. Trial and error
will produce optimum results for your microscope, the subject being projected, and the strength of the microscope
lamp.
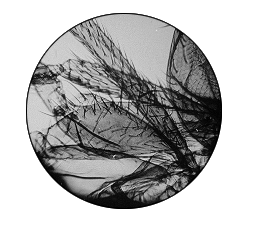
I had already made up some B&W developer solution and fixer. I was excited to see
the results as I placed my first ever photo-micrograph into the transparent liquid. Like magic, an image started
to appear - faint at first then stronger and more defined.
 
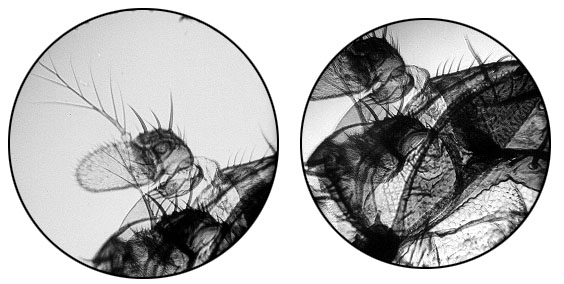
It is difficult to convey the feeling of delight and magic I felt to see that tiny
snapshot of a fruit-fly antenna swimming in the tray. Although the image was not crisp due to the poor optics of
my toy microscope, it was none-the-less my own personal first record of a view into a different world!
Of course, the image obtained was a negative one but as I owned a hand b&w scanner,
and a personal Computer, I knew I would be able to convert it into a positive image later. This is not necessary
though because the negative image alone provides its own unique charm and detail.
Improving the image
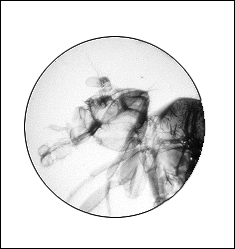
I experimented with trying to get a sharper image from the toy microscope. I found that
by using a variety of small washers and placing them between the lamp and the slide, I suddenly got much crisper
images: a diaphragm of sorts!
Further improvements were gained by scanning the photos with a now-outdated
hand scanner into my PC and using image-enhancement software to improve tonal range and sharpness. Here is
a sequence from an original photo through to a final copy. Surprisingly - these are all grey scale only images.
 |
 |
 |
|
Original
|
Inverted to Positive
|
Sharpened by PC
|
How good can they get?
You might think the quality of these images pretty poor compared to what can be achieved
with high-tech tools and equipment but you would be completely wrong. First of all, using the microscope as a camera
itself, removes the chance of 'loss' caused by passing the image through another lens system and focus train -
that of a camera! Secondly, exposure time is completely under control : there is no sudden judder from a camera
shutter! On the downside, you need to make sure you don't live next to a busy main road or railway line as any
vibration during the exposure time will decrease the sharpness of the image.
It is important to get the projection onto the paper as accurate as possible to avoid
distortion. This is achievable by careful trial and error of the alignment of the microscope to the projection
screen, and then by fixing the microscope and frame in place semi-permanently.
My nostalgic gallery
Since those days 4 years or so ago, I have been privileged to be able to work with video
cameras and better quality microscopes, yet - for all their power and extra quality - I still treasure my very
first attempts at photographing the microscopic world with a limited set of resources and know-how.
To close this article then -which I hope will inspire you to have a go
at this technique, here is a mini-gallery of my very first 'snaps'.
Well, that's my story anyway. The important thing is that had I not bothered
to get curious about the microscopic world or attempt to take these images my way without advice, I probably would
not have travelled this important road these last few years, a journey which has had significant impact on my quality
of life, my friendships, and my outlook. Some people look back in their photo-albums at friends and family snap-shots.
I do too, of course... but few people can look back and see a photo of a tiny fly and remember that moment it was
taken - changed their entire life!
|