 I
have always loved darkfield images; there is something almost magical about
the glow against a black background. However, while I could enjoy viewing
such images by eye, my attempts to photograph these images were disappointing.
After thinking the problem through, and playing with the controls of my
digital camera, I have found that good results can be obtained consistently
and with little trouble. You need to understand a bit of how cameras are
different from the human eye (and brain), then just do a bit of playing.
I am not going to go into the 'hows' of setting up the microscope for darkfield
illumination, there are already good articles on the topic (Making
Darkfield Illumination Easy by Mike Samworth and Wim van Egmond). What
I want to describe are the issues involved with photographing these images
with a digital camera.
I
have always loved darkfield images; there is something almost magical about
the glow against a black background. However, while I could enjoy viewing
such images by eye, my attempts to photograph these images were disappointing.
After thinking the problem through, and playing with the controls of my
digital camera, I have found that good results can be obtained consistently
and with little trouble. You need to understand a bit of how cameras are
different from the human eye (and brain), then just do a bit of playing.
I am not going to go into the 'hows' of setting up the microscope for darkfield
illumination, there are already good articles on the topic (Making
Darkfield Illumination Easy by Mike Samworth and Wim van Egmond). What
I want to describe are the issues involved with photographing these images
with a digital camera.
Darkfield Illumination
 When
normally using the microscope, light enters from below the subject and
refracts through it, then enters the lenses and finally your eye.
With darkfield illumination, you block the light that directly enters the
subject. A small ring of light is permitted around the subject, which reflects
off of it and into the lens. The blocking of the direct light gives the
black background (darkfield), on which the brightly illuminated subject
is superimposed. The difference of reflected light from refracted light,
and the extreme contrast between subject and background, are what give
these images their richness.
When
normally using the microscope, light enters from below the subject and
refracts through it, then enters the lenses and finally your eye.
With darkfield illumination, you block the light that directly enters the
subject. A small ring of light is permitted around the subject, which reflects
off of it and into the lens. The blocking of the direct light gives the
black background (darkfield), on which the brightly illuminated subject
is superimposed. The difference of reflected light from refracted light,
and the extreme contrast between subject and background, are what give
these images their richness.
It should be noted that darkfield images are not
better or worse that normal illumination, they are just different. While
the high contasts may produce a more artistic image, this is not necessarly
a better image for scientific use. For scientific purposes, different lighting
conditions serve different needs. Do you want to see internal structures
or external surfaces? Is the subject transparent or opaque? Darkfield illumination
is another 'tool' in the 'toolbox'. The more tools you know, the more you
can do.
The Eye and the Camera
 The
human eye and brain are able to process a wide range of light. A camera,
under the same circumstances, can handle only a limited range. If the camera
adjusts to the bright subject areas, the dark areas are black. Inversely,
if the camera can distinguish the dark images, the light areas are 'burned
out' (image right). While not scientifically accurate, for illustration's
sake it is like saying the eye can detect images in a light range from
1 to 100, but a camera can 'see' only a 20 point range (i.e. 1 to 20, 40
to 60 or 80 to 100). The eye is much better than the camera; you have to
recognize these limitations, and work with them (or let them work for you).
The
human eye and brain are able to process a wide range of light. A camera,
under the same circumstances, can handle only a limited range. If the camera
adjusts to the bright subject areas, the dark areas are black. Inversely,
if the camera can distinguish the dark images, the light areas are 'burned
out' (image right). While not scientifically accurate, for illustration's
sake it is like saying the eye can detect images in a light range from
1 to 100, but a camera can 'see' only a 20 point range (i.e. 1 to 20, 40
to 60 or 80 to 100). The eye is much better than the camera; you have to
recognize these limitations, and work with them (or let them work for you).
 Most
cameras with 'auto-exposure' try to adjust the light level to give the
overall image a 50% neutral grey tone. Given a subject against a black
background, the camera will try to lighten the image (to make the background
more grey), which tends to 'burn out' the central subject. This is a normal
photographic problem, and most cameras have a way to fake the camera out
by setting the 'stop' up or down to adjust for these high contrast situations.
This is the heart of the solution. With a high contrast between subject
and background, you have to adjust the camera to properly read the subject,
and lose the background to the extreme (in this case, to blackness). This
is where the narrower range of the camera works for you; even if your darkfield
illumination is not perfect, the narrower range of the camera will push
the dark areas to a uniform rich black.
Most
cameras with 'auto-exposure' try to adjust the light level to give the
overall image a 50% neutral grey tone. Given a subject against a black
background, the camera will try to lighten the image (to make the background
more grey), which tends to 'burn out' the central subject. This is a normal
photographic problem, and most cameras have a way to fake the camera out
by setting the 'stop' up or down to adjust for these high contrast situations.
This is the heart of the solution. With a high contrast between subject
and background, you have to adjust the camera to properly read the subject,
and lose the background to the extreme (in this case, to blackness). This
is where the narrower range of the camera works for you; even if your darkfield
illumination is not perfect, the narrower range of the camera will push
the dark areas to a uniform rich black.
How To:
 In
a previous article I outlined how
to use the Intel PC Camera for microphotography. I am using the same setup
for these images. If you are using a different digital camera, read its
help file; there should be similar controls, as what I am using are standard
features. The Intel camera provides settings to control many of the features,
though under normal conditions they can be ignored (and are often forgotten).
The default setting is for 'auto-exposure'. With one click I turned the
default off, and started playing with the 'brightness' control (a slider
bar). By moving the settings window to the side, it is possible to see
the live image in the microscope at the same time you are playing with
the controls. Moving the brightness control is similar to adjusting the
aperture of the microscopes light source. So far, I have found it best
to adjust the microscope to normal darkfield illumination, then play with
the brightness control. Another option is to make a coarse adjustment with
the camera, then continue making fine adjustments with the aperture (there
is some interchange between the two light controls).
In
a previous article I outlined how
to use the Intel PC Camera for microphotography. I am using the same setup
for these images. If you are using a different digital camera, read its
help file; there should be similar controls, as what I am using are standard
features. The Intel camera provides settings to control many of the features,
though under normal conditions they can be ignored (and are often forgotten).
The default setting is for 'auto-exposure'. With one click I turned the
default off, and started playing with the 'brightness' control (a slider
bar). By moving the settings window to the side, it is possible to see
the live image in the microscope at the same time you are playing with
the controls. Moving the brightness control is similar to adjusting the
aperture of the microscopes light source. So far, I have found it best
to adjust the microscope to normal darkfield illumination, then play with
the brightness control. Another option is to make a coarse adjustment with
the camera, then continue making fine adjustments with the aperture (there
is some interchange between the two light controls).
 As
noted in the other article, darkfield illumination gets tricky at high
magnification. When I have tried to push it to 400x, I can still get a
good image, but the background coloring is not as reliable. My 'masks'
are pieces of plastic with black dots painted on. The accuracy of the dots
(or lack there of), and the difficulty of positioning the mask likely contributes
to this problem.
As
noted in the other article, darkfield illumination gets tricky at high
magnification. When I have tried to push it to 400x, I can still get a
good image, but the background coloring is not as reliable. My 'masks'
are pieces of plastic with black dots painted on. The accuracy of the dots
(or lack there of), and the difficulty of positioning the mask likely contributes
to this problem.
There is one problem that I have not been able to
get around, and that is depth of focus. With a regular camera, it is possible
to stop down the aperture and increase the length of exposure; gaining
more depth of field. Digital cameras have no such exposure control. Thus,
while I can get some nice images, they all have a relative narrow range
of focus. With fairly thick specimens (such as daphnia), it is not possible
to have the whole specimen in focus at the same time. If anybody has any
suggestions, please let me know. I have read of CCDs used in astronomy
for long exposures (minutes to hours), but these require special cooling
(defeating my goal of being easy and inexpensive).
About the images:
All daphnia were collected around St. Louis, MO, USA
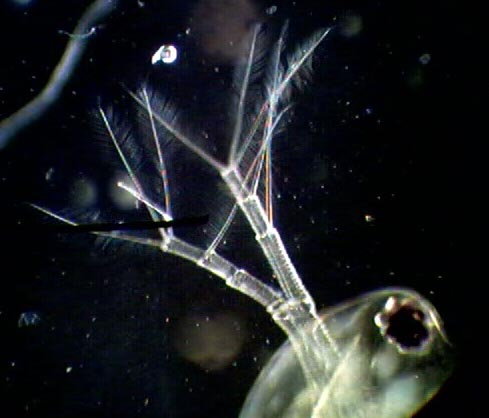
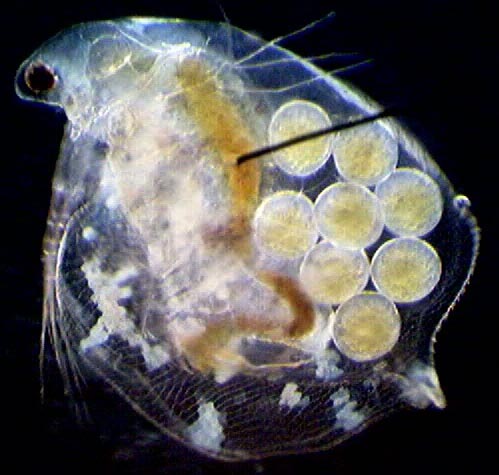
1) Daphnia (pulex?) from Grasso Spring, 100x, 27kB: note the detail of the antenna.
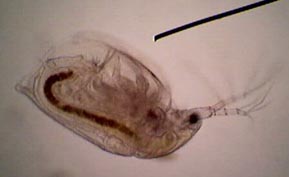
2) Small Ceriodaphnia from Forest Park, 100x, 8kB.
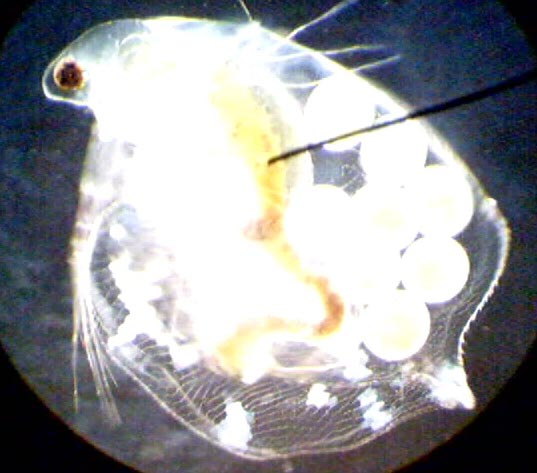
3, 4, 5) Larger Ceriodaphnia from Forest Park (St. Louis, MO) 100x, 37kB, 37kB & 41kB
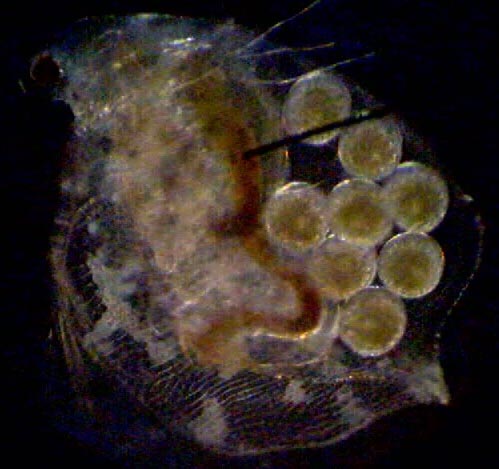
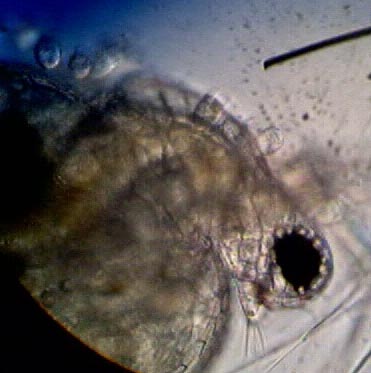
6) Small Ceriodaphnia from Forest Park 400x,
23kB: note the ciliates attached to the back.
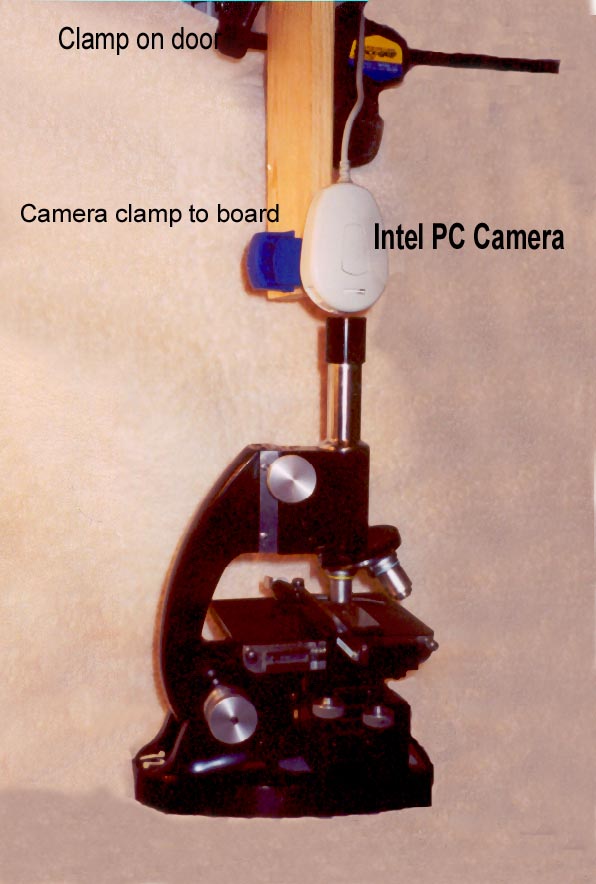 P.S.
In the last article I did not have a good close-up of the camera and its
relationship to the microscope. Since then I have taken such a picture,
and enclose it here (63kB).
P.S.
In the last article I did not have a good close-up of the camera and its
relationship to the microscope. Since then I have taken such a picture,
and enclose it here (63kB).
Contact: Howard
Webb.