The Canon 350D Digital SLR Camera.
Suitability for photomicrography with the Zeiss Axiostar microscope.
By Ian Walker. UK.
Introduction.
The first point I would like to make and I think many others agree, do not buy a digital SLR camera solely for the purpose of photomicrography. Firstly the results can be variable depending on individual microscopes and adapters, it's expensive and you will quite likely find the attachments which have served you well for many years might not work successfully with your new camera. I have diverse interests regarding DSLRs from super-macro to landscape so it's a bonus if the Canon 350D will work with my Zeiss.
There is a lot of debate about the suitability or indeed logic of attaching DSLRs to microscopes, taking a quick look at any of the news groups and forums on the Internet will show a lively discussion on the results of such combinations but never one for giving up on a challenge I endeavored to attach the 350D to my Axiostar and see what sort of images I could capture so, without further delay, read on...
This article is for the most part concentrating on the Canon 350D attached to a modern microscope like the Zeiss Axiostar and I will not be discussing the camera for outdoor and macro photography where in-depth reviews can be found at several major digicam review sites on the Internet except where I think a particular feature is good or bad in general use. Using a DSLR on the Zeiss has been a mixed experience creating problems as well as solving a few and I have spent a much longer time getting acquainted with the pros and cons before concluding my findings compared to the more straightforward photomicrography using my Canon G6. Some issues like the smaller capture area compared to the G6 have become important areas to consider but more on that later. I refer through the first part of the article to comparisons between the Canon 350D and the Nikon D50, I don't own the Nikon but I have had the chance on several occasions to use one at some length including on the microscope.
Summary of the Canon 350D when used with the Axiostar:
[For those not wishing to read through the whole article here are the main points]
Good points:
Exposure metering without lens, this is a personal preference and may be of no significance to other users, LCD display of parameters including shutter speed on the back of the camera for easy viewing on a trinocular head, very simple menus, fully operational RAW software included, good battery life.
Needing further investigation:
Depending on subject many images can seem dissapointing straight from the camera compared to the Canon Ixus and G6 lacking sharpness and contrast, mirror lock ineffective on my setup, results from difficult subjects handled easily by the Canon G6 could not be replicated at all.
General comment:
Build quality, LCD and finish not up to Nikon D50 standards which cost substantially less, again some people may disagree with me on these points but I have been fortunate enough to compare them side by side!
Choosing the Canon 350D for photomicrography.
[Remember, these are features I personally found useful and may be of no interest depending on your own requirements, they are in no particular order].
1. Fast start-up and save to disk operations, although most of the competition is equally good in this respect now.
2. Exposure metering without lens attached unlike the Nikon D50 and D70, I found this useful when adjusting the lamp intensity on the Zeiss to obtain around 1 second exposure and it's easy to read on my setup.
3. Menu function for mirror lock working with or without self-timer, the Nikon D50 and D70 have no mirror lock, more on this later.
4. LCD information display and most useful controls on the back of the camera for easy viewing and settings when mounted to the trinocular head, several other DSLRs have LCD information displays with shutter setting etc on the top panel of the camera out of easy view, not a great problem but slightly inconvenient depending on the position of the camera body on the microscope.
5. Histogram display in play mode together with highlighting of over-exposed pixels, this is becoming standard across DSLRs now.
6. Connection to the PC allowing RAW images to be viewed directly after shooting in the RAW software package included, the Nikon RAW software has a 30 day limit, you must spend over Ł100 in the UK to keep running it, in the US I believe this sells for around $100.
7. Reasonable value, the body being not dissimilar price to a high-end pro-sumer digicam.
8. Simple menus in a folder structure, it can be tedious scrolling through endless options, the menus on the 350D have been well implemented and kept to a minimum.
Some things I would have liked to have.
1. Larger CMOS sensor to get closer to the 35mm standard enabling a larger area to be captured especially since my Zeiss relay lens optics have been optimised for this format.
2. Custom memories like the Canon G6 which had two [C1 & C2], on the G6 this took the form of an extra couple of positions on the mode dial of the camera which I found very convenient, this is where menu settings for microscopy and macro could be stored. I have to reset parameters every time in the menus etc on the 350D to shoot for normal photography and then back again for microscope work.
3. Release of shutter from PC software with lens removed, the software detects there is no lens attached, you must fire the shutter manually from the camera, this situation can be improved by purchasing a special cable release or infrared transmitter but at extra cost, albeit a modest outlay.
4. More solid body, also the 350D has a hard gritty finish and to me rather unpleasant to touch, personally I think the Nikon D50 is better feeling more robust and using superior plastic, it's also cheaper to buy and is more comfortable to hold with a substantial rubber grip. I have an issue with handling for general photography as well with the 350D its OK with light weight plastic lenses like the 50mm f1.8 Mk II but put a metal clad EF S macro on and the balance is wrong, fatigue starts quickly in the wrist because of the small grip. More comfort could be provided by the optional accessory BG-E3 battery grip creating a more substantial area for holding the camera and I would say this is essential if you are contemplating any of the longer focal length lenses but I have not purchased this. Canon provided dpreview.com with an 'expanded' schematic of the internals of the 350D and it doesn't fill me with confidence being mostly plastic parts [albeit high quality] including the mirror housing, I wonder about the long term durability.
The Canon 350D with Zeiss Axiostar.
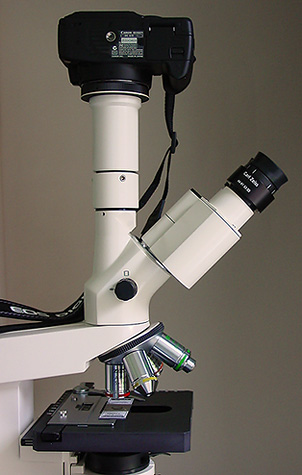
The first check I made was to test whether the viewfinder alone on the 350D body is suitable for photomicrography perhaps for microscopists considering using the camera with a vertical monocular tube only and I think the simple answer is no, the view is rather small because a penta-mirror is used rather than penta-prism to save weight and cost, is not really bright enough and a little too coarse in structure to allow critical focus of some subjects. If higher powers of magnification are used, say a 10x or 20x objective then focusing is much easier but looking down the viewfinder for anything more than a few minutes at a time when the camera is connected to the microscope I find both tedious and uncomfortable so personally I would only recommend trying the 350D if you have a trinocular head and parfocality between the binocular head and phototube. Some of the problems here could be alleviated by the right-angled viewing attachment [Angle Finder C] for the 350D supplied by Canon as an accessory which has switchable 1.25x and 2.5x magnification which could make sitting in a chair and looking down the viewfinder possible [?] but I haven't purchased this. In the photograph below you can see the hand grip design has been compromised, it's too small and has a very hard rubber coating rather than the more usual softer material.
I have been informed by Gregor Overney that the Nikon D70 is viable with respect to focusing accurately with the viewfinder even with crossed-polars being sufficiently bright enough to do so however tests with the D50 didn't show much improvement over the 350D.
Canon 350D in position on the Zeiss Axiostar. The phototube is centred and held firmly in place onto the trinocular head by 3 Allen bolts. At the base of the trinocular head can be seen the control to set 100% light to either binocular view or camera. The setup is very neat and tidy compared to the previous multiple tube/adapter assembly for the Canon G6. This shot was taken with the Sony S75 digicam.
Using a low power monocular for critical focus in conjunction with an eyepiece.
One of the first things I did was to download from the Zeiss website 'Photomicrography with 35mm SLR cameras' in PDF format [see 'links' at the end of the article] although specifically written for film cameras and Zeiss microscopes there is some useful information here including the effects of mirror bounce on image quality, optimum shutter speeds and critical focusing and I recommend anyone attaching an SLR or DSLR to a microscope to read it. Zeiss suggest adding a low power monocular sitting on the eyepiece to aid focusing at low powers and I have tried this technique with the monocular below and I did find it was eliminating a number of wasted pictures where I thought I got the focus correct by eye but in fact I was very slightly off creating a soft image. The monocular is set to infinity when critically focusing and the 4x12B shown can also be used as an excellent phase telescope with the eyepiece removed when set at its close focus position together with the fact I can take it around with me on walks and weighs around 50 grams its an excellent all rounder.
The Zeiss SLR manual suggests using their 3x12 dedicated microscope monocular which seems to based around their 'Classic' monocular to increase magnification when used with their 'Classic' binoculars but the price of this is much higher than the 4x12B which is available from many good binocular retail outlets. I am convinced of the usefulness of critical focus using the monocular and I don't take any image on the microscope without it no matter what objective is in use but note this is only useful and worth purchasing if you have exact parfocality from both the binocular view and camera attached to the phototube of the trinocular head. My brother tried the monocular on his Russian Biolam system but the results in terms of enhanced focusing or using it as a phase telescope were somewhat indifferent so its usefulness might be microscope specific, besides it tends to suit the large 30mm eyepieces of the Zeiss Axiostar rather than 23mm eyepieces.

Zeiss 4x12B T* monocular, focus is achieved by push-pull on the lower section which seems crude but works surprisingly well because of the close tolerance of manufacture, the rubber eyecup can be folded down.
Importance of T2 mounts with some photo-adapters.
[These notes are based upon the Zeiss adapter for SLR 2.5x T2 part no. 456005-0000-000].
Although I am discussing the Zeiss system the same issues should be taken into account in all microscope trinocular head/SLR camera setups. In my case the Zeiss SLR manual provides various order codes for special Zeiss T2 mounts when different SLR cameras are used to provide the correct film plane to T2 contact surface distance, this is a critical figure for obtaining parfocality between camera and the binocular viewing tube if the relay lens assembly has no height adjustment. This is the case with my tube and is based on the film plane [or sensor] to lens flange distance which varies considerably between manufacturers + thickness of T2 mount which is varied in the different Zeiss T2 adapters to obtain the same distance for all cameras when used with the Zeiss 2.5x T2 SLR relay lens.
Some time ago Zeiss made another SLR phototube to take a dedicated photo eyepiece, this did have an adjustment to allow different cameras to be used without resorting to the special Zeiss T2 mounts but I'm not certain if this is still in production. I had already purchased my Canon EOS T2 mount so to obtain the correct CMOS to T2 contact surface distance I had to add 2 mm to the thickness to my 'off the shelf' adapter to get the correct distance of sensor to T2 contact surface of 54.9 mm. I measured the thickness of the T2 mount and home made shim very accurately with vernier calipers. The film plane to lens flange is 44.0 mm in Canon EOS cameras irrespective of older film or newer CMOS designs making the T2 mount thickness required 10.9 mm, quite thick for a T2 mount.
Note, as always Zeiss charge high prices for T2 adapters compared to ones you buy in camera stores so I saved a good sum modifying mine with a simple shim. A point worth noting is that I obtained one of the last older Zeiss SLR relay lens assemblies in Europe, indeed this part is no longer listed on their shop, I have been informed by Zeiss UK there is a replacement which now comes in two parts so may be parfocality will be a lot easier to set up but I haven't seen any details yet on the Zeiss UK online store but the combined price for the two parts is substantially higher than my adapter, however the design may be superior to mine taking into account the meteoric rise in popularity of DSLRs.
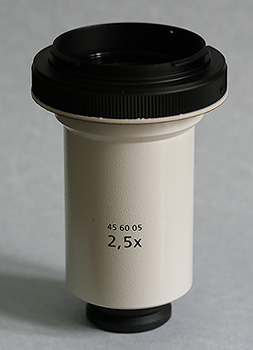
Zeiss SLR 2.5x phototube for the Axiostar with T2 mount connected, as you can see there is no height adjustment so the T2 thickness is critical for parfocality with binocular view, you can see my shim appearing as a thin white disk beneath the mount. Normally the adapter would have dust covers fitted top and bottom to limit the problems of dust settling on the CMOS sensor and tube optics but for this shot they are removed. The camera lens rear dust cap is used on the T2 mount when the adapter is not in use since the lens will be on the camera and vice-versa.
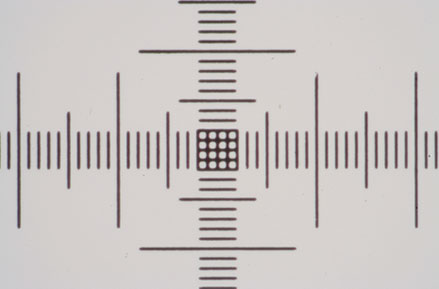
Eyepiece reticules.
When using a sensor which can only capture part of your visual field of view it is important to have known limits to fit your subject in so an eyepiece reticule is very valuable and the one I use is a cross-hairs with measurement scales. Zeiss recommend a reticule as part of the accessories needed to provide sharp images with the 35mm system in their manual and suggest their own at a very high cost so I purchased mine from Knight Optical UK [see 'links' at the end of the article] who can provide a number of reticules in different diameters and styles for a fraction of Zeiss costs. The Axiostar uses a large 26mm diameter 2mm thick reticule so I had to modify my 21mm by adding a supporting ring but works fine. The reticule thickness will affect the focus point on the focusing eyepiece and theoretically you should buy another focusing eyepiece to match but so far I have managed without probably because the Knight Optical ones are thinner at about 1.5mm.
Zeiss have a 3 point plan for accurate focus of subject and reticule as follows:
1. Use eyepiece fitted with reticule to focus the reticule with its focus ring preferably with a clear part of the slide and I suggest blanking off the other eyepiece, I use my Zeiss monocular rotating with the eyepiece to get a good sharp outline.
2. Focus the subject accurately with microscope course and fine controls.
3. Focus the eyepiece without reticule with its focus ring to obtain a clear detailed image of the subject without moving the main focus drive and I suggest blanking off the other eyepiece, I have found through my tests that no adjustment is required for my eyes and I don't need the second focusing eyepiece.
Grid tests with the Canon 350D connected to the Zeiss SLR relay lens.
These tests were carried out very early before using the monocular for critical focus but show areas captured and linearity with camera and relay lens. The small CMOS sensor size of the Canon 350D [22.2 x 14.8mm] compared to 35mm film [36 x 24mm] means a significant loss of capture area and images taken with my old relay lens designed for the Canon G series etc [see 'links' to my article with the Canon G6] show much greater flexibility in the type of subject which can be photographed for a given objective. I have estimated that one of the pictures I took recently with the G6 would need 4 images stitched together with the 350D to obtain the same effect both using the 2.5x objective on the Zeiss. It could be argued in some circumstances that dropping to a lower power objective could be a way round the problem but in most cases this is unsatisfactory since the lower NA will create a less detailed image, in fact some of the poorest images returned from the 350D have been using the 2.5x objective.
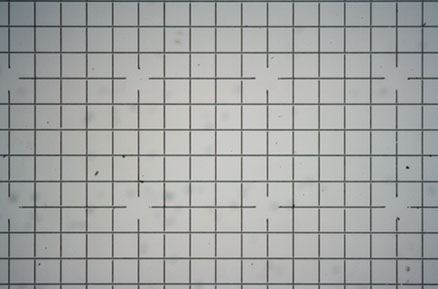
Left and right the 2.5x and 5x Zeiss A-Plan objectives respectively. Grid spacing is 0.1mm. The 5x objective and 350D are capturing about 8 1/2 by 6 squares compared to the Canon G6 [not shown] which captured 14 by 10 squares.
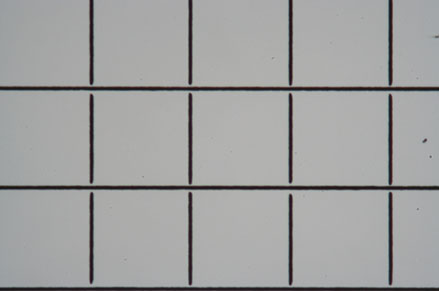
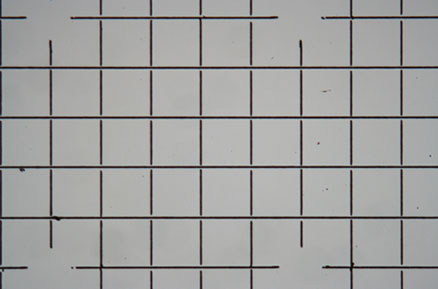
Left and right 10x and 20x Zeiss A-Plan objectives respectively. The grid is really too coarse for the 20x objective so I have switched to a Motic test slide, 0.01mm line spacing.
The grid images were not compensated for exposure, ideally they needed about +1 EV to obtain higher contrast and brightness, no sharpness has been applied on or off camera.
Suggested initial settings on the Canon 350D for microscopy.
There is no lens attached so there are not many settings that need to be checked.
1. Mode dial to Av.
2. Menu custom function 7 [C.Fn7] set to mirror lock and the self-timer set using the drive mode select button, this provides an automated mirror-up, picture taken and mirror down from a simple depressing of the shutter.
3. Set communication to PC connection if you wish to use the camera directly connected to a PC, the default is printer.
4. White balance to AWB, auto white balance, I have found this does a good job for most images.
5. A.S.A. to 100 for best noise performance.
6. Evaluative exposure metering, ie: metering from many areas of the subject, except for some cases like diatoms against a white background where partial metering may be beneficial.
7. Cover the viewfinder with the one supplied by Canon when shooting with self-timer [or make your own], stray light can enter the viewfinder and upset the exposure, this is recommended independently by Zeiss in their SLR manual and by Canon.
Other selections are more user preference like shooting in RAW which I prefer rather than JPEG I also find this just has the edge in terms of detail and contrast and whether you would like to do most of the work at the camera or PC using the remote capture software. One area that you will spending a lot of time is exposure bracketing, the Canon allows this to be automated but I have a preference to spend time looking and judging each single image taken and make minor adjustments accordingly. On the whole I think Canon have done an excellent job with the buttons and menu structure on the 350D, everything is well thought out, easy and accessible, some people have complained about the LCD and reading menus in bright light but I find it acceptable but not as bright as the excellent LCD on the Nikon D50. The almost instantaneous start-up means you can set the power-off time to a minute or two to save battery life, I always set the Canon G6 to disable power-off but the thing still hibernated after 3 minutes and tended to loose the macro manual distance setting. The 350D manual is informative and well laid out so you should be up and running with some promising [?] results in good time.
Useful functions on the Canon 350D for microscopy.
1. The INFO button on image playback is useful, press this button once or twice to obtain the histogram if it is not already your preferred playback screen, the LCD display will show this together with a small image of your subject and any over-exposed areas will be highlighted by flashing pixels - you may need a magnifying glass to see the flashing pixels however and I'm not joking I do use one! The histogram is very useful to see if you need to make exposure adjustments, I use it all the time. If connected to the PC this is also duplicated in the software after the picture is taken, the Nikon D50 has a substantially larger histogram display.
2. Magnifier, the two small buttons on the back of the camera at top right adjust the magnification in the playback mode and by itself it's useful but used in conjunction for testing the same subject but changing microscope settings it is very valuable. Increase the magnification to the desired level on the first image then without making further adjustment turn the mode dial and your next image will be selected with the same magnification at the same part of the image. I have used this when checking mirror lock functions and parfocality, even slight differences in the thickness of the T2 mount can make images blurred with the fixed tube Zeiss photo-adapter so I achieved parfocality by using 350D playback magnifier and adjusting the thickness of the shim in my adapter to obtain a sharp image through the binocular head and camera whilst also having the reticule in good focus. Alternatively if you have the camera attached to the PC you can see a nice big preview image on the screen but for making a series of tests I found being directly at the camera more practical because of the layout of my PC and microscope. The Nikon D50 has a very similar system but personally I don't find it quite as intuitive as the Canon requiring more button presses to achieve the same result but this is personal preference.
Dust and the Canon 350D.
So far after many lens changes and use on the microscope I have not suffered any problems. I am now much more careful how and where I change lenses or adapt back to the microscope, the small CMOS sensor and mirror may be helping here giving a smaller aperture for dust to enter and settle. I always have the rear dust cap sealed and ready for lenses if using on the microscope so dust cannot settle on glass elements or in the caps themselves. All relevant microscope parts/adapters for the camera are always covered with tight fitting home made dust covers or the original Zeiss ones when supplied.
Issues concerning image quality using the 350D on the microscope.
Unless you are luckier than me you might be dismayed at the images resulting from your first tests with the 350D on a microscope - it's a camera that needs to be worked on to get decent results, images taken on the Canon G6 using crossed-polars gave rich black backgrounds whilst maintaining good contrast from difficult subject matter this can be extremely hard to copy with the 350D and in some cases after many experiments I gave up, you are most likely to be confronted with poor contrast and soft images. In contrast the Canon Ixus 400 when used with the Leica CME provided consistent results with regards to contrast and sharpness as did the Nikon Coolpix 4500 with the Zeiss Standard. These cameras along with the Canon G6 are all CCD based however this may be more to do with how the images were obtained, the Nikon 4500 and Canon Ixus were held in place just above an eyepiece and the Canon G6 used the Zeiss digicam adapter. Purely out of interest for comparison with the 350D Nikon use a CMOS sensor in the top of the range D2X the rest of their models: D50, D70, D70s and D2H, D2Hs all use CCDs.
Gregor Overney points out that the soft image issue I am experiencing especially when viewed at full size on a monitor are the result of oversampling and the photo adapter should have a magnification factor dropped from 2.5x [35mm film cameras] to 1.67x to take into the account the smaller capture area of the 350D and compared to the Canon G6 and its dedicated photo adapter I am not fully utilizing the potential of the 350D by using the 35mm photo tube. However at the present time I don't have many options until Zeiss decide to start making new photo tubes for digital SLRs and even then it would have to be manufacturer specific since sensors vary in size and probably more so as new cameras with higher pixel counts come on the market.
Canon ships the 350D with Parameter 1 set which is supposed to provide sharper more contrasty images but many tests have shown that any of Canon's in-camera settings have only a minor effect when used with my Axiostar and I use the camera with all sharpening etc at zero as in Parameter 2. To be fair to the Canon with large image sizes like these the Zeiss objectives might not be up to the job being achromats, Neofluars with higher NA's could be preferable to provide better contrast and sharpness but a changing from a 2.5x achromat to a 2.5x plan-Neofluar had little effect.
The softness of image can be somewhat lessened as you resize down to the images likely to be used for the Internet and web articles but for competition use I am less happy. It could be that images print much better than the images I see on my screen, I use a Dell 1920x1200 WUXGA screen with very fine dot pitch but the 7Mp [only 1Mp less than the 350D] results from the Canon G6 can look very nice at full size on my screen when I got everything just right on the Zeiss, the same cannot be said from the results off the 350D. The low contrast output from the 350D with a number of difficult subjects is bourn out in the histograms obtained which show a very bunched peaky response from typical darkfield or crossed-polar subjects irrespective of exposure which if adjusted just moves the response up and down the histogram chart, it is much more difficult to get the pixels to stretch further out and provide more contrast. Note, in the tests shown at dpreview.com the Canon's in camera settings do make significant changes to the histogram and to some extent on the colour saturation but when confronted with low contrast [typical] microscope subjects the differences I see are more subtle.
The importance of shutter speeds.
Below are a series of images from a Klaus Kemp test slide with the 20x A-Plan objective in use, the series is taken at different shutter speeds using the mirror lock and self-timer function. The images have been converted to black and white to remove different colour balances due to the lamp being turned from very low to high. There is clearly a major problem at higher shutter speeds with loss of contrast and detail suggesting either the mirror lock self-timer combination is ineffective or some other force is at play. The Axiostar microscope is no lightweight design and combined with the DSLR very rigidly connected to the microscope through the short phototube so to still have this phenomena is strange. There will be the shutter firing but the small lightweight design compared to the older film based cameras I would have thought the vibration from the shutter would be insignificant.
I tried these tests since Zeiss go into some detail about the correct use of shutter speeds when using older SLR cameras in the SLR manual. What is more important would be when using even higher power objectives like a 40x or 50x, I have not repeated the experiment but presumably the effect is going to be even worse. Anyone considering attaching a DSLR or SLR to a microscope would be wise to try the same experiment to confirm firstly whether you have the same effect and secondly if so what the maximum shutter speed should be to eliminate any loss of detail. I think detail is being effected even between the 1 second and 1/4 second shutter speeds when I viewed the images full size and if you look carefully you can see it even on these smaller images. This could mean as Zeiss suggest, keeping within a quite narrow window of shutter speeds for optimum use. By the way the table I use for the microscope is on a concrete downstairs floor and I remain perfectly still when the images are being captured and out of interest I put a heavy onyx paperweight onto the microscope stage, re-focused and did the same test at 1/40th second...it isn't likely to be the stage vibrating since I got the same result as below.
Having been in conversation with Gregor Overney who kindly read the article in its final draft form before submitting it to Micscape he commented that he was not surprised at the results I obtained with mirror lock engaged and I enclose his comments here:
I understand that you were not able to reduce the effect of vibrations with the help of the MLU [mirror lock-up] feature of the 350D. This does not surprise me a bit. The vibration induction of the shutter of SLR and DSLR cameras is not negligible since it is a curtain and not a leaf shutter. This motion is not symmetric to the optical axis and hence can induce a vibration that is easily visible at 1/5 second. My Nikon F3, which has a mechanical way to lock the mirror and which has an excellent shutter, still shows some vibrations when used at speeds around 1/5 second. (The danger zone goes from 1/30 to 1/2 seconds. Longer exposures are fine and shorter exposures are fine.) - Since my D70 has no MLU and hence induces a lot of vibrations, I use an external shutter, which consists of a black plastic assembly. This assembly allows me to achieve exposures down to 1/2 to 1/4 seconds without a flash light. This is perfect when photographing static subjects. Of course, a flash light can easily be synchronized via external trigger. During all my photomicrographs, my D70 is put into bulb mode using an external IR remote.
Gregor also points out another way round the problem is to use much higher shutter speeds, ie: 1/125th second or greater and my setting of 1 second is most likely still too fast and 2 seconds or slower should provide even better results.

Left and right, 1 second, 1/4 second shutter speed respectively using the mirror lock and self-timer function.

Left and right, 1/20th second and 1/40th second respectively using the mirror lock and self-timer function.
Left and right 1/40th second, left image self timer only with no mirror lock and right using manual shutter release with no self timer but mirror lock engaged.
With mirror lock function only engaged the first depression of the shutter release locks the mirror up, I then waited 10 seconds and depressed the shutter release again which takes the picture note this was far from ideal since I had to do this via the camera shutter release albeit as delicate as I could. You can see using self-timer only without any form of mirror lock the image has really fallen apart with very poor quality results whilst the manual method of firing the shutter with mirror lock engaged is comparable to using it with self-timer. From these tests at least with my system it is essential, especially using higher power objectives to use slow shutter speeds in the order of 1 second [Gregor recommends 2 seconds or more] for all image capture irrespective of contrast technique to provide adequate results.
Optimising results from the Canon 350D with the Zeiss Axiostar.
I have probably made more tests with this camera than all of my previous digital cameras [several] put together to try and optimise image quality. The most important points I have found include:
1. Keeping the shutter speed low, around 1 second being a good starting point and experiment with longer shutter speeds, here a good range of adjustment of the lamp intensity together with neutral density filters [ND filters] is useful.
2. Use of sRGB and aRGB colour space from the menu, although the aRGB [Adobe RGB] tends to be less saturated than the more common sRGB I have found it can provide more neutral colour images especially with regard to the backgrounds of crossed-polar images when presenting them for editing in Photoshop. Note this is not using aRGB in the true sense since I am viewing on a screen setup in sRGB but the effect of using aRGB on the camera on my screen is preferable in some circumstances.
3. Experiment a lot with the exposure compensation for each image whilst observing the histogram for best spread and no clipping at the brightness extremes, here the 350D over-exposed pixels display on the same playback screen as the histogram is useful.
4. Even small changes in the condenser aperture can really effect the contrast on 350D images, I have found with some types of subject closing the aperture just a fraction more than I normally would with my A-Plans can help bring up contrast whilst balancing this against resolution of detail.
5. Using reasonable amounts of sharpening on images [I use different methods depending on the size of the image and subject matter], the 350D output is definitely on the soft side, you can set sharpening to +1 or +2 in camera but I set to 0 preferring post sharpening at the final stage of editing. The soft images are not only microscope specific I have read a number of reviews concerning Canon DSLR cameras including the 350D and it seems to be a common feature, my landscape shots are definitely on the soft side and the reviewer in Amateur Photographer magazine [UK] was concerned at the loss of fine detail at mid-distance in landscapes. Note the CMOS sensor used in the 350D is not the same as the one used in the Canon 20D although they are both 8Mp.
Difficult subjects.
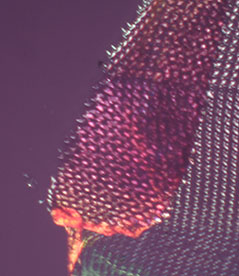
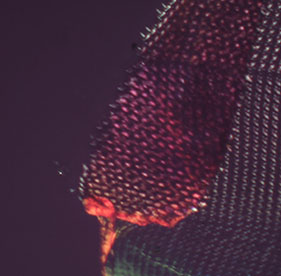
Above and below images of the radula of a pond snail using crossed-polars, the slide was prepared and mounted by Biosil.
Images captured from the Canon 350D. These have been resized with low sharpening in Photoshop, otherwise untouched. The images were captured with a Zeiss 2.5x plan-Neofluar NA 0.075 objective. All exposures were 1 second with left to right 0 EV, -1 EV, -1 2/3 EV, the best overall histogram is for the 0 EV which is central but limited span, the other two progressively bunched to the left. From past experience the Canon G6 would work best on an image like this at -1 to -1.5 EV and provide excellent contrast.
Matching edited images using Photoshop levels control, further level adjustment can send the background to near black but the bleed on the structure of the coloured section of the radula becomes unacceptable, the lack of saturation is dissapointing. As I have found a few times with the 350D some subjects just don't work and this is one of them, another I have found is small highly detailed structures like feathers against coloured backdrops created with crossed-polars and Rheinberg filters, the colours seem washed out and there is a lack of fine detail compared to the Canon G6 no matter what settings I use on the camera or post editing I use in Photoshop.
The above was captured by the Canon G6 using a Zeiss 2.5x A-Plan NA 0.06 objective, the original unedited picture showed excellent contrast and only needed modest level adjustment in Photoshop to provide a super black background and high contrast colour, whilst the histogram shows good balance of pixels across the range for a subject of this type. I have had to put a border around the image since its background is so dark it disappears into the black background of the article! This is a resized crop from a large 7Mp file and since I wanted to keep this image minor anomalies captured near the edge of the radula structure have been brushed out in Photoshop compared to those above.
Software.
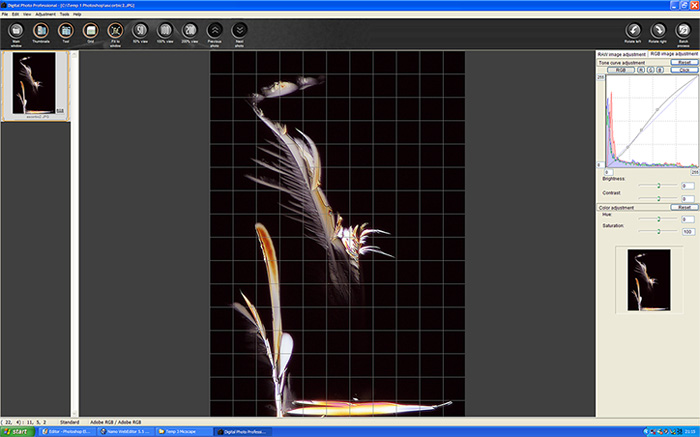
Canon provide a comprehensive software package with the 350D but the only two I find useful for microscopy or otherwise are Canon remote capture and the DPP software, the rest I have tested and removed from my hard drive. However since finishing the bulk of this article I read dpreview.com review of the 350D in detail and he suggests the RAW plug-in for Photoshop CS is superior to DPP in retrieving fine detail and DPP can cause some colour anomalies and that the RAW software within the Zoombrowser package is better. The above picture is a screen capture of DPP or Digital Photo Professional, it may look very simple but the curves function for enhancing levels is a useful feature for it is missing in Photoshop Elements 3, this gives precise adjustment to small or large areas of the RGB channels collectively or individually, you can see a gentle 'S' curve being applied to the combined RGB channels to the image shown later in this article. The program can process and edit RAW images straight from the camera having been saved on the computer hard drive rather than the cameras compact flash card using the Canon remote control window which operates within the program.
Unfortunately you cannot operate the shutter from the software because it can detect no lens is attached to the camera...a pre-requisite for it to function. All the more common adjustments to image quality found in photo-editing programs can be found including a useful before and after edit to compare results, final editing like sharpening and resizing I do in Photoshop Elements importing it directly after saving from DPP generally as jpeg format at the highest quality setting.
Selecting suitable subjects.
Given the right subject matter and images captured from the microscope by the Canon 350D can be a lot more promising than some of the earlier comments would suggest. Good images can include the use of crossed-polars provided I was careful about picking subjects with the right mix of dark and light areas to obtain saturated blacks whilst maintaining highlights. With close attention paid to shutter speeds, lamp setting and exposure compensation DPP and Photoshop could bring the 350D images to life. One of the interesting points is that the 350D with my microscope provides some of the most satisfying images from higher power objectives especially using the Zeiss 10x or 20x suggesting an improvement could be gained substituting the A-Plans for plan-Neofluars in this range, in general the least satisfying are those from my 2.5x objectives which suited the Canon G6 well, this may or may not have something to do with sampling, sensor size, pixel dimensions, screen resolution etc.
The loss of capture area due to the small sensor compared to full frame 35mm can work both ways, for some of the images I have taken before that I wished to attempt again I would need to use image stitching but I would end up with a much larger image to print if I wished, otherwise it is about starting fresh with new ideas and adapting the subject matter to the new format. Although I use the eyepiece reticule to estimate the amount of the subject I can capture I also back this up quite frequently by a quick look through the camera viewfinder and I frequently leave the camera in the vertical format on the Zeiss since I find this suits many of the subjects I like to take.
Gallery, most images have larger views but file sizes are quite large, could be slow download!
click image for a larger view.
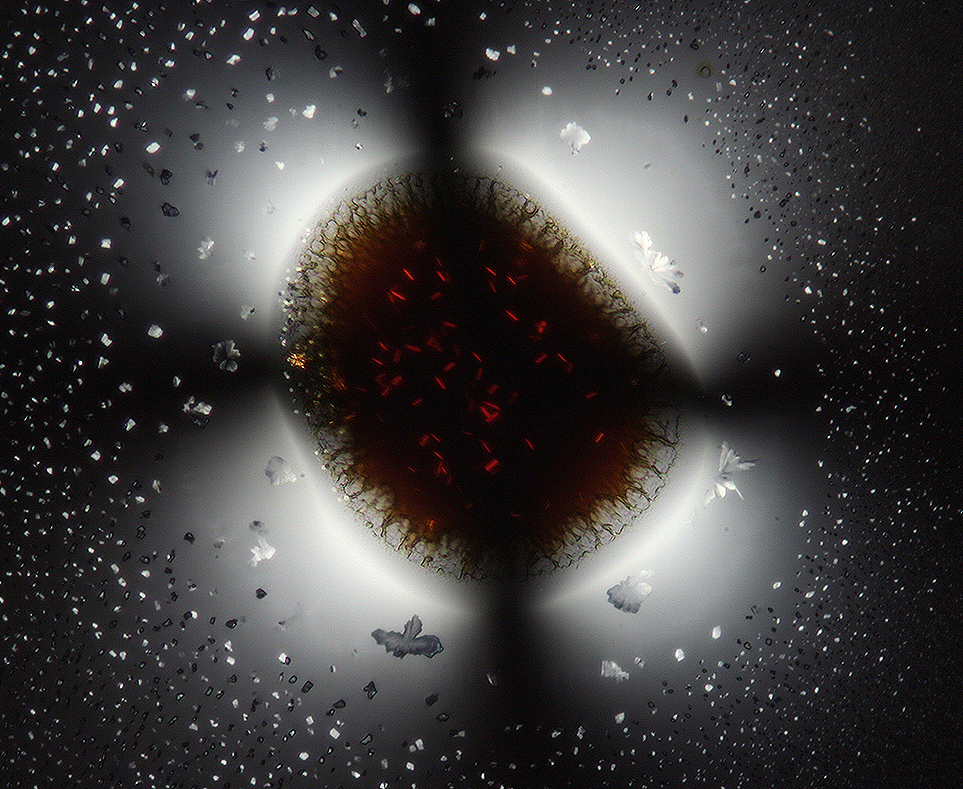
Here I have selected the exposure for the backdrop not to loose crystal detail into the corners, The 350D has held the peak white in good check aided by feedback from the histogram and over-exposed pixels function on the camera whilst shooting. I have tried to obtain the most accurate image that I saw through the binocular head and in this case the central portion is as seen here appearing very deep red-brown with lighter red tiny crystal formations, whilst the backdrop remains slate grey. A good effort by the Canon.
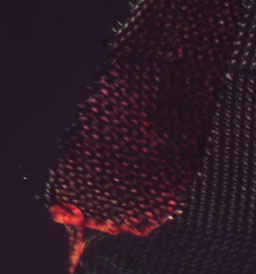
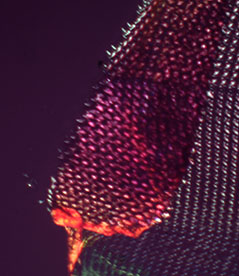
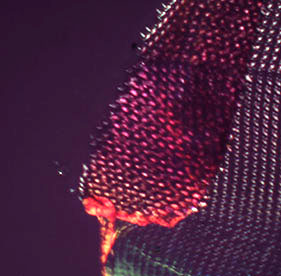
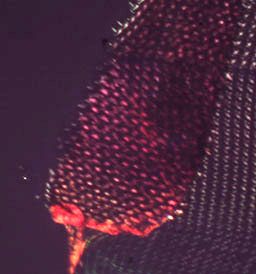
Above and below, ascorbic acid crossed-polars, Zeiss 10x A-Plan NA 0.25 objective above and 20x A-Plan NA 0.45 below, the slide below is a tiny crystal formation at the edge of a preparation from a collection of slides specially prepared and recently donated by Mike Samworth, thanks Mike!

click image for a larger view.
Careful selection of exposure and subject can provide a pleasing image.

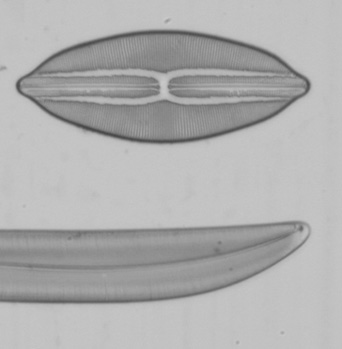
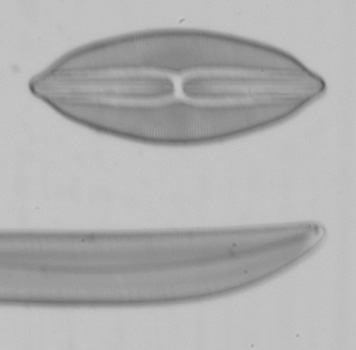
click images for a larger view.
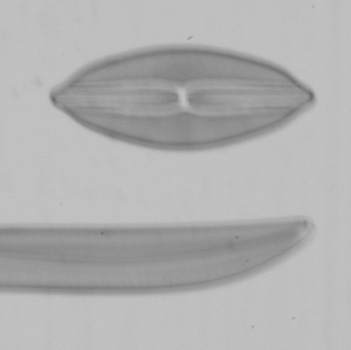
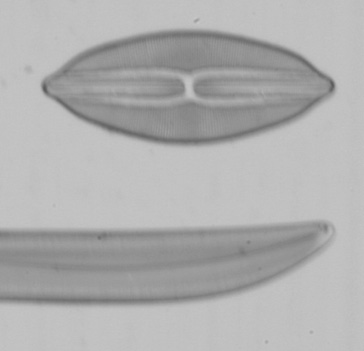
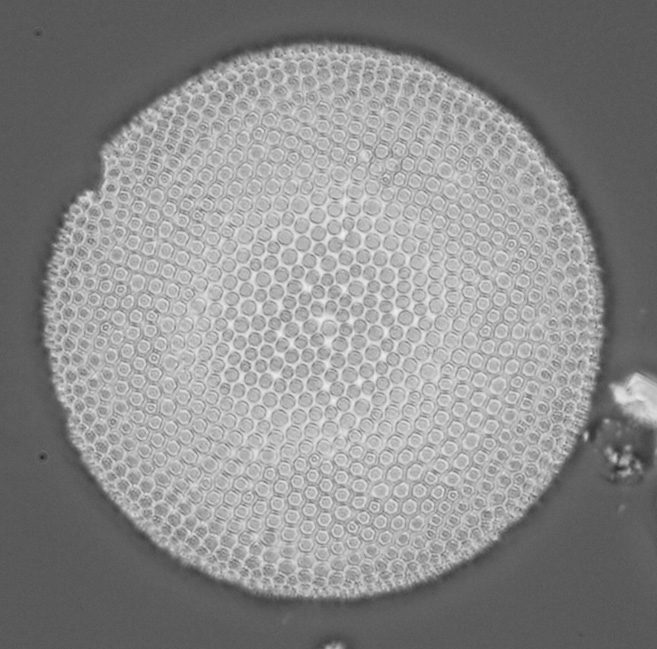
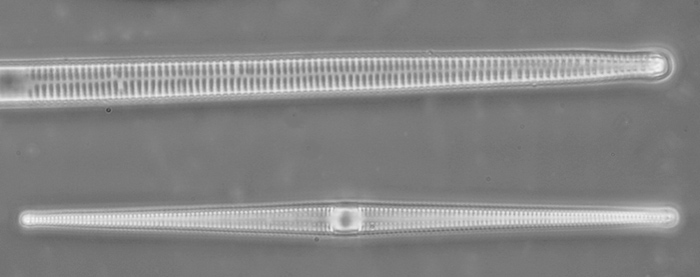
On the left, part of a diatom strew prepared by Klaus Kemp this was taken with the Zeiss 20x NA 0.45 Ph2 A-Plan using phase contrast at 1 second exposure, 100 ASA and 0 EV. This was one of my tests for focusing and parfocality accuracy since I focused exactly 50% out from the centre of the diatom, I was pleased that the 350D on the phototube replicated this. On the right, a very old TS section of the stem of an elder prepared by Richard Suter. I purposely selected this for its fading stain and low contrast but with careful adjustment of microscope and camera this is as it appears in the binocular view, the colour is precise and the image including cell structure and detail is neither better nor worse than my view showing that the Canon 350D can provide accurate portrayals of subject matter, the elder was taken in brightfield with a Zeiss 5x A-Plan NA 0.12 objective.
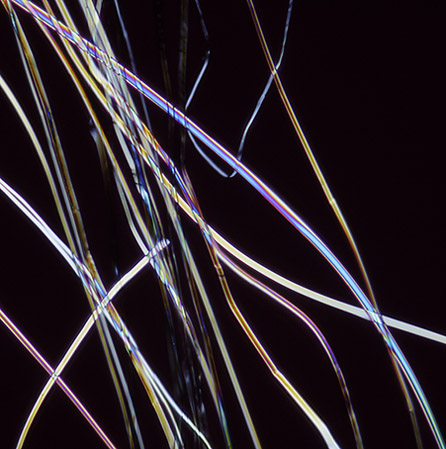
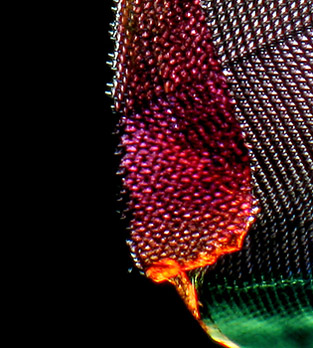
Silk under crossed-polars, Zeiss 10x A-Plan NA 0.25 objective, slide prepared by Biosil, 100 ASA -1 2/3 EV. Again, because of the selection of subject to background ratio the Canon 350D has done a reasonable job in keeping the background dark aided by EV correction and Photoshop to enhance this. This is a fair capture of the visual image I saw down the binocular head with the silk having only subtle colour, sharpness and contrast is OK after post processing.
click image for a larger view.
The above image shows acceptable detail capture from the Zeiss and Canon 350D considering my 40x NA 0.65 Ph2 CP-Achromat objective is nothing special. This is part of the 100 form diatom test plate prepared and mounted by Klaus Kemp. The 350D has been set at 200 ASA and exposure 1 second 0 EV, the strange mottling in the background is mountant anomalies captured by the phase technique.
click image for a larger view.
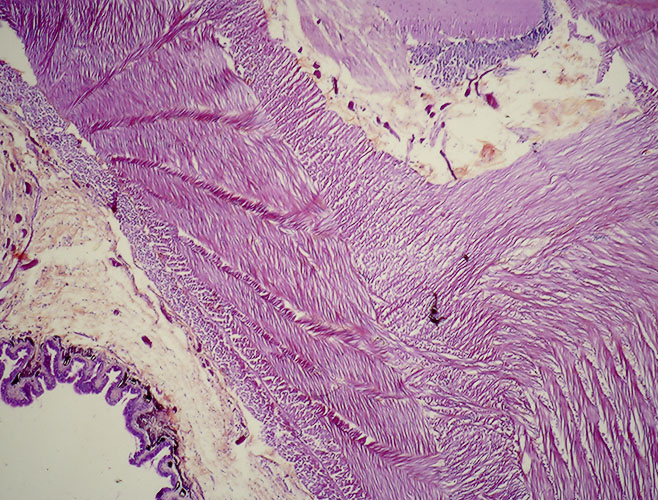
Section of octopus tentacle prepared and mounted by Biosil. Zeiss 2.5x NA 0.075 plan-Neofluar in brightfield. exposure time 1 second, 100 ASA +1/3 EV.
Conclusion.
It must be remembered these findings reflect my system, many factors influence image quality captured on camera, different microscope design, light sources, the type and quality extinction of polarizers, objective selection etc all play a big part in any microscope/camera pairing. Even now after several weeks of tests I am still learning and I will provide an update in future if I find I can improve on any of the materials : ) or methods used here. As is, the Canon 350D is a lightweight compact DSLR with many useful features available for not much more than a pro-sumer digicam and with the right lenses and accessories provide satisfying results from macro to landscape. Used with the microscope I would make a cautious recommendation and this would raised somewhat when the price drops further over the next year or two providing a lower risk purchase. However be prepared for a number of hours in experimentation with both microscope and camera to obtain the best results...but that's photomicrography. Compared to my previous Axiostar/Canon G6 with its combination of adapters and tubes the 350D with simplified phototube and parfocality with the binocular view offers a more practical, professional and rigid package and I have enjoyed the challenge of extracting some promising images and indeed assembling my findings into writing this article. Have fun!
My thanks go to Gregor Overney who read the final draft version of this article before publication and made several suggestions and comments which have been integrated into the main text of the article with his kind permission.
If anybody reading this is using a camera from Canon like the 300D, 20D, 1Ds or indeed any DSLR in this class and has achieved similar or better results from their microscope I would be interested to hear from you.
Links.
Previous article, Zeiss universal digital camera adapter [includes photos of grid slide for comparison with this article] http://www.microscopy-uk.net/mag/artdec04/iwzeissadap.html
Zeiss SLR manual in PDF format from the Zeiss website, scroll down the manuals until you find Photomicrography with 35mm SLR cameras, click here to link to the manuals page.
Knight Optical, suppliers of microscope reticules [graticules] and polarization materials, click here for a link.
the end.
Comments to the author, Ian Walker, are welcomed.
Please report any Web problems or offer general comments to the Micscape Editor.
Micscape is the on-line
monthly magazine of the Microscopy UK web
site at
Microscopy-UK