Revisiting an old illumination technique.
Improving a Jessops slide viewing panel for use with the microscope.

By Ian Walker. UK.
Last month whilst talking
about the
Watson Edinburgh 'H' microscope I referred to using a simple light box
made by Jessops UK normally used for viewing slides which I use with
old
microscopes supplied with a mirror. I find this a very convenient
lightweight design which can be used either with four 'AA' batteries or
low voltage
mains adapter but after many hours of use I thought about
improving its usefulness for the microscope. The first thing was to
dismantle it into two halves by removing the batteries or mains adapter
lead and four screws
in the base and remove the opaque plastic viewing panel which
fortunately is only held in place by double sided sticky tape, the
panel can be
carefully pushed out from the back with fingers and then cleaned up for
later.
Fig 1. Box re-assembled with the diffuser panel removed showing the small fluorescent tube and original curved silver reflector, the tube is showing its age by the dark grey banding at the bottom end but are reasonably cheap to replace.
Fig 2. shows a new thick cardboard panel accurately cut to fit the original surround and reduces glare, the large aperture is of sufficient diameter when using low power objectives with the diffuser back in place.
Behind the aperture there is a slightly smaller ring stuck to the back this allows an accessory disk to be fitted from the front without it being accidentally pushed all the way through. Referring to Fig 2. the first improvement noticed when using medium to high power objectives over the unmodified version is light output which is about doubled in brightness but more importantly is the 'quality' of light which has more penetrating power compared to the diffuser and gives a significant improvement in contrast and fine detail especially diatom structure. The tube width is sufficiently wide to allow complete illumination over the field with a 40x objective and simply holding a narrow object at the bulb surface allows focus of the condenser.
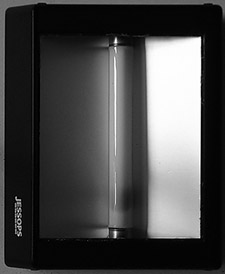
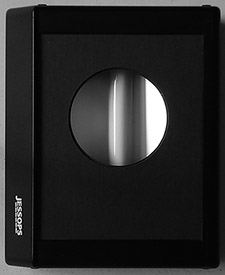
Fig1. Fig 2.
Fig 1. Shows the tube and
curved 'metalized' reflector whilst Fig 2. shows the home made
baffle with aperture cut-out to remove glare and take accessories. The
position of the aperture is based on the height of the microscope
mirror from the
desk and picking the brightest section of the tube.
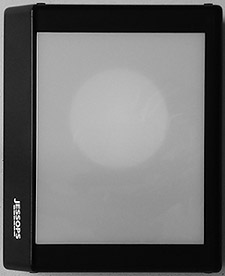
Fig3.
Fig 3. The original opaque
diffuser panel can be re-fitted over my cardboard
aperture for low power work improving its versatility, it is simply
held by being a good fit in the recess and can be pulled off when
needed.
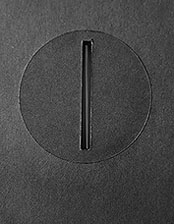
Fig 4.
Fig 4. Detail of 'slot illumination' accessory panel fitted to the aperture hole with diffuser removed, to remove the panel I simply pull it out with the edge of one of my metal dark field stops. A smaller cardboard ring fitted behind the main aperture overlaps by about 1mm preventing the panel pushing through and importantly removes light escaping at the perimeter.
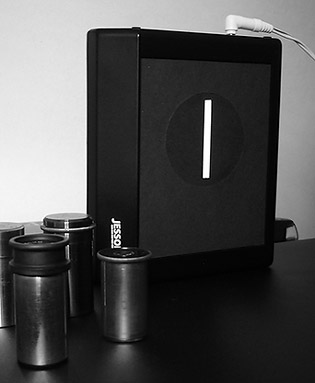
Fig 5.
Lamp in action with 'slot illumination', the lamp box is placed around 9" away from the mirror of the microscope just out of view at the right and here the lamp is being powered by the low voltage mains adapter with the wire trailing off at the top of the box. By careful placement of small feet the enclosure points slightly downwards without being too excessive to cause instability.
Revisiting an old illumination
technique.
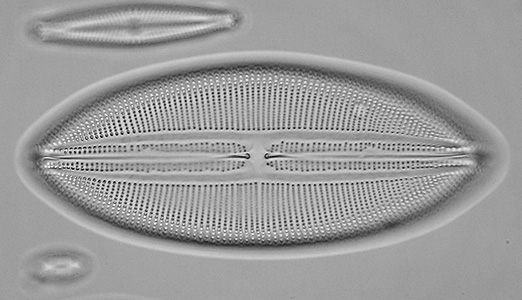
Fig 8.
Navicula henndyi.
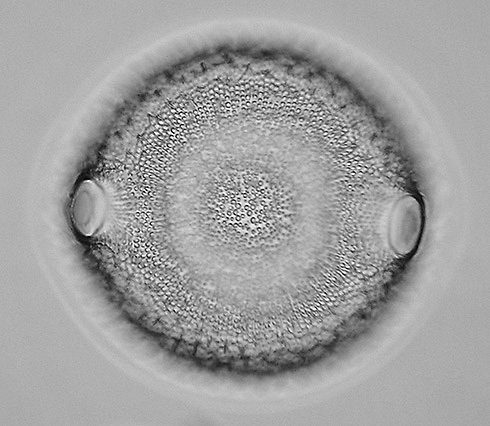
Fig 9.
Biddulphia edwardsii.
This little fellow could do with image stacking but shows good definition in the focus plane.
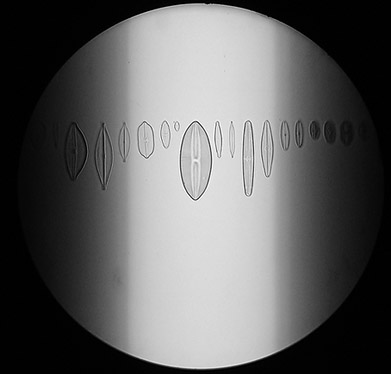
Fig 10.
Group diatoms.
Very old John Browning 1/4" objective the illuminating section can be narrowed by movement of the lamp, compare this to Fig 6.
Conclusion.
Back in the days of using an
oil or
gas lamp to illuminate the microscope the flame was arranged by the
design of the wick or burner to have a broad and narrow surface. For
setting up the microscope the edge of the flame was used to focus the
condenser where for a typical medium power objective and eyepiece a
correctly set up microscope would look like Fig 6. below.
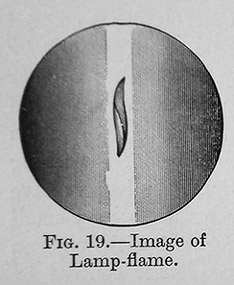
Fig 6.
Sample images.Fig 6.
This picture was taken from
'Modern
Microscopy' by M. I. Cross and Martin J. Cole 2nd Edition 1895 but also
appears in other publications and shows a diatom being illuminated by a
narrow beam of light rather than across the field. As it says in the
text it is of personal preference whether you then turn the broadside
of the wick towards the microscope to illuminate the whole field after
setting up but for some subjects like diatoms it can be provide optimum
contrast using the edge of the flame.
Several factors need to be taken into account in a modern experiment
since I have no reference regards original flame dimensions
but eyepiece and objective magnification and illuminating distance from
the microscope will all have an effect on the perceived width of the
illuminating
portion as seen through the eyepiece. The width of the slot cut-out on
the accessory panel must not
be too narrow otherwise strange diffraction effects will appear and
resolving power of the objective will be impaired but after much
testing with both a modern LOMO Apo 40x NA 0.95 and an old brass Beck
40x NA 0.85 objectives fitted to my Edwardian microscope shows a subtle
improvement using this technique rather than illuminating
the full field born out by better contrast in fine detail areas
without losing resolving power for the same setting on the condenser
diaphragm. Old objectives particularly of the early Victorian era can
suffer from extraneous light from the microscope lamp reducing
contrast and creating a very 'washed-out' image and sometimes require
the condenser diaphragm to be reduced to 60% impairing fine detail
retrieval but this method can help somewhat in these circumstances by
limiting the amount of unwanted light entering the objective. It could
be argued there may be some oblique illumination creating this effect
but the width of the illuminating area I have used is somewhat wider
than that above with the diatom central to the brightest area with the
40x so I
don't think this is influential in this case. Using lower power
objectives the illuminating area becomes narrower but I have found this
an advantage using a very old John Browning 1/4" brass objective which
is very sensitive to flare, the image seems crisper with this method
and
the general appearance looks not unlike Fig 6. above.
With the demise of decent external Kohler lamps many years ago and the difficulty now of getting hold of them a simple light source like this can work well and is a big improvement over the unmodified version of the Jessops light box and is certainly worth experimenting with. LED illumination can work well but I never got it to work to my total satisfaction for both low and high power objectives when I optimized it for one the other would get worse in consequence but this is most likely down to optical components available to make both work equally satisfactory.
Whilst I carried out these tests I borrowed my brother's LOMO external 15 Watt filament lamp and power supply for the LOMO Biolam microscope with the same objectives and my old microscope. I have always been rather indifferent about this lamp it seems you are forever fiddling around with clear blue filters [sometimes one, sometimes two] ground glass [sometimes with, sometimes without] and have enough range on the illumination level plus sufficient aperture for low power work but I persevered to compare results with my lamp. I was pleased to find out that my simple illuminator stands up well against this lamp without the heat, better white balance without the need of filters and a big improvement when using low power objectives using the original diffuser. Regards flare and the 40x objectives the LOMO doesn't seem any better even though it has a condensing lens and diaphragm, also filament 'colour abnormalities' can be seen even when using these objectives so I dutifully gave him it back and went back to mine. Even though it uses a fluorescent bulb most digital cameras can cope with this either by using a dedicated setting on the white balance menu or auto mode works well on my Sony.
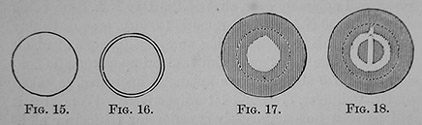
Fig 7.
With the demise of decent external Kohler lamps many years ago and the difficulty now of getting hold of them a simple light source like this can work well and is a big improvement over the unmodified version of the Jessops light box and is certainly worth experimenting with. LED illumination can work well but I never got it to work to my total satisfaction for both low and high power objectives when I optimized it for one the other would get worse in consequence but this is most likely down to optical components available to make both work equally satisfactory.
Whilst I carried out these tests I borrowed my brother's LOMO external 15 Watt filament lamp and power supply for the LOMO Biolam microscope with the same objectives and my old microscope. I have always been rather indifferent about this lamp it seems you are forever fiddling around with clear blue filters [sometimes one, sometimes two] ground glass [sometimes with, sometimes without] and have enough range on the illumination level plus sufficient aperture for low power work but I persevered to compare results with my lamp. I was pleased to find out that my simple illuminator stands up well against this lamp without the heat, better white balance without the need of filters and a big improvement when using low power objectives using the original diffuser. Regards flare and the 40x objectives the LOMO doesn't seem any better even though it has a condensing lens and diaphragm, also filament 'colour abnormalities' can be seen even when using these objectives so I dutifully gave him it back and went back to mine. Even though it uses a fluorescent bulb most digital cameras can cope with this either by using a dedicated setting on the white balance menu or auto mode works well on my Sony.
Fig 7.
Also from the
book 'Modern Microscopy' 1895.
Using the 'slot
illumination' you can check the limit of the condenser for critical
work using higher power objectives like a 40x NA 0.85. Using the
original figure numbers above Fig 15. and Fig 16. were part of the
discussion for low power objectives and not required here. Fig 17.
shows the adjustment where the condenser is gently racked up until the
maximum aperture is seen down the eyepiece tube with eyepiece removed
and then continued until two black spots appear as in Fig 18. which
grow larger as you further rack up the condenser. Here I quote from the
book:
'The last point before the appearance of the black spots furnishes the position in which the condenser has the largest aperture consistent with its outstanding spherical aberration not too much interfering with the highest results, and is the limit of the condenser for critical work. Any further advance of the condenser gives merely annular illumination, which, of course, is to be avoided, excepting when stops are used.'
And on using the edge of the flame for illumination, an extract taken from 'The Microscope - A Practical Handbook' by A. H. Drew D.Sc. F.R.M.S. and Lewis Wright 1927 [who also details the use of the edge of flame to determine the aplanatic cone of the condenser shown in Fig 17. and Fig 18]:
'The partially illuminated field often seems strange to the beginner, but he should bear in mind that our object is to secure the finest definition and illumination in the centre of the field and the rest is neglected.'
I have found this method quite useful sometimes in obtaining a little more aperture from the Abbe condenser compared to its usual position but only a small deviation is required to obtain a brighter image consistent with a slight improvement in definition of fine detail excepting the edge of the focused slot is more diffused compared to Fig 6. above.
Fig 8. was taken with a
very
early 20th century brass Leitz 1/12th" oil immersion achromatic and Fig 9. was taken with
a LOMO 85x NA1.0 water immersion with cover correction both using a
Sony
P200 digital camera hand held at the eyepiece [so not very scientific]
but I
hope it gives some idea that 'slot illumination' together with the
modified
light box above can provide good contrast and definition to diatoms
provided by Klaus Kemp on his 100 form test plate. The
diatom in Fig 8. is
not laid flat to the cover slip so some definition is lost on the right
hand side, I suspect ultimate resolution is being limited by the old
Abbe condenser.
Fig 8.
Navicula henndyi.
Fig 9.
Biddulphia edwardsii.
This little fellow could do with image stacking but shows good definition in the focus plane.
Fig 10.
Group diatoms.
Very old John Browning 1/4" objective the illuminating section can be narrowed by movement of the lamp, compare this to Fig 6.
Conclusion.
I am pleased with the modified
light box compared to the original also the Jessops box overall is
lightweight and
efficient and with the new baffle can accept different diaphragm
sizes or other accessories making it quite versatile. Compared to both
filament bulb lights and LED illuminators that have been tried past and
present it holds up well in comparison and for anyone with an old
microscope without built in light source makes a useful addition to the
microscopist. Since the microscope is a monocular I particularly like
the way eye strain is minimized by using only a central portion of the
field illuminated making longer viewing times possible without fatigue.
A number of manufacturers worldwide manufacture similar slide viewing
boxes on the same principle making the design accessible across many
countries.
Reference: Jessops 5"x4" [lit area] slide viewing panel can still be obtained from their website [www.jessops.com] for £14.99 inc VAT at the time of writing this article with spare daylight corrected tubes for £6.50 they also sell the matching 240V ac mains adapter which also has various preset output voltage settings making it quite versatile, I also noticed a more expensive slimmer version of light panel with 'new technology' [whatever that means, but possibly using LED's which could be interesting].
Note: Their search engine is poor and at first I thought they had stopped selling them but the search engine doesn't find their own product, its under the main heading of accessories > enthusiast products > projection/viewer > light boxes.
Comments to the
author,
Ian
Walker,
are welcomed.