 |
| Used Phase Condensers (Part2) Servicing the Wild M20's phase condenser By Paul James |
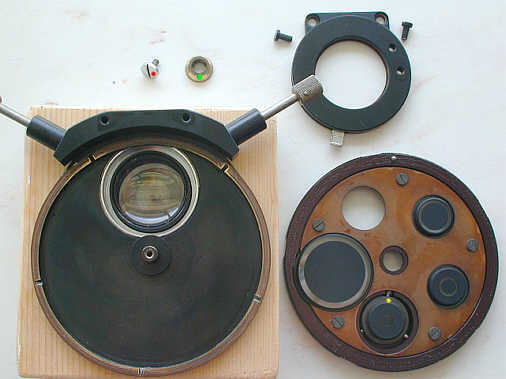
Phase Condensers like the Wild M20's are very durable and will no doubt function reliably for generations to come, but there are times when the delicate motion of the Zernike disc is compromised by the aging lubricant's tendency to dry up, causing unnecessary stiffness in the moving parts, accelerating the process of wear. The following notes are offered to the those who have acquired such a module that requires servicing. Of course the old adage 'leave well alone' springs to mind, but the need to open up the condenser to at least remove the offending remnants of aged 'grease' is a job worth tackling. However the actual choice of lubricant I leave to the reader, though I do offer some advice regarding the disassembly of the condenser as well as highlighting a couple of important procedures that need a little care in their execution. I have also for the record described my 'personal touch' regarding lubrication and a modification too.
NB : Please read through before you even attempt to dismantle the condenser.
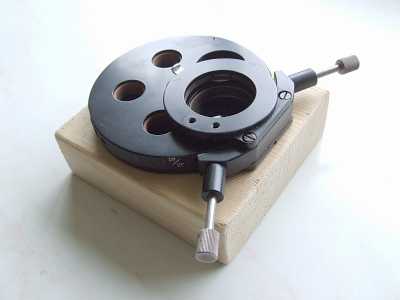
Support Jig I recommend the making of a very simple jig using a block of wood about the same area of the condenser, minimum thickness of approximately 30mm with a + 40mm hole bored out to accommodate the Abbe optic/ mounting ring. When supported by the jig the whole job becomes much easier and frees both hands, and of course prevents damage to the optic's top lens etc..
|
Dismantling The first step in dismantling is to remove the under side fitting that supports the iris diaphragm and filter holder, by undoing the 2 appropriate screws . Unfortunately by removing the iris assembly you will also be losing the maker's original alignment. This affects only BF, but returning it to its original position is not difficult to accomplish, so I'll describe this procedure further on.
 |
Opening Procedure
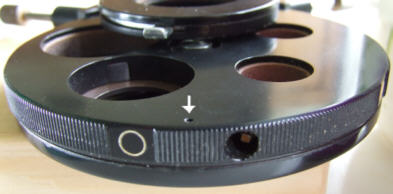
1) The chromed machine screw shown above has a 'left hand thread' and its purpose is to lock the bronze spindle tension nut beneath it. Remove by turning it clockwise. Underneath you'll see the bronze circular nut ( standard right hand thread) which is responsible for adjusting the frictional resistance of the Zernike disc. Inadvertently trying to remove the chromed cap machine screw as if it was a standard right hand thread could easy lead to its shearing off !
 |
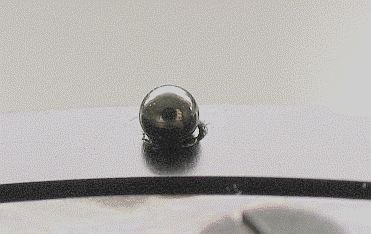
2) Before you even attempt to open up the condenser body have a think about how you can guarantee that the tiny steel ball which provides the 'click stop' facility, can be safely restrained from flying through the air should it decide to do so if the spring is suddenly relieved of tension. There are 3 basic ways of preventing its potential loss. First consider the very real advantages of working with a layer of material/cloth below the condenser which will dampen any motion of the ball if it decides to scurry across the work surface. Even flying through the air is possible which the suddenly released spring is more than capable of doing which could result in its loss ............. This is not a job to be carried out on a bare Formica surface for rather obvious reasons.
An alternative precaution would be to place a magnet near the side of the disc just prior to opening it so the ball will behave accordingly and stick to the magnet's face. The spring will in all probability stay put.
 |
You can accurately estimate the position of the ball/spring from the outside before you separate the 2 halves. The small hole(->) seen on the outer margin of the under surface is in fact the seating of the spring/ball combination . So if you do make use of a magnet it should be placed nearby. The ball is unlikely to fly off at a tangent if you refrain from turning the discs during their parting, and also if the unit is horizontal too.......another virtue in the use of a support like the block of wood............................. A last resort would be to part the 2 halves inside a clear plastic bag !!!
If I seem a little OTT about all this, it's simply because the loss of the ball would incur infinitely more time and trouble gaining a replacement, than the small effort of preventing its potential loss in the first instance.
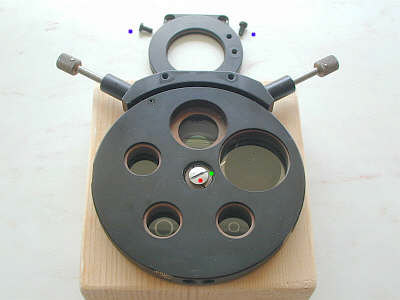
The Interior
Once opened, the inside is more straight forward to deal with. Strictly speaking no further dismantling need take place for lubrication purposes, but the perforated bronze cover can be removed ( 5 screws) from the Zernike disc if you have a problem with the annuli etc..
 |
Here's a close up of the x 10 annulus and dust too : evidence of an earlier dismantling ?
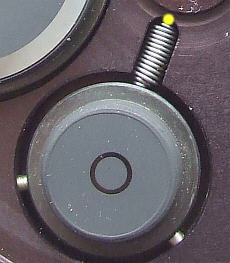 |
Note the spring that provides the yielding force that the 2 adjusters require for centering the annulus. This method of adjustment is a very reliable one, and is unlikely to fail. The large annulus seen in part above is for the DF facility and is centred by 2 grubscrews accessed externally. Other than removing as much of any dust that may be present, there is little else to do.
Lubrication and Adjustments
Your likely reason for getting this far is to restore the smooth motion of the Zernike disc. To this end, almost any form of lubrication will suffice, BUT whatever your particular preferences maybe on this subject, I'd stress the importance of using the very minimum necessary to achieve your goal. There is no perfect lubricant : ie one which will remain exactly where you put it, and do the job for years without starting to either creep, if it is oil based, or dry up and stiffen if of higher viscosity. There is even some merit in removing all traces of the old remaining lubricant, and leaving it at that.
In my own phase condenser the 'grease' had dried up resulting in high frictional forces that made the turning of the Zernike disc a two handed affair. Wild's idea of mating two dissimilar surfaces : The smooth anodised disc's peripheral face with the soft bronze rim is good engineering practice, but unfortunately the chemical activity of standard greases, more especially the older forms tended to dissolve the copper component of the bronze alloy. This left the immediate surface full of minute micro pores and led also to a slurry of metallic debris tainted with copper salts. The presence of such a mix is not conducive to the requirements of proper lubrication.
Sadly therefore it seems that even the most diligent application of maintenance using inappropriate lubricant can cause erosion : spoiling the otherwise silky smooth feel that Wild's engineering prowess is capable of providing.
The choice of fresh lubricant is entirely yours of course, and to help towards this goal a peep at Ian Walker's informative and comprehensive article will prove very useful. Viscous lubricants impart a waxy feel to usage during rotation which many users might prefer, necessitating a slightly more relaxed adjustment of the locking screw pair, whilst lower viscosity 'oils' call for slightly closer 'fit' from the locking screw pair since oils by their very nature allow more intimate contact between the slipping surfaces.
After removing all traces of the old lubricant, a slight dab of fresh lubricant on the spherical face of the bronze nut, and a 'wiping' of same on the narrow mating tract of the bronze upper body only is more than sufficient to do the business. Don't be too concerned about such a small amount of lubricant disappearing for good, for the fact is that capillary action will prevent this, which is why in all probability when you opened the condenser, there were traces still left in the important places after all these years ! Only the excess from too generous a lubrication will escape which serves no purpose at all other than to make a mess, particularly as the mating boundary is exposed all around the knurled disc.
Since the unit's upper surface is essentially a 'drum skin', minute frictional vibrations will be greatly amplified as the disc is rotated, manifesting audibly as a faint 'swish'. I only mention this to those who might think there is something wrong with their condenser even after lubricating it, when in point of fact the noise can never be entirely eradicated. Conversely, the same effects greatly exaggerate the 'ping' generated during click stop registration, letting us know together with our fingers when to cease turning the disc !
My Personal Touch
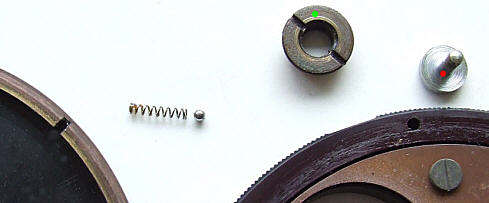
In the pursuit of contriving an ultra smooth operation of the Zernike disc, it seemed logical to not only relubricate the disc, but to ease the spring's pressure on the ball which I deemed too severe in my condenser. So in order to achieve the desired effect, I snipped off 30% of the lower part of the spring. Now the disc still registers positively enough, but the force to initiate its rotation is far more in keeping with the overall silky smoothness of operation that I desired : one finger can do the job with consummate ease.
 |
Note the unrestrained spring's height : shortened by about 1/3rd so as to be flush with the mating surface of the disc : reducing the ball pressure in the slots and thus proving to be ideal for my use.
Reassembly
Having successfully dismantled the condenser, your only concerns when reassembling it should be that the 2 halves are put together horizontally, and as near parallel between each face as you can muster. The ball can be coated in viscous lubricant to aid its adherence to the top of the spring whilst you perform the closure.
Make absolutely sure when closing the 2 halves, that the position of the ball/spring combo is in between 2 registration slots. Failure to attend to this simple procedure might result in the ball and spring slewing into a nearby slot and causing the spring to collapse at right angles when the halves are pressed together !
Only experimentation with the bronze tension and chromed locking screw settings afterwards will reveal how they should be nipped to provide you with the desired feel of rotational resistance. If in some doubt I think it best to bias for slightly easier rotation than to stiffen the motion. Take your time attending to this process of gauging the 'feel' of the rotating disc and adjustment of tension, because you will want to avoid a repeat of the collimating procedure of the iris housing, should you need to readjust the rotational tension once again at a later stage.
Regarding the recentering of the iris diaphragm : Best I think to loosely nip up the 2 screws which attach it to the main body, so that when the condenser is in place on the stand, the iris assembly can be tweaked into the centre position, yet remains in position once centred whilst its 2 screws are finally secured.
To centre the iris set up for BF with lowish power and focus the condenser. Now remove an eyepiece and close the iris diaphragm until its inside edge is seen in the back lens of the objective. It's relative position to the objective's will be noticed, and it's centering can be tweaked accordingly. Finish with more accuracy using the x 40 objective by repeating the procedure until you are satisfied that the condenser's iris diaphragm is actually central. Nipping securely the 2 screws belonging to the iris assembly heralds the end of the whole affair !
| All comments welcome by the author Paul James |
Microscopy UK Front Page
Micscape
Magazine
Article
Library
Please report any Web problems or offer general comments to the Micscape Editor.
Micscape is the on-line monthly
magazine of the Microscopy UK web
site at
Microscopy-UK