Russian LOMO Microscopes:
[Notes on refurbishing and the use of Nye special lubricants].
By Ian Walker. UK.
Introduction on lubricants .... a little knowledge can be a total disaster!
When I became dissatisfied with using general purpose lubricants on microscopes I tried to find out what people were using on their 'scopes. After some searching around I found out some useful information from old club magazines, newsgroups and Google searches and one brand often kept popping up... Kilopoise damping lubricants by Rocol, and light to medium grades of Kilopoise were recommended. As with all lubricant manufacturers there will be different grades for different uses but Kilopoise damping lubricants are not sold by many dealers in the UK and I could only find RS Components who were selling one grade '0868' in rather large quantities of 450gm tins. Rocol's online data sheets included '0868' in their range of damping lubricants described as giving a 'silky' feel to 'instruments' so thought, as it's only the damping grade I've found, I'll buy it and if it works fair enough [it cost a fortune relative to my usual budget on such things]. It duly arrived and from the look of it when a sample was removed from the tin I thought it could be OK. To cut a long story short if you are ever tempted to buy Kilopoise 0868 advanced lubricant for a microscope ... DON'T! It will completely sieze any moving parts solid and it is EXTREMELY difficult getting it off again and you will shred any plastic gears instantly if you try to move them. A closer look at the data sheets shows '0868' to have a viscosity almost ten times greater than that of the lowest damping grease grade, so suspect it's for heavy industrial instrument use, possibly for sliding surfaces on large milling machines and lathes. The only home use I could think of for this grade would be coating fly paper for ensnaring flies the size of pterodactyls....but I like flies so I will leave them alone : ).
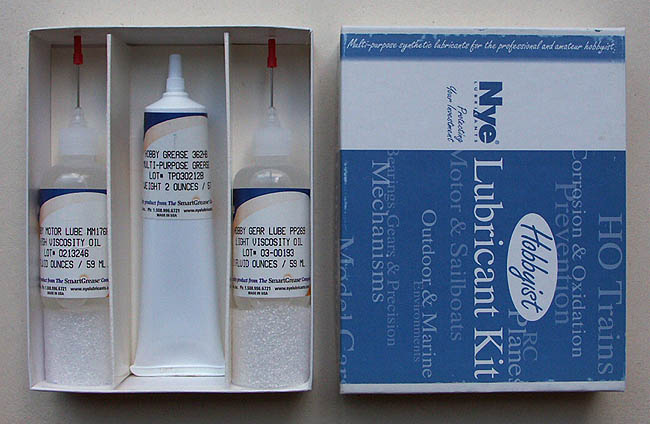
For a number of years I have had the opportunity to use and refurbish a range of older microscopes (as an enthusiast) and one thing in common with manufacturers like Zeiss, Swift & Son and the Russian Biolam-Bimam range bought off eBay is they usually need some maintenance with respect to siezed or stiff moving parts. In the past I have 'made do' with oils and greases needed around the house, however these are by no means ideal for the requirements for the microscope. Psychologically there is always a reluctance to start a major refurbishment project on a microscope, especially if you have no choice because components are siezed, and all you have to complete the job is something like a general purpose oil. Enter the excellent lubricants offered by Nye. These lubricants are specifically manufactured for mechanisms like the turning and sliding parts on a microscope. The 'hobby kit' shown in Fig 1. and the higher viscosity 795A grease in Fig 2. were purchased on-line from Micro-Tools Europe [see below for details] based in Germany so there is no extra VAT or import duty to pay for those residing in the UK. ('Micro-Tools International' is based in the USA). The total cost for the two including postage and packing was 56 euros which may seem expensive but should last you a very long time, they took about 4-5 days to arrive after completing the order. Their catalogue includes many items which may be useful to the microscopist including various precision screwdrivers, pliers, tweezers, magnifiers etc and is biased towards supplying materials for repair and maintenance of older Nikon and Leica professional SLR cameras, the parts of which are not unlike those found in microscopes.
|
|
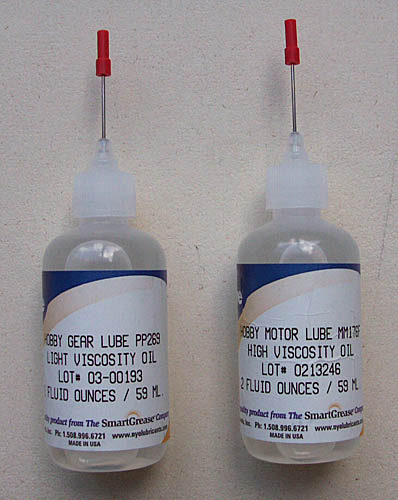
Fig 1.
The image above shows the 'hobby kit' consisting of two oils and one grease, the oils come in 59ml precision applicators [both low and high viscosity] and one 57gm multi-purpose grease completes the line-up. The benefit of this package is the small amounts offered, you are not drawn into buying a single 0.5 litre tin of one lubricant which would probably last you the next two centuries if you were still here to use them! These small bottles should last a life time. The general purpose grease has a very nice consistency and looks not dissimilar to a semi-transparent hand cream and the high viscosity oil does not 'creep' when applied to moving surfaces, a common problem with household oils which can become a nuisance if applied to the rotating parts of stages.
|
|
|
Fig 2.
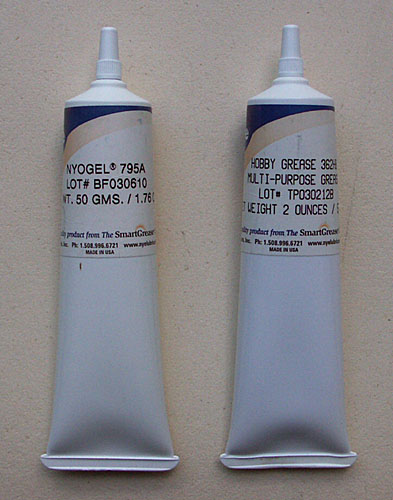
Here is a close-up of the two bottles of oil in the hobby kit and on the right the small tubes of grease. Note the left tube [Nyogel 795A] in the right hand picture was purchased separately and is a higher viscosity grease suitable for the larger moving parts found on your microscope like the coarse focus sliders.
|
|
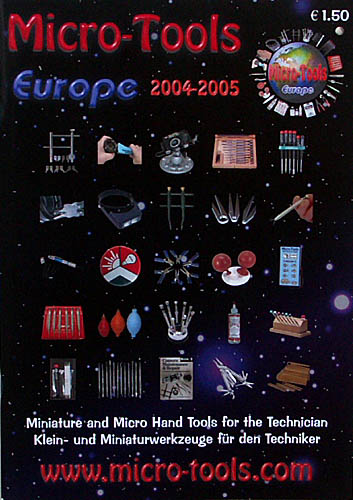
If you don't like browsing the on-line shop, Micro-Tools can send you a free printed catalogue with your first order giving full details of all their products, I prefer this method since it is easier to compile a shortlist of any tools or greases you need after your initial purchase. (Catalogue image scan used with the kind permission of Micro-Tools Europe.)
For full details of Nye lubricants visit their website: www.nyelubricants.com
For a link straight to their on-line shop go to Micro-Tools or you can visit their homepage shown on the paper catalogue above.
You can type the two codes below into their search engine once you have entered the shop and see brief details on the characteristics of the lubricants but it is also worth checking the many other lubricants on offer which may be closer to your requirements than the ones I used.
The shop reference code for the oil and grease kit is HOBBY-KIT
The shop reference code for Nyogel 795A lubricant is 795A
Notes on refurbishment of the microscope and application of oils and greases.
Historical note.
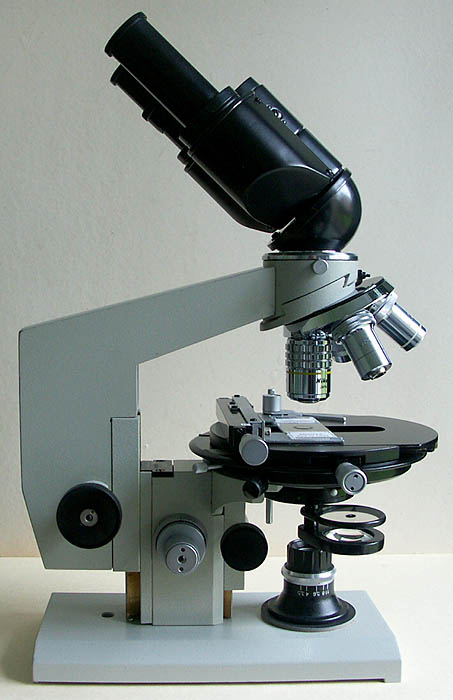
For some time the Russian Biolam [also sold under the Bresser name] has used a large plastic dial residing in the base to adjust the fine focus, this method goes back a number of years but is found on all the current range. I can't say I like this method of focusing, although it is precise I have found I need two hands to adjust the dial - it being a little stiff on my sample due to the action of a large spring pushing down on the thrust pin. Some years ago LOMO used this method of focusing together with other models using conventional fine focus controls placed either side of the limb, if you are tempted buying a second hand Biolam I suggest you might prefer the light action but weighted feel of these graduated solid aluminium fine focus controls although the internal method of focusing is similar in both models. I recently purchased one of these stands with condenser, angled eyepiece tube and eyepiece on eBay [see Fig 11.] and after a good clean and application of fresh lubricants it works a treat and at present has become my main microscope.
Application of new lubricants.
The most important thing to remember is absolute cleanliness of the parts on your microscope before applying fresh lubricants. There is no point in applying new expensive grease or oil if there is the slightest remains of the old lubricants - you will just get a horrible mess where the two lubricants start to interact. The Russian 'tank' grease applied to their older scopes tends to be acidic and attacks the brass sliding surfaces like the main focus or condenser movements and should definitely be removed. I have found after complete disassembly [controls, screws, nylon or metal drives etc] of the focusing mechanisms that a disposable lint free paper towel dipped in white spirit removes most of the old Russian grease [be prepared to use several applications] and then use isopropyl alcohol to remove any traces of white spirit. I usually leave all the cleaned parts a few hours to let any cleaning material evaporate in difficult to access parts like screw holes. If the brass surfaces of the microscope seem blackened or pitted due to acidic lubricants I have found after thoroughly removing the grease deposits that watered down kitchen cream cleaners, Brasso or Duraglit can do a good job of bringing back the finish, indeed I have used kitchen cleaner on a Biolam stand recently that had not been used for some years and by the time I had finished, all the brass surfaces were gleaming. Again it is essential to leave no remains of the cleaner, for some of the larger components I have rinsed the whole part under the tap and let it dry it off.
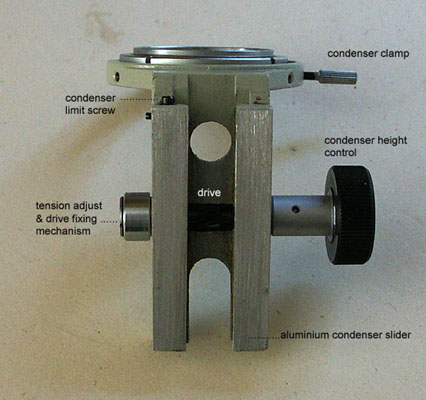
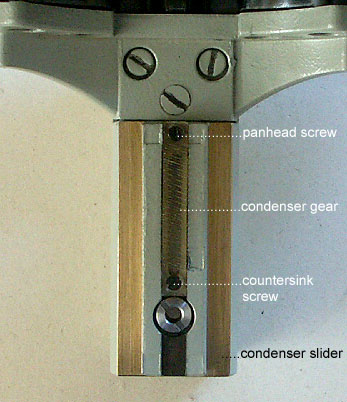
Another thing I have noticed with Russian microscopes in particular is they tend to allow an excess grease to get into the plastic and metal gear mechanisms, minimal lubricants are needed on the teeth of these gears in my view and if the teeth are partially covered in old lubricant I suggest you completely remove it by immersing the whole assembly in white spirit. The small drive trains are easily removed from their parent assemblies usually with two small screws one being a countersink and one pan head in the case of the condenser [see Fig 7], it is very important they are put back in the correct positions otherwise you will crack the plastic. This is a good idea using a countersink screw in one end of the drive since it centres the drive train properly and prevents the drive moving. Once you have left the small drive mechanisms to soak in white spirit for a while to loosen the old lubricant deposits I use a small stiff brush to clean between the teeth of the drive whilst it is still immersed in the spirit, when completely clean I scrub the drive with an old toothbrush soaked in washing up liquid whilst rinsing under the tap and let it dry off.
Oblique and Abbe Condensers, plus other small parts.
After completely dismantling the condenser into its component parts and cleaning off old grease residues you can apply either the multi-purpose hobby grease 362HB or the high viscosity oil MM176F to the sliding parts on the oblique type condenser. You could use the Nyogel 795A higher viscosity grease on the brass sliders but I prefer a lighter action so I used the hobby grease. Abbe condensers have no sliding parts but could benefit from a touch of PP269 oil from the hobby kit on the rotating filter holder and bulls-eye lens using the precision applicator. As with just about all the older LOMO scopes the diaphragm could be very stiff, lumpy or completely seized in which case you should remove the diaphragm from its centring mount [normally by slackening off 3 minute special screws...don't lose one on the carpet you will never find it] and soak in white spirit meticulously cleaning all the leaves individually with a soft brush, then clean each with isopropyl alcohol and re-assemble dry. If you ever lived with trying to adjust or force these diaphragms whilst using your microscope over a period of time it is a real pleasure with the finger-light action of a cleaned one! Small parts like centring adjusters for rotating stages etc should be cleaned off and a trace amount of the thicker Nyogel 795A can be applied to the threads to give the control a nice smooth damped action. Incidentally this is the only use I have found for the Rocol Kilopoise 0868 grade mentioned in the opening paragraph but I have enough here to last about 50 million screw threads!
General cleaning of paintwork.
The paint on the Biolam and Bimam ranges varies from a light mottled green to grey and is usually applied quite thick, no more than a cloth dampened with a mild solution of washing up liquid should be needed but particularly stubborn stains can be removed with any one of the 'cream' kitchen cleaners like Ajax, Jif or Cif as they call it now applied with a small cloth to the offending area. After a good clean these microscopes can look like new even after 30 years of storage or use.
Stages in removing the focusing and condenser parts on the popular older Biolam range with the large fine focus dial.
|
|
Fig 3.
First remove the thrust plate for the fine focus [held by two short screws] just below the stage at the back and remove the spring. The spring prevents slack in the fine focus when moving in the up or down direction.
Suggested lubricant on the spring to prevent rust, 'hobby grease' 362HB from the lubricant kit.
Next.
|
|
|
|
Fig 4.
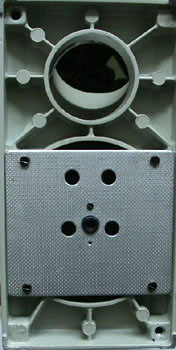
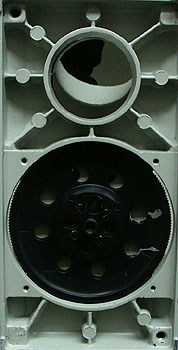
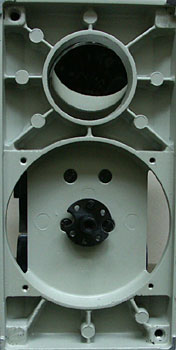
The left picture shows the underneath of a typical older Biolam stand using the large plastic dial method for focusing. Remove the four screws.
The middle picture shows the aluminium plate removed allowing access to the focus dial, there are three short screws and one long one, the long one forms part of the end stop for the fine focus when the plate is in position. Remove the four screws from the plastic focus dial.
The right picture shows the focus dial removed allowing access to the four large screws holding the base to the block holding the stage. Remove the four screws, there are cut-outs in the metal flange to allow screwdriver access by rotating the focusing flange slightly. The modern stands will vary a bit from the above since some now have built-in illumination. The thrust pin sitting in its well will come away with the base [Fig 8.]. Make sure when you offer the base up to the limb after refurbishment that the thrust pin engages in its dedicated hole in the fine focus plate.
|
|
Fig 5.
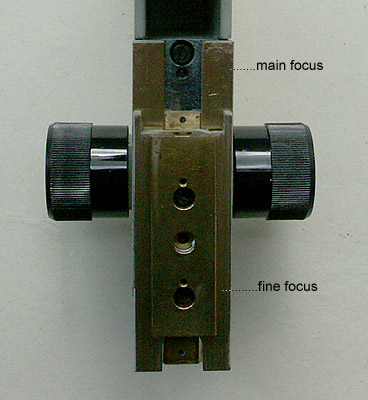
The above picture shows part of the coarse-fine focus assembly with labels showing the two main brass surfaces which the sliding parts act on. This is after it has been removed from the normally fixed block [when assembled] holding the stage. If at any time you wish to work on the coarse focus limb without working on any other parts of the microscope you can simply remove the two screws holding the fine focus thrust plate shown in Fig 3. and lift off the limb from the rest of the microscope first using the coarse focus controls and then slide off from the brass dovetail without getting involved in removing the base plate.
Suggested lubricant on the main focus sliders Nyogel 795A high viscosity grease, this provides an excellent, smooth damped action.
The fixed block [holding the stage] and the limb of the Biolam has good quality dovetail section solid brass movements. When applying the new greases it is essential to remove any traces of the old hardened grease from the dovetails, this is best achieved by complete disassembly of the parts. There are guiding pins which centre the main parts so re-assembly shouldn't be a problem. With the parts all separated you are left with easily cleanable brass surfaces rather than trying to squeeze cloth or cotton buds into the dovetails, some of the grease may have become so hard that a sharp knife has to be used to scrape off the deposits. Hidden within the coarse focus limb are some cogs that mesh with the main focus gear these can be accessed by removing two large screws behind the main focus brass slider one of which can be seen at the top of Fig 5. above - this allows the complete focusing block to be removed. From past experience these cogs are usually stuffed with thick horrible grease but if the coarse focus feels OK without undue stiffness or lumpiness then you can probably leave these alone. The tensioning of the coarse focus can be changed by counter-rotating the large plastic focus controls but you must do this by grabbing and rotating both controls at the same time.
|
|
Fig 6.
With the base removed you can simply wind down the condenser holder shown above to its lowest position using the condenser height control and then slide it off from the brass dovetail. You can adjust the left hand inner tension adjust screw for the best compromise between 'play' and freedom of movement, a similar system can also found in many other microscopes such as Zeiss. The outer clamping screw which prevents the tension adjuster from moving after adjustment normally has two small slots in the head. LOMO included a special tool for adjsting this in microscopes bought new. If not available, I have found needle point pliers sufficient for loosening or tightening these.
Suggested lubricant on the condenser slider, 'hobby grease' 362HB from the lubricant kit and to lubricate the drive shaft Nyogel 795A.
|
|
Fig 7.
The above picture shows the plastic condenser gear on the fixed block holding the stage after you have removed the condenser holder in Fig 6. If the plastic gear is covered in old grease, remove it from its mount and soak it in white spirit for a short while then use a small stiff brush to clean the teeth and then scrub with an old tooth brush soaked in washing up liquid and rinse under the tap and leave to dry.
|
|
Fig 8.
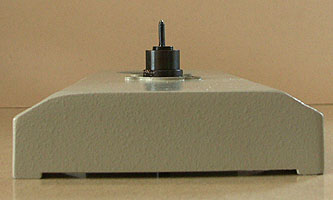
The thrust pin sits in a hardened rotating metal 'well' which in turn is screwed to the large plastic fine focus dial within the base. The top of the pin acts on the bottom of a 1/4" thick fine focus sliding plate situated between the fixed block holding the stage and the moving limb housing the coarse focus controls and is always under tension because of the powerful spring shown in Fig 3.
Suggested lubricant on the base of the thrust pin, Nyogel 795A.
Using Halfords 'Satin Black' spray paint on Biolam metal stages and parts. [UK only].
There is usually a Halfords store within a reasonable distance of most homes in the UK and not too long ago I did some experiments with colour matching and wear characteristics of their 'Satin Black' spray paint available in 500ml tins for about Ł5. I tried some tests on some aluminium plate and mimicked glass slides moving over the top and how good it was when wiped with a damp cloth etc. I was pleased with the results so I decided to completely re-spray the complex rotating stage on one of my Biolam stands, needless to say absolute cleanliness of the surfaces is essential since any grease residues or dust left from cloths will spoil the finish. It's best to integrate the painting with a general overhaul re-lubricating the stage, because I sprayed all the surfaces I masked off the sliding portions with masking tape cut exactly to suit the width of the sliders. The stage top had three light coats leaving plenty of time for each coat to dry, my sample wasn't deeply scored or damaged just a poor finish from years of neglect but if there are cuts in the surface try carefully hand painting these first and using fine emery cloth sand back to the same level as the stage and then spray.
Note: many Biolam rotating and fixed stages are made from high density plastic - I don't recommend spraying these but if the finish is looking poor try first thoroughly cleaning with soapy water after removing the X-Y stage controls and the stage from the microscope, you can be quite forceful here, I use a small stiff-bristled hand brush and really put some pressure on, then let it dry off. Apply a little ARMOR ALL on a cloth and buff in, keep repeating until a nice black lustre returns, then give a final wipe with a dry cloth. ARMOR ALL is also available from Halfords stores and is used as a plastic and rubber restorer for cars etc and has worked very well on both Zeiss matt metal stages and Biolam plastic stages, make sure no liquid residues are left on the stage as it has quite a greasy texture.
|
|
Fig 9.
This picture illustrates part of an overhauled LOMO microscope showing the rotating stage after this has been resprayed with Halfords 'Satin Black' paint, the finish is excellent, hard wearing and shows no sign of problems after several months use. The aluminium controls can be removed, disassembled and cleaned with a toothbrush soaked in washing up liquid to remove years of finger grime.
Suggested lubricant for the X-Y sliding surfaces, hobby grease 362HB from the kit and for the rotating part of the stage, hobby motor lube oil MM176F from the kit.
|
|
Fig 10.
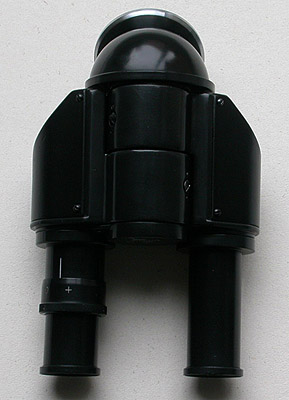
Spot the new paint...this binocular head had been quite badly damaged, after removing the prism covers they were sanded down and re-sprayed, it also gave me a chance to check the state of the prism mountings and optical surfaces.
The final result:
|
|
Fig 11.
This picture shows the LOMO microscope I use at present after a full clean, re-lubrication and re-spray of stage and binocular head. The basic stand [built in 1975] with monocular head [not shown], fixed stage with CT12 X-Y slide holder and eyepiece cost just Ł37 off eBay, the rotating stage has been swapped from another stand, also purchased at a very reasonable cost but like most LOMOs required full refurbishing. At the base shows the battery operated LED illumination with graduated field diaphragm referred to in a previous article and with home made polarization accessories [not shown, polarizer fits snugly on the LED mount with calibration markers and the analyzer fits permanently under the monocular head]. It makes a great all rounder and is small and light enough to put in a small cupboard when not in use. The turret has a mix of none parfocal objectives including a Swift & Son 14x strain free and LOMO water immersion which gives excellent conoscopic interference patterns. Virtually all the parts on this scope were dismantled, cleaned and lubed if necessary, the end result - all the controls have a very smooth damped action and a pleasure to use. I still use my home made cellophane and mica retardation plates in their mount discussed in a previous article and these have been augmented with 1/4 and 1 lambda retardation plates made from optical plastic available from Knight Optical who have an online shop and sell small sheets of retarders and polarizers suitable for the enthusiast. I hope this shows that you don't have to pay a fortune for dedicated polarization scopes indeed you can do it on a meagre budget and have just as much or more fun and learn much more with home made accessories using modest biological microscopes like the LOMO.
The difference when using a cleaned and freshly lubed microscope like this one compared to a typical LOMO 'off the shelf' say from eBay after it has been neglected a while using LOMO's original horrific 'tank greases' is nothing short of a revelation and is part of the reason why the Russian microscopes have such a poor reputation in some countries. I have never tried any of their current range but I hope they have improved the formulation of grease they use now...it makes all the difference, especially the use of different viscosities like the Nye lubes I have used complementing the different requirements of the rotating and sliding surfaces found in a modern microscope.
I think I once read that Wild used more than 20 different lubricants in their microscopes showing how much attention they put into the 'feel' of their scopes and as Chief Engineer 'Scotty' of the original cast of Star Trek said....'how many times have I told you...use the right tool for the right job', it's the same with boring and overlooked grease in your scope - but what a difference it can make if you use the right stuff.
Conclusion: Are these specialist and quite expensive lubricants worthwhile? Definitely, especially if you like renovating old microscopes, the difference in the 'feel' of the controls especially the coarse focus having just the right damping and silky smooth action makes using any of the older microscopes a pleasure especially compared to the 'make do' feel of household lubricants. Highly recommended.
the end.
Comments to the author, Ian Walker, are welcomed.
Published in the July 2004 edition of Micscape.
Please report any Web problems or offer general comments to the Micscape Editor.
Micscape is the on-line
monthly magazine of the Microscopy UK web
site at
Microscopy-UK
© Onview.net Ltd, Microscopy-UK, and all contributors 1995 onwards. All rights reserved. Main site is at www.microscopy-uk.org.uk with full mirror at www.microscopy-uk.net .