Leitz Ortholux
Black Enamel Microscope.
...
By
Ian Walker. U.K.
Introduction.
At first glance seen in pictures on the web, brochures or books, the would be purchaser may consider it of large and heavy build, although substantial using a light alloy casting, it is perhaps smaller than one would think measuring 32.5cm (12 3/4") to limb top and 37.5cm (14 3/4") to the centre of the eyepieces on the trinocular head fitted to this stand. Side by side a Zeiss Photomicroscope seems noticeably larger, in fact on some desks or work tops it may need a plinth beneath the base to raise to sufficient height for comfortable viewing.
It also has a relatively small footprint due to its 'T' shaped base allowing low slung controls, although it is quite deep due to the protruding lamp housing at the rear. Provided you are not moving it about many times it can transported short distances with a comfortable grip around the upper limb and support beneath, preferably with the lamp assembly removed.
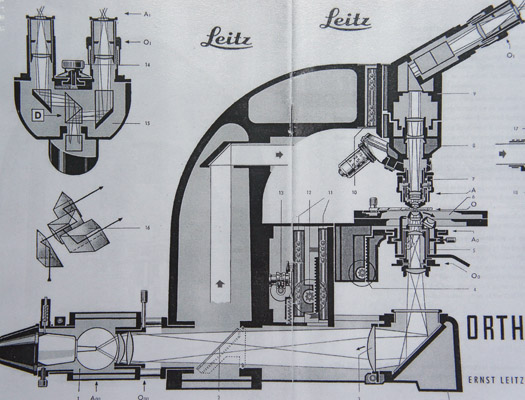
Schematic of earlier Ortholux with single lamp. Ernst Leitz Wetzlar documentation.
Note the lack of field iris, swing-in auxiliary lens and diverter mirror for epi-illumination. The lens after the lamp filament is frosted.
Later, two ports are situated on the rear of the limb allowing mixed lighting of epi-illumination and transmitted. This can be used as a rough guide to the date of the stand if you have seen one and don't know the serial number. In Gregor & Normand Overney's article on Leitz microscopes of the period they show a version fitted with dual light source in 1960 and later still, dual light source and field diaphragm 1966.
In the 1970's the Ortholux II stand was introduced similar in appearance to the Orthoplan with its much squarer modern lines.
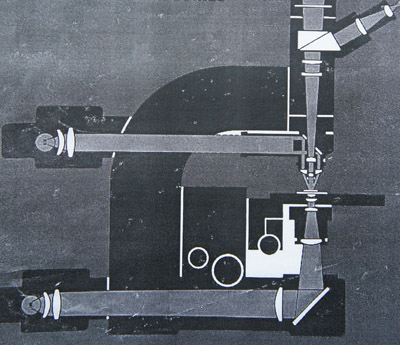
Less detailed schematic from Leitz showing a later Ortholux.
Ernst Leitz Wetzlar documentation.
Quality engineering.
The Ortholux was the earliest microscope to use a totally modular approach in the way numerous accessories could be added to the basic stand like fluorescence, polar, phase, epi-illumination etc. Before this manufacturers would sell the microscope for a narrow spectrum of use limiting its versatility. As we know, all have followed this route and stands of today of research grade are built to take many accessories allowing the end user to build up his or her specific requirements.
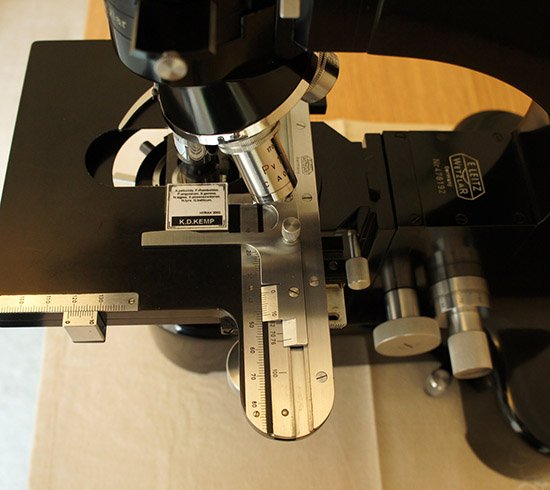
Fine engineering on the Ortholux.
Although the coarse focus controls are relatively small and thin compared to say the Zeiss Photomicroscope they work well and have the right gearing for precise control at high magnifications. The fine focus has limited travel indicated by the white lines etched on the body just above the left coarse focus control.
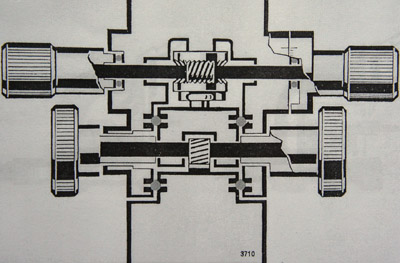
Schematic of coarse and fine focus.
Ernst Leitz Wetzlar documentation.
The nominal tube length is 170mm but unless high NA dry objectives from 160mm stands are used, interchangeability of objectives from other manufacturers is feasible taking into account none parfocality if mixed with the Leitz range.
Leitz DIN objectives with longer 45mm working were introduced later suiting the phase condenser after Zernike, this earlier stand is fitted with 37mm working none DIN Pv phase objectives suited to the Heine condenser and cannot be used in phase with the turret condenser as the phase rings are mis-matched although the bright field position is fine.
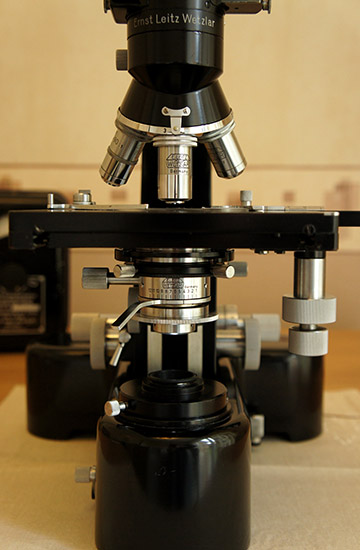
Clean uncluttered stage, fitted below is the centrable Berek condenser.
Typical standard equipment from looking at the price listings of the time for my Ortholux were a square stage with drop down X Y controls, four turret nose piece (brochures also show a five as an option) which works well with a positive click for positions and numbering for objectives, at least on the four turret fitted here. It works on the old sliding surfaces technique rather than a ring of many small ball bearings in the turret perimeter often found in todays higher priced stands but works with smooth, precise action and to complete the line up, a centrable Berek condenser seen fitted above.
The Berek condenser is a two diaphragm design the lower ring taking over the role of the field diaphragm situated on the base of most microscopes, the earlier Ortholux did not have a field diaphragm in the base but later ones did allowing use of the more modern Leitz turret phase condenser. The long arm above the ring sets condenser aperture.
The condenser is of excellent optical and mechanical design being well corrected and with the standard screw-in top allows maximum aperture dry 0.95 but with the oil top (often missing today in sales) NA 1.4. If you own the Heine condenser you can use the push on spring filter clip that comes with the Heine allowing a small green or blue filter specially shaped to fit as this is inter changeable with the Heine condenser as they both have the same diameter tube at the bottom. The Berek top element may be swung out of the optical path by a substantial knurled aluminium control for low power objectives increasing its versatility with minimum fuss.
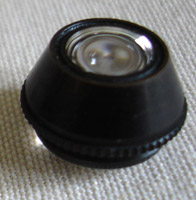
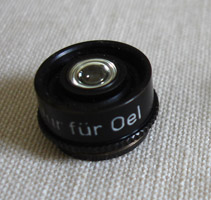
Dry and oil top for the Leitz Berek condenser.
The
pictures below shows the
sprung release leaver for the viewing head, the latter being removed by
pulling up on the dovetail slider seen on the right picture. Also seen
on the left picture is the slider which permits 100% of the light to be
either directed towards the photo tube or the viewing head (this later
changed to 80:20% photo/viewing or 100%viewing) this became a push-pull
knob situated at the front
of the trinocular body. Other viewing heads were the standard binocular
head and a monocular with upright camera attachment. Various camera
options were available at the time including large format film and a
smaller adapter with built in shutter for Leica cameras shown later in
the
article.
Modern digital SLR bodies can be fitted to the trinocular port as a
standard 23mm tube is used and adapters are available today to convert
this to T2 mount or with further adapter rings to Canon, Nikon etc
bodies. A
suitable eyepiece will have to be selected, I believe there were
dedicated photo eyepieces but I would think a Periplan would suffice
for most
purposes but this has not been tested up to writing this article.
It is surprising I think that
being of research grade the stand did not
have a dedicated slot for an analyzer or filter on the older Ortholux,
later ones did, seen as part of the nosepiece, the picture on the
right below
shows a position recommended in the manual to place an analyzer which
was available as a Leitz polar accessory, here fitted with a home
made analyzer adapted for the purpose snugly sitting on top of the
protruding nose piece optic.
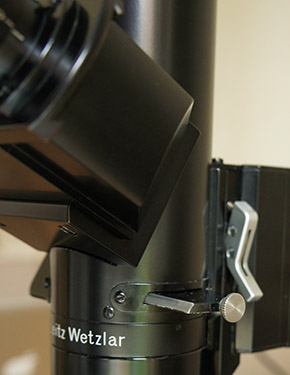
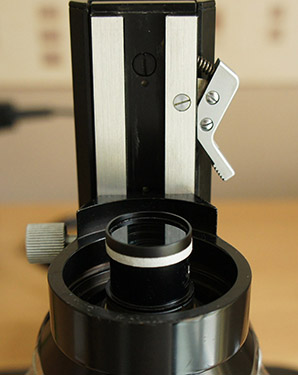
Details of trinocular mount, the right picture with home made analyzer fitted.
Illumination.
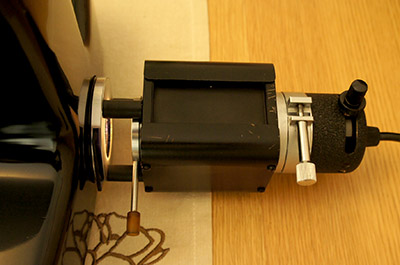
Lamp assembly.
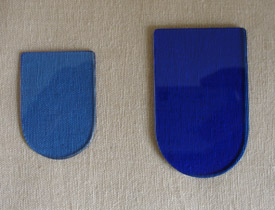
Glass filters, left for Heine or Berek & right, for lamp.
A variable collector lens in the lamp enclosure actuated by a long arm is adjusted to provide an even field which can be adjusted while viewing with a 3.5x objective and wide field eyepieces or putting a frosted glass on the base of the scope and viewing the effect of adjustments. The substantial alloy screw clamp holds the bulb housing in position also allowing some further adjustment by loosening and pulling out the lamp slightly for even illumination whilst concentric controls adjust the centering of the filament.
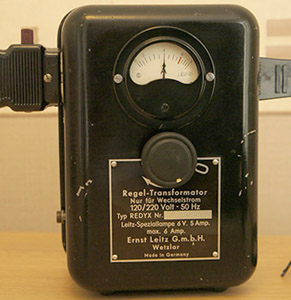
220V/120V ac mains power unit.
There is no voltage indication only current, a red line indicates the maximum recommended 6 amps for the lamp whilst a large plug with its own on/off switch brings the mains supply in together with on/off and variable current supplied by the rheostat on the front actuating a sprung metal arm with carbon roller which rotates up and down on the specially cut secondary winding of the transformer, crude but effective if contact surfaces are clean, I have had no problems with flicker and output is steady.
Optics.
The Leitz pre DIN objectives mentioned in this paragraph worked competently. Fitted to this stand were the 3.5x 0.1 achromat and three Pv phase objectives: 10x 0.25 & 20x 0.45 achromats & 90x 1.15 oil immersion apochromat. Missing was any 40x objective. Although not marked as such the 3.5x and 10x achieve good plan characteristics for their age and give a fair account of themselves on many subjects including larger preparations like plant sections or insect mounts, the 20x I think is rather under whelming both in and out of phase use as the numerical aperture is limited. The 90x apo performs OK within the limitations of its NA and is suitable for dark field with the Heine (with oil top) or the dedicated dark field condenser.
Out of a rather large but odd assortment of optics and accessories supplied with the scope an older style Periplan eyepiece and a 100x objective with iris were suffering from severe delamination together possibly with the latter of oil contamination behind the front element.. the objective was useless, the former passable at best.
Worse was the trinocular head forming a substantial part of the stand. The scope was bought from a European dealer supplying optics on eBay and was sold as optically and mechanically tested. Seen down the left hand eyepiece tube was a 'near square' this required no testing other than looking down the tube with the naked eye, so much for testing, it doesn't even require the scope to be switched on! Delamination of the splitter prism had caused a progressive shadowing of the field of view worsening at the outer edges, the right tube seemed mostly unaffected. An ultimatum was passed to the seller, either the lot goes back or a substantial amount should be refunded and this was agreed.
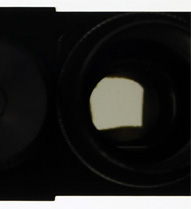
View down left eyepiece tube.
Without going
into detail the defective splitter prism was separated into its two
component parts, the prism splits the
light path to the left and right hand tube prisms and consists of two
prisms the contact surface being
a 50% deposit (or thereabouts) mirror
allowing light to pass direct
to the left tube prism whilst at the same time reflecting light
to the
right hand tube and is extremely
delicate. After cleaning where some dryback of the cement had caused damage to the surface, the
two prisms were offered back together with a very thin
layer of immersion oil, the two prisms 'locked' together by tape via
the none optical surfaces and offered
back to the mount, the latter is a simple copper or similar metal bar
with two screws
(see picture below).
Balsam was considered for the contact surface but considered a one off
process and if something went wrong in the alignment of the two prisms
the whole tube could be rendered useless so immersion oil was
considered the better option although medium term 'dry back' is likely
to occur.
Alignment of the combination splitter
prism is
not to be taken lightly as it is a 3
dimensional puzzle, pressure from the two mounting screws together
with the prism slew in the mount in minute amounts affects alignment,
we are talking fractions of a mm here. Using a graticule
eyepiece and a finely divided micrometer slide alignment was achieved
with 1 division lateral error and zero vertically between the two
tubes.
Small amounts of error between left and right tubes can
cause eye fatigue but I am happy to say I have had no problems.
I now see two round evenly illuminated discs with eyepieces
removed, the mirror damage is not visible whilst viewing but
can be seen looking down the eyepiece tubes with eyepieces removed. The
alignment itself is slow as an adjustment is made and the viewing tube
offered up accurately to the trinocular port, measurements made and
the process continued. A long term project is to seek a UK company that can resilver the prism face with a 50% mirror for a proper repair.
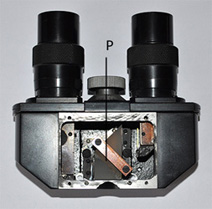
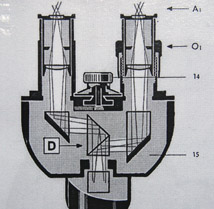
Viewing tube removed from trinocular port. note schematic 'flipped' 180 degrees.
Right image from Ernst Leitz Wetzlar documentation.
More time wasted chasing refunds and yet another trip to the post office, they know me well down there! The response from the dealer after time wasted checking, packing, paperwork, emails and sending it back was 'better luck next time' ... there will be no next time! This is by no means an isolated occurrence with eBay sellers and dealers across the board over the years.
[Editor's note: Unfortunately Ian Walker's reported poor experiences with some mainland Europe microscope dealers also mirror mine, both buying and building up a Zeiss Photomicroscope III and major unnoticed faults of a Leitz Diaplan purchased.]
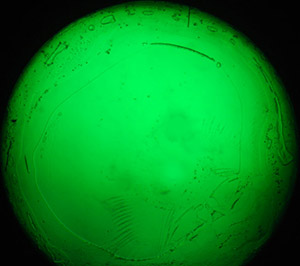
Is this the picture of a new planet, no it's one plane of delamination on the defective 40x 0.95 objective pictured using the Betrand lens of a Zeiss Photomicroscope!
Heine condenser.
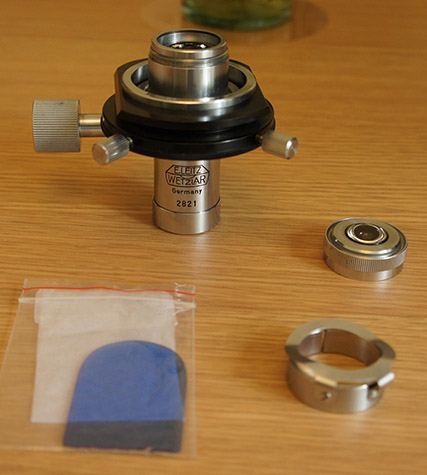
Heine condenser with oil top removed, spring filter clip and blue filter.
The above picture shows the Heine
condenser together with oil top removed and spring clip which can be
fitted to the bottom to allow the purpose made small blue or green
filters to be inserted safely. Some sales on eBay that I have seen, the
clip,
oil top and filters were not sold with the basic unit, I guess many
have been separated over the years from the condenser and get lost
which is a shame as it increases the versatility of the unit.
Unlike the Berek which I like for general use, so far I have not had
great
success with this condenser, yes it is
versatile allowing circular oblique illumination (COL), variable phase
and dark field to be achieved by the rotation of a single control for
different objectives but the ring of light I think is too thin no
matter the aperture
set creating what appears to be diffraction artifacts using COL, a
study of the optics I can find
no obvious problem but due to this phenomena phase is inefficient due
to the
narrowness of the illumination ring and COL has gone past what I think
is its optimum
setting.
I do not agree with Leitz in their
documentation that the condenser operates smoothly at all settings
between bright field and dark field as the illumination always remains
one of circular oblique whether of larger (filling the back focal plane
of the objective) or smaller diameter (say within the phase ring of a
Pv objective). Yes, there is a bright field 'effect' but not the same
as say a standard brightfield condenser like the Berek and again the
image to me looks one of a condenser too stopped down at the majority
of settings.

Heine condenser illuminating ring 20x Pv phase objective in use, due to camera flare this is in reality a little narrower than shown here.
The illuminating ring is approximately approximately 1/2 of the phase ring width on the objective.
I have done hundreds of tests with COL using numerous stands and objectives from 1850's Victorian to modern together with tests using the phase and dark field positions on condensers like the achromatic-aplanatic NA 1.4 from Zeiss and indeed many home made stops fitted to filter trays. Experimenting with these I have always found an optimum width for the illuminating ring, too thin and excessive reduction of illumination occurs together with artifacts introduced and this sample of the condenser verges on that, so I remain unconvinced of the results but I will persevere with it and possibly find combinations of objectives and settings where it performs better.
Dry achromatic NA 0.9 turret phase condenser.
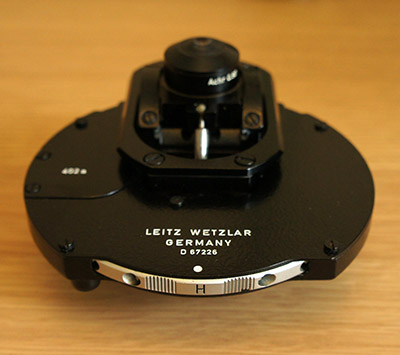
The condenser could take many years of use!
This can be rectified by using the later 'Phaco' objectives but I have not purchased them, interesting though the annuli match my brother's Zeiss Neofluar phase objectives from the Photomicroscope III as tested on ph2 position, 16x 0.4, 25x 0.6 & 40x 0.75 work well, I suspect that the ph3 position would work too for the higher power Zeiss's but this was not tested.
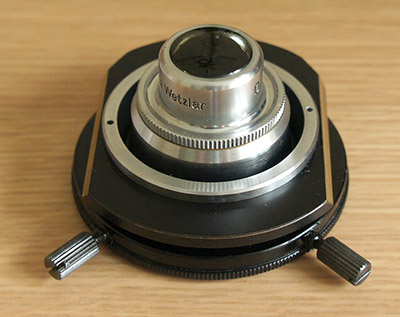
Leitz dark field oil condenser NA 1.2-1.4.
Recently I acquired a Klaus Kemp strew slide of Amphipleura pellucida in a high refractive mount RI 1.9, thin cover slip and with 10x eyepieces (note the viewing head has a 1.25x magnification factor) the striae were portrayed with great contrast and definition whilst punctae within limitations of eyepieces and my eyes, well defined.
The centering when first used was found to be seized due to hardened grease in the mount but after refurbishment works well and once set needs little adjustment on further insertions into the microscope stand. I would have liked to test the condenser with a Leitz fluorite NA 1.30 objective of the period but unable to source at the current time.
Compact Leica camera attachment.
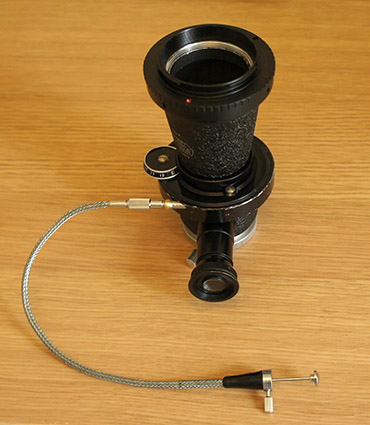
'MIKAS' micro attachment for the Leica film camera body.
A cable release allows speeds from 'T' & 'B' setting up to 1/125th of a second, later 'MIKAS' attachments may differ in style and the highest shutter speed used. The complex 'Compur' shutter mechanism also found on press cameras and many others of the time is notorious now for not working on one setting or another, this one is fine on all settings except 'T'.
The correct cable release with long pin protrusion is required to operate the mechanism successfully, the one which came with the adapter was defective, shown above is a short lead one from years ago hiding away in an old accessories box!
As yet I have not attempted any digital camera work with the microscope, this article may be followed up with another covering this in more detail.
A good range of accessories were available originally although getting harder to source now including a sizable selection of objectives. The pitfalls (and this is most noteworthy) must always be one of finding a good sample that has not been abused and relying on the experience, quality of checks and honesty from the seller whether eBay or dealer in regards all is well with both stand, accessories and objectives.
It is becoming much harder to source 50 year old optics whether Leitz, Zeiss or others that are in first class condition, free of defects and no matter what the fineries of any microscope it is only as good as the objectives, eyepieces and condensers fitted, this is why many prefer to use more modern designs.
Microscopy UK Front Page
Micscape Magazine
Article Library
© Microscopy UK or their contributors.
Published in the August 2010 edition of Micscape Magazine.
Please report any Web problems or offer general comments to the Micscape Editor,
via the contact on current Micscape Index.Micscape is the on-line monthly magazine of the Microscopy UK web
site at Microscopy-UK
© Onview.net Ltd, Microscopy-UK, and all contributors 1995 onwards. All rights reserved. Main site is at www.microscopy-uk.org.uk.