|
Some Ramblings on Micro-Technique, Part 2: Autumn Ponds and Ditches by Richard L. Howey, Wyoming, USA |
When the plagues of mosquitoes have subsided and it is once again relatively safe to venture out into aquatic habitats, there is a sense of anticipation not all that dissimilar from what I feel in the spring. The major difference is that the sense of urgency is altered. The spring urgency is a sense of pressure to go out and collect madly before the onset of pests–both insect and humans in the guise of tourists (or should it be tourists in the guise of humans?). However, in the autumn, when the threat of pests has largely passed, there is an urgency driven by knowledge that it will not be too long before the ponds and lakes freeze and that the roads to some of the best collecting sites will become impassible because of walls of snow. So, this is a time to collect and start lots of cultures, because the next opportunity will present itself only after the spring thaw.
Autumn is a superb time of the year to collect; the air is crisp, there is the beautiful color of the turning leaves and the silence–the glorious silence. The ponds and ditches are teeming with life forms preparing for winter and, as a a consequence, one often finds reproductive forms (eggs, and cysts) that one doesn’t encounter the rest of the year. The autumn, as well as the spring, is a good time to look for the elegant green colonies of Volvox tumbling through the water. Rotifers and cyclops with egg sacks are scurrying about; water bears (tardigrades) are preparing their magic of hibernation; bryozoa are producing statoblasts, and Daphnia are manufacturing their winter eggs. In spite of all the aquatic busyness, I find this time of the year at the ponds to be calming and peaceful; for me, it is a glorious reminder of the seasonal cycles in this part of the world and a bittersweet celebration of the seasonal rituals of life and death.
In my lab, this is the most frantically difficult time of the year–trying to find enough culture dishes, preparing culture media, deciding on the right food organisms or grains, etc. And then, of course, there are the constant problems of monitoring, maintenance, and subculturing–I NEED A LAB ASSISTANT!–Bill Gates, are you listening? Another constant battle is temperature, especially with samples collected from cold alpine lakes. In one of those lakes, at an altitude of about 10,000 feet, there is a wonderful assortment of rhabdocoel flatworms to be discovered amongst the lush growth of sphagnum moss–green ones, purple ones, orange ones, and transparent ones. This area has only been cursorily studied and I am sure there are undescribed species there. These marvelous creatures survive only a short time in the laboratory unless their cultures are refrigerated and even then, the best one can hope for is 2 or 3 months.
I am fascinated by the full range of aquatic invertebrates but, over the years, my work on micro-technique has focused largely on protozoa and marine organisms with calcareous or siliceous components. So, right now, I’d like to resume rambling about a few other aspects of protozoan micro-technique. Microscopists have at their disposal a large arsenal of staining techniques partly as consequence of the industrialization of the textile industry. Hundreds of different kinds of stains were produced and many of those of the highest quality came from German chemical laboratories. Getting access to stains has become increasingly difficult for the amateur in the past few decades with the increasingly litigious character of modern Western societies, especially America. Nonetheless, there are a few places which, with a bit of internet searching you can locate, that will provide stains and small quantities of other useful reagents.
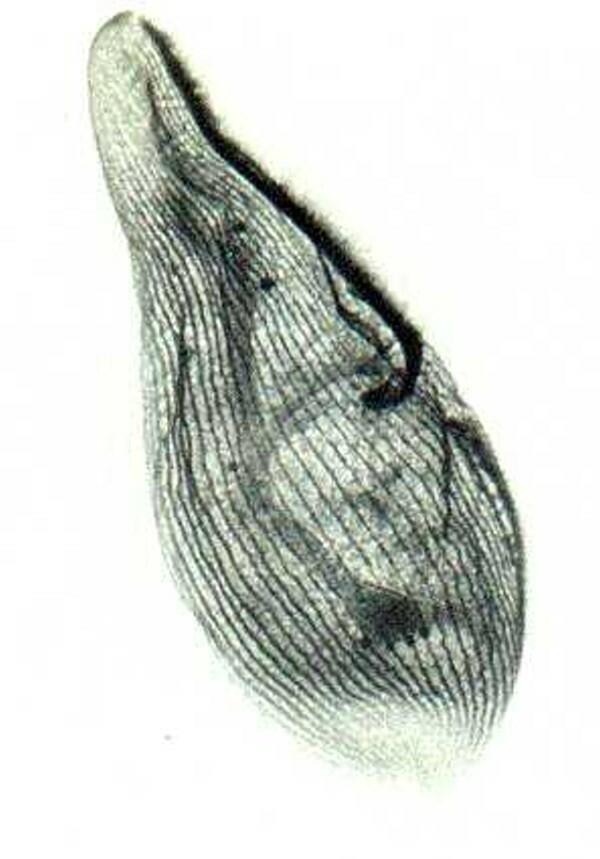
One biological supply house provides what they call a trichrome stain. I tried it out on a few Paramecia and got some interesting results. Here is an example below.
A drawback, as is evident in the image, is that there is a considerable amount of distortion such that the organism in the image looks rather more like Blepharisma than Paramecium. I admit right off, however, that I have as yet done very little with this particular stain, so I am looking forward to exploring its possibilities further. As you can see, the different stains comprising the solution, do differentiate specific aspects of the organism. The macronucleus is clearly evident.
Some features of micro-organisms can generally be revealed only by means of the use of elaborate procedures involving difficult to obtain reagents. One such method is the Protargol procedure which uses an organic silver compound to reveal the “silverline” system in ciliates. This is a system of fibrils not visible by ordinary means. The procedure is complex and demanding, but anyone deeply interested in the morphology of ciliates should investigate it, which can be most expeditiously done by the investment of about $20 to buy a prepared slide from a biological supply house, such as, Carolina Biological Supply. The one I have is stained specimens of the hypotrich Euplotes.
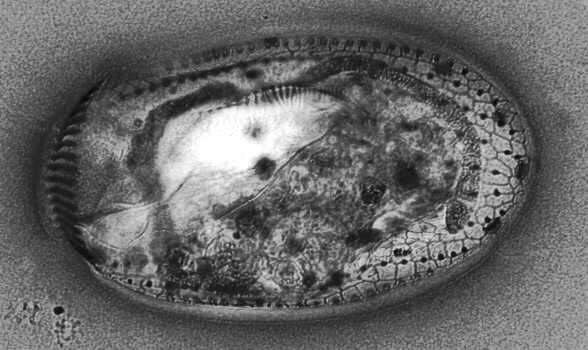
As you can see this network is intricate and is likely involved in the coordination of ciliary function. I also borrowed a slide from a colleague of mine of Protargol staining of Blepharisma which is also quite impressive.
There are several other such staining techniques which were developed before the Protargol method, but all of them are fairly complicated. I have been experimenting with trying to find a simple procedure, but thus far my results have been less than satisfactory. When I find a dazzlingly basic procedure and win the Nobel Prize, I’ll let you know.
Aceto-carmine is another stain worth experimenting with and can produce vivid results. It contains enough acetic acid to make it a bit obnoxious to work with and as with all reagents, you should exercise care in using it.
Don’t wear your white tuxedo when working with stains unless you plan to use it as an Halloween costume. After you get some experience with the potentialities of these incredible dyes, you can write a song called “These are Some of My Favorite Stains” and for an encore, you can sing “Mood Indigo”. Indigo was originally derived from a plant, as were a number of other important dyes, but now they are virtually all synthesized. Indigo has a rich violet-blue hue and produces strong contrast when used with carmine. Indigo-Carmine was often employed by earlier microscopists, but has now largely fallen into disuse.
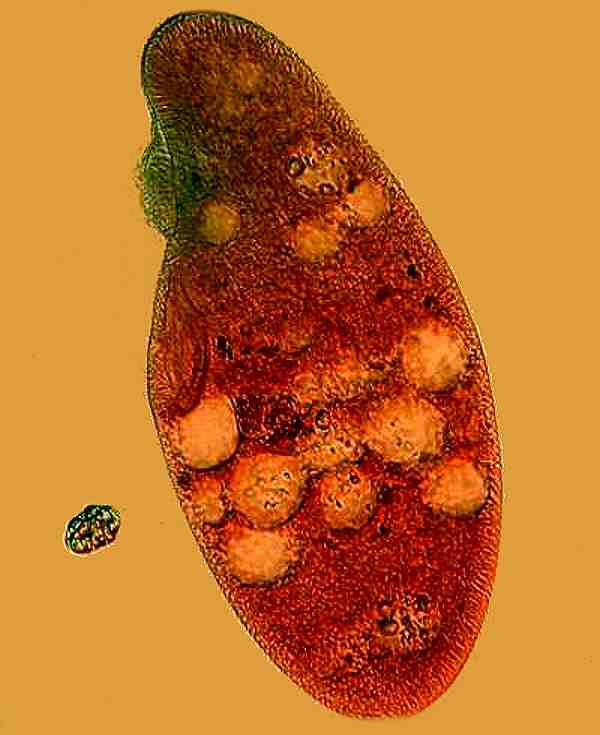
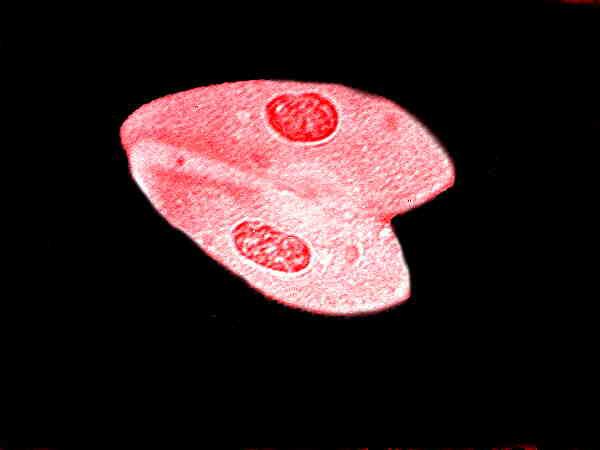
Hematoxylins, originally derived from logwood, are in a class of reagents of great importance to microscopists and while there are many formulae, there are 5 or 6 that have gained dominance. I have already mentioned Harris hematoxylin in Part 1 and although I like it, again I mention that it is somewhat dangerous and difficult to work with because it contains mercuric oxide. (Try to obtain the modified version which doesn’t contain mercury.) This is an image of special interest since the Paramecia are conjugating.
Several hematoxylin stains involve the use of a mordant thus making the procedures a bit more involved, but the results are impressive when the techniques are properly applied. This is an important stain for differentiating cytological detail.
In Part 1, I made some observations about powdered Carmine and I want to add a few additional comments here. In Stentor coeruleus, that striking trumpet-shaped blue-green critter, I have observed Carmine granules in vacuoles, but it is unclear whether these are genuinely an accumulation of the granules or are the remains of small food organisms which had ingested the Carmine particles. This is an issue which often has to be considered with the larger organisms that feed on small ciliates. My investigations with Amoeba proteus were inconclusive. In hypotrichs, I have found only a few granules in some of the smaller and mid-sized forms. However, one has to be careful not to jump to conclusions; the large ciliate Tillina magna at first show no sign of ingesting the Carmine, but after 48 hours, it was clear that it had. Spirostomum minus, a very long, slender species, does accumulate the Carmine. That odd little “hopping” ciliate Halteria grandinella also ingests the granules as well as the “elephant” ciliate Dileptus. A very impressive display can be obtained by feeding Carmine to Paramecium bursaria which has green symbiotic algae; the contrast is further enhanced by observation with phase contrast. A similar effect can be achieved with other species of Paramecia and a number of other ciliates which don’t have symbiotic algae by first feeding them with Carmine and then when the vacuoles are distinct, staining the organisms with Methyl Green Acetic which produces a bluish-green color in the chromatic nucleatic material. Strong solutions in water (1% or 2%) acidulated with about 1% of acetic acid work quite well. Because this acid has such a high freezing point (62 degrees F. or 16.7 degrees C.)–unless stored in a cool place it can freeze and break its container creating a very dangerous mess. As a consequence, I dilute the concentrated acid for storage with an equal volume of distilled water and adjust the amounts needed for specific reagents accordingly. Even in dilute form, it needs to be handled with great care.
Another useful, but somewhat quixotic stain is Janus Green B and the problems of dilutions are a nuisance. It is a stain which demonstrates mitochondria in living cells and the dilutions employed by various researchers depends, in part, on whether or not the material being investigated is tissue of higher organisms or protozoa and so concentrations may vary from 1 to 10,000 up to 1 to 500,000 (so, you take 1 gram of powdered Janus Green B and 500,000 ml. of distilled water–just kidding; here’s where multiple dilution comes in). Vital staining almost always involves employing highly diluted solutions. I usually make up stock solutions of 1%. It is well worth investing in a few graduated pipets (preferably ones with Ph.D.s). Get some that measure 0.1 ml. or better yet 0.01 ml. and count how many drops it takes to make 1ml. Once you do that you are in a position to calculated how many drops of stain you need to add to a given amount of distilled water to get the desired concentration. This ends up saving both stain and distilled water.
If, however, you are less interested in the aspects of vital staining and want to explore some other potential interesting effects of a stain, you many well wish to try out higher concentrations. For example, I found that with Paramecium a 0.10% solution of Janus Green B radically slows movement, but also produces some trichocyst extrusion in some specimens. In the culture sample I was looking at and there are some small ciliates whose movements were also slowed. I recommend experimenting with this stain on ciliates which don’t have trichocysts. This reagent acts rapidly on Chilmonas and Blepharisma, but doesn’t work well with Urocentrum. If you begin to notice precipitates, then it is time to make up a fresh solution.
One usually thinks of staining procedures as being carried out on slides, but an interesting alternative, especially for vital staining, is to add measured amounts (in drops) to a small (2 ½ of 3 inch) culture dish. The stain will be dispersed and create micro-environments which can produce variable effects, especially as one increases the concentration at regular intervals (daily or preferably every two days or weekly). An interesting case is Acridine Orange, a photoactive , fluorescent dye, which is both a carcinogen and a mutagen (in other words, to be treated with great respect and caution!). Some 12 or 15 years ago, I treated some cultures of Lacrymaria olor with this stain and produced some 3-headed monsters. At the time, I had only a Polaroid microscope camera which didn’t produce very convincing results, so you’ll just have to take my word for it. However, I do have one witness, Mike Shappell, who was a student and assistant of mine at the time and who is now teaching mathematics and computer science and, will, I’m sure, be willing to provide a sworn affidavit regarding the existence of these micro-mutants.
When applied to Paramecia, some specimens metamorphosed into what were essentially giant vacuoles but, in others there seemed to be no effect.
When staining the organisms on the slide there are 4 basic approaches.
1) Introduce the stain at the edge of the cover glass and let capillary action gradually spread it
2) Place a drop of culture containing the organisms on the slide and then add a small drop of the stain and then add a cover glass.
3) Place a drop of the culture on the slide, then place a drop of the stain on a cover glass and drop it onto the slide.
4) Place a drop of the stain on the slide and allow it to dry. Then add a drop of culture and a cover glass. This method has the advantage of allowing you to use the stain in either aqueous or alcoholic solutions and these latter will dry quickly, especially if they are in
70% or higher alcohol.
When using Carmine, India Ink, or vital stains, you can sometimes get interesting results by adding a fixative when the degree of staining is satisfactory.
I applied method #4 to Paramecia with several different stains and obtained considerable variation in results as one would expect. The solutions were 1% in strength. Different results can be expected in some cases when lower concentrations are used.
1) Alizarin Red S–There is some absorption into the cell and apparently in some granules, but not always into the calcium oxalate crystals even thought this dye is calcium specific.
2) Janus Green B–There was a violent extrusion of trichocysts which were then deeply stained. There was also some staining of the kineties. In a small, unidentified ciliate that was also in the culture, there was a deep brown staining of the macronucleus, kineties, and what may be trichite rods in the cytopharynx.
3) Acid Fuchsin–In dried specimens of Paramecia around the edge of the drop, some staining of the pellicle occurred.
4) Neutral Red–There is a deep staining of vacuoles, some staining of the pellicle, a massive discharge of trichocysts and light staining of the cytoplasm. Initial contact with stain tends to produce hyperactivity.
5) Basic Fuchsin–Deeps staining of the macronucleus.
Using some other methods, I got the following results.
6) Again with Paramecia, a 1% aqueous solution of Eosin Y plus a blue daylight filter produces very nice contrast and many protozoa will survive for some time in the Eosin. I also used a polarizer, but no analyzer to create a more pleasing light balance.
7) With some Vorticella, I introduced a 1% solution of Alizarin Red S at the edge of the cover glass. The Vorticella contracted, but there resulted a very nice staining of the large “C”-shaped macronucleus and the myoneme (spasmoneme) rendering it readily visible in the coiled stalk.
8) Lugol’s Solution–This is an aqueous solution of Iodine and Potassium iodide which is also good for staining the myoneme as is a dilute solution of Methylene Blue. Interestingly, Alizarin Red S also produces good results with the shelled amoeba Arcella in specimens in which the shell or test is still largely clear. As Arcella ages, its shell get increasingly darker becoming a rich, opaque brown hue in significant part due to the presence of iron salts. However, in the younger specimens, the nucleus stains quite nicely.
Delafield’s Hematoxylin
1) With Paramecia where the stain was introduced under the cover slip, there was a minimal discharge of trichocysts and some swelling of the pellicle in some specimens; however, in other specimens, considerable detail of the pellicle was visible.
2) In medium-sized hypotrichs, there was extensive distortion, however, the nuclei were sharply stained and, in some instances, the cirri were clearly evident.
3) When small flagellates where treated with this stain, the flagella were quite distinct.
4) when applied to some rotifers, it produced swelling in the lorica so that the surface detail was more readily observable.
5) Tillina magna–Two large specimens were treated with Delafield’s and clearly demonstrated the large ovoid macronucleus and four micronuclei. Since I introduced the stain at the right edge of the cover glass, the good specimens tended to be on the left side. By introducing a drop on the left side as well, one can get some good specimens in the middle (with a bit of luck). The glycerine in the Delafield’s keeps the preparation from drying up completely making evaporation and the cover glass presence less of a problem. A slide that has an especially good specimen or two can be carefully varnished and kept for some time.
Simple Silver Staining
Silver nitrate is a fascinating reagent to experiment with. (One needs to exercise caution because it is a strong caustic.) The basic technique is like some sort of primitive photography. One impregnates the specimens with silver by placing them in a 0.5% or 1.0% solution of silver nitrate for 2 to 5 minutes, then rinses them in distilled water taking care not to dislodge the specimens. The slide is placed in clean water and set in sunlight or bright artificial light. This stage needs to be monitored carefully and when the preparation begins to develop a brown color, it should be examined under a dissecting microscope to determine whether the preparation has been sufficiently developed or not. If not, then, additional exposure to light is called for.
What are the applications of silver staining? Off the top of my head, I can think of four.
1) For work on nerve cells and nerve tissue.
2) For staining the silver line system in ciliates.
3) For demonstrating the surface features of an organism. For example, when I used it on the rotifer Branchionus, I got excellent detail of the lorica.
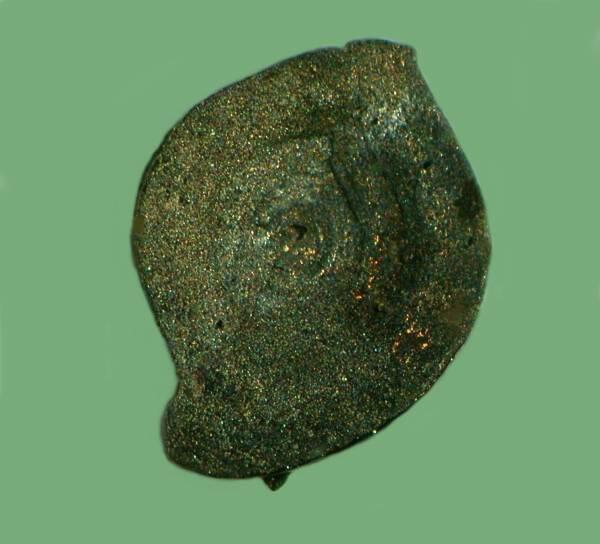
4) For revealing surface detail of small shells and organisms. I have placed forams and other micro-fossils in a 1% solution of silver nitrate, added several drops of a dilute solution of ascorbic acid (Vitamin C) to precipitate and deposit the silver, rinsed in distilled water and then allowed the specimens to dry thoroughly before mounting dry on paleo slides. Here is an example of a foram treated using the described procedure.
The same technique can be applied to small specimens (½" to 3/4") of dried organisms such as starfish, sand dollars, bryozoan, fragments, etc.
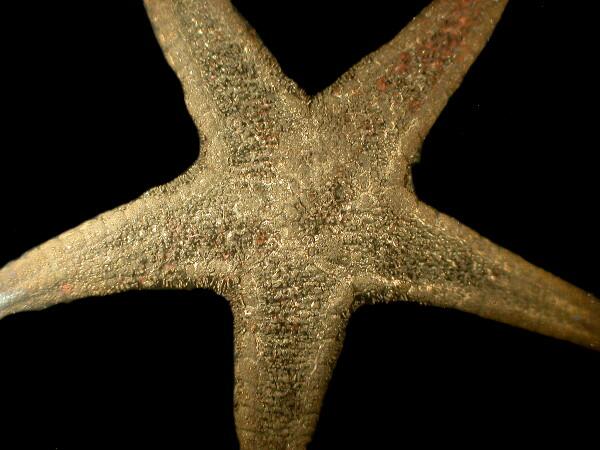
Here is a tiny starfish treated with silver. From craft companies, one can obtain packets of starfish that are less than 3/4 of an inch which makes them ideal for mounting on slides.
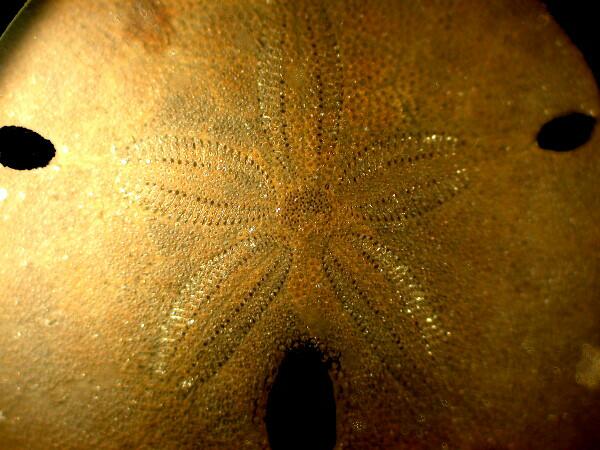
Above is a close-up of the aboral surface of a small sand dollar.
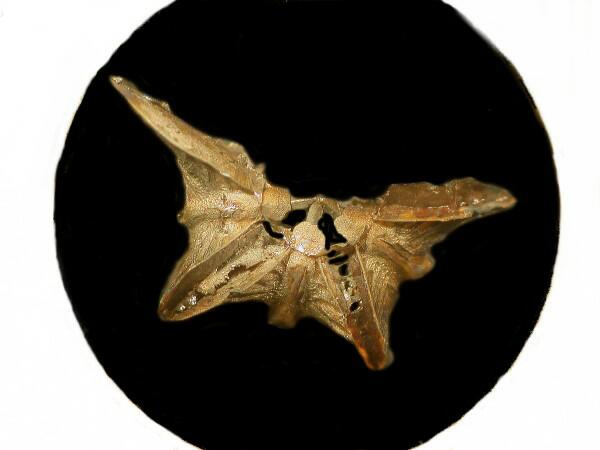
The image above is a fragment of the jaw apparatus of a tiny sand dollar. The silver treatment reveals interesting detail.
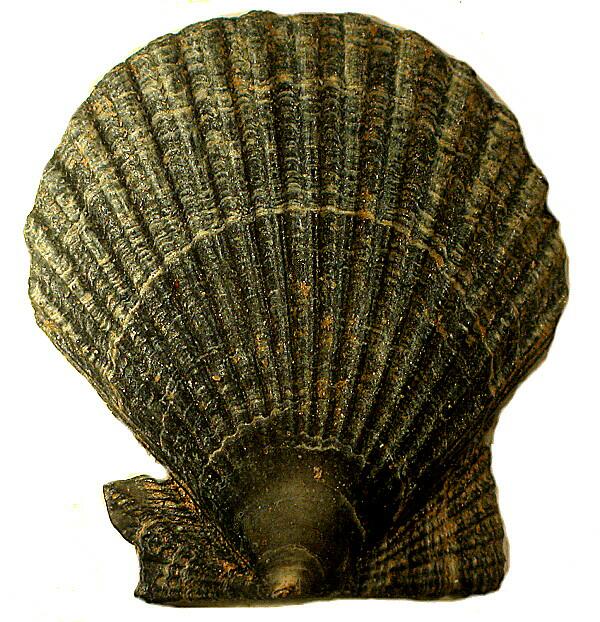
Here is small mollusk shell which shows up in a rather striking fashion.
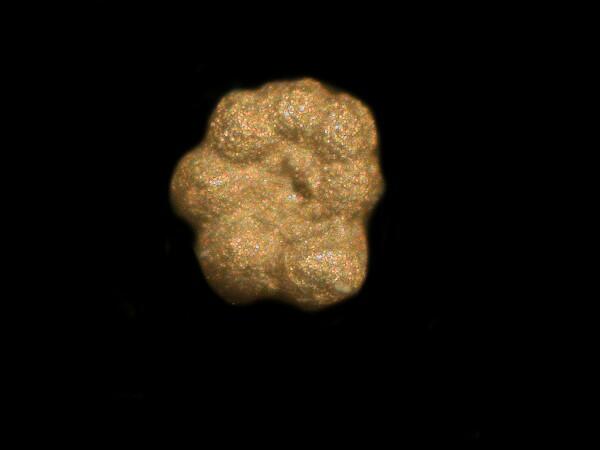
Although this technique is basically simple and quite straightforward, it is trial and error intensive, especially when applied to protozoa. If, however, you wish to stick to the more traditional technique employed by micro-paleontologists, you can use a sputter coater and deposit an extremely thin layer of gold on a specimen and then examine it with an electron microscope. The foram below was prepared using the gold technique and even though only very tiny amounts are needed, since the present price of gold exceeds $1,600 an ounce, you may wish to reconsider using the silver nitrate procedure.
I am certain that I could quite contentedly spend 10 years experimenting with staining and anaesthetizing techniques. I do still have some further rambles, but I will spare you those (at least for now).
All comments to the author Richard Howey are welcomed.
Editor's note: Visit Richard Howey's new website at http://rhowey.googlepages.com/home where he plans to share aspects of his wide interests.
Microscopy UK Front
Page
Micscape
Magazine
Article
Library
Please report any Web problems or offer general comments to the Micscape Editor .
Micscape is the on-line monthly magazine of the Microscopy UK website at Microscopy-UK .