|
Exploring the use of a cheap Peltier plate (e.g. TEC1-12706, £2-50) for cooling (or heating) subjects by David Walker, UK |
In hobbyist microscopy it can be useful having a simple and cheap method of cooling (or heating) subjects relative to the ambient temperature. Not necessarily with strict temperature control but a method of say cooling 10 - 20 °C below ambient. Examples of potential uses are:
- Keeping aquatic heat sensitive organisms alive and comfortable if ambient temperatures are high. (Stream invertebrates used to colder water may benefit. I've read that marine organisms can be particularly sensitive although I've no practical experience in this area.)
- Cooling / heating cycles for saturated solutions of chemicals for real time study of crystallisation.
- Controlled on-demand cooling / heating for processes e.g. public demonstrations using the safe low voltages of Peltier plates.
- Cooling may help slow down active terrestial invertebrates for study under a stereo.
- Controlling a temperature dependent process—my own immediate interest as I wished to reduce the evaporation rate of an uncovered alcohol (see August 2015 article.).
Professional cooling stages can be very expensive and may need to be a certain design for a given microscope. The Peltier effect is widely used for cooling e.g. portable food / liquid containers and for technical camera sensors. Some DIY cooling projects for microscopy have been described where the Peltier elements have been removed from consumer items but a browse of e.g. eBay shows a wide range of discrete Peltier plates for very little money. I chose the cheapest the TEC1-12706 for trials which sell for less than £3. (Comparable models seem far more expensive from major electronic component outlets). I'm admittedly late into exploring Peltier plates as many hobbyists may already have designed and built useful coolers/heaters. (A search shows that this TEC1 model was discussed some years ago in a microscopy forum for potentially cooling wax blocks in microtomy). I would be interested to hear from readers who have used Peltier plates as my 'try it and see' learning curve is steep.
The appeal of the Peltier plates is that they are cheap, compact and the required heat removal can be cobbled together with the wide variety of cheap used heatsinks, copper plates etc for older computer chips, as shown below. The most expensive item for trials is likely to be a good quality variable power supply which many may already have. I already have one for using high power LEDs in autofluorescence work.
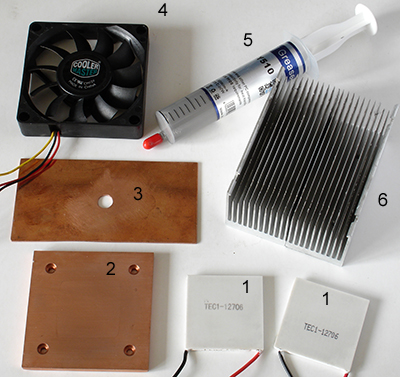
Left:
1) Peltier plate TEC1-12706 4 x 4 cm, 3.8 mm thick. With a voltage applied as per the wire polarity, the product coded side is cold (heat extracted) and the reverse hot (heat dissipated).
2,4,6) Items from one CPU heatsink / fan ca. £4 each used on eBay. The sturdy plate '2' at 4 mm thick is ideal as the first thermal sink for incident light studies using the Peltier plate .
3) 10 x 5 cm and 1.5 mm thick copper plate with 8 mm hole adopted for transmitted studies to date. Chosen because 10 x 10 cm is a readily available size of copper plate on eBay and cut in half to suit the 4 x 4 cm Peltier plate on one side of the drilled hole (see below).
5) Thermally conducting paste to closely couple heat transfer surfaces.
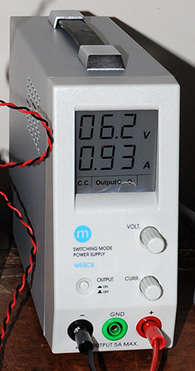
Right: A typical compact switched mode power supply: model N93CX, max. rating 20V 5A. Typically £90 new e.g. from Maplin UK but bought mine used for less than £50. One of the most useful items I've bought for some years and also use for tungsten lamps and high powered LEDs. The Peltier plate performance is current controlled, so once a voltage has been set to deliver that current, the current control knob can be set to
maintain it. The current display allows a previously calibrated setup to be reset.
The TEC1-12706 in brief. I'm not an electronics whizz but a detailed datasheet on this and other models are available to freely download. Graphs in the datasheet give an indication of idealised cooling performance with varying current. A key parameter is DTmax(C) defined in the data sheet as the 'Temperature Difference between cold and hot side of the module when cooling capacity is zero at cold side'. Depending on ambient temperature, for the TEC1-12706 this is typically 70-79 °C at its maximum rating of 12V / 6.1A.
Cooling or heating by reversing polarity. Unlike many solid state electronics* it is OK to swap polarity, when the heating and cooling sides are reversed i.e. can change the unit into a cooler or heater for microscopy. The product code rubs off with acetone for a clean background (but an idea to label in a corner which side is which). *E.g. see the Electrical Engineering Stack Exchange query Are Peltier elements polarized?
Monitoring temperature in trials. Bulb thermometers aren't ideal for the small areas likely to be monitored (and may not have a sufficient range). Thermocouples are ideal, albeit the common junctions are generally less accurate; the wire junction probe can be dipped into quite small volumes of water or taped to a surface and removed when required. Rigid probes are also available. To assess the TEC1 plate, I used liquid receptacles of various sizes (microscope slides with rings, small Petri dishes) with some plain water in while monitoring with a thermocouple. In my planned studies, the exact temperature wasn't vital, so I didn't monitor but reset a given current that was known to correspond to a desired temperature drop.
Initially I used my existing dedicated type K thermocouple with its own meter (left below). But for trials it can be handy to monitor and record the cooling / heating process. Thermocouple data-loggers with a built-in memory for later analysis are available but I preferred a USB thermocouple with software that allows real time computer monitoring (typically ca. £16 with free shipping from China).
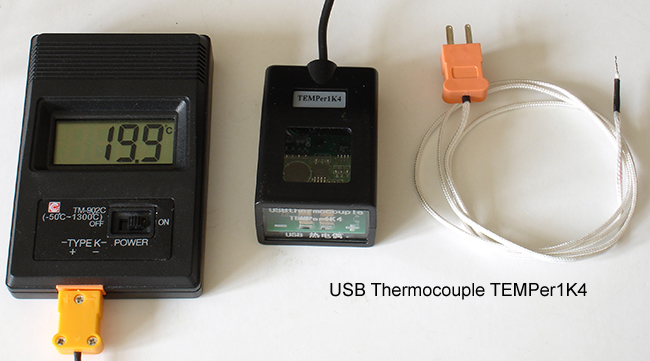
Left - A standalone single point temperature monitor using a type K thermocouple (right). Runs off a 9V battery. Typically less than £5 including delivery with one T/C included, direct from China on eBay. This is able to monitor sub-zero temps.
Middle - USB thermocouple TEMPer1K4 made by pcsensor.com. Typically £16 including delivery with one T/C included direct from China on eBay. There are some US based suppliers but have not found a UK / European supplier to date. Software supplied on CD for Windows / Apple also states Linux compatible and potential for own software
coding with 'open protocols'. This model is unable to monitor below 0 °C. (Other USB data logger type models in the TEMPer range do but the probes are bulkier for small liquids and don't have real time monitoring.) See Appendix for typical screenshots of the menu and data curve plots.
Try it and see, and lessons quickly learned! Early trials of the Peltier plate with various heatsinks were very useful and lessons were quickly learnt:
- The maker's stress that some form of heat dissipation on the hot side must always be in place. One or more copper plates may be sufficient at lower currents, but over 60W has to be dissipated even with this base model at full power. Overheating can damage the device and possibly surrounding microscope components.
- For maximum efficiency and to achieve 0 °C or below, the cold side must have a low thermal mass and be well insulated. The hot side fitted with as efficient a heat removal system as possible.
- Assess in a setup where unplanned high or low temperatures will not be damaging. My primary use was for a stereo and removed the glass plate from the scope's base in case it was thermally stressed. If trialling on a compound microscope, ensure the stage or adjacent objectives are not being unduly heated.
- Assess performance at low current levels to check the heat dissipation method being used is sufficient. The lowest current required for the desired result can then be found to minimise the heat that needs to be dissipated (if used for cooling).
- If the heatsink is not sufficient for a given V/A on the Peltier plate, initial cooling can reverse even with power applied as the heatsink gets hot and cooling performance drops.
- Remove potentially heat sensitive subjects, especially if live, from the plate before the current is switched off—the temperature difference across the plates starts to equilibrate within seconds when off load. Although this can be used to advantage for studying cooling / gentle reheating cycles, for example in crystallisation studies.
- If cooling for a live subject ensure it can tolerate the rate of temperature change. I was interested in inert subject cooling, where not critical, but cooling of a low specific heat set-up can be rapid.
Incident lighting on a stereo. This is potentially the simplest setup for uncovered aqueous samples as the receptacle can sit directly on the off-white plate and used with top lighting. For lower cooling demands on the Peltier plate, one or more copper plates with no forced cooling may be sufficient as shown below. Both the smaller Petri dishes or microscope slides are well suited.
With the often generous working area of many stereos, simpler cooling options are of course available, a small Petri dish could sit in a larger dish of ice/water or salt/ice/water. I've tried this approach but found it messy and not entirely safe if mains electrical items weren't far away.
Simple setup for incident lighting work on a stereo (or compound). This is suited for low current usage where long term heat dissipation is modest i.e. just chilling to say 8 - 10 °C. If the plates become barely above ambient temp. to the touch, forced cooling may be needed. But have also used for rapid flash cooling to zero Celsius of a microscope slide with liquid as shown below,
where a still image or video can be taken before the efficiency of the system drops and the temp. rises.
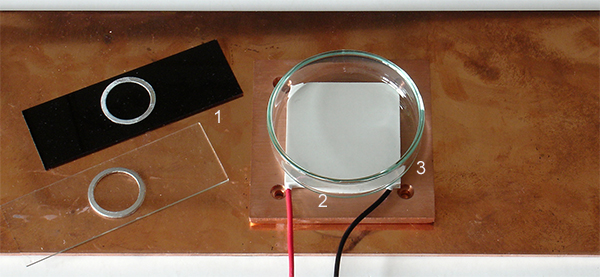
1) Ringed slides are useful for uncovered work (or covered work above the dewpoint), e.g. crystallisation or keeping small aquatic organisms cool. Spraying the back of the slide black and putting the ring on the other side gives a very even, barely structured background.
2) Peltier plate coupled with thermal paste to a copper plate from the base of a CPU cooler. The larger plate 3 mm thick gives further cooling. I didn't paste the two copper plates, so the small copper plate can be moved for scanning subjects without moving the dish off-centre on the Peltier plate. The off-white ceramic is a useful pale background.
3) The 4 cm square Peltier plate is suitable for the smaller glass Petri dishes, this example 5.5 cm diameter (inner plate of the 6 cm size). The Petri dish could be used dry and covered to slow down agile invertebrates or used with some water for aquatic organisms.
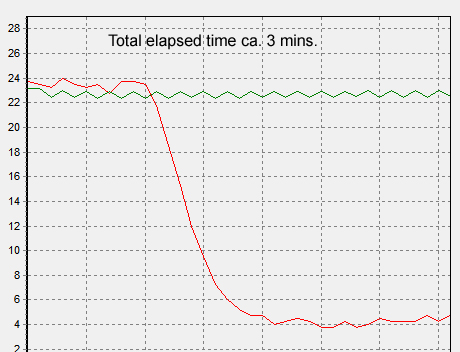
Above. Temperature profile for incident light setup above with microscope slide and aluminium ring filled with water. Peltier plate at 3.2V 1.2A. Sub five degrees Celsius can be readily achieved for short periods.
Examples of flash cooling using the incident Peltier cold stage setup with a stereo: Although the examples below are admittedly rather basic experiments, the easy repeatability of freezing conditions with a simple and safe low voltage setup, may make low mag incident light studies with Peltier plates suitable for public demonstrations related to flash cooling.
Above. Vitamin C in water in an open aluminium ringed slide (50 second clip). Stereo 16X optical, field of view 5.5 mm. Peltier set at 7.2V 2.1A. Freezing started after ca 1 minute after switching the plate on, but video starts at this point. After 25 seconds into the video above, the plate was switched off showing how the warming of the plate thaws the crystals.
My initial trials were to see if solutions of various common chemicals saturated at room temperature crystallise out attractively when the solution was cooled. This has not happened to date with flash cooling for a variety of chemicals. The freezing seen above I believe is primarily water, supported by the rapid thawing on gentle warming of the plate. Although the ice formation does seem to be modified by the chemical. The
video
below is pure water which crystallises reproducibly in a very different way.
To observe chemicals crystallising out, I may need to be more patient with gentler cooling for extended periods and possibly using solutions saturated above ambient.
Above. Pure water freezing (2 min clip). Stereo 16X optical, field of view 5.5 mm. Peltier set at 10V 3A. The video starts with thin ice already forming on the water surface followed by further freezing (from the right in this clip). After 1 mins 15 secs into the video, the plate
was switched off to show how the warming of the plate thaws the crystals.
This form of cooling prompted a lot of small bubbles to be formed during freezing.
Transmitted lighting on a stereo (or compound for a more compact design?). Finding a suitable design has been trickier from trials to date as wanted to achieve lower temperatures (e.g. to study ice formation between crossed polars)—with the necessity of greater heat dissipation but have lost direct heat removal from the observation area.
A wide variety of Peltier plates with central holes are available. In the TEC1 range, models of the same wattage with a 5 mm central hole (e.g. see this Chinese TEC1 data page) but I haven't found any UK supplier, or on eBay worldwide and those available from other makers within the UK are typically over 10X more expensive than the TEC-12706. I'm not sure they would be better for central subject cooling unless the hole is only just bigger than the desired field of view, which will change with objective. A circular heatsink may also encroach on viewing and sample access.
I haven't come up with a suitable design to date for the compound scope (i.e. compact but powerful). From trial and error, the major limitation is probably efficient heat removal. Water cooling cells suited for the plates are available but my hobby room has no running water and have no space for cooling tanks / pumps. For readers that can use water cooling, this seems a better approach. Some compact designs of commercial Peltier cold stages use water cooling (e.g. the Linton Instrumentation TS-4 capable of -20 to +60 °C with 0.1 °C control, cost £3600 with controller).
The most compact design I've cobbled together to date for the compound is shown below but it was not efficient enough at heat removal to give a useful and stable temperature drop.

Above left, an early trial design for transmitted work. 1 - insulated copper plate 10 x 5 cm with 8 mm hole, 2 - two Peltier plates in series, cold sides to copper, 3 - coverslip thermally pasted to copper, 4 - cooled with cheap CPU heatsinks and fan.
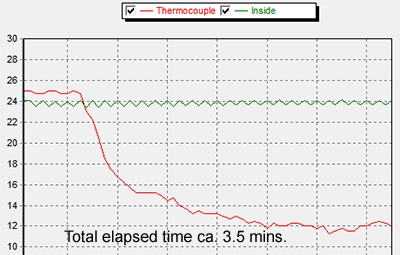
Above right - Thermocouple in water drop. Peltier plates at 3V 1A each, with water as subject, the temp. dropped to 14 °C briefly before rising again as the heatsinks got warm even with the fans running at 12V.
The work in progress design being tried at the moment for lower temp. transmitted work on a stereo is below. It uses an offset single Peltier plate with much beefier forced cooling! It is inelegant and bulky but it is capable of dropping subjects to 0 °C and lower temperatures within a few minutes in my hobby room typically at 20-22 °C for short periods—at least to capture e.g. stills or videos of crystallisation / freezing. Only one side of the stereo can be used, so better suited for an on-optical axis monocular macro setup.
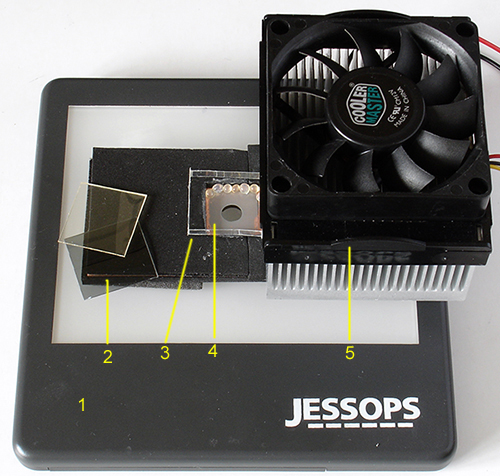
1) 5 x 4 inch cold light panel for viewing 35 mm slide film. (I don't have a dedicated lamp base for my Leica S8 stereo which could be used instead if available.)
2) A 10 x 5 cm copper plate with 8 mm central hole. Exposed areas above and below the plate are covered with adhesive foam for insulation to prevent heat removal from the surrounding air or the base the unit is placed on. This keeps the heat capacity of the cold side as small as possible.
3) Small enclosure of acetate film (not hermetically sealed) to create a dry area with some silica gel desiccant within (the self-indicating grades are useful). Desiccant is also required under the copper plate to stop the underside misting up if temps are below the dew point. A polariser with tint plate if desired can sit below the raised plate with polar analyser or clear oversized coverslip sitting on top.
4) A 17 x 17 mm square coverslip coupled with thermal paste to the copper plate. A smaller cover-slipped or uncovered liquid is placed on the slip.
5) An oversized CPU heatsink with its 12V fan coupled with thermal paste to the TEC1 Peltier plate underneath. The Peltier plate in turn is thermally pasted to the copper plate. The cold side of the plate faces down in this case cf the incident setup shown above.
Depending on the temperatures required and design efficiency, smaller heatsinks and fans may be suited but it does have to remove over 60W at its close to its full rating. The fan spins at lower voltages than its rated 12V if desired which in this case is noisy. The fan could be isolated from the subject if vibration is a problem.
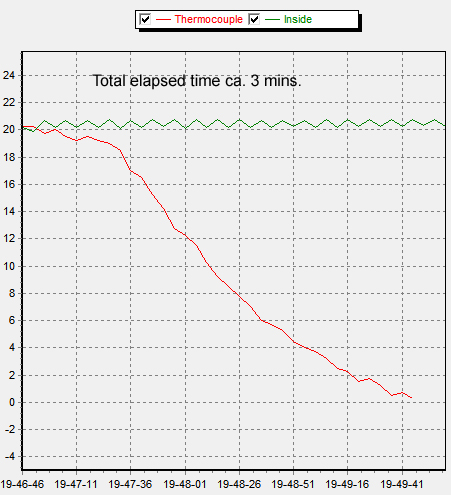
Above. Heavy duty cooling transmitted light setup shown above. Peltier plate at 5.6 V 2A. Sub-zero temps are possible (the USB thermocouple cannot record below zero) but water froze. In this study the temp dropped to -3 °C before starting to slowly rise as the warming heatsink became less efficient. But preventing condensation is a potential problem to study covered subjects, see below.
Condensation. This is a potential hindrance that became very obvious in my trials. It's not a problem with uncovered liquid samples but it is when they are covered. At the time of writing in the UK it is summer with room temps. ca 20 °C and ca. 50-60% humidity monitored indoors. The dewpoint is ca. 9 °C for these conditions, so as temps. drop below this, condensation forms on any exposed cold surface, notably the coverslip and spoiling the image. A solution I'm still exploring as shown above is to create a small dried air box around the subject with a little desiccant such as silica gel. This hopefully may benefit in two ways, the amount of air for condensation is minimised and the air within the box is drier. It's not clear to me how some commercial designs avoid condensation eg the Linton Instrumentation model linked to above. The maker didn't elaborate when asked. In lab. conditions the entire microscope could be put in a dry box.
The small dry box over the coverslip is preferred for rapid equilibration, but this only works for short periods to prevent condensation as the misting then transfers to the upper surface of the box covering—more trials required! I haven't progressed to compound microscope studies but the dry box could then be a clear tube surrounding the subject and rising to surround the objective.
Work in progress. It has been fun (with some frustration!) to date exploring how best to use Peltier plates and a good learning experience which has combined some basic electronics, the physics of cooling and some microscopy together. I would be interested to hear from readers with successful designs for incident or transmitted use, especially compact designs better suited to the compound microscope.
Comments to the author David Walker are welcomed.
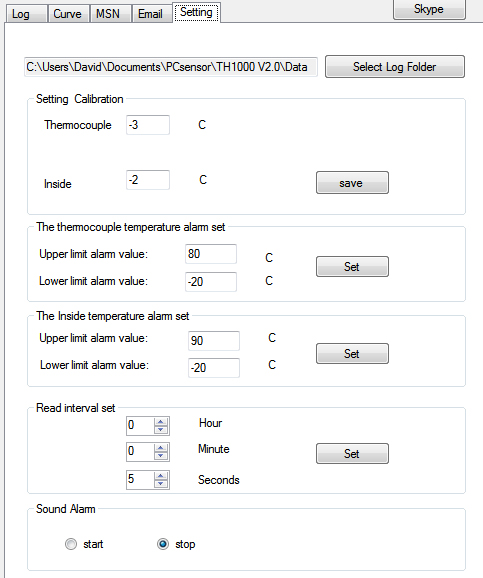
Appendix. A note on the pcsensor.com TEMPer1K4 USB thermocouple. Supplied with type K thermocouple (others available at purchase). Software TH1000v1.5 on CD (also on maker's website to download). USB powered with integral cable.
The outfit is very useful when real time temperature monitoring is desired but where high accuracy is not required. A good thermometer can read to 0.2 °C, the common type K thermocouple accuracy is typically cited as 0.75% +/- 2.5 °C at <400 °C but has the benefit of a wide temperature range.
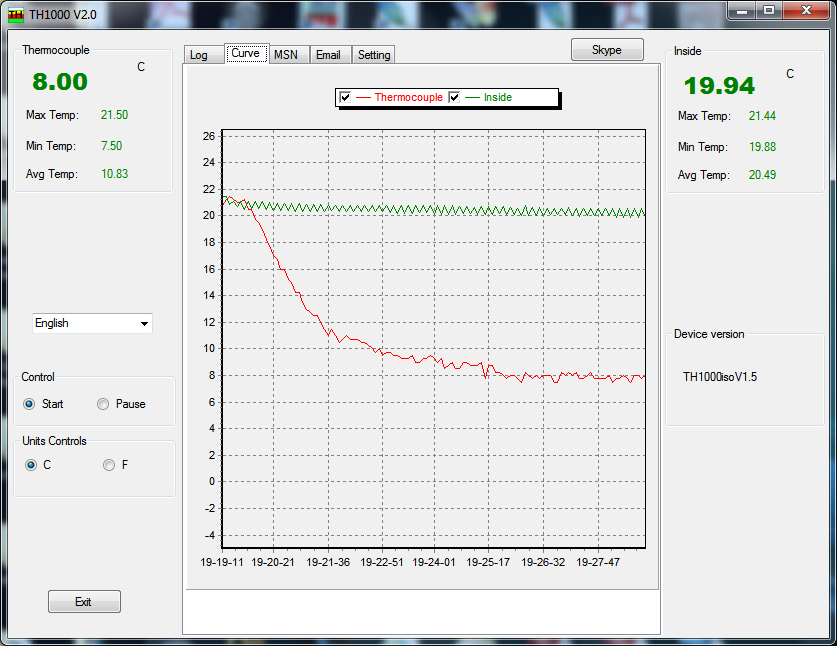
A screenshot of the main menu is below on Windows 7. A calibration option can adjust the read temps with respect to say a bulb thermometer. Alarms can be set and the read intervals. The primary data is an autosaved log which can be imported into a spreadsheet. A curve plotted in real time is an option (I screen capture these to save exporting log to spreadsheet). Data can be emailed or Skype can be used.
A typical screenshot of real time temperature plotting is shown below. Celsius or Fahrenheit readings are options. A thermocouple within the USB device monitors room temperature. It's a pity that the interval time format on the x-axis cannot be adjusted to elapsed time. The default form is the full time in hours-minutes-seconds. I find a real time plot a much more useful illustration of how temperature is changing and to assess when equilibrium is reached than fixed point monitors.
It's main limitation for my studies was that it cannot read temperatures below zero Celsius, an 'Overflow' error is reported. This seems a limitation of the electronics and/or software's inability to monitor the mV output of the thermocouple below zero as standalone temperature monitors using thermocouples can display sub-zero temperatures. USB dataloggers in the maker's range can but this data is not real time. The axes and times shown are auto adjusting as more data points are plotted.
Published in the August 2015 edition of Micscape.
Please report any Web problems or offer general comments to the Micscape Editor .
Micscape is the on-line monthly magazine of the Microscopy UK web site at Microscopy-UK
© Onview.net
Ltd, Microscopy-UK, and all contributors 1995 onwards. All rights
reserved.
Main site is at www.microscopy-uk.org.uk
with full mirror at
www.microscopy-uk.net
.