Making your own paraffin sections @ home
(part 2)
by Yvan Lindekens, Belgium
In part one of this series we made paraffin blocks containing our samples. In this part we will use a rotary microtome to divide the paraffin block into sections. These are very fragile and difficult to manipulate. That’s why I’ll add techniques to attach sections onto slides in this part, contrary to what I announced in part 1.
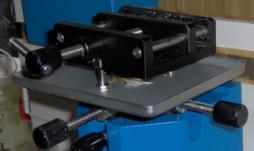
Brief description of my rotary microtome
ß
Trimming the paraffin block and mounting it on a paraffin table
ß
Setting up the microtome
ß
Sectioning
ß
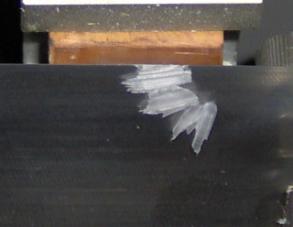
Stretching sections and attaching them onto slides
Brief
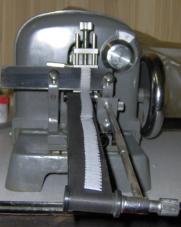
description of my rotary microtome
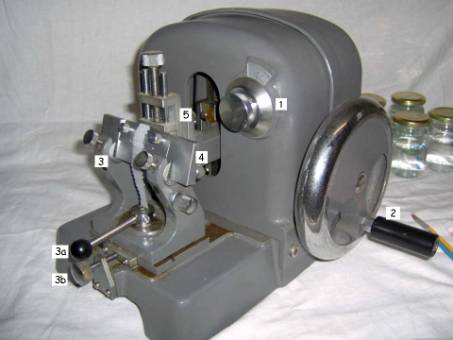
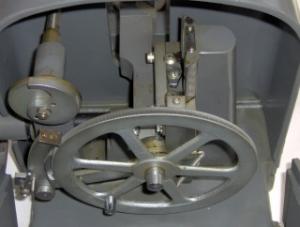
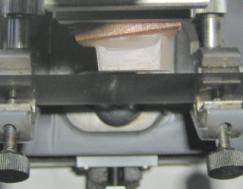
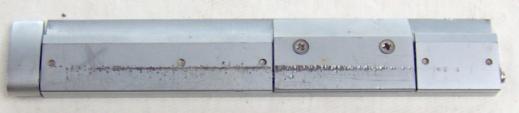
Picture1: Rotary microtome Euromex Mic 505
1. Section thickness dial. It has a scale from 1 µm up to 25 µm. You should keep in mind that the thickness mentioned is only an approximate value. This is true for all microtomes
2. Turn wheel to operate the microtome
3. Microtome knife holder
a. Lever to tighten the knife holder
b. Back and forth movement of the knife holder
4. Disposable razor blade holder (Euromex)
5. Universal specimen clamp
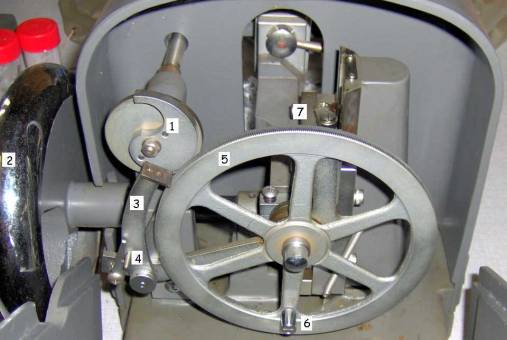
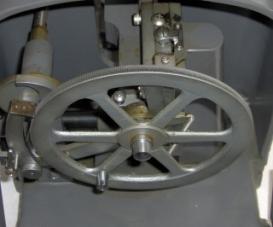
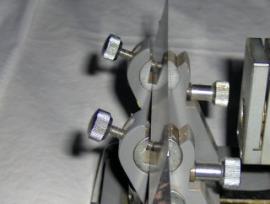
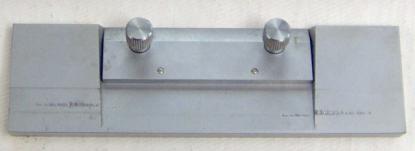
Picture 2: Mic 505. Back cover opened. On the right the second position of the lever engaging the tooth wheel. In the picture on the right it is disengaged
1. Section
thickness dial
2. Turn wheel to
operate the microtome
3. Lever engaging the tooth wheel
4. Handle to engage/disengage the tooth wheel. The tooth wheel is engaged, microtome ready for section cutting
5. Tooth wheel operating the feeding screw
6. Handle to rotate the tooth wheel manually (coarse feed)
7. Vertical movement blocking lever
How does it work?
Every tooth of the tooth wheel (picture 2, 5) corresponds with approximately 1 µm.
When the turn wheel is rotated clockwise, the block containing the tooth wheel, the feeding screw of the microtome and the specimen clamp is raised, until a small stop, part of the lever engaging the tooth wheel, touches the section thickness dial.
This causes the tooth wheel to make a partial rotation, the size of which depends on the position of the section thickness dial. Due to the rotation of the tooth wheel, the feeding screw rotates with it, and moves the specimen “out of the microtome”, thus towards the microtome knife. When the specimen clamp/specimen is lowered, a section is cut.
Trimming the paraffin
block
When everything has gone well in fixing, dehydrating, infiltrating the specimen and embedding it, you should have obtained a paraffin block containing the specimen surrounded with –generally- a too generous amount of paraffin wax. The surplus paraffin needs to be removed and the paraffin block trimmed in its final form prior to sectioning.
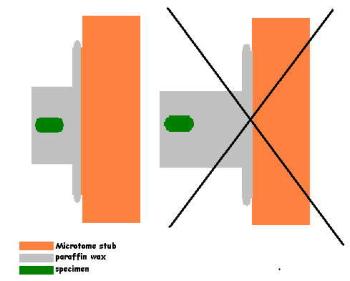
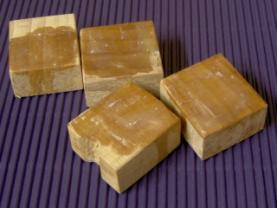
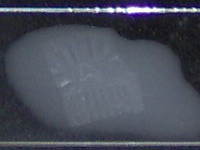
When several pieces of specimen are embedded in one block (as in the picture below) and you only want to section one of them it’s necessary to cut and trim the block too.
Paraffin
block containing both pathological and normal rabbit liver tissue, embedded in
paraffin wax using a matchbox.
How thick the paraffin layer surrounding the specimen should be is dictated by the final slide one has in mind and by personal preference of the microtomist. As a general rule, it’s a good practice to make the paraffin layer surrounding the specimen not too thick: the larger the surface of the paraffin block to be sectioned, the higher the risk of problems in section cutting and it serves no purpose to cut blank paraffin. Cutting only makes your microtome knives/blades dull at the end, so it’s not a bad idea to economize on knife sharpening/disposable blades and to use the knife/blade only for sectioning what really matters: the embedded specimen. On the other hand: there should be enough paraffin left to handle the sections in a comfortable manner.
Especially when you want to mount several serial sections under a common cover slip the surrounding paraffin should be kept to a minimum: 1 or 2 mm. The thinner the surrounding paraffin coat, the more sections can be mounted under a single cover slip. When only individual sections are to be mounted onto slides the surrounding paraffin coat can be kept larger so that the sections can easily be manipulated with a pair of fine tweezers or a camel hair brush. For sections to be mounted individually, I usually keep them surrounded with a layer of 3-5mm paraffin.
If only a single specimen is embedded in a single block, trimming is easy: just shave tiny amounts of paraffin wax off the block beginning on one side with a scalpel or a razor blade and proceed with the other sides, until the specimen is only surrounded with a thin layer of wax. This has to be done gently. Don’t try to cut too thick a layer of paraffin as this might cause the block (and the specimen!) to crack.
If two or more specimens are embedded in a single block, it’s necessary to cut them out of the block first. In my experience, the best way to do so is to gently cut a line with a razor blade on both sides of the block about 1/3rd of the thickness of the block deep. When that is done, the block can be broken. It will crack along the cut line. After that the resulting blocks can be trimmed.
Trimming should be done taking the geometrical axes of the specimen into consideration: the front side of the block should be, whenever possible, parallel with the plane of the sections one wants to cut. If really transverse sections are to be cut, the longitudal axis of the specimen should form a straight angle with the front side of the trimmed block in the X as well as in the Y dimension. In other words: the specimen should be in the exact middle of the paraffin block.
If this isn’t possible some corrections can be made by orientating the paraffin table on the microtome, but this is only the second best thing.
The upper and lower sides of the trimmed block should be parallel. If not this will result in curved ribbons of sections. This is especially a problem when you want to make slides containing several serial sections.
When the specimen is hardly visible, it’s a good idea to trim the left- and/or the right side of the block at an angle. With hardly visible specimens, this is about the only way to recognize individual sections in the ribbon.
Left:
curved ribbon due to inadequate trimming: upper and lower side of the block are
not parallel.
Middle:
block trimmed okay
Right:
left side of block trimmed at an angle to distinguish the sections.
Trim the rear side of the block too (the one facing the paraffin table): as paraffin is more or less elastic, it’s necessary to trim until only a rather thin layer of wax between the rear side of the embedded specimen and the paraffin table is left. If this layer is too thick this can result in sections of uneven thickness.
If the specimen to be sectioned is hard you can trim the block in a pyramidal shape with a larger basic surface. That way the block will be capable of resisting higher forces without breaking from the paraffin table.
The resulting paraffin wax shavings from the trimming step can be used over and over again to embed other specimens. The more the paraffin wax has been molten and solidified, the better it gets. If needed, the paraffin wax can be filtered trough coarse filter paper in the incubator.
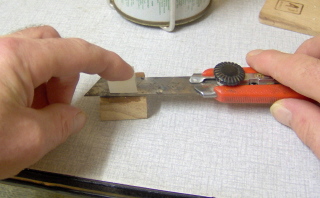
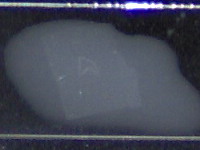
Trimming the paraffin block using a scalpel
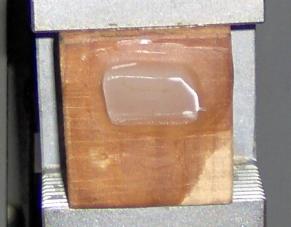
Mounting the trimmed block
on a paraffin table
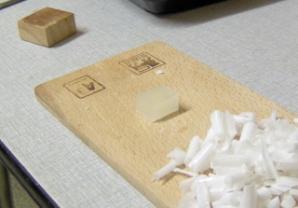
Usually a few paraffin tables are delivered with the microtome. When you bought a second-hand microtome only equipped with a cassette clamp and you can’t find cassettes you can use pieces of hardwood, aluminum, hard plastic (Stabilit, Pertinax…) sawn at the right dimensions to fit the clamp.
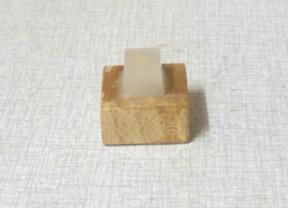
My microtome came with a few paraffin tables (which I rarely use) as well as with a “universal specimen clamp” that can hold several types/dimensions of paraffin tables. Most of the time I use small cubes sawn from a piece of beech. These can be used over and over again.
Paraffin tables made from hardwood (beech, these are leftovers from a stair, ask your local carpenter…),about 3cm * 2,5 cm * 1 cm
Whatever the kind of paraffin table you want to use, it has to be covered with a thin layer of paraffin wax first. Just put a few paraffin shavings on the paraffin table and heat them with a knife (old kitchen knife, hobby knife…) heated in the flame of a Bunsen burner or dip the table in some molten paraffin. When necessary the table can be warmed for a few seconds in a flame prior to applying the wax thus achieving a good bond between wax and table.
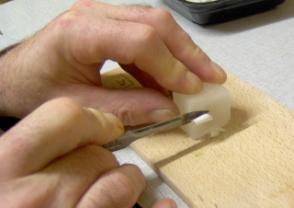
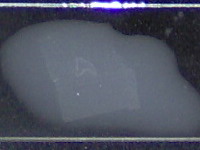
Mounting the trimmed paraffin block on the table goes as follows: warm the knife in the flame of a Bunsen burner. It should be moderately warm: some wax applied to it, should melt immediately but the wax shouldn’t boil or produce smoke! Now apply the knife to the paraffin table, put the trimmed block on it (with its upper and lower side parallel with the sides of the block if possible as this facilitates the orientation of the block in relation with the microtome knife) and gently pull the knife away as shown in the picture. Stability can be optimized by melting some small paraffin shavings around the block. The paraffin block should cool down completely.
If necessary a final trim can be done after which the paraffin block is ready to be mounted on the microtome.
![]()
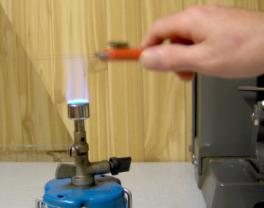
Mounting
the paraffin block on a piece of hardwood using a heated hobby knife
Mounting the paraffin
block/paraffin table and setting up the microtome
To mount the paraffin block on the microtome one just has to have a good look at your microtome. Usually it speaks for itself just how the paraffin block/paraffin table needs to be attached on the microtome.
Your microtome should have a possibility to block the vertical movement of the specimen holder. You should use that possibility: it’s much easier to work and the setting protects the very fine feeding screw of the microtome.
It’s good practice to “turn back” the feeding screw of the microtome to its beginning after every cutting session.
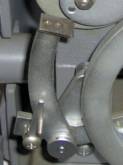
Blocking the vertical movement of the specimen clamp in the Mic 505.
Left: free movement (section cutting mode), middle: vertical movement blocked, right: detail of the vertical movement blocking lever
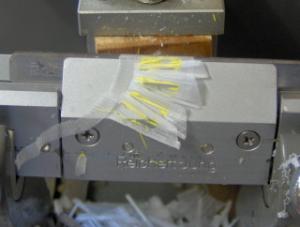
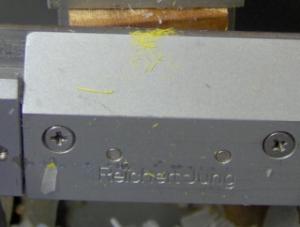
I strongly advise against mounting and orientating the block while the microtome knife is in place. For orientation purposes an empty blade holder or an aluminum strip can be attached in the knife holder of the microtome. Once the block is properly orientated and immediately before sectioning the knife is added.
Most microtomes have some provisions to orientate the paraffin table once it has been attached to the microtome. In the case of my rotary microtome these are very simple: orientation has to be done by hand only. Once you get the habit of it, it works reasonably well. As an example of a more sophisticated system, the picture on the right shows the two orientation dials of the HN-40 sledge microtome specimen clamp .
Orientation possibilities of the Mic 505. A rarely used steel paraffin table is used for demonstration purposes.
Far right: Reichert-Jung HN-40 specimen clamp with orientation dials
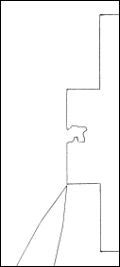
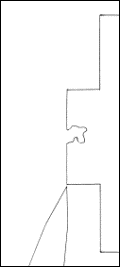
As mentioned above: the front side of the block should be, whenever possible, parallel with the plane of the sections one wants to cut. Viewed from aside, the surface to be cut should be orientated parallel with the vertical movement of the specimen clamp. Viewed from above, the surface to be cut should be orientated parallel with the knife’s cutting edge.
If the specimen is poorly orientated within the block, adjustments should be made to orientate it that way, that the section plane is right to make the sections you want.
For real transverse sections, the longitudal axis of the specimen should form an angle of 90° with the movement of the specimen holder during sectioning. For real longitudal sections, the longitudal axis of the specimen should be parallel with the cutting edge of the knife. If this means that lots of sections from one side of the block (left or right, above or below) have to be cut until (entire) sections of the specimen appear, some additional trimming should be done.
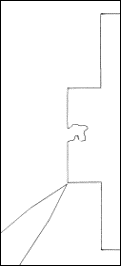
View from above, specimen poorly orientated in the paraffin block. Some additional trimming has been done to make the front side of the block parallel with the cutting edge of the knife
The upper and lower sides of the block should be parallel with the microtome knife.
Setting up the microtome
knife
Once the block has been orientated and mount on the microtome, the microtome knife has to be added.
Microtome knives should be handled with the utmost respect. They are very sharp and can produce horrible cuts as I learned the hard way. Unless section cutting, grinding or stropping is taking place, microtome knives should always be kept in their box. In a regular household, especially when there are little children, the knife belongs behind a locked door.
A good, sharp and well cared for good quality microtome knife should stay sharp a long time. When the knife becomes dull it has to be resharpened on a carefully chosen honing stone. For now I will assume that you have a clean and sharp microtome knife type B or C at your disposal.
I’m planning on writing a piece on microtome knife sharpening at home using the famous Belgian yellow honing stone (“Coticule”, “Belgischer Brocke”, “Pierre de Vielsalm”…) in the near future.
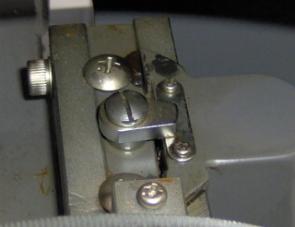
The knife is to be placed in the knife holder and secured with the appropriate screws. Usually there are four screws: two to secure the knife (on the left in the picture below) and two to secure the movable holders and the knife at the chosen angle (on the right in the picture).
Four screws of the knife holder
The knife should slant towards the specimen at an angle. To understand the importance of that angle let’s first have a brief look at microtome knife geometry.
During the last couple of weeks I measured every microtome knife with and without its honing/stropping guide attached I could get and I did some trigonometrical calculations. I always ended up with about the same figures.
A cross section trough a “typical” microtome knife type C, leaving the honing/stropping guide out of the picture for a moment is an isosceles triangle. The dimensions of the knife may vary, but in all the knives I examined (9), the three angles defining the triangle are about the same: 82°, 82° and 16° (sum of the angles in a triangle equals 180°, that much I remember from school).
As it is difficult to measure the angle of the knife’s “cutting facet”, I took the honing/stropping guide into consideration, and I calculated for what angle the guide was made thus obtaining indirectly an indication of the cutting facet’s angle. Here too, I came up with about the same figures: The angle of the microtome knife’s cutting facet was always about 30°.
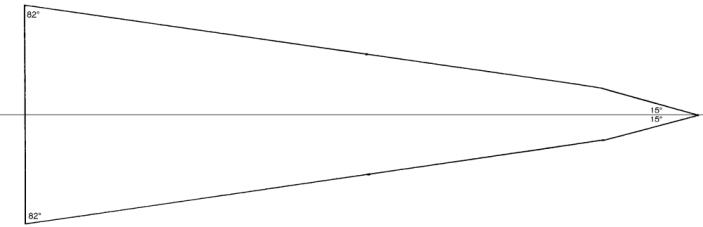
Cross-sectioned
view of microtome knife type C showing the cutting facet’s angle
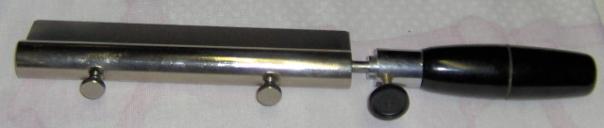
Microtome knife type C with honing/stropping guide and handle attached
I suppose the same goes for microtome knives type B when you make abstraction of the slightly curved upper surface of the knife.
Determining the angle of the cutting facet of your microtome knife is very helpful when it comes to setting up the microtome knife prior to section cutting.
An important angle to consider is the clearance angle: the angle formed between the cutting facet of the knife and the vertical movement of the microtome.
If that angle is to obtuse, the knife won’t cut a section, but it will merely scrape a section-alike piece from the block.
If it’s on the other hand too acute, it wont cut a section or only a very tiny one / a fragment as the paraffin block will be crushed between the back side of the knife’s cutting facet and the paraffin table. After passing the knife the block expands and touches the back side of the knife on its way up. During the next cycle a thick section will be cut as the block has expanded again before passing the knife’s edge. This is one of the main causes of those typical thick-thin/compressed-thick-thin/compressed ribbons.
Left:
clearance angle too obtuse. The knife will scrape a section from the block
rather than cutting one. There will be very noticeable cutting artifacts. In
extreme cases (as in the sketch) the specimen will scatter
Middle:
clearance angle okay, about 5°-10°, slightly more or less depending on
specimen, paraffin, temperature etc…
Right:
clearance angle too acute: The paraffin block will be crushed against the rear
cutting facet of the microtome knife and the paraffin table
Given an ideal knife, the tilt of the knife should be something between 20° - 25° (thus providing a clearance angle of 5° - 10°) and in practice this is a good starting point to cut paraffin sections.
Most microtomes have some kind of scale on their adjustable knife holder, but it’s not always clear what the scale is indicating. Fortunately the scale on my microtomes knife holder is very logical: “0” means parallel with the cutting movement of the microtome.
When the knife is in place and orientated at an angle of 20°, all four screws have to be tightened (by hand only!).
Nearly there…
The next thing to do is to move knife and specimen more closely to each other. This can be done using the coarse feed of the microtome, the back and forth movement of the knife holder or both. When the paraffin block is still about half or quarter of a millimeter from the knife edge all screws of the microtome should be carefully checked and tightened: specimen clamp, knife holder.
The section thickness dial should be set at 8-10 µm to begin with. If section cutting goes well section thickness can be lowered to 3 - 4 µm for animal histology or slightly more (5 – 6 µm) for plant anatomy. Should it be necessary to cut thicker than 10 – 15 µm a specially for that situation reserved (portion of the) knife should be used.
I consider the use of a reserved portion of the knife edge or a second knife -as some suggest- to cut thicker sections (15-25 µm) at first to reach the specimen faster an unnecessary complication. With the embedding method I use, the specimen is usually reached after some 40-50 sections.
When all screws are tightened you can start turning the turn wheel of the microtome at a moderate speed of about 1 section per second. The movie shows an example. It’s my debut as an actor. Movie directors can contact me through the link at the end of this article. I’ll forward their emails to my agent.
Rotary microtome movie (1.1 Mbytes, DivX codec)
When all goes well, partial sections should occur after some rotations (given a distance knife/paraffin block of 0,25 mm and a section thickness setting of 10 µm, sections will occur after 25 rotations).
Unless there’s a problem, keep turning the wheel until you obtain complete sections containing (part of the) specimen.
One of the main things that can occur is a problem with the chosen clearance angle of the knife.
When it’s too acute, you’ll notice that there's no sections even though you see that there should be contact between paraffin block and cutting edge. You’ll notice a strange dull sound when the block passes the knife edge.
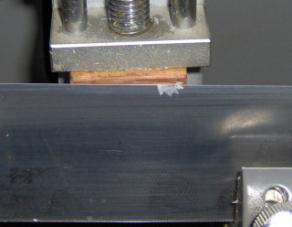
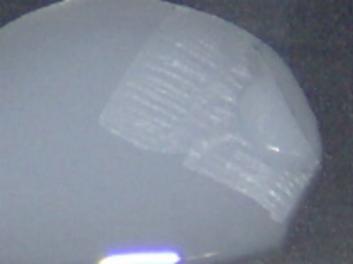
Have a close look at the back side cutting facet of the knife: you’ll probably see some paraffin crushed against it. Have a look at the block too: you’ll see that part of it has -at its sides- a white line of crushed paraffin as in the picture below on the right.
If you should cut further (I advise against it: bad for your knife, specimen AND microtome) you’ll see that after some rotations irregular sections begin to appear. The picture below in the middle shows that phenomenon. It’s difficult to see but there is a sequence of compressed thin and uncompressed thin and thick sections.
The solution is obvious: slant the knife 2°-3° more towards the block and try again until the phenomenon stops and regular sections appear. That’s the right cutting angle for that knife, specimen, paraffin, temperature, cutting speed…
Don’t forget to move the microtome knife backwards before starting to cut again! If you don’t, the next section you’ll cut will be a very thick one, which is disastrous for the knife.
Clearance angle too acute. Left: first partial sections.
Middle: thin-and-thick sections.
Right: crushed paraffin at the upper right corner and right side of the block
The clearance angle can be too obtuse too. In that case, sections will roll up and the knife will produce some kind of a scraping sound. Cutting with too obtuse an angle is very bad for the knife as well as the feeding screw of the microtome.
In extreme cases the paraffin sections show some transverse cracks. In still extremer cases, the knife will really “bite” in the block, breaking transverse bits out of it.
The solution is obvious: slant the knife away from the block. As “biting the block” is even worse for knife and microtome I didn’t attempt to make pictures of that situation.
Use a small camel hair brush to guide the sections. Never use a dissecting needle for that! If the first section of a ribbon has a tendency to roll up, use the brush to gently hold it with its side against the knife. The next section will stick on the previous one and a ribbon will form when the temperature in the room is right (in my experience: about 25-30° below the melting point of the paraffin for sections of 4-5µm and a cutting speed of about 1 section/second). Be sure to stay well away from the cutting edge of the knife with the brush as hairs crushed between knife edge and paraffin block can cause longitudal striations in the sections.
Longitudal striations in the sections can also occur when the knife has small nicks in the cutting edge. Use another part of the knife and consider regrinding it.
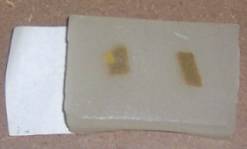
A third cause for longitudal striations is the knife edge being covered with paraffin or specimen grit. In that case clean it very gently with a very soft cloth slightly moistened with a drop of a paraffin solvent (xylene, toluene…). The pictures below show an extreme example. These are taken during section cutting with a disposable blade but the phenomenon is the same regardless of the nature of the knife/blade.
Too hard a
tissue, due to inadequate processing. Sections are scattering. Striations in
the paraffin sections due to tissue fragments resting on the cutting edge of
the blade. Rabbit spleen, Bouin, ETOH/IPA, xylene clearing (too long), section
thickness 6 µm.
If you want to mount serial sections under a common cover slip and the ribbon isn’t straight: correct it by cutting paraffin fragments preferably from the upper side of the block when the lower side is parallel with the knife. If the latter isn’t the case: leave well alone when section cutting goes well or remove the block from the microtome, trim it again and mount/orientate again on the microtome.
When these problems don’t occur or they’re corrected the section thickness dial can be set at the right thickness.
Don’t try to cut too long a ribbons: 15
or 20 cm is more than enough, unless your microtome supports an attachable
conveyor belt. Put the ribbons on a piece of cardboard or a sheet of paper as
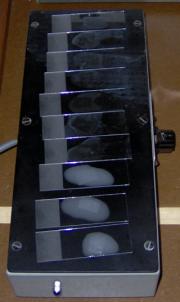
in the picture below. Keep the ribbons in their sequential order.
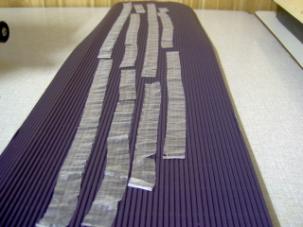
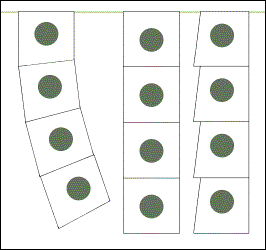
Left: microtome with attached conveyor belt
Right: ribbons of sections in sequential order
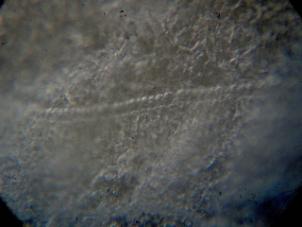
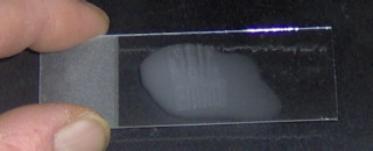
When you have cut some sections, take one, put it on a slide and have a look at it under a microscope using low and medium power. It should show no or only slight compression, no striations and the specimen should look okay (for example: without ripped cell layers). The pictures below show an example of a good section.
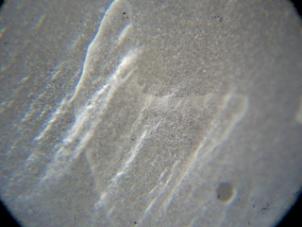
Left: Low
power view in poor man’s incident light (microscope near a window) of a paraffin
section, 6 µm thick, straight from the microtome knife. Notice the small air
bubble in the paraffin surrounding the specimen. This is of no consequence as
long as these are NOT INSIDE the specimen. Zeiss planachromat 2,5x, KPL 8x
Right:
High power view. You’ll notice the cross sectioned stoma. Zeiss planachromat
25x,KPL 8x
Remove the knife immediately after section cutting and clean the microtome. Paraffin shavings can be removed with a cloth and some xylene or toluene. The microtome should be greased according to the manufacturer’s instructions.
Section cutting using
disposable microtome blades
Although I agree with the opinion that a microtomist should be able to regrind and strop his own microtome knives, there are situations where disposable blades or razor blades are very handy: to cut specimens of which you know they will ruin the cutting edge of your microtome knife for example. Let’s say, for arguments sake, you want to cut horsetail stems and you don’t want to mess around with hydrofluoric acid to remove the silica in the specimen…
Contrary to the situation with razor blades, the cutting facet angle of disposable blades is indicated on their box.
In the case of disposable microtome blades, the holders they require are very expensive (650 Euro and upwards) but they appear from time to time on eBay at affordable prices. I suppose that this kind of knife holder would be a real challenge for a mechanic as its locking mechanism is very sophisticated.
Disposable microtome blade holder (Reichert-Jung)
Disposable microtome blades and their holders come in 2 versions: those for the so-called high profile blades (dimensions 76,2 mm * 14 mm * 0,32 mm) and those for the regular types (dimensions 80mm * 8 mm * 0,24 mm).
The disposable microtome blade holder is designed to hold the blade at an angle of about 30° - 35° towards the vertical movement of the microtome.
This means that when a blade with a cutting facet angle of 35° (that’s the standard disposable blade, such as the Feather S/R35) is added and the knife is placed on the microtome,in a way that the back of the blade holder is parallel with the cutting movement of the microtome, the clearance angle will be about 0°.
One should pay special attention to the back side of the holder during section cutting: as it protrudes towards the block it can easily scrape it.
That’s why the clearance angle for this kind of knife is usually taken somewhat larger (10 – 15°) than the one chosen when using a regular microtome knife.
Section cutting using razor blades
Razor blade holders are less expensive (about 120 Euro for the Euromex holder) than disposable blade holders. I suppose a good mechanic can make this one without any problem.
Razor blade holder (Euromex)
Regarding the cutting facet angle of razor blades: it’s not that difficult to calculate it once the thickness of the blade and the width of the cutting facet is measured. The first can be done with a micrometer, the latter with a microscope equipped with a low power objective and a calibrated eyepiece.
The razor blade holder I have holds the blades at an angle of about 15° towards the vertical movement of the microtome. In that case, the blade holder needs to be tilted more towards the paraffin block. How much more needs to be tried for every type of razor blade to be used.
Not every razor blade is usable for section cutting. Those very thin safety razor blades are not. I have had good experiences with the kind of thicker razorblades with a shorter cutting edge as those used by chiropodists to remove horny skin. These are available (at least here) in some supermarkets. Given the fact that these blades are very inexpensive, they cut at least some paraffin embedded specimens remarkably well. Given small samples (for example: onion root tips) it’s even possible to cut sections as thin as 1 – 2 µm.
I’ve tried several brands of the so called “technical razor blades”. These (at least the ones I tried) proved to be useless for section cutting as their cutting facet turned out to be only very briefly polished.
Stretching sections and
attaching them onto slides
As one can imagine it’s extremely difficult to manipulate those thin sections without damaging them. This becomes nearly impossible once the paraffin has been dissolved as the tissue is no longer supported. That's why it’s necessary to attach the sections onto slides.
The sections should be tightly bound to the glass surface of the slide to prevent them from loosening during the next steps in the preparation process. Some liquids frequently used in slide preparation are notorious for their ability to loosen sections from the slides (as an example: ammonia water in the “bluing step” after hematoxylin staining!).
During this step the sections are stretched too, thus retrieving –more or less - their original form and dimensions. There are several methods to achieve this.
In histological/pathological labs, sections are usually stretched in an electrical, thermostatically controlled warm water bath, a piece of ribbon at the time. Once stretched, the ribbon is divided into individual sections using a small brush and a dissecting needle. The sections are subsequently picked up on slides coated with some kind of adhesive.
Another method, which I prefer, is to stretch the sections directly onto slides using a hotplate. This is by far the simplest way to attach series of sections on a single slide.
Pretreatment of the slides
Clean and grease free slides are absolutely necessary. New bought slides from a good brand should be pretty clean so only minimal cleaning is required. Usually slides stored in a mixture of equal parts ethyl alcohol and diethyl ether, rubbed with a lint free cloth prior to use are sufficiently clean and grease free. A drop of water put on such a slide should spread evenly.
If they are not clean (enough) it will be necessary to clean them further immediately before use: rub them thoroughly with some detergent dissolved in hot distilled / deionised water or in hot ethyl alcohol 10%, rinse them in hot tap water, rinse again in cold distilled / deionised water and store them in fresh distilled water until they are to be used. Use a detergent for laboratory use or, if you can’t find that, the cheapest detergent you can find. The higher grade household detergents leave a film on the glass surface containing perfume, traces of wetting agents… Stuff that can interfere with the slide prep process. Cheap detergents are usually a minimum formulation containing far lower amounts of fancy ingredients.
I strongly advise against cleaning slides with chrome-sulfuric acid. This is extremely corrosive and poisonous –thus dangerous - stuff and from an environmental point of view a disaster!
Stretching and attaching
liquids
A thin film of an adhesive can be smeared on a slide, dried, the section applied and stretched plain boiled and cooled down deionized water or one can stretch the sections in a solution acting simultaneously as an adhesive. I prefer the latter method as it is less complicated but I’ll give recipes for both methods.
I’ll leave aside those adhesives containing silanes or polylysine. I’ll leave aside pretreated, ready to use slides as well. Both are very expensive and difficult to get for individuals.
Haupt’s gelatin adhesive
Distilled / deionized water, about 40°C: 100 ml
Gelatin (household gelatin is satisfactory) 1 gm
Glycerin 15 ml
Thymol a small crystal
Shelf life about a month, but in my opinion it’s better to prepare a fresh solution prior to use. In that case the thymol can be omitted.
Smear a thin film on a slide and let dry. Use boiled distilled /deionized water, cooled down to room temperature, to stretch the sections on a slide on a hotplate or above a flame. You should be aware of the fact that this adhesive easily picks up some regularly used stains such as iron hematoxylin and safranin.
Use: pick up a very small amount of the solution with a clean finger tip and smear it as thin as possible on a clean slide. Let dry. Store the slides in a dust free place.
Egg albumen adhesive
Mix one white of an egg with an equal volume of glycerin. Beat vigorously to obtain a foamy mass. Let stand for a few hours, discard the supernatant foam. Add a crystal of thymol.
Shelf life about a month, but in my opinion it’s better to prepare a fresh solution prior to use. In that case the thymol can be omitted.
Smear a thin film on a slide and let dry. Use boiled distilled /deionized water, cooled down to room temperature, to stretch the sections on a hotplate or above a flame. This adhesive easily picks up some regularly used stains such as iron hematoxylin and safranin too, but less than Haupt’s gelatin adhesive.
Use: pick up a very small amount of the solution with a clean finger tip and smear it as thin as possible on a clean slide. Let dry. Store the slides in a dust free place.
Unproblematic stretching /
attaching liquids for home users
Distilled / deionized water, boiled and cooled down to room temperature 100 ml
(or cooled down to about 45°C when using gelatin)
Add one of the following:
Gelatin (household gelatin in sheets) 1 cm² or
White of an egg 1 ml or
PVA (Polyvinyl alcohol) wood glue (such
as Rectavit 230) 1
ml – 10 ml
This is a somewhat more water resistant (D3 according to the European norm EN 204) white wood glue. It’s readily available in most countries I suppose, but if you can’t find it you should try an equivalent formulation from another brand such as Bison or Titebond, or whatever white wood glue is available in your country.
White wood glue can contain bacteria, sometimes very noticeable in the finished slides when viewed at higher magnifications. In that case one of the other recipes should be used or another white wood glue should be tried.
Mix thoroughly. As these are easy to prepare and inexpensive I don’t think it’s worthwhile to store them.
Use: simultaneous stretching / attaching liquid
Some authors advise to add a drop of wetting agent (Kodak Photoflo, Agfa Agepon…) to the stretching liquid but I consider that an unnecessary complication. These liquids should spread easily provided the slides are grease free.
You should always use freshly boiled distilled / deionised water to prepare stretching / attaching liquids, because the water should only contain the least possible amount of dissolved gasses, to prevent air bubbles to occur underneath the sections.
Slide drying hotplate
As paraffin sections will only stretch when they are warmed, you’ll need some kind of warming device. Once you have the hang of it you’ll see that it’s really no problem to stretch sections above the flame of a Bunsen or alcohol burner, but a slide drying hotplate is easier to use and you can stretch several slides simultaneously.
Don’t confuse this kind of hotplate with those used to boil liquids, sometimes combined with a magnetic stirrer: a slide drying hotplate works at a much lower temperature (30 – 90°C).
Jouan (FR) makes excellent slide drying hotplates, Medite (D) too, together with the big names (Leica, Microm…). These are expensive but perhaps you are lucky, browsing eBay.
When you’re not that kind of lucky person: it’s not that difficult to build your own hotplate. It only takes a metal cookie tin, a bulb holder with a small electrical bulb and a dimmer or a dimmer kit such as the Velleman kit K8037.
Stretching paraffin sections only requires a moderately warm temperature of about 40 – 45 °C.
Section stretching on a slide-drying hotplate. This one is made by Jouan (France) but you can build your own too
Stretching / attaching
sections onto slides in practice
You need clean slides for this (or clean slides coated with one of the adhesives mentioned above if you prefer that method), a pair of fine tweezers, a small camel hair brush, a scalpel, a dissecting needle, a small pipette, stretching / attaching liquid (or distilled /deionized water if you want to use your own adhesive - coated slides), some toilet paper and a hotplate adjusted at a temperature of 40 – 45 °C.
Now this may sound silly, but you may want to consider wearing a surgical mask as any uncontrolled breath can shatter your precious ribbon of sections all over the place.
Dividing the ribbon into
individual sections
Perhaps you have already noticed during section cutting that the sections in the ribbon are only loosely connected to each other, so dividing a ribbon into individual sections isn’t that difficult. When you hold the ribbon with a fine pair of tweezers in the middle between two sections and you put some light pressure on it with a camel hair brush, the paraffin will usually tear between the two sections. Placing the ribbon on a piece of paper and dividing it into sections with a scalpel or a razor blade works even better. When the specimen is easily visible, you can even use a pair of scissors to divide the ribbon into sections.
Make a distinction between the two sides of the section: the upper side looks somewhat dull, the underside has a smooth and shiny appearance. It’s this side that should face the slide during stretching / attaching it.
Stretching / attaching the
sections onto slides
Take a slide and put a generous amount of the stretching / attaching liquid on it with a pipette. There should be enough liquid to allow the section to stretch properly. Keep in mind that paraffin sections can expand considerably during stretching (up to 25% surface expansion). The liquid on the slide shouldn’t contain any air bubbles. Add the section very gently, lower it down on the liquid beginning from one side to avoid air bubbles underneath it and place the slide on the hotplate. In the course of a few seconds the section will stretch, thus regaining its original form and size.
Once the section has stretched, hold it in place with a dissecting needle, put one side of the slide on some toilet paper and tilt the slide to drain most of the liquid. Orientate the section on the slide the way, wipe away the superfluous liquid and place the slide back on the hotplate. Let dry completely.
When you use pretreated slides the method to attach sections to them is basically the same except for the fact that freshly boiled and cooled down deionized water is used as the stretching liquid.

When the temperature is right and there’s enough
liquid under the paraffin section, it will stretch in a few seconds only
without melting
Try to
avoid spilling stretching/attaching liquid on the upper surface of the paraffin
section. If this happens the section will curl up. As long as the surrounding
paraffin only is affected (as is the case here) it’s no big deal. When the
slice of specimen curls up, you could try to unfold it but in most cases the
finished slide will show clearly visible folding artifact
Stretching / attaching
serial sections onto slides
It’s nearly the same as the method described above but instead of stretching individual sections short pieces of ribbons are used.
As far as I know, the convention is that serial sections should be attached onto slides in the same order Western world uses in written text: from left to right and from top to bottom.
If for whatever reason sections are missing, their place should be left open.
Paraffin section expansion should be taken into consideration as the section area of the slide should be covered by the cover slip to be used finishing the slide. Furthermore there should be a safety margin of at least 2 mm. (In other words: the section area of the slide should be at least 4 mm * 4 mm smaller than the size of the coverslip.
You should keep in mind that finishing slides using large cover slips (e.g. 22 * 40mm, 22 * 50mm…) is not the easiest thing to do.
That’s all for now. You should keep your sections/slides in a dust free slide box. Next time we will use the sledge microtome. In the meanwhile let me know how you’re doing. I’ll be glad to help where I can.
