Making your own paraffin sections @ home (part 1)…
by Yvan Lindekens, Belgium
…is not that difficult. As an example I would like to show how I make them. This is only one of the many methods possible. I would be glad to hear what method you use and how your results are.
The pictures below show some of my results.
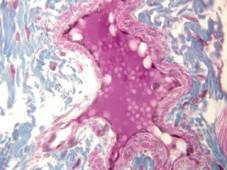
Rabbit tongue, Bouin/mod. Masson’s trichrome;
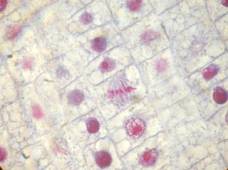
onion root tip, Duboscq-Brasil/azocarmine G+anilin blue;
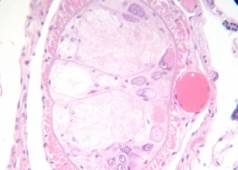
earthworm (Lumbricus terrestris), ventral nerve cord and associated blood vessels, Bouin/H&E;
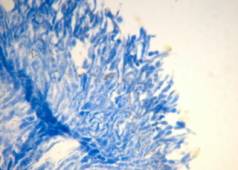
Monilia fungus on apple, FAA/anilin blue+orange G
As this is a subject that can be discussed at length, I have to narrow the scope of this series of articles down to:
- slides for plant anatomy
- fixed in one fixative only (FAA, ethyl alcohol-formaldehyde-acetic acid)
- using chemicals available to non-professionals
- avoiding dangerous chemicals as far as possible, enabling the slides to be made in a regular household environment
This month, in part 1, I’ll describe how to make the paraffin blocks.
Parts 2 and 3 will be devoted to the cutting process. I will use a rotary microtome (Euromex Mic 505) as well as a sledge microtome (Reichert-Jung HN40). I’ll use regular microtome knifes, blades not designed for microtomy (razor blades, Stanley knife blades etc.) as well as disposable microtome blades in a blade holder especially designed for the latter.
Unfortunately I don’t have any experience with the Cambridge rocking microtome. I suppose it would be really helpful if someone could write an article on these since this type of microtome seems very popular in the UK.
In part 4 I’ll affix the sections to slides, dry them, deparaffinize them, bring them to water or alcohol depending on staining method, stain them, and finally dehydrate and mount them. I will use several staining protocols.
At the end of this part I will provide a list of books with an emphasis (if not entirely devoted to -) microscopical technique/slide preparation in Dutch, German, French and English. Most of these are out of print but they still can be found second-hand, sometimes even cheap! These are the books I frequently use in my lab.
Unfortunately I don’t understand Italian nor Spanish or Portuguese. That’s why I didn’t add books in those languages: I simply don’t know these... Perhaps somebody else can write a few notes on these.
Now, before we begin, just a quick word on equipment and consumables. If you want to make your own slides, you’ll need at least a few pieces of dependable apparatus: an incubator, a microtome and an air suction pump. Almost all the rest you can improvise, but unless you’re a good mechanic or electrician (I’m not) and you can build your own you’ll have to buy at least those. This doesn’t necessarily means that making your own slides is extremely expensive: good equipment is sold regularly on eBay or other online auctions at bargain prices.
An incubator for microtechnique should have an adjustable temperature range of 30 – 70°C. Don’t confuse incubators with drying ovens! The latter have a maximum temperature of 200°C or even more. I consider these unusable for microtechnique because of their inaccurate temperature control, especially at the lower temperatures you need for paraffin embedding or slide drying.
Small incubators are inexpensive. Some brands of dependable incubators regularly seen on eBay in Europe are Melag, Memmert, Heraeus, Jouan. These are not the only manufacturers producing good incubators, but I only have experience with these. The Melag Incubat 80 older style is entirely satisfactory for embedding in paraffin : it’s build like a tank and it is sold from time to time for 40-50 Euro on eBay. The newer type is more expensive (second-hand anything between 100 and 200 Euro). In my experience it’s better to have a few small incubators than one large one: that way it’s possible to do several things at a time, e.g. embed in paraffin in one incubator while drying already mounted sections in a second one, as those two preparation steps require a different temperature range.
150 Euro is a reasonable price for a decent air suction pump capable of a vacuum of about 740 mm Hg including regulator valves and manometers, more than good enough for ordinary slide prep work.
A water-jet pump is a good and inexpensive alternative, but most tap water providers forbid their use. When the vacuum drops, fluids can be sucked into the water piping system, thus providing a serious health and environmental hazard (poisonous fluids, bacteriological contamination…). Safety bottles aren’t a 100% effective as aerosols can still contaminate the water supply. Besides that, water-jet pumps use a lot of tap water freely flowing down the drain. If there’s something you really don’t want to have in your lab it’s a humid atmosphere as this causes lots of problems during dehydration, infiltration with paraffin, slide finishing etc….
If you really can’t find an air suction pump you can use an old vacuum cleaner (no kidding) to remove air from your samples. I’ve used an older style Nilfisk for years for that.
Microtomes are sold from time to time on eBay or other online auctions. Sometimes these are expensive sometimes they’re not.
One should carefully consider the choice of a microtome type: section cutting on a rotary microtome is the simplest way to produce serial sections, but only for unproblematic (read: not too hard) samples. On the other hand: a sledge microtome is ideal to produce sections from hard(er) samples, but it’s impossible to obtain ribbons, thus serial sections with this kind of specimens.
From my lab notes and personal experience I’ve tried to sketch what is likely to be possible and what is not with the two microtome types:
|
|
Rotary microtome |
Sledge microtome |
||
|
|
Sections |
Serial sections |
Sections |
Serial sections |
|
Paraffin-embedded soft specimens (onion leaf, earthworm, rabbit tongue…) |
+ |
+ |
+ |
+ |
|
Paraffin-embedded hard(er) specimens (rabbit trachea, tillia stem 2yrs, elderberry stem 2 yrs…)
|
-/+(1) |
- |
+ |
- |
|
Non-embedded soft specimens
|
- |
- |
- |
- |
|
Non-embedded hard(er) specimens
|
- |
- |
+(2) |
- |
|
Paraffin-embedded hard(er) specimens Known to cause problems due to their nature (very dense tissues as rabbit spleen, pork liver… or tissues known to become very hard and brittle during “standard” processing such as keratinized skin) |
- |
- |
+(3) |
- |
|
Using razorblade and/or microtome blade holders |
+ |
+ |
+ |
+ |
(1) rabbit trachea: very noticeable cutting artefacts, sections difficult to stretch and to attach on slides, most plant tissues impossible to cut.
(1) Strange: very woody old roots of stinging nettle cut very well…
(2) woody plant tissues unfixed or fixed in FAA cut very well this way. Animal tissues problematic
(3) spleen and pork liver no problem. Keratinized skin: lots of unusable sections. About one in five usable
Unfortunately there’s no such thing as a “universal microtome”. Generally speaking, the sledge microtome is capable of cutting a broader range of specimens than the rotary. Given unproblematic samples, the rotary will divide a sample in serial sections very fast, but not that much faster than a sledge once you get used to use it.
I bought my Euromex Mic 505 about 20 years ago new and directly from Euromex Holland.
The Reichert-Jung was bought a year ago on eBay Germany. As sledge microtomes are very popular in Germany, I had to bid high to outbid the competitors, as the microtome was in pristine condition. I finally paid 900 Euro for it but the pain was immediately over when the seller offered me 2 disposable microtome blade holders for free.
I paid only 6 Euro for my second HN40, just a few weeks ago. It was old (from the 50’s I guess) and in rather poor condition, although without any real structural damage at first sight: grease dried out completely, some rust, that kind of thing… I think it will become a usable microtome, at least for thicker sections. I will use it in the future to make wood sections. If not usable for that, it will make a nice decoration object in my library. A restoration project for this winter.
Keep in mind that it can be very difficult and expensive to find someone to repair such a delicate instrument as a microtome so when you buy online carefully study the pictures of the machine and don’t hesitate to ask lots of questions.
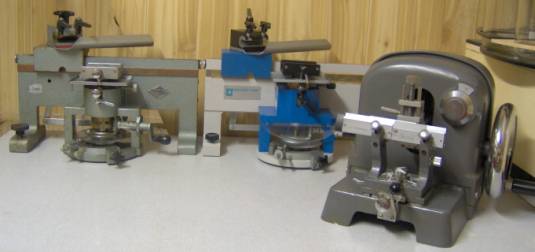
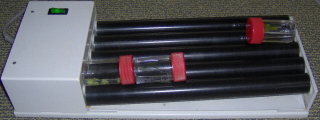
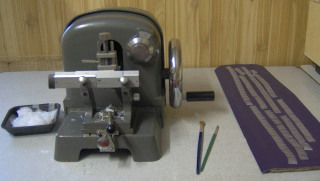
Microtomes. Background: sledge microtomes, foreground: a rotary microtome
Regarding consumables: have a look around. Don’t pay 2 Euro or more for a pack of 50 blank slides when you can buy those really cheap by 1000, 2500 or 5000 at a time (15 Euro or so + shipping costs from Germany when you buy 50 packs = 2500 slides). Store them in glass jars containing a mixture of equal parts of ethyl alcohol and diethyl ether. They’ll keep forever. Wipe them dry with a clean cloth prior to use and they are perfectly grease free.
Use what you have or what you can find: small glass jars from canned vegetables, yoghurt, anchovies… make great staining jars and these are for free. Small tin cans from tomato paste or those small aluminum cans from tea light candles are excellent paraffin embedding jars, due to their better heat conductivity compared to Petri dishes.
In part 1 of this series I will discuss in some detail the following:
Sample taking
ß
Subdividing
ß
Killing and fixation
ß
Washing and dehydration
ß
Infiltration with paraffin wax
ß
Embedding
Sample taking
It’s common practice to take plant tissue samples in the early morning, when the plants are fresh and turgescent, and not (yet) exposed to full sunlight, heat and water shortage. On the other hand, if you want to study plasmolysis: take your samples on a hot day, at noon, from plants in bright sunlight. The samples described here were taken on a sunny morning at around 8 a.m.
Use the sharpest knife you have to cut the plants and do so gently to prevent traumatic changes and artifacts in your samples as much as possible. A razor blade is ideal but not strong enough to cut through wood. In that case a Stanley knife or a really sharp pocketknife would be a better choice. I use an old French “Opinel” pocketknife for that purpose.
Dig up plants with a trowel if you want to make slides from their roots, never tear them out of the ground with force. Wash the roots in lots of water and brush them with a soft camel hair brush prior to fixation to remove as much sand as possible (Sand particles, even minute ones will ruin your microtome knife!).
Subdivide and fix your samples as fast as possible.
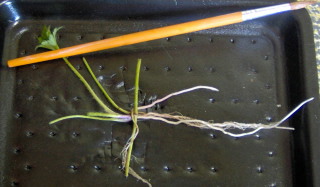
Roots of a buttercup species after cleaning
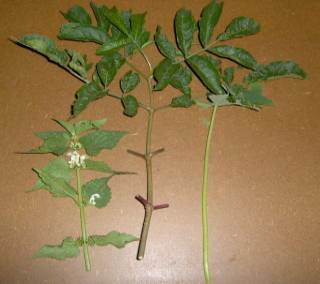
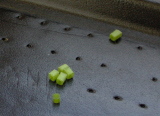
Some of the freshly cut plants I will make slides from. From L to R.: stem of white deadnettle (Lamium album L.), a branch of black elderberry (Sambucus nigra L.) and a leaf stem of Nasturtium (Tropaeolum majus). The elderberry stem is the “difficult one” because it’s rather hard due to the wood content
Subdividing
As the fixation fluid has to reach every cell of the sample as soon and as unaltered as possible, it’s necessary to divide the specimen into smaller parts. How small depends on the fixative to be used, the nature of the sample and its purpose. I always try to keep my samples smaller than 3-4 mm on their thinnest side. Of course, this also depends on the very nature and form of the specimen: the stem of the white deadnettle is hollow and its wall is only about 1 mm thick. In that case it’s no problem to cut it in 5-6mm long parts or even longer and to fix those. On the other hand: the elderberry stem is a full structure containing lots of wood: that one has to be cut rather thin prior to fixation if reasonably possible.
Killing and fixation
Generally speaking, the purpose of fixation is to preserve the tissues in an as lifelike condition as possible. As every cell structure has his own “optimal fixation”, fixation usually is a less than perfect compromise.
Prior to fixation the sample has to be killed. FAA, as all fixatives, does both.
There are literally thousands of fixative recipes. As one of the purposes of a fixative is to kill as fast as possible, all fixatives should be considered poisonous and they should be handled with caution!
I’ve chosen to work with F(ormol)A(cetic)A(lcohol). This mixture and its variants are known as Kahle’s, Bles’s, Langdon’s, Rawlins’, Johansen’s… fixative. According to Peacock it’s a modification by Johansen of Cardowfsky’s original formula.
Composition of FAA:
Ethyl alcohol 70%: 90 ml
Acetic acid glacial: 5 ml
Formaldehyde 35%-40%: 5 ml
You shouldn’t have too much trouble to find the ingredients: all of these are sold by pharmacists, at least they are in Belgium.
Ethyl alcohol for disinfecting purposes containing a few percents of acetone, MEK, diethyl ether or isopropyl alcohol is entirely satisfactory. This kind of alcohol is also used by dry cleaners to remove some stains from clothing (e.g. chlorophyll!). As ethyl alcohol is very hygroscopic, taking up very easily water e.g. from a humid atmosphere, it’s commonly considered as ethyl alcohol 95%, containing a few percent denaturant and a few percent of water.
Formaldehyde is used by farmers and animal breeders as a disinfectant of stables, cages, boots and so on. It’s also used to disinfect cattle-, sheep- and goat hoofs. Usually formaldehyde contains some methyl alcohol as a stabilizer to prevent it from polymerization into paraformaldehyde and the product can contain some formic acid, which is not that much of a problem as the formaldehyde is used here to make a strongly acid fixative.
FAA is inexpensive, keeps well, is unproblematic in preparation and use, it can be adapted to almost every sample by variation of the ethyl alcohol/acetic acid ratio. Its fast penetrating, large pieces can be fixed in it and it’s a good conservation fluid. Little or no influence on subsequent paraffin embedding or staining, FAA doesn’t need to be washed out from the tissues prior to dehydration. Nuclear detail is reasonably well preserved but cells fixed in it sometimes show marked plasmolysis. That’s not really a drawback, as the main purpose of FAA is plant anatomy, where cell outlinings are more important than cytological detail.
As already explained above, the fixation fluid has to reach every cell of the sample as soon and as unaltered as possible. So it’s not only important that the specimens are small enough, but also that the fixative can impregnate the specimen from all sides simultaneously. Ideally the specimen should be flooded permanently from all sides with a steady stream of fresh fixative. That’s hardly possible but there are several ways to achieve good fixation and all of those can be used depending on your personal preference and your budget:
- Specimens can be fixed in jars with a few layers of bandage gauze or some cotton wool on the bottom.
- Embedding cassettes are used on a regular basis in histological/pathological labs. An embedding cassette is a small perforated box in solvent resistant plastic in which the specimens are brought prior to fixation. They provide a good solution, but I haven’t found a company (yet) willing to sell these to individuals
- The “tea bag method” works with some kind of do-it-yourself embedding cassette. The specimen is placed in a “tea-bag” made of some bandage gauze and a thread of sewing wire. It takes some practice to make these. The easiest way is to put the bandage gauze over the bottom of a test tube and then to loosely apply the thread. After the specimen is added, the thread is firmly tied and the package hung in the fixative. Hang a paper label at the other end of the sewing wire containing plant species and organ for identification purposes of the sample. The “tea-bag” can be used during the fixation and dehydration process, but it has to be removed prior to infiltration with paraffin as air bubbles are easily trapped in the gauze when the bag is brought in molten paraffin
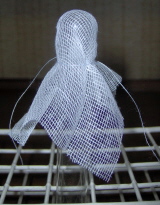
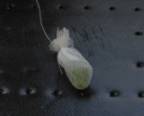
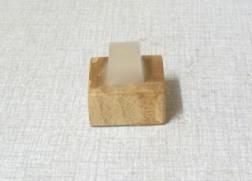
“Tea bag method”
- If you can afford it you can simply put the samples in a small jar and use a rotator. These are rather expensive, even second-hand. Nevertheless, this is a very good solution: the specimen is permanently in motion and constantly flooded with the fixative. This method has the added advantage that fixation and dehydration times can be shortened by about one third compared to the other methods described here. Not to be used with delicate specimens though: as the samples are tumbling over each other all the time, delicate structures such as trichomes (e.g. stinging hairs on the surface of stinging nettles) are usually damaged.
Rotator
You should use a large amount of fixative compared to the total volume of the samples: the classic ratio is 50 times the volume of the samples.
The specimen should sink in the fixative. If not it contains too much intracellular air. That’s where the air suction pump has to be used.
Removal of air from those floating samples is absolutely necessary: remaining air bubbles will prevent the fixative, the dehydration fluids and the paraffin to penetrate the specimen properly, resulting in unusable paraffin blocks. Ethyl alcohol has a tendency to remove air but this effect is not enough to remove all of it from the specimen and it leaves the problem of inadequate fixation unanswered.
Elderberry stem. Unusable paraffin-embedded specimen due to inadequate removal of air. On cutting it disintegrates. There is no cure for this.
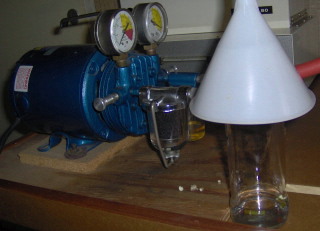
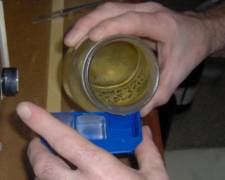
The easiest way to use the air suction pump is simply to connect a piece of thick rubber tubing at one side with the inlet of the pump and to mount a plastic funnel on the other side. The specimen is brought in a jar containing the fixative. Those large thick walled jars from asparagus are ideal for that as you only need a mild vacuum. The pump is switched on and the funnel is placed over the mouth of the jar. While the vacuum is building up, you’ll see that air bubbles are starting to come out from the specimen. From this point on you shouldn’t push the vacuum much further as this may cause delicate structures in the specimen to rupture or, in extreme cases, the jar to implode. Every once in a while (I use a 30 seconds interval give or take a few seconds) you should break the vacuum by removing the funnel for a second or two. That way the fixative can flood into the specimen. At the end of the process the specimen should lie on the bottom of the jar.
You should lead the outlet of the pump with some rubber tubing to a hood or outside because otherwise fixative vapors will spread into the entire house!
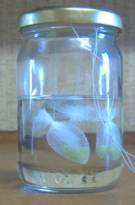
Removing air can take quite a while. It took about 30 minutes to remove all of it from the elderberry stem samples in the pictures below.

Removal of intracellular air in the elderberry stem sample using an air suction pump
In general fixation should take long enough to complete but not longer than needed. As FAA is also a good conservation fluid, the time the specimen can remain in it is not all that critical: I’ve made good slides from specimens that have been in FAA for a few years. The minimum time the specimen should remain in the fixative is about 48 hrs.
Washing and dehydration
As paraffin is immiscible with water, it needs to be removed from the specimen prior to infiltration with paraffin wax. This has to be done gradually to avoid excessive shrinkage and distortion of the sample. The more delicate the sample, the more gradual dehydration has to be carried out.
As the FAA contains a lot of ethyl alcohol 70%, the specimen is already partially dehydrated. FAA doesn’t need to be removed from the specimen prior to dehydration as washing and dehydration are done simultaneously using the dehydration fluids.
Several alcohols and other fluids have been used and are still being used for dehydration purposes: ethyl alcohol, methyl alcohol, butyl alcohol, n-butyl alcohol, propyl alcohol, isopropyl alcohol, cellosolve, dioxane, acetone, glycerin… From this list I use ethyl alcohol (“ETOH”) up to 95% and isopropyl alcohol (“isopropanol”, “2-propanol”, “IPA”) for the final dehydration because these are readily available here. You should keep in mind that those are highly flammable!
For normal, not too delicate specimens as the one described here I use the following dehydration series: ethyl alcohol 70%, ethyl alcohol 95% I, ethyl alcohol 95% II, isopropyl alcohol I, isopropyl alcohol II, isopropyl alcohol III.
For delicate samples it’s sometimes necessary to use steps of 10%, 5% or even less.
You can replace the ethyl alcohol by isopropyl alcohol if you want, but for the final stages of the dehydration you should use isopropyl alcohol. Isopropyl alcohol is less hygroscopic than ethyl alcohol. Using isopropyl alcohol dehydration will take longer, but your isopropyl alcohol will stay much longer free of water on storage as it doesn’t have the habit of taking up water from the air. Ethyl alcohol does.
Diluting ethyl alcohol (or other alcohols) is a piece of cake: let’s say you have ethyl alcohol 95% and you want to prepare ethyl alcohol 70%: just take 70(0) ml of ethyl alcohol 95% and add 25(0) ml of distilled water. That’s all. For dehydration purposes you can add a few stickers to your stock bottles indicating the amount of alcohol and water to be added. This is not entirely correct as there is some volume contraction when ethyl alcohol is mixed with water but it’s more than accurate enough for dehydrating purposes.
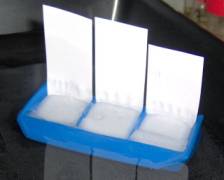
There are several ways to perform the dehydration. You can put your specimen in a jar, decant and add the different alcohols successively, or you can set up a series of jars each containing an alcohol. I prefer the latter method as I find it more convenient.
As the water/lower alcohol concentrations in the sample have a higher density than the surrounding higher concentrated alcohols, these sink to the bottom of the jar, a phenomenon that is easy to observe in the dehydration series. At the same time there is some diffusion of lower grade alcohol in the surrounding higher grade from the specimen directly and from the lower concentration on the bottom of the jar. Thus: the alcohol concentration at the bottom of the jar is lower than the one higher up in the jar. That’s why I hang my “tea-bags” containing the samples just under the surface of the alcohol. Another approach is to gently shake the jars from time to time to “mix everything”, thus avoiding this concentration gradient.
To economize on alcohols you can shift the jars one place to the left after some samples and add a new one on the right or you can discard and replace all the alcohols with new fluids after quite a few dehydrations.
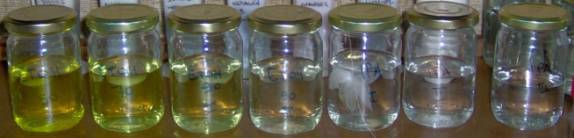
Dehydration series
How many dehydrations? We did some calculations. You can find those here. Use the back function of your browser to return.
I use dehydration jars containing about 120 ml of dehydration fluids. I dehydrate 10 samples in these after which I discard the first ethyl alcohol, shift all ethyl alcohols one place to the right and add a new jar of ethyl alcohol 95% II. The first isopropyl alcohol is also discarded, the jars are shifted one place to the left and a new isopropyl alcohol III is added for another 10 samples after which the whole dehydration series is renewed.
There seems to be no general consensus on the time the samples need to stay in the different steps of the dehydration series: in literature one finds a diversity of opinions, which is normal given the wide variety of specimens.
As I like to keep things simple, I use a simple rule of thumb: for most small specimens (maximum size 4mm*4mm*4mm) I use a 4 hours interval, that’s roughly 1 hour per millimeter thickness of the sample, regardless the form or nature of the sample. So the dehydration schedule looks something like this:
|
Dehydration step |
Duration |
|
ETOH 70% |
4 hrs |
|
ETOH 95% I |
4 hrs |
|
ETOH 95% II |
4 hrs |
|
IPA I |
4 hrs |
|
IPA II |
4 hrs |
|
IPA III |
4 hrs |
Larger or more difficult to penetrate samples (as the elderberry stem) should stay longer in the dehydration series: for those I use a 6 or 8 hours interval.
Leaving specimens too long in lower ethyl alcohol concentrations (50% or 70%) is a bad idea, as these tend to macerate the specimen. Leaving specimens too long in high ethyl alcohol concentrations (90% or 95%) is a bad idea too, as these tend to harden the specimen too much.
But with the times given here these effects are unlikely to occur.
Preparing your own paraffin wax
I’ve put that part on a different page, you can find it here. Use the back function of your browser to return.
Infiltration with paraffin
You have probably noticed that there seems to be something missing between “Dehydration” and “Infiltration with paraffin” in the schedule above: “clearing”. In the old days the samples were, after complete dehydration, brought in a solvent of paraffin such as xylene, benzene or toluene. These hydrocarbons with a high refracting index (making the samples more or less translucent or transparent, thus the name “clearing”), are rather nasty (poisonous, carcinogenic, causing liver damage and so on), so substitutes were sought and found. One of those, apart from the so called “limonene-based solvents” is isopropyl alcohol.
It is known that, although isopropyl alcohol doesn’t dissolve paraffin wax, it can be used to transfer samples to it. When kept at a temperature above the melting point of the paraffin wax, isopropyl alcohol forms an emulsion with molten paraffin wax. As this alcohol is relatively harmless compared to the hydrocarbons mentioned above, this is a good solution for home users.
It’s said that this method can only be used for very small samples, but I have used it to infiltrate objects as large as 3cm * 1cm * 1cm without any problem.
This is how I proceed:
· Tea-bags need to be removed. Put the specimen(s) freely in a small jar and add a small amount of the IPA III, just enough to cover the sample(s) with a layer of IPA of about a millimeter. Put the tightly closed jar in an incubator at a temperature one or two degrees above the melting point of your paraffin wax. When it has reached that temperature, gradually add some paraffin shavings to the IPA until you have approximately a 1/1 by volume mixture IPA/paraffin wax. The paraffin will melt slowly in the IPA. Shake from time to time to obtain a milky mixture. Leave the specimen(s) in it for 4, 6 or 8 hours, depending on your specimen.
Make sure to have 3 open jars ready with just enough molten paraffin wax to cover the specimen(s) with a layer of about a millimeter, 1 jar with paraffin wax to finally embed the specimen(s) and a pair of tweezers in this – or in another - incubator
· Transfer the specimen(s) with a pair of warmed tweezers to the first paraffin wax bath. DON’T USE AN OPEN FLAME TO WARM THE PAIR OF TWEEZERS: IPA IS HIGHLY FLAMMABLE! The IPA/paraffin wax mixture surrounding the specimen shouldn’t solidify during this step, so you’ll have to hurry. The specimen(s) should sink immediately in the molten wax. Leave for 4, 6 or 8 hours depending on specimen. The paraffin will infiltrate the specimen and the IPA will slowly evaporate
· Transfer the specimen(s) with a pair of warmed tweezers to the second paraffin wax bath. The wax shouldn’t solidify during this step either. Leave for 4, 6 or 8 hours
· Transfer the specimen(s) with a pair of warmed tweezers to the third paraffin wax bath. Remember: the wax shouldn’t solidify during this step either. Leave for 4, 6 or 8 hours
After these steps the specimen(s) should be adequately infiltrated with paraffin wax and every trace of IPA should be evaporated.
The paraffin baths can be used over and over again. When stored in an incubator, traces of IPA in the wax slowly evaporate.
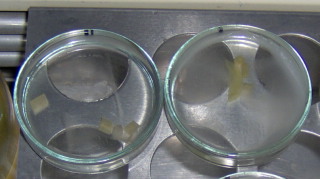
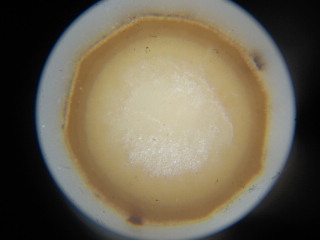
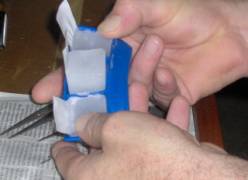
Specimens in the first and second paraffin impregnation bath. You’ll notice that a thin layer of solid paraffin forms almost immediately when the door of the incubator is opened. Try to avoid this as much as possible
Embedding
The purpose of the embedding step is to surround the specimen with a “coat” of paraffin wax. Therefore some molten paraffin wax has to be poured in some kind of mould and the specimen and a label have to be added.
As these are readily available I use rubber ice cube forms for that, but you can also use your own moulds made from paper, match boxes, covers from cover slip boxes or anything else that looks usable.
Keep in mind that it’s necessary to remove the paraffin block from the mould! If you use moulds made of hard plastic that can be a problem.
The specimen and the paraffin wax should form a single mass, otherwise it’s possible that the specimen will fall out of the wax block during cutting. This can only be achieved when wax and specimen have the same temperature, above the melting point of the wax. As both are cooling down very fast during this step, it’s necessary to act quickly!
· Have a jar of molten paraffin wax ready in the incubator as well as a pair of tweezers, a mould to pour the paraffin in, blank paper labels and a dish containing cold water
· First pour some molten paraffin wax in the mould. As paraffin wax shrinks considerably on solidifying it’s necessary to add enough of it in the mould!
· Quickly add the specimen using the pair of warmed tweezers. Orientate the specimen in the block so that the surface to be cut rests on the bottom of the mould. If that is not possible (as is the case with leaf fragments, tiny stems or roots) place the specimen flat on the bottom of the mould
· Slip a piece of paper in the paraffin for identification purposes
· Immerse the mould carefully in the cold water when a thin layer of solidified paraffin has formed on the surface of the block. Push it under the water surface when the layer of solidified paraffin seems thick enough to withstand the water pressure. Don’t do this too fast otherwise you’ll end up with water-filled cavities within the block!
· Let cool down for at least 15 - 20 minutes, until the wax is entirely solidified, then carefully remove the block from the mould
· Let dry and fill in the necessary information on the label: date, specimen, mode of fixation…

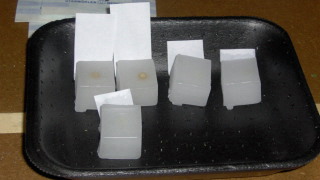
Final steps in making the paraffin blocks: pouring paraffin wax in the moulds, adding the specimen and a label, blocks cooling down in cold water, extracting blocks from the moulds, ready
Automation of the fixation, dehydration and embedding process
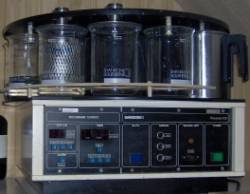
As you can see the whole fixation, dehydration and embedding process is very laborious and time consuming. Although that’s part of the fun for a devoted amateur microscopist, it’s very expensive and ineffective in a professional environment. That’s why the industry has sought and found ways to automate the whole process: tissue processors of which the Autotechnicon was one of the first.
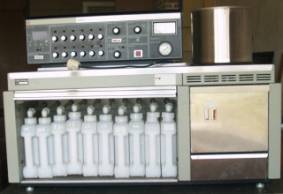
Basically there are two types of tissue processors: the so called carrousel-type processor of which the Autotechnicon and the Shandon 2LE shown in the picture below on the left are fine examples. The other type is the one processing chamber processor such as the Fischer Histomatic Tissue Processor 166A shown on the right.
Using the carrousel-type, the samples are placed in a basket that is lowered, raised and brought to the next jar after a time that can be programmed in a chip inside the machine.
With the one processing chamber processor, the samples are placed in a basket in the processing chamber and the fluids are pumped in and out the processing chamber using a programmable time table. They are constantly agitated by a build in stirrer and they can be warmed up. These processors usually have a build in vacuum pump to fix, dehydrate and embed in (partial) vacuum witch speeds up the process considerably.
These apparatus appear from time to time on online auctions. They’re usually very cheap as no one is really interested in those or people don’t know what they are. I used these machines only a few times to prepare a large quantity of blocks and slides. They’re very handy if you want to make let’s say a thousand slides from a hundred specimens for i.e. slide sets for the children’s school or with some other enthusiasts from the local microscopy club.
That’s all for now. Make sure to store your paraffin blocks in a cool and dry place! Next time we will try this:
Literature
In het Nederlands
W. Van Cotthem, E. Fryns-Claessens: “Plantenanatomie in praktijk”, J. Van In, Lier, 1980, ISBN: 90 306 0861 7
Auf Deutch
Benno Romeis: “Romeis’ Mikroskopische Technik”, 16. Neubearbeitete und verbesserte Auflage, R. Oldenbourg Verlag, München, 1968, ISBN: 3-486-45796-9
Peter Böck: “Romeis’ Mikroskopische Technik”, 17. Auflage, Urban&Schwarzenberg, München, Wien, Baltimore, 1989, ISBN: 3-541-11227-1
Hans-Christian Burk: “Histologische Technik”, 6. Unveränderte Auflage, Georg Thieme Verlag, Stuttgart, New York, 1988, ISBN: 3-13-314306-9
Dieter Gerlach: “Botanische Mikrotechnik”, 3. Unveränderte Auflage, Georg Thieme Verlag, Stuttgart, New York, 1984, ISBN: 3 13 444903 X
In English
Albert E. Galigher, Eugene N. Kozloff: “Essentials of Practical Microtechnique”, Lea&Febiger, Philadelphia, 1964, LCCCN: 64-19425
Saville Bradbury: “Peacock’s Elementary Microtechnique”, 4th edition, Edward Arnold, London, 1973, ISBN: 0 7131 2368 0
Ruth McClung-Jones (ed.): “McClung’s Handbook of Microscopical Technique”, 3th edition, revised and enlarged, Hafner Publishing Co., New York, 1950, reprinted 1961, LCCCN: 61-10086
John E. Sass: “Elements of Botanical Microtechnique”, 1th edition, McGraw Hill, 1940
James Brontë-Gatenby (ed.): “The microtomist’s vade-mecum (Bolles-Lee)”, 10th edition, The Blakiston Company, Philadelphia, 1937, 1946
Peter Gray: “Handbook of Basic Microtechnique”, The Blakiston Company, New York, Toronto, Philadelphia, 1952
Free download at http://www.science-info.net:
H.F. Steedman: “Section cutting in microscopy” A must have for everyone interested in microtomy!
En Français
Maurice Langeron: “Précis de Microscopie”, cinquième edition, Masson&Cie, 1934
Maurice Langeron: “Précis de Microscopie”, sixième edition, Masson&Cie, 1942