|
Notes on renovating a Zeiss III RS epi-fluorescence head *and adapting use of a spare port for axial epi-brightfield* by David Walker, UK |
* if never used with high intensity visible and/or UV light sources
Over the last few years I've been slowly building up the capabilities of a Zeiss Photomicroscope III when funds permitted. This being a fairly recent project after being a user of a LOMO Biolam for thirty years. For simple autofluorescence studies of plant tissues I was encouraged by the success of a transmitted darkground system with filters with the 100W halogen lamp as suggested in the literature, (see Forays into Fluorescence I) but was interested in setting up a more capable fluorescence system for visible light excitation fluorescence studies (not UV).My brother and I had shared a Leitz Diaplan with Ploemopak fluorescence outfit last year as an experiment, and learnt a lot from it, in particular finding that we had no interest in UV excitation work. We couldn't justify the space it took up in a small house or were comfortable using the expensive and potentially dangerous mercury arc lamps in a domestic environment; so recently sold it. We much preferred using simpler setups on a Zeiss stand, either the transmitted darkfield fluorescence or the renovated epi-head described here.
So for sometime had been keeping an eye out for a good example of the Zeiss III RS epi-fluorescence head. When one came up on UK eBay for a typical price I bought it. It was described as in good condition, but that was far from the case when received; in a nutshell it had been 'cooked'all excitation filters and the mirrors were unusable and even the grease on the turret seemed to have carbonised to a gritty black powder. Examples rarely turned up in the UK, so heavily renegotiated the price paid and kept it with the aim of potentially renovating it.
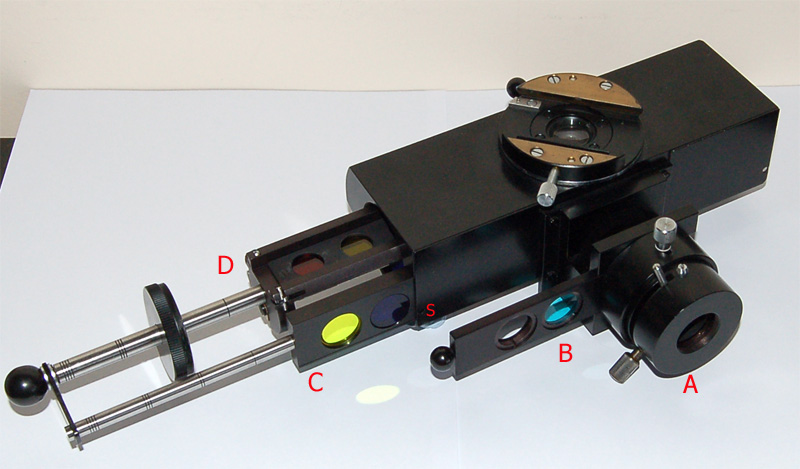
Zeiss III RS epi-fluorescence head (after renovation described below) with filters / mirrors shown partly removed. Its design allows ready access without special tools to the filters and mirrors for cleaning or replacing. No glue, awkward collets etc hold these optics in place, making it a delight to work on. The unit slides onto and is clamped to the nosepiece support of the Zeiss large research stands of the period e.g. Universal and Photomicroscope.
A - focussing and centering field iris.
B - three position slider, with light stop, Schott BG38 filter (Zeiss 'red suppression' filter near IR removal) and open port. The BG38 also had the opaque 'cooked' finish of the other filters before repolishing.
C - four port excitation filter bar. Each port can hold up to two 3mm thick 18mm diameter dyed glass filters, or interference filters. Removal of the retaining screw S allows complete removal of bar.
D - four port dichromatic mirror and barrier filter module. The mirrors are underneath facing the excitation filters at 45°. Both barrier filters and mirrors are held in place by two metal bars with screws.Renovation for fluorescence
Turret - Renovating this was straightforward as had previously stripped the turret on the PM III (to replace a worn objective click stop). As with many nosepieces, the first nut has a reverse thread. From past experience, the turret had a generous population of none captive ball bearings, so it was disassembled in a large white tray. But as the grease had totally dried out, that still didn't stop a few bearings bouncing out onto the carpet. I found all but one but was prepared, as I keep a box of new ones rather than searching a cluttered hobby room for the final elusive ball bearing!
After washing the turret parts and ball bearings with white spirit and regreased it was reassembled. The click stop can wear badly in this design but fortunately this example when clean gave a nice firm click stop. So now had a very smooth acting turret.
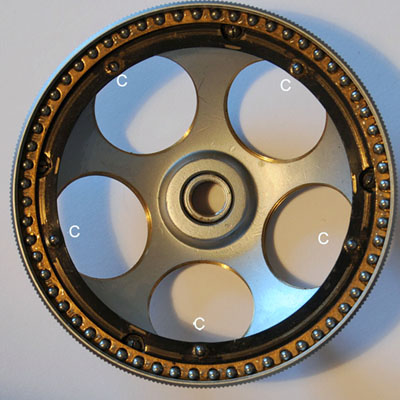
Left: A refurbished Zeiss nosepiece for the Photomicroscope. The outer ball steel bearings are not captive and easily lost, but they are 2 mm in diameter and are cheap and readily available.
Right: Nosepiece click stop, a very worn example shown here (not from the III RS head); the port on clip should only be a slim rectanglethe wear shown gives a wobble on seated objectives before replacement. Despite the number of outer balls, the 'feel' of the turret is mainly dependent on the metal click stop on the head, rubbing on the metal in between the objective ball bearing click stop positions labelled 'C'.Excitation filters - These and the near IR barrier filter all had an almost opaque dull surface finish on both sides; where two were stacked the first was the most badly damaged. They were 3 mm thick dyed glass so if the damage was only a surface one, a repolish may restore their properties. Readers experienced in glass polishing will probably be aware of better options, but the author found that 'Silvo'* silver polish (Reckitt & Colman Ltd, UK) which had a very fine grade of powder (alumina?) did an excellent job (it stated on the tin that it was also suitable for polishing glass). Each filter was polished on a pane of glass with a piece of lens cloth in between soaked in the polish and each needed about 15 minutes of firm random circular polishing. Inspection with a 10x hand lens showed no scratching of the surface. The most heavily damaged showed residual slight etching from the original damage but now had a high polish. These were colour modifying filters for the light rather than passing image forming rays, so perfection wasn't vital as long as they were restored to high transmittance and their original colour.
* The author's tin was old, so the formulation may have changed. The web offers many resources, advice and specialist materials for glass polishing.
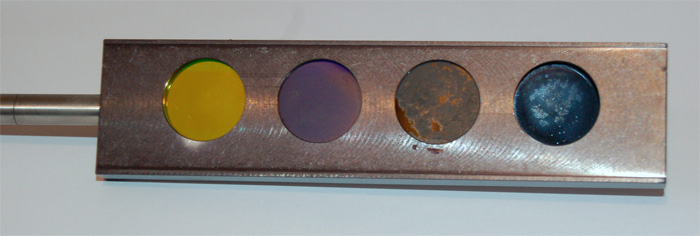
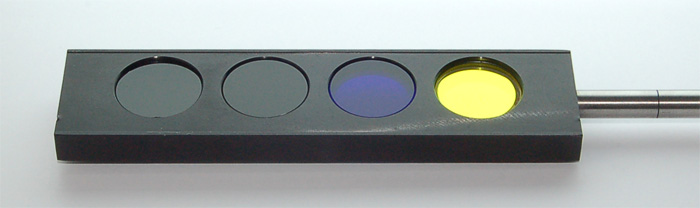
Front (upper image) and back of the excitation dyed glass filters (the far left is an interference type). These should have a high gloss finish!
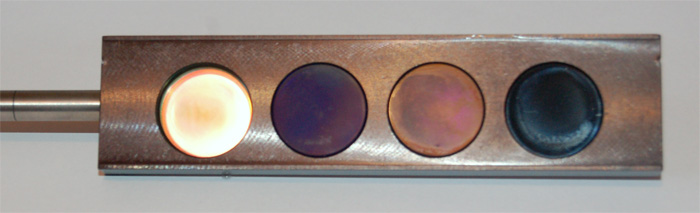
Excitation filters after repolishing. The green excitation filters on right were two interference filters, the first a light blue modifier was damaged and unrepairable, the main green interference filter was OK. It has presumably changed the green excitation spec a little but fine for author's use.
Barrier filters - These showed no evidence of damage and a gentle clean was all that was required. This was fortunate as the image forming rays passed through these filters and would have been more wary of the home brew polishing used for the excitation filters.
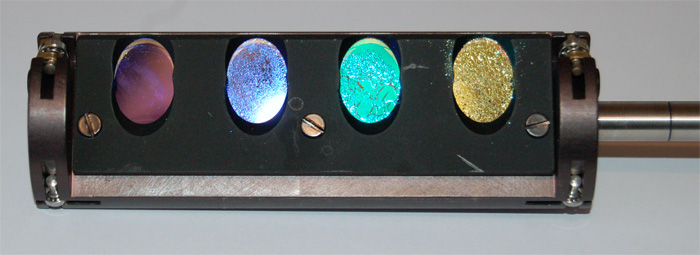
Dichromatic mirrors - These should have high reflectance / transmission with unblemished surfaces, but as the image below shows, three of the four had orange peel surfaces and were unusable. They also cannot be repaired as their specific wavelength dependent properties rely on special micro-thin layers unlike the dyed glass filters above.
Dichromatic mirrors, they are orientated at 45 degrees to the excitation light, which is reflected down onto the subject through the objective. The fluorescence image at the emission wavelength passes through the mirror but blocks transmission of the residual excitation light. They are 22 mm diameter and 0.7 mm thick and held in their recesses with a three screw plate and are readily removable.
I spent some time looking for the genuine dichromatic mirrors and asked a number of Zeiss distributors and kept an eye on eBay. I've found none to date. Two specialist US companies were helpful and did quote about £100 to make each mirror to order but couldn't justify that cost, plus the import taxes. However, there's at least one specialist seller on eBay USA of a wide range of optical parts including dichromatic mirrors with the right transmission / reflection spec. at 45 degrees. Occasionally the right spec. in a thin size came up but none that would fit the recess. But they were only $10 - $20 each so selected a set to explore whether they would work laid on top of the ports. The eBay seller includes a transmission spectrum with all orders.
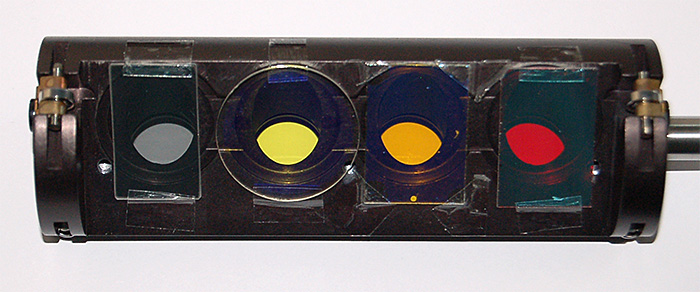
The set of mirrors ca. 0.7-1 mm thick, from various sources currently being used. They lay on the module rather than in the recesses so the reflecting optical axis of light is shifted a few mm. They are functional rather than elegant(!) and held in place with Sellotape, (preferred to a glue which may attack finishes).
Before this set was installed, three ways of using brightfield epi-axial were tried, the 50/50 mirror shown and a coverslip both fully over port and half over port.
Left to right:
50/50 silvered mirror in the not used UV port for axial epi-brightfield work. The size shown 25x15x1 mm can be bought off the shelf from Knight Optical for ca £14. For mirror to fit the 23 mm recess, this company will cut to order for a reasonable £35 but the above works well enough.
Violet excitation - Zeiss state a 'FT 460' in original (ref. 3). The eBay seller's 'Omegabob' 460DLP replacement has similar spec, cost $21.
Blue excitation - Zeiss state a 'FT 510' in original (ref. 3). Mirror ca. 520 LP was bought on eBay.
Green excitation - Zeiss state a 'FT 580' in original (ref. 3). Mirror 580DCLPXR, 0.7 mm thick cut to order by eBay seller 'Omegabob', cost $20.
NB. if ordering such mirrors from suppliers, ensure it is the correct transmission / reflection spec at 45° that is being bought.Safety note: The author's Zeiss Photomicroscope III with III RS head is only used at home with transmitted, variable intensity, tungsten lamps up to 100W. So any slight mismatch of filters and mirrors would have no safety consequences beyond those of normal transmitted work. I do not own a mercury or other fixed high intensity lamp. Home trials of new filter / mirror combinations away from the maker's original tight specs, may not be safe if used with high intensity white light or UV light sources (e.g. fixed intensity Xenon / mercury arc lamps / >100W quartz halogen lamps). It is up to the experienced reader to decide if it's safe to try modifications with their own epi / incident light heads. Such modifications may never be suitable for a microscope in a multi-user environment such as school / college or industry where the history of a microscope setup could be lost and unsuitable lamps tried by others.
Consequence of shifting mirror axis? - Laying a new mirror on the recess top rather than in recess will shift the optical axis slightly. By simple ray tracing I believe that shifting the axis of the angled mirror by 2 mm along the horizontal x axis would shift the axis of the incoming light reflected onto the specimen, but this could be mainly compensated by recentering the field diaphragm. The important image forming rays from the subject passed vertically through the mirror and believe the slight axis shift would have no major effect (comments welcomed).
Experiments seem to bear this outan existing Zeiss mirror in its recess compared with a new mirror lain on top of recess, did shift the field iris a little. I retook images of fluorescing subjects previously taken using the formerly owned Leitz Diaplan using the same type of filter set and the images seem comparable.
Consequence of using a 100W quartz halogen lamp for visible light fluorescence rather than a 100W mercury HBO lamp - As remarked earlier the author much prefers not using a mercury lamp in a domestic environment, the power supplies are also bulky if space is a concern. For autofluorescing subjects of main interest, the visible image is dimmer (about 3-4 stops less cf the Leitz Diaplan with 100W HBO lamp formerly owned), but with a semi-darkened room many subjects can still be viewed. Live view focusing on the DSLR is no longer possible with the duller images, but by making the DSLR exactly parfocal with the eyepieces using the diopter adjustment for fine control, photography is straightforward. Modern DSLRs like the author's Nikon D300 have excellent long exposure and high ISO performance so ensures that image quality is retained.
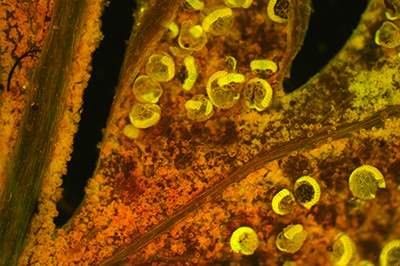
100W quartz halogen (left) cf 100W HBO mercury arc (right) for blue excitation:
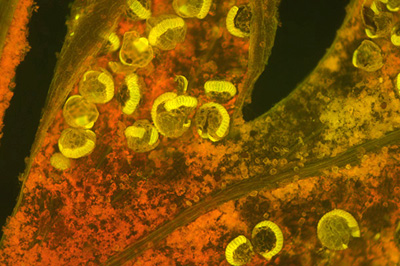
'Gymnogramma peruviana' (Silver fern) slide dated 1881. Zeiss 2.5x NA0.08 objective. Fluorescence using blue excitation. Both images used the same dichromatic mirror and excitation / barrier filters; formerly used in Leitz Diaplan with Ploemopak cube and now Zeiss III RS head.
Left: Zeiss Photomicroscope III with III RS head. Zeiss 100W quartz halogen lamp. Exposure 8 secs ISO800
Right: Leitz Diaplan 100W HBO lamp. Exposure 4 secs ISO200. i.e. 3 stops less than above.
Colour and tonality inevitably changes with such different lamps and with camera on Auto white balance, but both are revealing the differences in fluorescence between spore capsules and leaf.
Exploring simple incident epi-brightfield using spare port
My interests were in blue, green excitation but not in the UV (the lamps used had no real intensity at these wavelengths anyway). So removed the UV barrier, excitation filters and dichromatic mirror in one port. In place of this mirror I experimented with different types of mirror for brightfield visible light epi-studies, as had no existing epi setup (beyond the simple intense side spot light). I tried adding a coverslip but also tried a 50/50 half silvered mirror (as recommended in the textbooks as a suitable mirror for incident studies in a proper incident light head, e.g. Needham, ref. 1).
Glare and its reduction - I used normal Zeiss objectives. Zeiss notes that for their Epiplan objectives: 'special care has been taken to eliminate reflections at glass-to-air surfaces by suitable shaping and coating of the lenses' (ref. 2). Glare is noted by Needham (1) as a potential problem with incident light work with a 'Beck cover glass type' mirror because 'the illuminating rays and image-forming rays cross'. One reported way to minimise glare is with polarising light. Proper incident light mirrors are also likely to be coated.
Incident axial light systems for other microscopes using a coverglas as reflector have been described and Ted Clarke presents his elegant home designed and machined illuminator using fibre optics for his Monolux and LOMO stand in this Micscape article 'Metallograph imaging with home built instruments'.
Suitable objectives - Needham notes that subjects should be in the main uncovered (i.e. no coverslip) for incident light work. The author's interest in epi studies was at low to medium mags. Zeiss objectives up to the 16x NA0.4 can be used uncovered so are suited for uncovered work.
The main disadvantage of this set-up for axial epi brightfield noticed so far, is that it is not being used with the Zeiss epi-condenser. Possibly because of this, the lamp structure is imaged in the field of view. Slight defocusing with the 100W lamp and use of the lamp's diffuser plate corrects this, but works less well with the 60W tungsten lamphouse.
Trials of Incident axial light image subjects - some items from around the home
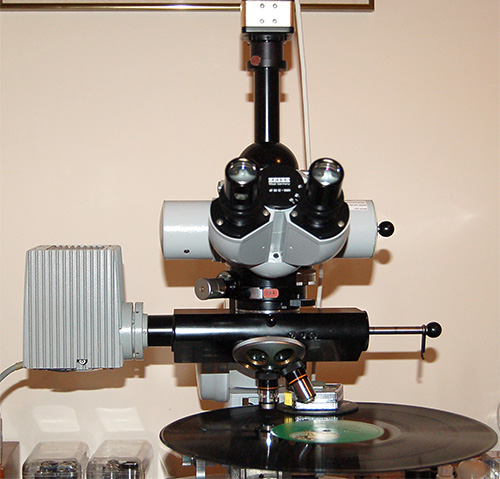
Looking at digital and analogue information, CD and LP record: The Photomicroscope's size with round stage with mechanical controls removed allows a large working area for a whole CD or record to be inspected. (Or a fragment can be studied if unwanted examples are broken up in a stout bag; use eye protection / gloves and take care as they can shatter into splinters.)
A rather unorthodox subject! A felt place mat with weight on keeps the vinyl LP record balanced and safe to study. A cloth on stage prevents scuffing of the record. The 100W quartz halogen lamp is attached to the Zeiss lamp holder and prism behind the III RS head.
There is a dedicated epi condenser that fits in the epi port of the Photomicroscope and accepts diverted light from the lamp mounted at back, but the condenser is quite expensive on the used market (and a different design to that used on the Zeiss Universal). The side lighting shown is as effective and cheaper. With thanks to Spike Walker for alerting me to this method.All the images shown below were taken with a Nikon D300 DSLR at ISO200, auto white balance, unless stated otherwise. Projection eyepiece Zeiss 10x Kpl W with 12 mm collar.
The LP record is a good example of where axial incident lighting is superior to off axis, as the axial illuminates within the groove allowing the analogue detail to be studied. It also demonstrates the value of experimenting with polarisers above and below subject, to create the view desired. Polars suppress reflected light off the surface of the record and emphasise the internal groove structure.
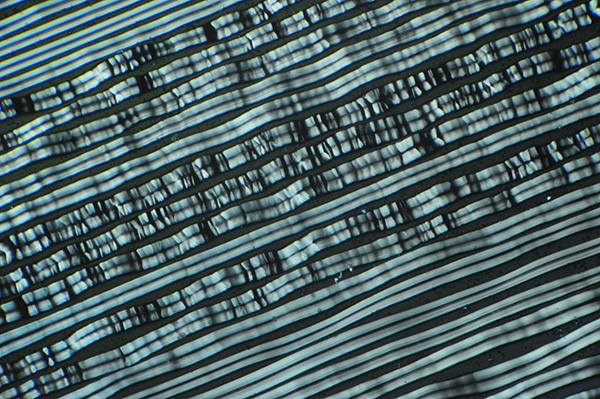
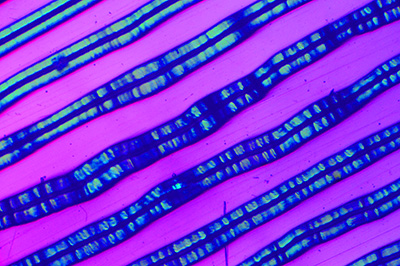
LP record (Tchaikovsky Symphony no. 5, Deutsche Gramophon), Zeiss 4X NA0.16 planapo. 100W quartz halogen lamp, partially crossed polars eliminates surface reflected light and shows how the groove amplitude, frequency and internal modulation changes during the music. Out of camera image apart from resize.
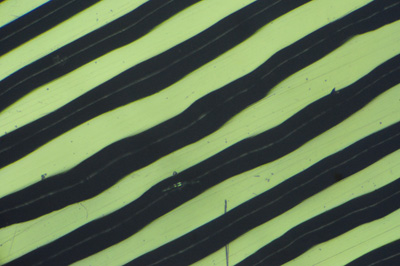
LP record (Tangerine Dream, Ricochet, Virgin Records), Zeiss 6.3 X NA0.16 planachro. 100W quartz halogen lamp.
Left - axial epi, polars uncrossed shows predominantly the surface reflected light. Out of camera image. Some loss of contrast with flare is seen.
Middle - axial epi, crossed polars with lambda tint plate, shows the surface in purple and internal groove detail. Tonal balance and hue stretched in software.
Right - off axis epi, same record, different area, Zeiss 2.5X NA0.16 planachro, but with the 100W lamp handheld next to objective as a side spot light. Off axis light only shows surface reflected detail not internal grove detail. Dust is fiercely emphasised. (Opticstar PL-130M CCD camera.)CD / DVD: The digitally encoded data can be seen visually with an objective ca. 16X with the Optovar 2X and 10x eyepieces. Higher mag objectives may not have a great enough working distance to focus through the CD. But the LOMO 40X NA0.75 water immersion is excellent for this as it has a large working distance. It is easy to miss the focus point as the digital layer is shallow and of low contrast. It's interesting to try different types of discs, 'silver' music CDs / video DVDs and recordable dye types. An early 'gold' Kodak PhotoCD just seemed to show fine lines, and couldn't see the data stream.
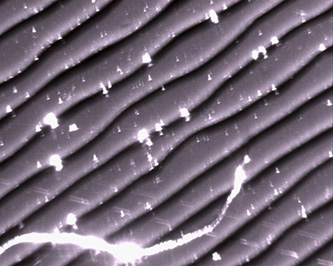
Video DVD (BBC TV, Pride and Prejudice, disc 1). LOMO 40X NA0.75 water immersion, Optovar 1.6X, half silvered mirror, green filter, crop of image from 1.3 Mpixel Opticstar PL-130M CCD camera. The tonal range is very flat so enhanced somewhat. This is probably where a true epi objective could give a superior image. The data stream seemed clearer when the data was parallel, as here, with the y axis of stage.
Off-axis lighting can work as well and have previously imaged the data on a LOMO Biolam using a LOMO 20x achro objective and side lighting; the objective working distance was just sufficient for light to reach the subject from the side.
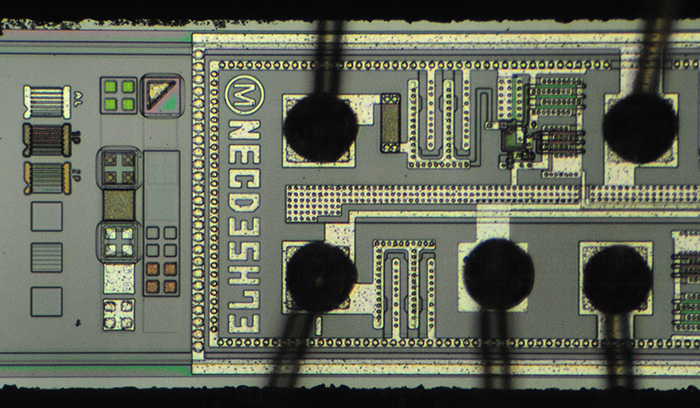
Detail of sensor circuitry from a dismantled handheld document colour scanner (remember those .... before A4 flatbeds became affordable!). Zeiss 6.3x planachro objective (not an epi form), partial crossed polars, 50/50 mirror. Out of camera image apart from resize and slight highlight adjust.
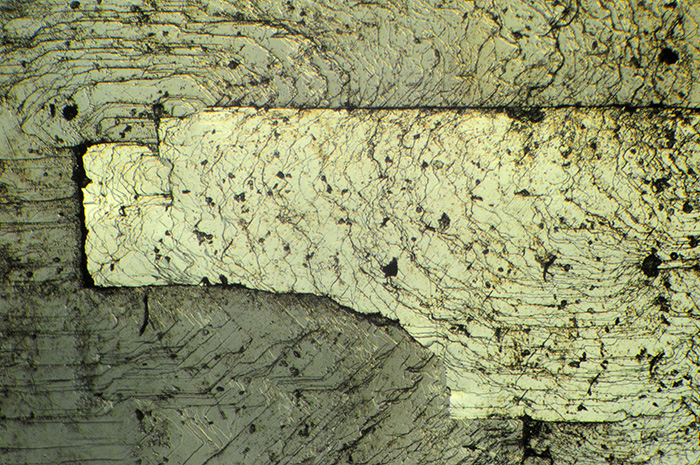
Iron pryrites cube, surface detail. Zeiss 2.5x planachro (not an epi), partial crossed polars, 50/50 mirror. The central raised area is barely seen by eye but clearly shown in pseudo relief with epi illumination. Out of camera image apart from resize and light highlight adjust.
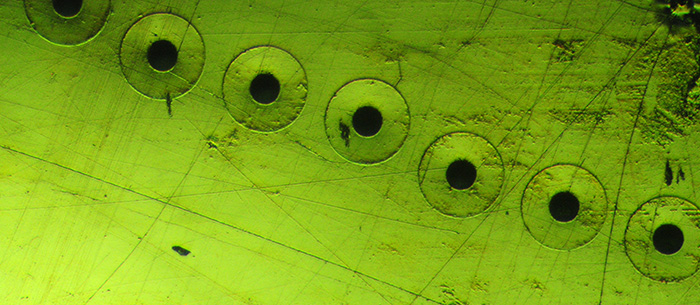
Off axis epi: Plate from an old inkjet printer (when plate was in the ink cartridge) showing the holes. Zeiss 2.5x planachro (not an epi form). The 'mirror'' was a coverslip only covering half the back focal plane of the objective as described and illustrated by Needham to reduce glare and to give an oblique effect (1). The edge of the coverslip was painted black as found to cause reflections in the field. The author's experiences with this technique are mixed to date, but imaging the extremely small relief on this plate was improved in this example. Axial epi gave a flatter image. The green colour was genuine and presumably caused by the partly crossed polars on the gold plated surface.
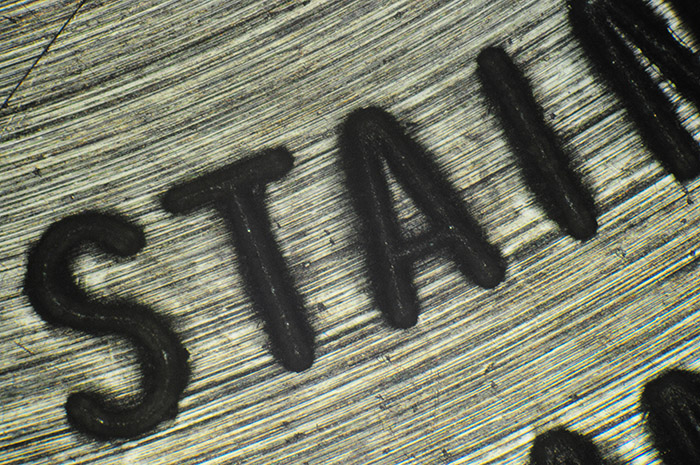
Steel watchback, etched text. Zeiss 4x planapo (not epi form), partly crossed polars, 50/50 mirror. Out of camera image.
Comments to date: The Zeiss III RS is a beautifully made accessory and of a design that permits relatively easy access and repair / replacement of the filters and mirrors if any have been damaged. The admittedly basic replacements for the dichromatic mirrors are a cheap and functional way to bring the item back into use for fluorescence studies with a quartz halogen lamp, pending sourcing of affordable original replacements.
The installation of a 50/50 mirror (or coverslip) in the unused UV port gave to the author's eye, quite competent axial epi-brightfield with normal non-epi objectives with polar filters controlling glare, a technique I've never had access to before. There are of course dedicated epi brightfield / heads for the Zeiss and epi objectives, but these can be expensive and it's a technique the author will only occasionally use. So modifying the spare port of the III RS gives a useful epi-brightfield feature in the fluorescence head (with safety provisos on lamp use mentioned).
I'm not certain if Zeiss did or does have an axial epi-brightfield option for their past or present fluorescence heads to save buying a dedicated brightfield epi-head. But recent discussions by members on the Yahoo Microscope Forum revealed that Leitz did make a cube for their Leitz Ploemopak head for axial epi-brightfield. UV exposure from fluorescence lamps could be prevented with a barrier filter but not clear if these cubes were safe to use with the fixed high intensity lamps often use for fluorescence, and if not safe, if it was up to the user to ensure the cube was never present in the head with unsuitable lamps.
Comments to David Walker welcome.
Acknowledgement Thank you to members of the 'Yahoo Microscope Forum' for useful discussions and for providing information on the Leitz Ploemopak epi-fluorescence head and epi-brightfield cube available for it.
References
1) G H Needham, 'The practical use of the microscope', pub. Charles Thomas, US, 1958, Chapter XXI, 'Illumination by incident light'.
2) Zeiss (Oberkochen, W. Germany), 'Optical systems for the microscope', p. 60. Available to download (43 Mbyte pdf) on www.science-info.net hosted by Gordon Couger.
3) 'Epi-fluorescence condenser III RS. Operating Instructions'. Document G41-351-E, Zeiss West Germany, ca. 1970s. Page 12, 'Filter sets'. Available on www.zeiss.de website.
Disclaimer: Neither the author David Walker, nor owners of the Microscopy-UK / onview.net websites nor any other site contributor accept any responsibility for damage to the eyes, other body part, equipment caused by adopting any of the modifications described above. It is the responsibility of the reader to read the safety warnings, decide if the modifications are safe for their own equipment and if so, takes the appropriate precautions with suitable lamps. As remarked such modifications are unlikely to be safe for microscopes in a multi-user environment where use of an unsuitable lamp for brightfield axial epi or imperfectly matched exciter / barrier / mirrors may be possible.
Microscopy UK Front Page
Micscape Magazine
Article Library
© Microscopy UK or their contributors.
Published in the February 2010 edition of Micscape Magazine.
Please report any Web problems or offer general comments to the Micscape Editor,
via the contact on current Micscape Index.Micscape is the on-line monthly magazine of the Microscopy UK web
site at Microscopy-UK

© Onview.net Ltd, Microscopy-UK, and all contributors 1995 onwards. All rights reserved. Main site is at www.microscopy-uk.org.uk with full mirror at www.microscopy-uk.net.