The Novitiate’s Odyssey
Episode Seven: Bumbling and Stumbling into Phase Contrast, a Tour of the Laboval 4 and Other Assorted Ramblings
by G. Joseph Wilhelm, Florida Keys, USA
( Editor's note: Previous episodes - part 1, part 2, part 3, part 4, part 5, part 6. )
As a wise man once said “Ya gotta have a plan so you got sumptin to deviate from.” My original intention, as pertains to microscopy, was to simply have an antique scope for display. However, as has been chronicled since Episode One, my rekindled interest has taken on a life of its own. Things are moving along nicely thank you, my Zeus system is up and running, the stereomicroscopes are performing well and the remodeling of a corner of my mini museum as a microscopy suite is proceeding in a pleasantly welcome manner. Now, while these are some of the favorable outcomes of my microscopic machinations, there are converse aspects also.
To paraphrase Oliver Hazard Perry, “I have met the enemy and he is me.”
I have journeyed in haste down the yellow brick road of microscopy to find the Wizard of Optics and have him grant me knowledge of all things microscopical. Due to this unbridled celerity and since I am assembling my kit piecemeal, I often find myself acquiring accessories as a “good deal” that I am not quite ready or unable to incorporate immediately due to: a) Not having adequate tutelage or b) The part requires some modification to fit the Zeus system. I get the same overzealous urge to obtain and consume when I walk into a Chinese food buffet. All those entrees, so little time. But unlike Chinese food, microscope accessories don’t go bad in the refrigerator after three days. So if they present themselves advantageously I happily snarf them up knowing I will get around to them eventually.
I had mentioned to Mr. David Walker of my interest in phase contrast and the new aftermarket condenser/lens set I had my eye on for $600. This set was by the same manufacturer as the superb plan achromatic lens set I had purchased earlier. Mr. Walker in turn, informed me that in the UK, complete, quality phase equipped microscopes such as the Watson Microsystem 70 were selling for $150-$200 so perhaps I should look into a similarly equipped Spencer or B&L as a phase dedicated set up would be much more convenient. Well Mr. Walker, I can safely say that the purport of this article is due to your advice but it does deviate from the norm of my offerings as it may actually contain some useful information. So with the above precepts in mind allow me to present my rendition of “The Agony and the Ecstasy.”
The Agony:
If you are like myself dear reader, venturing for the first time into the realm of Phase Contrast, you will find a plethora of possibilities encompassed by a rather large financial bracket. Used Zeiss phase condensers were upwards of $350 with the individual objectives from $150 to $250 each, which is why the four objective $600 after market set did not look too bad even though I would have to do a bit of fancy machining to create an adapter. Amscope offered some plan achromatic three objective sets for about $350 even though the objectives were not marked “plan”. I found this very set on ebay, offered as “In new condition”, low mileage, only driven by a little old lady to church on Sundays etc. for $150 or best offer. I knew I would be turned down but I offered $50 anyway and continued my search.
I had been searching for phase contrast under the Zeiss brand and I noticed how LOMO accessories were always offered as LOMO/Zeiss. Having been befogged for quite some time on this relationship I decided to delve into this mystery.
(Reading the Zeiss Company chronological record is tantamount to taking a European history course. Let me condense the facts that were of interest to me.
With the end of WWII the Zeiss workers and tooling assets were dispersed from Jena to Leningrad- LOMO and Oberkochen-Zeiss West Germany, with some workers remaining in Jena East Germany to become Zeiss aus Jena or as marketed in the US simply aus Jena, thus explaining the similarity and interchangeability of some parts and the aforementioned coupling of the LOMO/Zeiss brands. All of these companies were producing quality instruments using former Zeiss employees. A fascinating read of the over160 years of accomplishments of the respected Zeiss Company can be found at:
http://www.company7.com/zeiss/history.html.)
Armed with this new information I expanded my search to include aus Jena and up popped some aus Jena Laboval 4 microscopes. Most were commanding a minimum bid upwards of $400 but a woman in Texas had four “in good working order” for $275 each. In the single photo she posted, the scope had what appeared to be a sub-stage phase turret condenser. She evidently had no idea what she had as inquires about whether the objectives were also phase was met with confusion (The rest of her eBay offerings were Hummel ceramic figurines). Finally after receiving confirmation that three of the four objectives were marked with a “Ph” and two of the scopes were already sold, I decided to take the plunge and purchase one. Hopefully a good deal on a complete phase outfitted microscope.
Shortly thereafter I received notification that my offer on the Amscope phase set was accepted and the flat spot on my forehead where I slapped myself with my palm is still apparent.
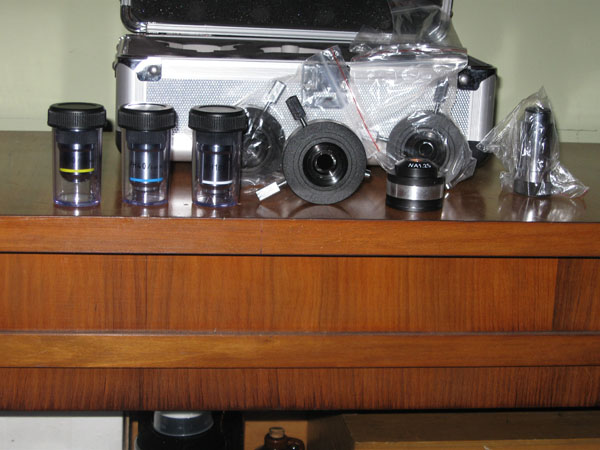
The aus Jena microscope and the Amscope phase set arrived the same day. The Amscope set appeared as advertised, in excellent, as-new condition in a nice case. (See Figs 1 & 2.) A single dovetail carrier would be all the machining that was necessary to adapt it to the Zeus system.
I next turned my attention to the large box containing the Laboval 4 and here is where the agony really set in.
First of all, purchasing this instrument was alien to all of my collecting parameters. Compared to my GFL it was of a harsh angular design. Perfectly square dimensions, entirely devoid of any aesthetic or artistic influence. A starkly efficient presentation of “form follows function”. It presented itself as the proletariat of microscopes, as it were, and it was the wrong color, (gray, not black).
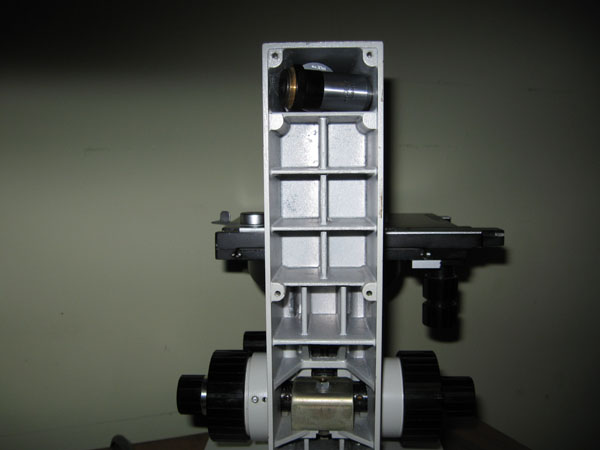
The disassembled microscope components came well packed in a sticky sided bubble wrap (See Fig. 3). The inconvenience here was the sticky side was applied to the microscope. I spent the better side of an hour removing this tenaciously gripping material, which left a tacky residue upon the affected constituents. Thankfully the optic component surfaces were not subject to this detriment. This in turn revealed a University of Texas at Dallas property sticker on the back. Not a good sign, as institutional scopes have a reputation as suffering from a neglect of maintenance and care. The angular interface for the Siedentopf head to the arm was eliciting an aggravating rattle, the fine and coarse focus were stiff and seized together, the potentiometer for the base illumination light was shot and the right eye piece had a lens fracture halfway across the field of view. Further investigation revealed that rotation of the phase condenser resulted in complete seizure after half a turn.
All of these components came individually encased in sticky bubble wrap.
I sent a rather terse message to the seller indicating that the microscope was in substantially less than the advertised “good working condition” and this resulted in a $75 refund. Since the microscope was sold as “no returns” I figured this was the best I could do.
The Ecstasy:
So far, the only benefic element to this whole experience was the condition of the Amscope phase components. I set about the aus Jena to salvage what I could.
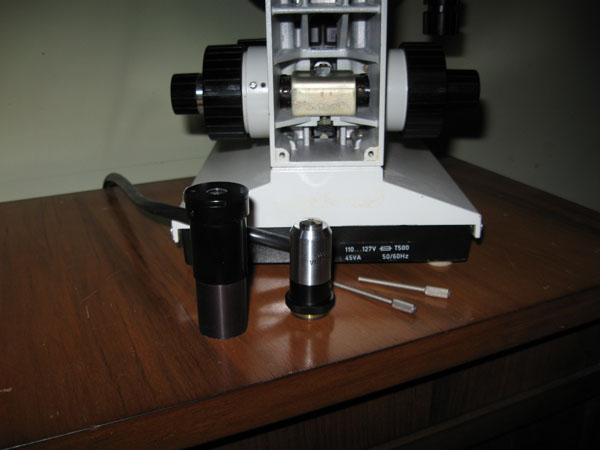
The residuum left behind by the bubble wrap took an hour to remove with judiciously applied treatments of naphtha (Highly flammable, lighter fluid actually, please read Episode 5 on common sense safety). The plastic parts did not react with the naphtha, which was the first good sign. I didn’t know at exactly what part of the focus mechanism was seizing up so I started with some penetrating lubrication around the stems of the coaxial focus knobs. The rattle in the head interface was just that. The optics were neither loose nor affected by whatever small piece was roaming around in there. I decided not to disassemble it, better the devil you know, so to speak. The “crack” in the right eyepiece lens turned out to be a rather crude wire pointer inserted at the lens plane field of view. With that removed, the eyepieces were flawless. With a shot of contact cleaner the light dimmer started working, at least on the bright end from the 9 setting down to about 7 and after letting the penetrating oil do it’s job for a couple of hours the focus mechanism freed up and started working smooth as silk. The problem must have been the old hardened Russian grease I keep hearing so much about. Things were looking up. (See Fig. 4)
Assembled stand after cleaning
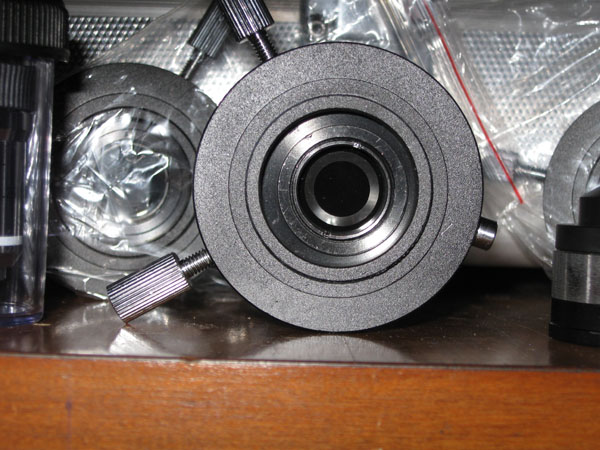
Now, to deal the rotating condenser, some disassembly was in order and upon removing the top screw and cover, I was greeted with this.
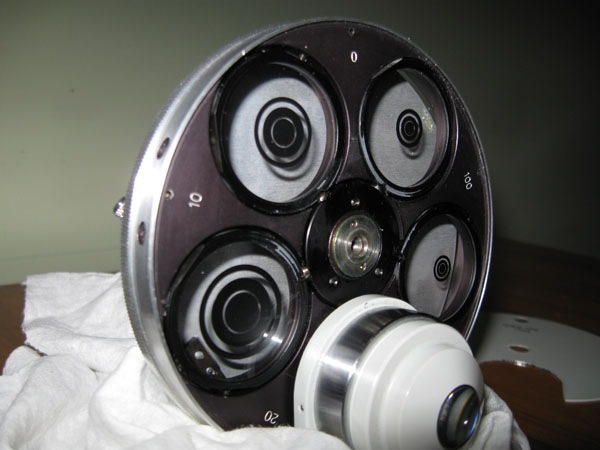
Four strange looking multiple annuli discs. All others I have seen (and the Amscope set) have just one ring.
The rotating seizure problem was because the annuli turret was seized to the center shaft causing the cover and bottom screws to tighten up on rotation. This was the same hardened grease problem with the focusing mechanism. This deficiency was easily remedied with a thin brass shim washer under the top screw as a temporary fix. Total dismantling of the condenser will be required in the future to properly address this situation so as not to put the pristine condition of the annuli in jeopardy with possible lubricant contamination.
Finally, the objectives were scrutinized. The 10X, 40X and 100X Phase that came with the scope had a “v” after the Ph and what appeared to be corresponding multiple ringed phase plates to the annuli of the condenser. As with all the other optical components of this microscope, they appeared to be in like-new condition. The fourth objective was a non-phase 3.2/0.10 160/- in the same excellent condition as the others. The condenser had a 20X phase annulus also, but alas, no corresponding objective.
So with a days labor I now had a functional (except for the dimmer limitations) phase contrast microscope outfitted with what are seemingly rare, (and a total mystery to me), aus Jena Phv condenser and objectives. The lacking accessories were a phase telescope and annuli centering tools for which I hoped the Amscope set telescope and a soon to be ordered pocket watch winding key would suffice. All of the other microscope adjustments such as the mechanical stage and diopter adjustments were working splendidly. With a few more sprays of the electric contact cleaner the light dimmer potentiometer came back to full function.
The very next day, in an effort to replace the penetrating lubricant with a more permanent form of grease or oil, I removed the back of the microscope to expose the perfunctory focusing elements. There, wrapped in plastic and stuffed into the void of the upper arm was an aus Jena phase telescope, two phase centering tools and the missing 20X Phv objective! Yessss! There is a God!
These treasures found here in thin plastic wrap
In the light of day they are in like new condition
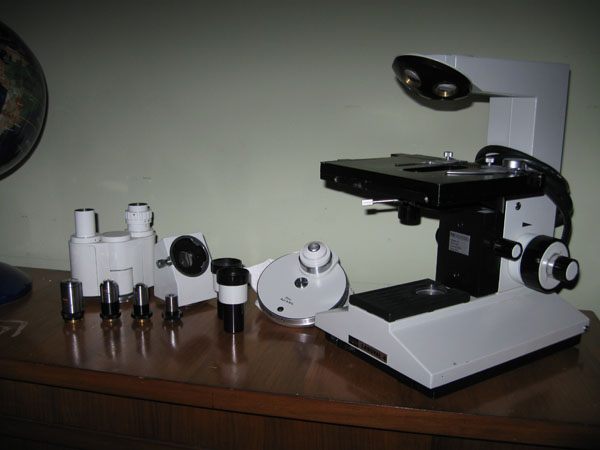
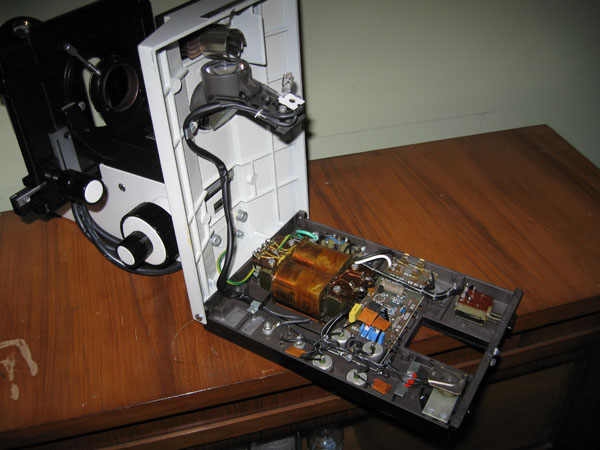
With all of these fortuitous developments at hand, my decidedly improved attitude prompted me to take a closer look at this particular Laboval 4. My aforementioned aversions to its aesthetics did not negate the quality engineering in this instrument. All of the controls are precise and (now) smooth and the optics exemplary. The mechanical stage gears are metal, not plastic. Access to the electronics is easy by undoing one captured screw and tilting out the hinged base (Fig. 8). As you can see there is a tremendous amount (by modern standards) of electronics for simple voltage conversion and dimming. However, since the Laboval 4, according to aus Jena documents, was only produced from 1985 to 1987 this is expected for 25-year-old technology. All these dated electronics also contributed to the substantial “heft” of the instrument. The phase condenser has centering adjustments for the iris as well as being able to individually center the phase annuluses. A swing-out filter holder and collector lens completes the package. (Fig. 9)
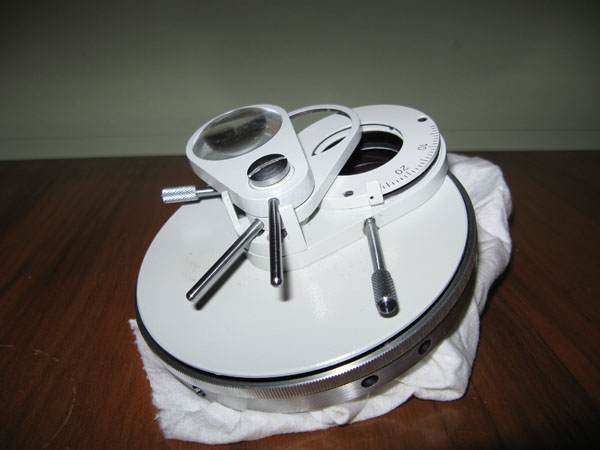
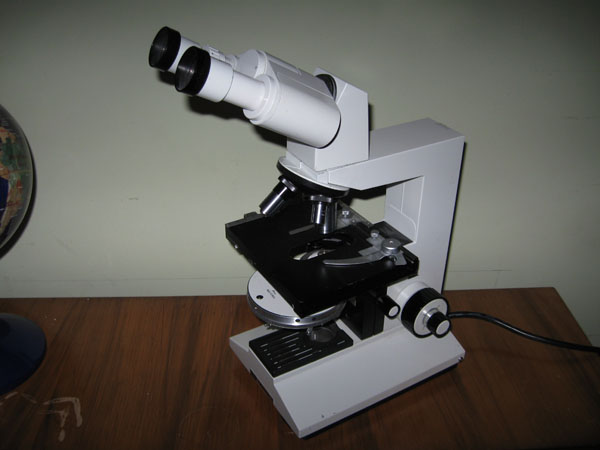
In the minus column, the sub-stage condenser carrier has a very limited amount of vertical travel thus ruling out any easy adaptation to other than the 37 mm after market condensers. Improving the transmitted lighting was also going to be a challenge. There is very little room to get ham-fisted fingers like mine to adjustments under the stage and while there is a marked a iris scale, it cannot be read unless your line of sight is significantly below stage level. There is no field iris but annulus rings could possibly be placed over the light and centered. I have searched for a trinocular head but the prospects seem dim. Since I have acquired a proper Zeiss trinocular head for my GFL the Microscopes.India head it replaced may well suffice for the aus Jena provided I turn down the dovetail to 41mm. I also believe it mitigates the ascetic presentation of this stand. (Fig. 10) The Amscope phase set is a plug n’ play accessory for this stand.
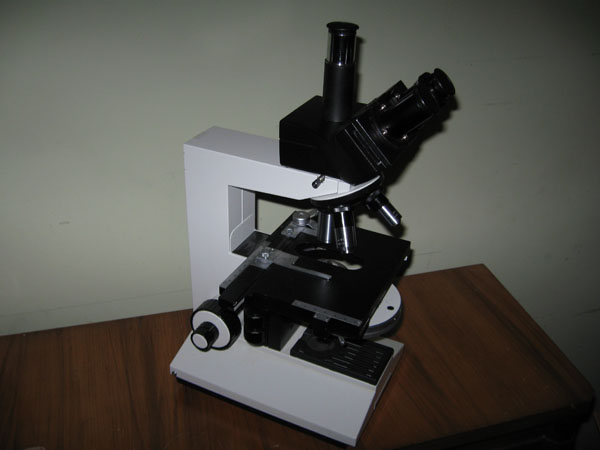
The Laboval 4 with after market trinocular head
So, there you have it. A quality, fully functional, cosmetically excellent, phase dedicated microscope with optics that appear to be in mint condition, for $200. Add the single annulus Amscope set as another variation and it's $250. Life is good. All I have to do now is educate myself about this unique multiple ring “Phv” setup. That turned out to be a whole other story.
Unraveling the (to me) Phv mystery.
As to as the images of the Saturn like rings for phase contrast from the aus Jena Phv objectives and phase annuli and there respective relevance, I spent some considerable time trying to divine online information about what was to become an elusive subject.
My first choice of research, as always was the Micscape library. Under the techniques, lighting, Phase banner there were 14 articles listed. To my surprise, just the one by Edward Cowen referenced any inner and outer phase annuli, but just in passing, and as adaptable to other phase objectives. He advocated altering the inner phase ring in a nonspecific manner. Not much help here.
Further investigation into operator manuals yielded a dearth of responses and various other search parameters were just as forthcoming. Finally, after some days, I chanced upon a natural science yahoo thread from 2007 discussing the differences between the Leitz Heine condenser and the Carl Zeiss Jena (CZJ) variable phase condenser (Variable? Could this be the “v” in Phv?). This thread revealed a link to CZJ operator and repair manuals that I immediately followed only to find they were in the German language. There was a “translate” button on the toolbar but unfortunately it did not translate the text in the PDF files presented. Searching nearly all of the files yielded a Laboval 4 manual in two parts and a CZJ “Phasenkontrast” file also in two parts. I jumped on his link hoping there would be visuals and as I was armed with the Google text translation link I was in anticipation of deciphering the manuals. This is where the fun began. Here is the link to the manuals:
http://www.mikroskop-online.de/Zeiss%20Jena%20BDA.htm
Readily available computer translation programs like Goggle’s have a long way to go in interpretation of intent, phrasing, figure of speech etc. When you couple this with technical speak, it can get to be a real hoot. For instance, I recently purchased a barbeque grill made in China, which came with assembly instructions obviously translated by computer. The first step for assembly implored me to “Insert please the left hand part into happy valley and attach with angular motion.” After throwing away the instructions and successfully assembling the grill, I still have no idea what parts of the grill are the “left hand part” and “happy valley”. Likewise the translation of the CZJ manuals from the German was just as entertaining.
After painstakingly copying paragraphs for translation from the “Phasenkontrast mit Microval Mikroskopen” text file, I soon learned that in German an optical “halo” was “a light in the interior courtyard and sunny spells”. ACHTUNG!! Meant “Oops!! (Go figure) and “ Vierkantaufsteckschlüssel” translated as..well.. “Vierkantaufsteckschlüssel”.
I went back to the discussion thread to read it through, which I should have done in the first place. There, to my relief, in wonderfully lucid terms, was the explanation of the how and why of CZJ Phv variable phase contrast by Mr. Kevin Sunley.
I cannot give Mr. Sunley enough credit for bringing to light a perfectly understandable layman's illumination of this subject. Rather than paraphrase or otherwise deface an excellent presentation, I would like to quote his remarks verbatum. I have placed his remarks in a different font to distinguish them from the rest of this article.
Mr Sunley, please take the stage:
“The
CZJ Phv system is more like the standard phase contrast system than
the Leitz type (Leitz also had a Phaco type phase contrast, which is
identical to the traditional Zernike type). The only difference
between the Phv type and the regular Zernike type is that the Phv
phase annuli and objectives have two concentric phase rings in the
same objective and condenser annuli. These can be used together, or
the outer ring can be masked off by the condenser's regular iris
diaphragm.
The reason to do this would be that the width and
positioning of the phase ring within the objective is optimized for
different types of specimens. The regular type of Zernike phase, and
the Phv type with both rings being used (the outer ring is more
dominant, so the inner ring plays essentially no role when the outer
ring is used) are optimized for
relatively small specimens with
smaller details relatively close together. A larger, specimen with
less internal small details would produce significantly prominent
halos when viewed in this type of phase.
The novel feature of
the Phv being able to block off the outer ring, utilizing only the
smaller inner ring, which is optimized for larger less detailed
specimens. When used this way with smaller cells, the contrast
enhancement is overdone and details are lost, but
with
larger cells the halos are significantly reduced and the
contrast
is similar to that of smaller cells used within regular Zernike phase
contrast.
I've wrote a message concerning this before in the Yahoo Microscope group which links to pictures (although not mine, and described in German) that illustrates the advantages.”
In that link Mr. Sunley goes on to explain this phase contrast as described in the original Zeiss literature
"
in the online Jena manuals the theory of the Phv "variable"
phasecontrast is explained in the two files for the "Phasenkontrast
mitMikroval Mikroskopen" document in the "Mikroskop
Zusatzeinrichtungen"directory, unfortunately it's explained in
German.
From what I've been able to work out from a quick read
through an online translation of the text, the two rings in the Phv
can be used (together) to produce a typical Zernike phase contrast,
or by using only the inner ring to provide a phase contrast in
situations where the Zernike design is not optimal.
Forgiving
my poor understanding of how phase contrast works (especially if you
know all this already), the theory goes that since the object is
transparent, there is no optical absorption in the visual spectrum
and therefore the specimen appears to have poor contrast.
But
since the specimen is more dense than the liquid, the phase of the
light is shifted (slowed down) as it passes through the specimen
because the light travels faster through the surrounding liquid than
it would through a cheek cell (for example). So if you picture a pair
of individual "rays" of light (of a particular wavelength)
going through the microscope slide. The wave of light which did not
pass through the specimen would maintain its sine wave pattern (and
frequency), but the one which went through the cell would be slowed
down, offsetting it from the other wave.
The intention of
phase contrast is to further reduce all the waves which have gone
through the specimen so that their total amount of slow down makes it
exactly half a wavelength offset from the other wave. They do this by
adding a "phase plate" in the objective of a material which
further slows down those specimen waves by 1/4 of a wavelength. This
1/4 wavelength plate assumes that the specimen will also slow down
the light by a 1/4 wavelength, so the specimen wave is exactly
opposite of the non-specimen wave (1/2 a wavelength off). Now if you
recall how two opposite waves will cancel each other out, this
happens with the those waves when they recombine to produce an image
creating contrast (dark areas) in the image.
The
way the specimen and non-specimen waves are separated is by the fact
that as a ray of light goes through the specimen it will be
diffracted out of the hollow cone of light produced by the condenser
annulus. So if there was no specimen in the field of view the
illumination would enter the objective as a hollow cone of light
(exactly fitting the dark ring which can be seen in the back of the
objective. That dark ring is not the phase plate(1), but is just a
neutral density filter meant to dim the non-diffracted light so it
doesn't over power the light that is diffracted by the specimen.
If
a specimen were present, the light would be bent as it passes through
the specimen, causing it to pass through the rest of the area of the
objective and therefore the phase plate which is built into it. By
the time that diffracted light gets to the eyepiece it has been
slowed down twice; 1/4 of a wavelength by the specimen and 1/4 of a
wavelength by the phase plate, and cancels out the equivalent
non-diffracted wave to produce visual contrast.
According to
what I've been able to get out of the translation of that file, that
theory working properly is dependent on the size of the object you're
looking at. A small object will bend the light sufficiently to create
a fairly large distance between the rays of
diffracted and
non-diffracted light, allowing the objective to distinguish between
the two rays. The width and placement of the phase ring are the two
factors which determine this, and can only be optimal for one size of
objects.
Larger
specimens have less localized differences in how much they'll slow
down and bend the light, and therefore won't bend the light out of
the path of the cone of non-diffracted light by as much. My
understanding of the theory breaks down a little here, but according
to the text if the amount of diffraction is too small and your phase
ring is too wide this is what causes the "halo" effect you
see in phase contrast images. A result from the objective not being
able to differentiate between the diffracted and non-diffracted
light.
So CZJ included the second, narrower inside phase ring
in the Phv objectives. This narrower ring is capable of
distinguishing the subtle differences in diffracted light from larger
objects in the field of view without causing halos. Halos will still
occur around
very large specimens, but their intensity is reduced
in Phv objectives.
So by closing the condenser iris down to
block out the broader outer ring, only the very narrow inside ring is
utilized and the contrast enhancement is more sensitive to subtle
changes which would otherwise appear blurry and without the sharpness
characteristic of phase
contrast."
Finally Mr. Sunley goes
to images posted by a Mr. Ecki to visually present the Phv contrast
variations:
"Now
going back to Ecki's
images:
http://www.kleinsehen.de/Testaufnahmen%20mit%20Phasenkontrast.html
..
you can see in the third column of images there is significantly less
haloing around the smaller details of the image - which are
especially apparent within the large cell of the second row of images
(all the ghost-like details in second column picture). The
third
column pictures are images taken using only the inner ring.
Once the outer ring is utilized (in the second column pictures) the
contrast of the large cells (second row) becomes much less clear,
full of shading and artifacts which do not exist in the specimen
itself.
In the first row images (which appear as smaller
cells), there is much less haloing in the middle picture (using both
rings) because the amount of magnification causes the cells to be a
more ideal size to produce good distinction between the diffracted
and non-diffracted
light.
Therefore when the outer ring is blocked off the objective
becomes
over-sensitive to the differences in phase and the cells appear
unnaturally dark. This is a good example of why it is ideal to have
both rings available, as one is never ideal for all specimens and/or
magnifications.
So to make a long (and likely poorly
explained) story short, in Phv objectives, using it with both rings
visible in a phase telescope (or in the back focal plane of the
objective) is the same as any other implementation of Zernike phase
contrast and is optimal for relatively small specimens. But if you're
looking at larger objects which would produce prominent halos in
traditional phase contrast, the outside ring can be blocked out and
the contrast enhancement produces a sharper image with less halos.
"
So ends my search for Phv phase knowledge, and as comment on Mr. Sunley’s information it's “Yeah, what he said.”
I now am very interested in providing a comparison between the single and multiple ring phase set up on this stand if I can improve the lighting somewhat. (Whenever I can find the bloomin’ time. The explosives safety business has been brisk of late.)
As always, comments or corrections welcome.
Cheers!
Acknowledgement: The author and Micscape Editor would like to thank Kevin Sunley for permission to share his valuable information from the Yahoo Microscope Forum messages.
Microscopy UK Front Page
Micscape Magazine
Article Library
© Microscopy UK or their contributors.
Published in the February 2011 edition of Micscape Magazine.
Please report any Web problems or offer general comments to the Micscape Editor,
via the contact on current Micscape Index.Micscape is the on-line monthly magazine of the Microscopy UK web
site at Microscopy-UK
© Onview.net Ltd, Microscopy-UK, and all contributors 1995 onwards. All rights reserved. Main site is at www.microscopy-uk.org.uk.