If unfamiliar with a phase contrast microscope and its special phase condenser and annular rings; an excellent introduction to phase contrast microscopy (including a Java tutorial to show how the rings are aligned with the objectives), can be found on the superb Molecular Expressions Microscopy Primer web site.
Roland Mortimer's fascinating article on slide-ringing tables this month, reminded me of a use I found for my ringing table some time ago. The table came in very handy to make a missing condenser annular ring to match a phase objective. So in case of interest I describe how the ring was made below. It's probably not an original tip but the author stumbled on it through trial and error.
The potential problem:
A new phase contrast microscope or accessory phase kit for existing microscope, will come supplied with a condenser ring to match each phase objective. But an older microscope with a set of phase objectives may have one or more of the vital annular rings for the condenser missing. Or there may be a mismatch; in older 'scopes there can often be a mix of makers equipment on the stand.
Sourcing the correct annular ring plates for the condenser is tricky if not impossible for older microscopes. Although each annular ring has to be precisely matched to a given objective for phase contrast to work, it is possible to make a missing ring to a sufficient accuracy; especially if it's for a medium to high power objective i.e. those that are often the most used in phase contrast. (If the design of the phase condenser is similar to the author's microscope).
My second-hand Cooke, Troughton and Simms M2000 microscope (dated ca. 1950's) had a good set of phase objectives, but unfortunately the condenser annular ring plate was missing for the 45x objective (oil).
The annular ring plate made using a slide-ringing table is shown below, alongside the maker's plates for the other objectives. The home-made plate is not a work of art, but it is the exact size required and gives excellent results! It's especially valued, as the 45x phase objective is the most used by the author for studying protozoa etc.
Annular ring
plates viewed from below the phase condenser The annular rings are larger and wider for the higher powers, so it's easier to make a ring for 40x objectives and above. A ring for the 10x or 20x would probably be trickier to make. |
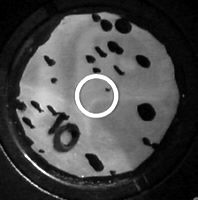
Supplied CTS annular ring for 10x objective. The opaque plate material can vary between makers, but only the annular ring allows light through. Scale for this image series; complete plate to black mount ca. 22mm across. |
|
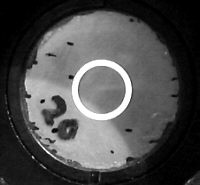
Supplied CTS annular ring for 20x objective. |
|
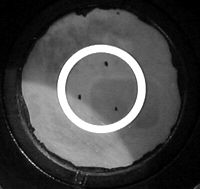
Supplied CTS annular ring for 40x dry objective. (Although 40x objective not owned.) |
|
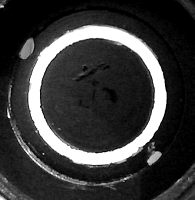
Home-made annular ring for 45x oil objective, as makers plate was missing. Made from a plastic disc painted on a ringing table with matt black paint. Held in place in the condenser with plasticine. The exact size and width of the ring was calculated using a 'ruler disc' of fine concentric lines also prepared on the ringing-table. See below for details. Minor imperfections (as here!) in the paint ring border shouldn't matter unduly. |
|
Supplied CTS annular ring for 95x oil objective. |
|
The solution:
Materials needed: Slide-ringing table, some clear thick sheet (e.g. the clear sheets for inkjet printers often have a slight matt side which takes ink well), small tin of black paint, very fine brush, drawing pen with very fine tip, fine scissors or modelling knife.
The basic idea is given in the graphics below, although more details if needed are given in the Appendix. Hopefully, the graphics and notes are clear, so if you have a missing annular ring and try making one, the phase objective with the new ring should work.
Basic idea
(For details see Appendix.)
|
|
|
|
| Ruled lines on a
clear disc. Use the slide-ringing table and drawing pen to create a clear plastic disc with fine ruled lines on, to fit an empty hole in the phase condenser. Mount this in the phase condenser. |
Brightfield view of
the phase ring in the objective using the phase telescope. Set-up/focus the phase microscope, condenser and objective for brightfield on a subject. Then remove slide subject. (Oil immerse objective if appropriate). View down the eyepiece tube with the phase telescope. The phase ring of the objective is usually seen as a duller area (shaded red above). The annular disc required needs to fit just inside this phase ring. |
Brightfield view of
phase objective using the telescope with 'ruler disc' in condenser. If the ruled disc is now swung in and centred in the optical field, the lines are sharp when viewed with the telescope, and can act as a ruler. Make a note of where to draw two lines on a new disc that will fit just within the inner and outer border of the phase ring (red borders above). These lines define the border of the new annular ring for the condenser. |
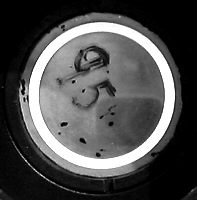
View of phase objective ring
(red) using the telescope with home-made annular ring in condenser. Align a clear disc on top of the ruled disc on the ringing table, and draw the two lines required. Leave the annular ring clear and paint the inner patch and outer border. Mount this disc when dry in the phase condenser and align and use as a phase ring for the correct objective. If successful, the bright annular ring will sit just inside the objective phase ring (shown above). |

Drawing software for the PC often has 'concentric ring' drawing and 'fill' commands, which in principle, makes the accurate preparation of the 'ruler disc' and the final annular ring very straightforward. These could then be printed to size on a clear sheet suitable for the printer, and the discs cut out; but the author hasn't tried this approach.
Comments to the author Dave Walker are welcomed.
Note added March 2001. On the Quekett Microscopy Club web site, Tony Saunders-Davies describes an alternative (and possibly quicker and more accurate) way of making annular phase rings for the condenser. Visit the Quekett site to read Tony's article DIY Phase. In this article Tony also describes ways of making phase plates to convert normal objectives for phase use.
Appendix (detailed instructions)
1) Remove the phase condenser from the microscope. Make two clear discs from the sheet to snugly fit an empty aperture in the condenser.
2) Centre one of the discs on a slide-ringing table. With the fine drawing pen make a series of concentric lines as close together as possible across the width of the disc. If you know from the other plates approximately where the ring needs to be for the objective of interest, concentrate on making lines in that region of the disc. Or the series of plates shown above may serve as a rough guide.
3) Mount this 'ruler disc' in an empty aperture of the condenser. Set up the phase microscope in the normal way on a slide subject, focusing the specimen and condenser for brightfield using the phase objective that needs a phase ring. Immerse the objective if appropriate. Then remove the slide, open the condenser diaphragm fully and swing the prepared disc into the field of view as if it was the phase plate.
4) Look down the eyepiece tube with the phase telescope. The disc of fine lines should be in focus and acts as a ruler; overlaying the phase ring in the objective. Determine by counting out from the centre, which two lines (or new lines) will fit just within the inner and outer border of the phase ring; make a note of these line positions on a piece of paper.
5) Remove the ruled disc, place the second clear disc on top and centre the two carefully in the slide-ringing table. If the table clips won't hold them well, use some tiny pieces of sellotape.
6) Using the notes made, use the pen to draw the inner and outer border lines for the new annular ring. Then using the fine brush and black paint, fill in the central spot and outer border. Take special care with the annular ring borders. Slightly thinning the paint may help give a smooth edge.
7) Allow the disc to dry and mount in the condenser.
8) Now try this disc to see how it works as an annular ring for the required objective. The condenser focus and centring controls may take out any minor sizing errors.