The assortment of apparatus which one needs for
collecting specimens depends, of course, on what sort of things you wish to collect. I
shall focus primarily on aquatic specimens, but will briefly mention helpful equipment for
some other types of collecting as well. In the realm of animals, I shall consider only
invertebrates. If you're standing alongside a stream or lake with a pole and you plan to
eat what you catch, that's fishing, not collecting. And if you catch a nice salmon,
off-season on restricted land, there's only one way to cook it—by poaching it!
Freshwater Invertebrates
Most of us who trek to the ponds and are willing to brave midges, biting flies, hordes of
mosquitos, scorpions, rattlesnakes, grizzly bears and irascible moose, want to collect a
nice variety of specimens as a payoff.
1) Dip Nets—These are generally short-handled nets
with a medium mesh and are suitable for collecting insect larvae, Nostoc, Spirogyra,
water boatmen, whirligig beetles ( if you're fast enough), and some of the larger
planktonic forms. For smaller forms, there is a dip net with a considerably finer mesh
called a brine shrimp net and it's a valuable and inexpensive tool. When collecting, it is
best to carry two or three nets in case one gets lost or damaged.
If you are after very small planktonic forms and want to use a dip net, then you will
probably have to make your own. Perhaps at a military surplus store you will be lucky
enough to find some old parachute silk, but more likely you will have to go to a fabric
store where you can purchase some very fine mesh nylon fabric which will be considerably
cheaper than silk cloth.
Making nets is not as easy as it would seem and mine all turn out to have rather weird
shapes, but they are quite serviceable. The drawback with this sort of net is that the
water moves through it very slowly. Fortunately,. there are a couple of alternatives:
a) Take some plastic prescription vials, saw off the bottoms, then using stout thread, tie
a piece of the nylon mesh to the bottom. Now you can take a sample and pour it into the
vial and let it drip through, then using a wash bottle, backwash the residue into a small
culture dish. This procedure is best done after you get your samples back to the lab.
b) You can go back to the fabric shop or to a discount store and buy some plastic
interlocking rings that are used for needlework and, for those males who are worried about
their masculine image, just think of Rosie Greer. Cut a section of nylon mesh of the
appropriate size, clamp it into the frame and you're in business. These rings come in
various sizes so you can choose one to fit your needs (and containers). I use a small pail
and a ring slightly larger than the top of the pail and then using yet another pail, I
collect a water sample and pour it into the ring. As the nylon gets wet and
"seasoned", the filtration speeds up a bit, but this is not a technique for
anyone in a hurry. Pour some water in, go collect another sample, come back and pour some
more water in, and repeat until exhausted, making sure that the material in the nylon
netting never gets dry. When you are satisfied with your sample, unclamp the rings and
rinse the nylon in a fresh quantity of pond water in the pail, pour into a bottle and take
back to the lab for examination.
Oh, yes, what if you want to use a dip net, but want a long handle. No worries, mate. Use
a broom stick or mop handle or go to a lumberyard and buy a longer pole or find a nice
long piece of bamboo, which is my preference because of its flexibility. Drill four to six
holes in one end and use some plastic coated wire or cord to attach the net handle to the
pole.
2) Plankton Nets—Plankton nets are best utilized by towing slowly behind a boat. A small glass or plastic jar or vial clamps onto the cone end of the net and as the net is towed, the plankton accumulates in the tube. Such nets are expensive (and so is the boat). There is a small version, only 15 inches long, which could be attached to a pole and swept back and forth through the water from the shore, however, I recommend hiring a football player for this procedure.
3) Rakes, Grappling Hooks, Chains and Hooks—No,
we're not going after sunken pirate treasure. (I guess there were freshwater pirates.)
Often aquatic plants are a particularly rich source of micro-organisms and there are some
types of such plants that simply won't grow along the immediate shoreline for our
collecting convenience and so it becomes a matter of honor to devise means of collecting
them, so as not to find ourselves in the embarrassing postion of having to admit being
outwitted by a plant! You could take an ordinary garden rake with widely-spaced tines and
extend your reach a good four or five feet, but such rakes are heavy and cumbersome. You
already have about 175 pounds of collecting gear strapped to your bicycle, not counting
the boat and motor. You can buy a sturdy plastic rake and saw it down to a width of 5 or 8
inches and that's useable and much lighter. Weight is an important issue here, as you want
something that will sink to a proper level, but not bury itself in the bottom mud.
There are small grappling hooks which are sold for our purpose and they are workable. The
advantage of such an implement is that you attach it to a rope and toss it out into the
lake or pond and get much better distance than the four foot extension you achieve with
the rake. If, however, you're old and feeble like me, then you'd better hire the football
player again.
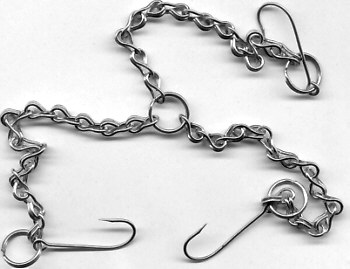
My own solution to collecting aquatic plants is considerably less expensive and a bit more
flexible. In dissecting kits (however, fortunately they can be bought separately), you
sometimes find chains and hooks. These are used in the dissection of medium-sized animals
to hold folds of skin, tissue, and muscle aside as one proceeds. Take a piece of iron rod
about 6 inches long or purchase a large spike nail at a hardware store and wrap it with
waterproof plastic tape. Then, using plastic coated wire (to slow corrosion), tie the
chain to the bar in several places so that the hooks are spread out. This is a tool that
must be handled with care as the hooks are extremely sharp and can inflict nasty wounds.
If the rod is not sufficiently heavy, you can buy some steel weight such as fishermen use
and adjust it to your satisfaction. With a stout cord tied to it, this implement can be
tossed into the pond, allowed to sink, and then pulled back with a harvest of aquatic
plants.
When you throw it in, DO NOT try to twirl it over your head—this may result in
serious injury to you or someone nearby (who will undoubtedly have a better lawyer than
you do). Adjust the weights until you get the rod to the point where a good underhand toss
will take it out a reasonable distance. This method has the advantage over the rake of
providing greater distance in sampling, but if you get too enthusiastic and toss it too
far out, you may find that the hooks get hopelessly entangled and cannot be pulled back up
again. Fortunately, if you have to abandon your device, the chain and hooks are
inexpensive and you can make another such tool.
When you get your bouquet of plants, carefully remove them (remember the hook!) and place
some in a large jar or two and then take the rest and wring them out over sample jars and
add fresh pond water to all of them. When you get back to your lab, remove the plants and
divide them up into aquaria and culture dishes.
As I mentioned in an earlier segment, plastic containers are better than glass for
collecting, because they are unbreakable and lighter. You might also want to take one of
those cheap thermometers along with you and a pocket pH meter too, if you have one. If you
measure both temperature and pH at pondside and then at regular intervals in your lab with
a record of the variation of organisms, you can generate some interesting and valuable
information.
Marine Invertebrates
For marine collecting, there are several additional items
which you may need. A small hammer and a chisel are probably not the first thing that come
to mind, however, they can be very helpful when collecting limpets, barnacles, and certain
types of mussels and, believe it or not, certain polychaete worms as well. One time when I
was collecting on the coast of Oregon at a particularly low tide, I came across
mini-towers of rock 5 and 6 feet high which looked as though they had small holes drilled
all over them, which in a sense they did. The holes were the burrows of a particular type
of polychaete worm and with a chisel and hammer, I was able to obtain a small sample for
preservation and later examination. When doing marine collecting, some basic precautions
are in order. Always be aware of the tidal flux; while collecting in small bays, I have
twice had the tide sneak up behind me. Extra special care should be taken in the Bay of
Fundy where tides can exceed 70 feet!
In rocky areas one needs to be careful of algae—both macro and micro—which can
make the rocks treacherously slippery. If you fall, barnacle cuts can be particularly
nasty and you should carry a small first-aid kit with a plastic bottle of tincture of
iodine.
A pail or two should accompany every marine collecting expedition, but keep them of modest
size, for you will soon discover that the combination of specimens and sea water get heavy
very quickly.
If you are collecting animals that are contractile and you want them preserved in an
extended condition, then you will have to anesthetize them before attempting killing and
fixation. There are two simple techniques that can be effective with a variety of
organisms. The first is the gradual addition of freshwater to the specimens. Take the
specimens you wish to treat and place them in a dish of sea water, let them expand and
very gently add fresh water. If the organisms contract, give them time to expand again
before adding more fresh water. What this does is disrupt the osmotic regulatory system
and when the organisms no longer react to the addition of fresh water or gentle prodding,
then you can add the killing and fixative agents. However, don't be surprised if there is
still some contraction. We still have so much to learn about biological systems. Just
think back to the early experiments with the severed legs of frogs. Dead, right? Yet they
still reacted to stimuli and demonstrated how enormously complex the fabric of living
material is.
The second method is also very straightforward and involves bringing along some magnesium
sulfate crystals. These are relatively light (an entire pound of them only weighs a single
pound) and the best part is that you don't have to worry about expensive chemically pure
magnesium sulfate; instead you can go to your local store, buy a box of Epson Salts and
use that. If you have any left over, you can add it to some hot water and soak your tired
feet in it. For anesthetizing, you can add the crystals directly and gradually or you can
make up a solution of the crystals in freshwater and use a two-pronged anesthetic
technique.
************
Apparatus For Other Types Of Collecting
1) If you are collecting butterflies, beetles, and other insects, you will need a sweep net and a killing jar. CAUTION: the fumes from the killing jar are extremely poisonous and the jar must be handled with great care.
2) Plants can be placed in layers of newspaper for
transporting, it you intend to press them. You can buy or make a plant press and produce
some very nice specimens. These should be mounted on stiff paper and labeled. There are
special herbarium papers available for mounting if you decide to create a serious
reference collection.
If you want to bring the plants back from the field more or less intact for sectioning,
then you may wish to consider buying or making a vasculum. You can buy a section of metal
stove pipe or some plastic pipe with a diameter of 4 to 6 inches. Tie some coarse-meshed
cloth (several layers of cheese cloth will do) over one end to allow air circulation. For
the other end, you can devise a top from a piece of plexiglass or cut the lid of a
margarine tub to the appropriate size. Drill four holes—two on each side and four
corresponding holes in the pipe. On one side, run a piece of wire though the holes in the
lid and the pipe and create a primitive hinge. On the other side, you can use a piece of
sturdy, stiff wire or a paperclip and devise a means of closing and securing the lid.
3) Fungi, slime molds, moss, lichens, liverworts
Many mushrooms are easily collectible, but a small plastic trowel is helpful in bringing
them up nearly intact. They can be stored in plastic bags to transport. A very sharp knife
is a valuable tool for collecting types of fungi that grow on wood and also for slime
molds which at certain times of the year can be found growing on the undersides of logs.
Mosses and liverworts should be packed in plastic bags and kept moist. Sections of ferns
are also well worth studying and they have a surprisingly complex life cycle.
Lichens are another one of nature's surprises, for they are a peculiar and interesting
example of a symbiotic relationship which allows them to survive in situations that we
judge as hostile to life forms. In the area where I live, lichens are abundant and are
found growing on trees, decaying branches and, amazingly, on bare rock surfaces. Lichens
are a particularly successful collaboration between fungi and algae. The hammer and chisel
can come in handy for collecting lichen samples.
Sphagnum moss is worth collecting both for itself and for the community of organisms which
it supports. Again plastic sandwich bags are a convenient means for transporting it back
to your lab. Using a small aquarium, you can easily create a terrarium in which you keep a
variety of mosses, liverworts, and other small plants. With a bit of time and patience, a
terrarium can be a pleasing mini-environment and a source of interesting specimens at the
same time.
A sample of the sphagnum moss should be agitated vigorously in a small culture dish
containing water. Allow the sediment to settle and then examine it for tardigrades or
"water bears", one of nature's most
astonishingly hardy creatures.
If you are interested in minerals and fossils, you will want a geologist's hammer with
pick on one end. These can be purchased for between $20 and $30. A rock chisel may be had
for $10.80 and will allow you to take reasonably small sections of a rock you find of
interest. Remember Howey's Law which applies not only to rocks, but all the various and
sundry collecting apparatus as well: After two miles, an object which initially weighed 5
pounds will now weigh 25 pounds.
For fossil collecting, a small folding shovel is helpful and you should also take along
some dental picks. If you find the hint of an interesting specimen, it is usually best to
investigate carefully by removing bits of the surrounding matrix so that you have some
idea of the extent of the specimen before you undertake any major surgery on the
surrounding rock.
I have delayed mentioning one of the most valuable tools, both in and out of your
lab—magnifiers. Here, I must admit that I am a hopeless addict. I have magnifiers in
my coat pockets, in the desk drawers of my office, in my collecting gear, in my lab at
home—especially in my lab at home. You can purchase magnifiers from $0.85 to over a
hundred dollars and in a bewildering variety of forms. Consider: there are single
magnifiers, double magnifiers, triplets, pocket magnifiers, folding magnifiers, linen
testers, giant folding magnifiers, stand magnifiers, tripod magnifiers, rectangular
magnifiers, full page sheet magnifiers, lighted magnifiers and they have been made in
everything from plastic to glass, to brass, to silver, to gem encrusted gold (for royalty
only). A good magnifier is indispensable and you can buy 10 (yes, ten!) with a
magnification of 10x, folding style, glass lenses, for only $26.00 and then you never have
an excuse to be without a magnifier.
***********
ENDNOTES
There are certain important precautions which one should
take before collecting.
1) If you want to collect on private land, then be sure that you get the land owner's
permission. If you don't, you may run the risk of prosecution and incur a substantial
fine.
2) If you are planning on collecting on government-owned land, public park land, national
forests, or any such other areas, then you need to know about any restrictions regarding
collecting and whether or not you are required to have a permit.
3) Many states in the U.S. now require permits for collecting marine animals from coastal
beaches and tidepools. These are important to help preserve and manage natural resources.
4) When collecting rocks, whether for mineral and crystal specimens, or for lichens
growing on them, be sure that you are not in an area where the mineral rights are owned or
restricted. Always collect only small samples.
5) When collecting water plants, try to collect only floating plants or ones that have
already been dislodged from the bottom. This is especially important in small ponds where
the amount of vegetation is limited and crucial to the health of that habitat. For such
situations, the use of the pole rake with a grapple to lift water plants from the surface
is much to be preferred.
6) Always limit your collecting to amounts of material that you can make use of and never
collect any living material that you are unable to process in a reasonable time frame.
7) It is best to go collecting with another enthusiast. If this is not possible, let
someone know where you are going and when you will be returning. It is important to know
the terrain which you will be entering and any potential hazards.
8) Finally, NEVER collect any rare, scarce, or endangered plants or animals and take care
to leave the environment as undisturbed as possible.
These simple rules will help making collecting better for everyone interested in
collecting and will help maintain a positive public image with landowners and government
officials, thus making it easier to get permissions and cooperation.
***********
Prices are once again taken from the 2000-2001 Cynmar Scientific Equipment Catalog. For additional information, see the endnote in Part I of this series.
Comments to the author Richard Howey howey@uwyo.edu welcomed.
(If your web browser isn't set-up
for e-mailing by clicking the above, just highlight and copy the address into your
standard e-mail software).
Earlier articles by the author in this series:
Part I Dissecting tools.
Part II Glassware and related accessories.
Part III Special Glassware and Some Other Apparatus
The author's other articles on-line, can be found by typing 'Howey' in the search engine of the Article Library, link below.