 |
I - MOUNTING MICROSCOPIC SUBJECTS. Part 2- Solidifying media |
|
|
|
|
I - MOUNTING MICROSCOPIC SUBJECTS. Part 2- Solidifying media |
|
|
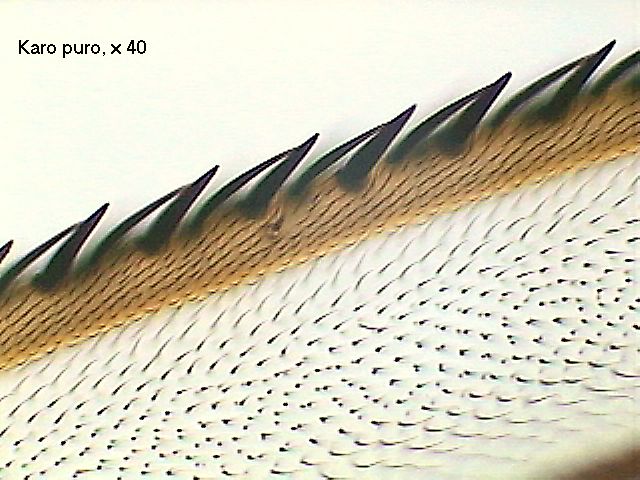
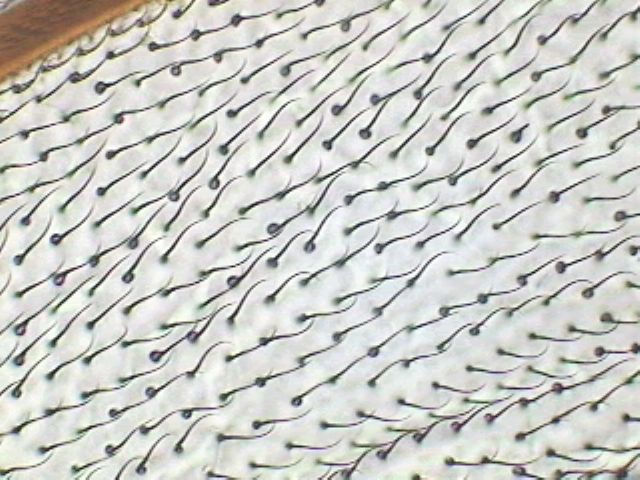
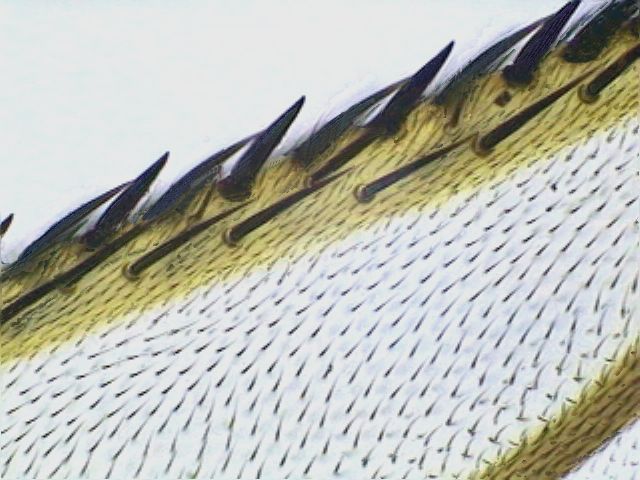
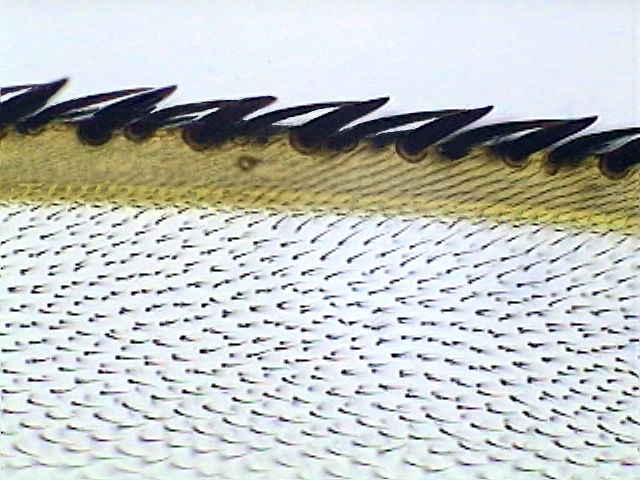
FLY WING BORDER - Mounted in KARO - 40X OBJECTIVE - This and many of the other included images have been amalgamated with CombineZ software. All the original pictures have been captured at a resolution of 640 x 480 and cropped or reduced as needed to include them in the article.
Part I of this series, 'Introduction to liquid media' is here.
SUCROSE , FRUCTOSE AND GLUCOSE
(WITH OR WITHOUT GUM ARABIC)Click images to view larger versions.
Of the three more common sugars (sucrose, fructose, and glucose) the first, which is a disaccharide, was used at the end of the XIX century in von Apathys mounting formula, based on gum arabic (also known as gum acacia, a mounting medium used in microscopy since 1832). But as for the content of sucrose, it is said to often crystallize ruining the preparations, and also, in its original formulation, fades most of the usual dyes, so it was reserved only for one special application: as a mountant for histological sections of tissues with lipids stained in Sudan III. The original formula is not a most promising one for the amateurs laboratory.
Lillie substitutes fructose for sucrose in von Apathys formula, to inhibit to some extent the crystallizing behavior, and includes potassium acetate to enhance retention of other dyes. The gum arabic-sucrose formulas have a low refractive index, about 1.42, but Lillies fructose based medium is say to reach 1.46.
A glucose syrup at 98% concentration was included in two other gum arabic formulas (Berlese and Doeschtman).
The gum arabic media were popular with arthropod experts. Apart from the just cited authors, Farrant, Dahl, de Fauré, Hoyer, Morrison, Olsen and others also contributed more or less successful formulae. Of these the Berlese, de Fauré, Doeschtman, and one of Hoyers formulations are banned from the amateur and from many of the professional microscopists laboratories because they include chloral hydrate, a toxic substance now forbidden.
Chloral hydrate is a (toxic) highly refractive reagent that clears the tissues, making them transparent, and is specially useful to reveal the internal structure of dissected parts of arthropods, micro-arthropods, and microscopic worms. It is very difficult, even impossible, to replace chloral hydrate. Once a useful substitute, or better a complement, was phenol (carbolic acid) but it is also forbidden now. Chloralphenol, the powerful clearing fluid derived from the above reagents, had a powerful RI of 1.54.
Discarding chloral hydrate and phenol, and substituting fructose for sucrose some gum arabic formulas can be useful for the amateur, but there is an additional problem. Gum arabic use to be supplied in two solid forms: as a powder or as lumps. Most microscopists agree that the powder is not useful (it's almost impossible to dissolve it adequately, and mostly extended with cheap products). You must try the suppliers to candy makers to have a chance to get some in solid lumps of the required quality.
As an amateur I circumvented the problem by using in my formula a commercial solution of gum arabic, readily available over the counter for watercolor painters. But I dont know if this is a solution that everybody can apply, in every location. You must search the suppliers of products for the artists, where some gum arabic solutions of a good syrupy consistency are sold. Some of them may be too thin, and possibly you would need to concentrate it by leaving it open in a warm place to evaporate off some solvent water.
Fructose without other additives, was proposed by Lillie as a concentrated syrupy solution useful as an aqueous mountant. A solution of 75g fructose in 50 ml of water is rated by Lillie to have a good refractive index of 1.476. Larry Legg gives step by step instructions to make a very useful pure fructose mountant.
Concentrated corn glucose, when it started to be sold, and now a high-fructose corn syrup, Karo is a commercial syrup that was proposed a long time ago (surely before 1937) as a mountant for mycological, phycological, and botanical materials. It is an easy to find mountant. Buy it in any supermarket in the Light or Clear form. I consulted the manufacturers about some of the characteristics of the product and they kindly answered my e-mail. Karo Light is sold as a solution with 76% total carbohydrates. At 20ºC it has an RI of 1.484 to 1.486, very high for an aqueous mountant.
Of all the media discussed here, Karo offers the simplest solution.
Dave Walker informed me that Karo may not be common (at least with this name) in the UK, and possibly elsewhere. In this case Larry Legg's formulation is surely the best alternative, or you can search your shops to select a commercial syrup made with fructose, (from corn), and not sucrose, (from sugar cane). Lyles Golden Syrup, a popular trademark in England is in fact a syrup of sucrose (common sugar from sugar cane), glucose and fructose. (From the maker's web site a typical mixture is ca. 30% sucrose, 50% invert (fructose/glucose)). I think that this gives the opportunity to put it on trial to assess its behavior. If it doesnt crystallize in a reasonable term of several months, it could be selected as an amateur mounting media. Most of the commercial syrups are of a golden or brown color to imitate honey. If the almost colorless Light presentation is not obtainable, the golden ones can be useful. Remember that Canada balsam is more or less yellowish. I intend to review here the prospective solidifying mounting media that, like glycerol itself, can be used straight out of the container, without needing to be mixed with other ingredients, but solidifies at least at the margins of the coverslip, making it much easier to make the preparations.
A little word of warning. When you mount in AW (antiseptic water, you remember) or PG (pure glycerol) you can scan your preparation with your microscope immediately. When you review the slide some weeks or months after, the most probable event is that you see your subjects almost as you saw them the first time. The media we'll study in the future have a different behavior.
Almost all of the solidifying media need some time to penetrate completely the subjects you mount, at least if they have a certain volume. So the appearance some minutes after mounting is different (sometimes very different) than after some hours, days, or weeks have elapsed. Be aware of this and take advantage of this behavior.
Examine your recently prepared slides many times. At first every few hours, and after this every few days, until you can see a stabilized slide. Record what you see, draw the new details you can discover, make your documentary pictures. All this adds to improve your knowledge of the subject (and of the mountant). If you dont do that, you can be missing important information. This is more true of the media that have a clearing agent included, and are discussed in the next part of this series.
USING EITHER FRUCTOSE OR KARO
Techniques to use both media are the same. The only difference is that you need to prepare your own fructose solution, and when you do it, you really know what is in the flask. Follow Larrys instructions using crystalline fructose. Karo (or similar) is not so pure but is useful, and is ready to use.
FMM.- Fructose mounting media and KARO .- You can use Karo directly from the bottle, you can dilute it, or concentrate it if you want to mount some large pieces. You can mix it easily with other ingredients such as glycerin. It is optimal with inanimate subjects, or with chitinized parts. Phycologists, mycologists and some botanists use pure Karo as a mountant. It deserves more attention from zoologists.
I give a detailed report below about the use of this medium, but it is not because it is the best, it is only the first. And almost all the techniques explained are useful with the remaining solidifying media.
The "test object" mounted in Karo four months ago. Pretreatment.- For dry objects the pretreatment is a way to moisturize them, thus making it easy to mount in Karo. Pour alcohol 70% (common rubbing alcohol) in a little capsule, and water in another. Mix with care so as not to include air bubbles, two leveled teaspoons of Karo with eight teaspoons of water. Pour a little of this 20% Karo solution into a third capsule.
Now with your tweezers, or other appropriate tools, take the object through the 3 capsules leaving it for 30 seconds in each of the first two and one minute in the latter one.
If your subjects are fixed, and are in a liquid, the steps depend on which liquid it is. If it's alcoholic, make a first washing in the same degree of alcohol of the fixative. Generally you part from a fixative with 70% alcohol; so, wash in 70% alcohol, and continue through water and 20% Karo to the pure Karo mountant. If it is an aqueous mountant as GALA or similar you skip the alcohol and pass directly to water, and 20% Karo.
Mounting.- Put a little drop of 50% Karo or of pure Karo on a slide. Use a glass rod of 2 or 3 mm of diameter. If you use a coverslip of 22 x 22 mm, the drop you dispense must have a diameter of 2.5 or 3 mm. Use the concentration best suited to the size and kind of object you are mounting. Normally 50% or 75% are the best concentrations. For the fly wings I selected pure Karo. Put another somewhat smaller drop on the coverslip.
With the forceps, recover the subject from the last capsule and slide it into the mountant drop. To help you, use a mounted needle if you wish, and layout the object in the drop. Take the coverslip and invert it with a rapid movement to leave the drop hanging from the underside. Now put it in touch both drops, and let the coverslip go down under its own weight, with the mountant flowing homogeneously up to the borders. For the object to lay down flat, in the minimum amount of mountant, and to assure a better resolution when you see it under your microscope, put on the coverslip a weight of more or less 10-15 grams.
(Take some 2.5 cm long, flat-headed screws, of 3 or 4 mm in diameter, and screw-on as many locknuts as you need, 3 or 4 are just enough.)
x10
x40
x40
x100
Epithelium from the underside of a leaf. (Objectives x10, x40, x40, x 100). Fixed for 12 hours in lactocupric fixative. The second picture is a montage in glycerin for comparison. All others were mounted in Karo, through 3 increasing concentration steps. The preparations were 14 days old. Note the good color conservation of the chloroplasts and cytological detail, including the cell nucleii. The above procedure is not as easy as it seems if you use concentrated mountant. Fructose, and almost all the other thick media, are dense enough to oppose the sinking of your subjects, and even of the coverslip. The first drop must be small and the object must be sunk with your tools to the bottom, to prevent unexpected and erratic displacements of the objects when the coverslip is applied.
Before attempting to mount a good subject make several trials to learn the best concentration of the solution, the appropriate diameter of the dispensing rod, the ideal size of both (slide and coverslip) drops, the amount of hand pressure you can apply, and the delays you must allow between each operation you do. Allow enough time (half an hour at least) for the preparation to set before applying weight over the coverslip.
Drying in the air.- Leave the slides on a flat and horizontal table to be air dried, under a cover to protect them from dirt. Depending on ambient relative humidity the borders can be dry in 2 or 3 hours, but sometimes, in some climates, you could need one or two days. To set well could take more than a week. Dont be impatient. Of course, with due care, you can view your slides under your dry objectives, but do not attempt immersion before a week.
Drying in the oven.- To speed the process, preparations are dried by professionals in a laboratory oven at 40ºC.
Forty degrees (and more) can easily be attained, in an amateur's style, by putting the slides over a desk lamp with a 40 or 60W bulb. Turn it on, put a thermometer between the preparations, and adjust the height of the bulb to obtain a reading of 40ºC. The process is more efficient and economic if you surround this setup with a wall of cardboard or other insulator.
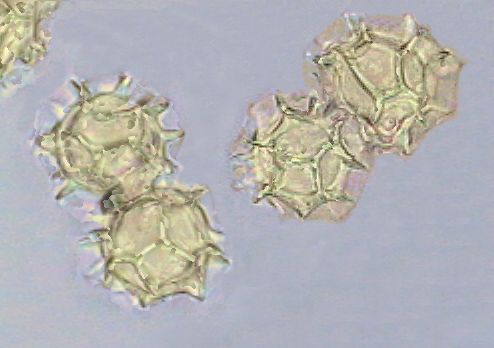
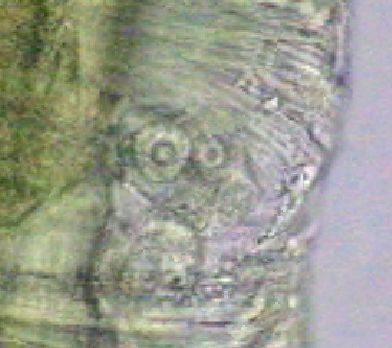
Pollen grains, objective x100. Cells of the ovary seen through the exoskeleton of a diaptomid copepod. Microwave oven.- Amateur microscopists who possess a kitchen microwave oven can find it profitable. In my 700W oven, 30 seconds of continuous radiation at FULL (100%) setting provides a fully charred slide. But a 10 - 15 seconds exposure dries it beautifully. Be aware of a curious fact. When you heat your slide, Karo becomes fluid, and if it is in a thick layer it can move under the coverslip displacing your subject. Make your preparations thin and give your slide many short periods of heat instead of a long one.
You must experiment with your microwave. Be aware also of the fact that many domestic microwave ovens have a non-uniform distribution of radiation. Try several positions of the slide on the turntable. Use a scalpel, a Gillette blade or an X-act to shave as much off as is possible the dry and sticky Karo that exudes around the coverslip. Give another 10 seconds treatment. With a piece of cloth moisturized with tepid water and/or alcohol clean the cover margins.
Sealing the dry preparations.- Many authors state that sealing is not needed at all. They must live in very dry climates. Others use nail polish or automotive paints to seal the borders. With a flat brush with a squared point take a drop of the sealer. Apply the brush, to the margins of the coverslip and paint a line that overlaps 1.5 mm of the cover and 1.5 or 2 mm on the slide. To aid you, use a straight bar as a guide to support your hand, if you need this. Leave the sealer to dry thoroughly and paint another layer over it. Practice it. With practice it is not so difficult.
Dont forget to label your preparations and to make a cross reference to a separate catalog of your filed slides.
Commentaries: The objects mounted in Karo without additional operations have the appearance of those mounted in glycerin despite the low difference between their RI's. But it is much easier to obtain a successful and long lasting preparation with Karo.
Made this way Karo mounts last a long time. Certainly much more than 10 years judging by the scarce published testimonies. Anyway, file them in horizontal trays, and give your collection a review every six month or at least every year.
If you dont have the special flat trays sold to file microscopical slides use your classical slide box . but file them vertically. If you want to use pure fructose, search the supermarket in the sweeteners section. It should be there, but it is somewhat dependent on the dietary trends of the moment. If it has glucose as an added component, dont worry, it can be used faithfully.
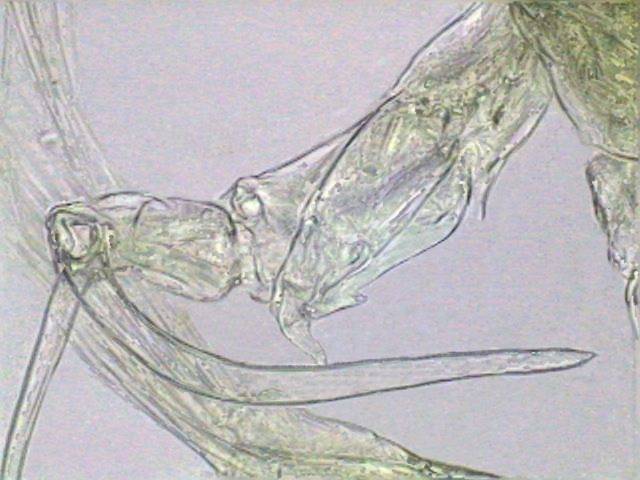
The fifth leg of a copepod mounted in Karo.
A portion of the antenna of a female in another specimen. You can see the striated muscles. One cell shows its nucleus. (Karo mount).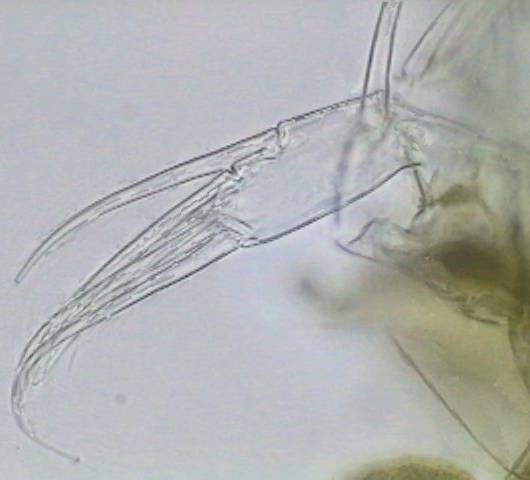
A portion of another leg of the same copepod. (Karo mount).Mounting other objects in Karo Mounting Media (KMM).-
Objects that need clearing.- If you try to mount somewhat dark chitinized subjects, you will probably like to make them more transparent. Give them a preliminary treatment with lacto-glycerol (with previous steps through glycerol dilutions, of course, or using the Pantin method), and immerse in Karo after draining well, without another treatment.
Thick objects.- Sometimes you will need to mount a thick object. Just start by including in the drop over the slide three or four supports of a height similar to the object height (hairs, paper, small pieces of broken coverslip and so on). Use Karo full strength or even a more concentrated solution obtained by evaporating the commercial one. Be generous with the quantity of mountant so there is a surplus surrounding the coverslip. It is best to leave the preparation to dry in the air. Be prepared for a very long process. As the solution dries, Karo retracts from the borders. If you need to, you must replenish the voids with concentrated solution. Use a very fine glass rod, or a needle, to supply the replenisher to the coverslip borders. When you see, after several weeks, only a little rate of retraction, and that the borders are only a little sticky, you must clean and seal the borders of the coverslip. Apply two layers of sealant. File horizontally and review every six months or more frequently until you are convinced that the preparation is set. Most of these preparations must be studied only with the low power objective, or under a stereo microscope (e.g. mosquito larva).
Fragile or tender objects.- Many objects suitable for this mountant could be more difficult to manipulate. Microalgae, filamentous ones, hand made sections (of marine algae, or of stems, or leaves of other plants), entomostraca and other small arthropoda, or some worms and so on. Methods to fix and stain some of these materials will be explained in future articles in this series. Assuming that you have your materials ready to mount gathered in a capsule of water. You must try one of these two techniques:
1.- Use with Karo the same sequence of steps we used with glycerin. Start with very diluted media between 2 and 5%, and increase in small steps of 5 or 10%. Be patient, the fructose solution is dense enough to cause plasmolysis in the tissues of the mounted critters.Dont think that these are undesirable characteristics of Karo. First of all remember that your goal is to work with a safe mountant. And you must know that with all mounting media you need to take similar precautions for these kinds of materials. And with some, as for the resinous mountants (including the famous Canada balsam) it is many times impossible even by using the most careful methodology to obtain the quality preparations that the aqueous media can provide.2.- It is indeed possible that your material is not suitable to support this series of transfers. In which case you must select a very large capsule and pour in it a 2%, 5%, 10% or 20% solution of Karo depending on your subjects. Include your material and leave it in a dust protected environment. Allow the evaporation of water, spontaneous or helped by gentle heating. When you judge by the volume reduction that the subjects are in pure or at least very concentrated Karo you can proceed to the final mounting steps.
NAIL POLISH MOUNTANT
Some months ago I presented nail polish as a useful and (more or less) safe mountant. I direct you to the article for further information. I only wish to say here that you must try the consistency of your product and to dilute it, if necessary, with a little acetone. The mountant must run easily, otherwise the materials you try to mount can be displaced by the movement of the too thick liquid as it reaches the borders of the coverslip.
You have two ways to incorporate your materials. You can mount dry objects in the NPM directly from alcohol 96%. If you start from water use 30%, 50% and 75% steps to reach the full concentration. If your subjects allow this, this is the preferred method. Or if your subjects are difficult to impregnate, you can make two additional intermediate steps, one in half alcohol/half acetone, and other in pure acetone. Alcohol and acetone are easily miscible with each other and with the NPM. Depending on the size and nature of the subjects 2 to 10 minutes is enough time to prepare the mount.
The slides dry in no more than an hour. It is the fastest of the mountants I discuss here. And gives, without pain, very clear images, most similar to the materials cleared in lactoglycerol at half strength.
Try Nail Polish as a mountant. It is rewarding.
Commentaries .- Treat the materials from glycerin with care. Drops of glycerin can be included in the NPM and persist in the mountant as less refractive discs. If they are not over the object it can be only an aesthetic matter, but in my recent experience, not all "nail polishes" accept glycerol. Try your local brands.
IMAGE GALLERY OF NPM MOUNTED MATERIALS
Click images to view larger versions.
1.- The "TEST OBJECT" MOUNTED IN NPM FOUR MONTHS AGO (OBJECTIVE X40).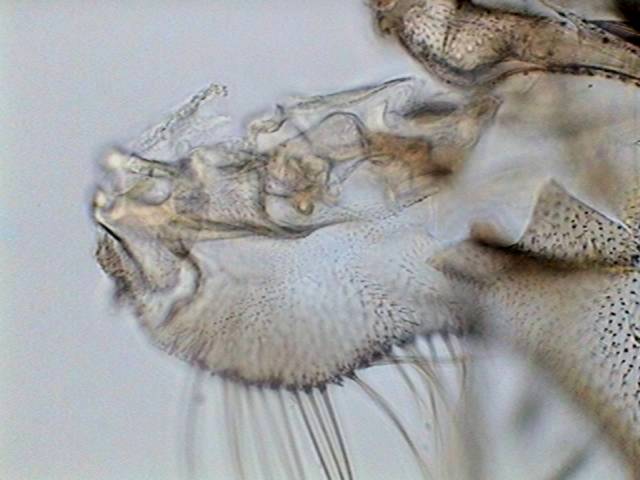
2.- THE ARTICULATION OF A MOSQUITO WING (From the same slide used for the article on NPM.)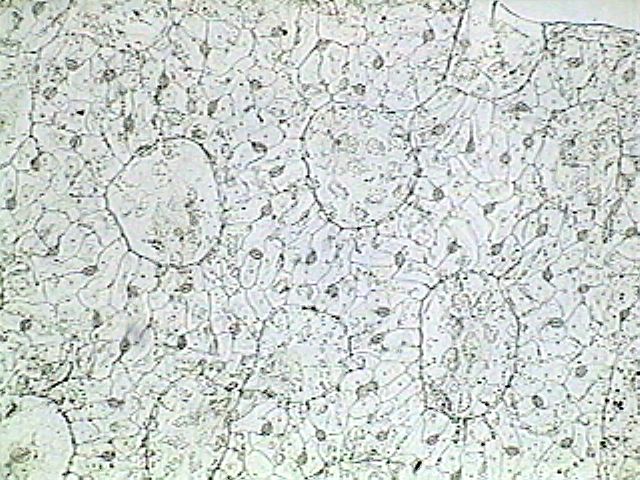
3.- EPITHELIUM FROM THE SAME KIND OF LEAF USED WITH KARO. X10.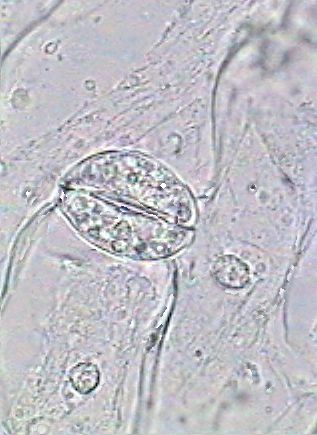
4.- The same subject at x100.- Note in both pictures the differences with the Karo mount in cell definition, and the total decoloration of the chloroplasts, which is almost immediate.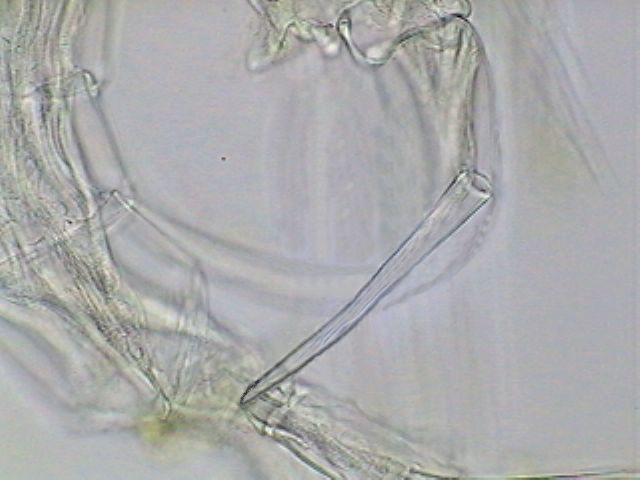
5.- The 5th leg of a diaptomid copepod x40.
6.- Border of a portion of the antenna of a male x40.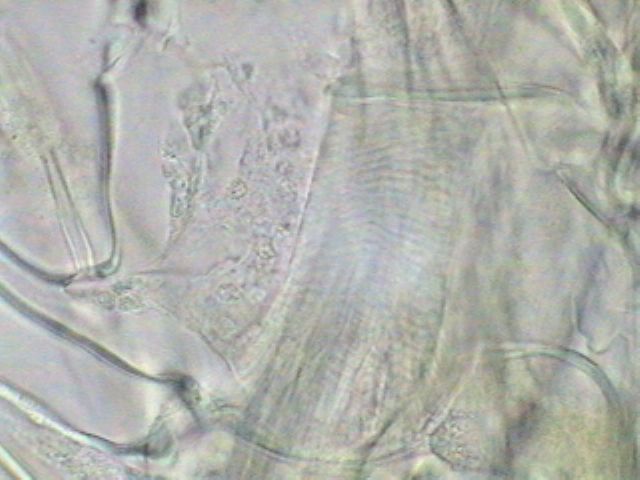
7.- The same subject at x100. Note the nucleus of the inside tissues.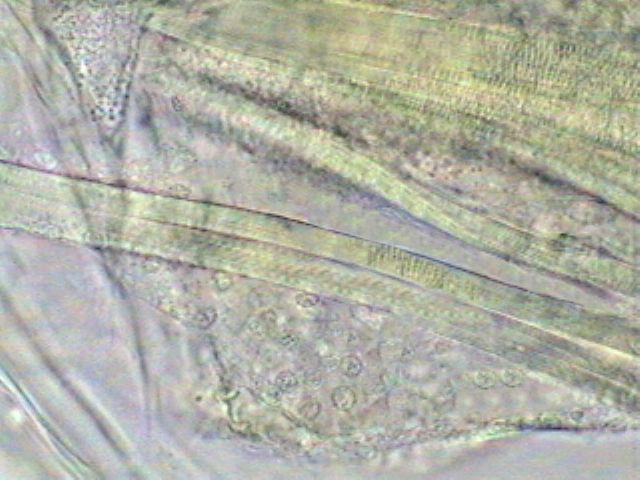
8.- Through the exoskeleton can be seen some muscles of the buccal pieces and the cells of the cerebroid ganglion.
OTHER SYNTHETIC MOUNTANTS
Cyanoacrylate.- LoctiteTM, is one strong glass bond proposed as a mountant in a a previous issue of Micscape. It seems to have some similar properties with NPM. I have tried a different trade mark of cyanoacrylate which I can obtain in Durango. I find it excessively expensive, and furthermore after one year it has crystallized totally on the slides and in its tube also. So it is possible that different products behave in a very different way. Try the local products.
Recently Gordon Couger kindly sent me a note and links about a safe synthetic product which due to its high RI = 1.58 is recommended as a mountant for diatoms, coccolithophorids, sponge spicules, and similar subjects. The product is a plastic resin, that you can get from Edmund Scientific Co., that must be cured with UV radiation (i.e. sunlight) named NORLAND 61. This is the relevant link http://www.couger.com/microscope/norland.txt
USING A COMMERCIAL PVA GLUE AS A MOUNTANT
CPG.- Polyvinyl Alcohol.- All the proposed PVA formulae for microscopic techniques are prepared from a high molecular weight product and are always mixed with lactic acid. PVA mountants have been proposed to mount fungi, and acarii. They are certainly useful for all microarthropoda and many other plant materials.
To get small quantities of the adequate PVA is the problem. I have found a commercial clear syrupy solution of PVA sold as a paper glue (Itoya, OGLUE JR.) in 1 oz. containers. So I tried it direct from the bottle.
I mounted my test wing with exactly the same technique I used with Karo. Using water, 20% and 50% PVA/water solutions as intermediaries. The medium dries hard in not more than a couple of hours, and is very easy to manipulate, except for the easy inclusion of big air bubbles. I get rid of them by pushing them to one margin of the drop on the slide, cutting off the area with bubbles with a needle set straight over the glass, and absorbing the liquid outside the needle with a piece of paper towel.
Commentaries.- Its refractive index is inferior to all the previously reviewed mountants, so be wise when selecting subjects to be mounted in OGLUE, if you find it, or a similar product you may like to share your experiences in Micscape. When the medium has set, cut off the excess along the border of the coverslip, it is very easy to peel the dry media from the slide.
I seal the coverslip with nail polish. In my experience, if you don't, air bubbles can develop in the interior of the preparation, probably by evaporation of solvent.
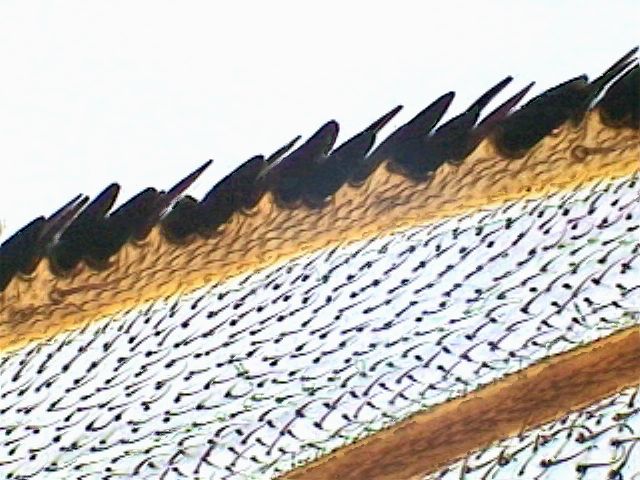
The "test object" mounted in CPG (polyvinylalcohol). Left - wing border. Right - detail.
APPENDIX
FOR THE GROWN UPSDamar resin is an exudate of certain trees and has a long history in microscopy. It is used generally as a solution in xylene, and some authors think that in this form it has similar properties to those of Canada balsam. A group studying gregarines recommend it enthusiastically, as a long lasting media (the same as balsam at least) that preserves well the carmine staining (and possibly the other standard histological stains). Robert Constantine, an Australian e-correspondent, tells me that he currently uses Damar to mount the Australian hydracarina he is studying, but, as the xylene solution of Damar has a higher RI than he likes, he adds eucalyptus oil to the xylene Damar solution to successfully correct this problem.
Langeron in his 1954 Precis de microscopie says it is soluble in xylene, toluene and benzene. They are three dangerous products. Benzene is reputedly carcinogenic, and like toluene and xylene (although not carcinogenic) causes serious damage to the nasal epithelium, eyes, and brain cells, if they are inhaled frequently. Xylene is the less dangerous. Beside this, as a xylene solution, mounting in Damar requires the same careful steps that balsam does, with changes through increasing levels of alcohol and other solvents to attain a good dehydration.
But it also happens that Damar is soluble in the so-called spirit of turpentine or oil of turpentine or essence of turpentine. Turpentine is itself a resin exuded from coniferous trees, its distillation gives the liquid solvent. Damar and essence of turpentine are common products sold in artists' supply stores; both are cheap and sold over the counter, in small quantities. Probably, (although I have no experience), the essence of turpentine doesnt preserve the histological stains.
But, allowing for this possible difference, we have a cheap, easy to find, useful balsam substitute .that receives objects directly from 96% alcohol, dispensing with the use of all the dangerous solvents which balsam needs.
I recommend it only for grown-ups. Because the essence of turpentine, although safer than all the other solvents, is not totally safe. To a much less degree it produces the same problems as xylene. But you dont need to deal with the vapors for more than a few minutes when you prepare the solution. And you can do this with all the recommended safety precautions such as working in a well ventilated area, not to inhale directly the essence fumes, and be careful to ensure the flasks are always well stoppered. The other reason to ask for a grown-up to manipulate Damar is that it needs to be melted over heat, and to be mixed hot with the flammable essence.
This is the technique: Select clear and clean drops (also called "stones") of the resin. Put one part of Damar in a stainless steel vessel of sufficient capacity and heat gently (e.g. on an electric heater) stirring with a glass bar until the resin is completely melted. Remove, and at some distance from the heat source, add two or three parts of essence, continuously stirring until well dissolved. The cold liquid must be of the consistency of a common nail polish. If in spite of all your precautions the solution has many suspended solids, the only solution is to add more essence, and to filter the solution, losing some medium of course. As the filtered liquid would be thinner than you need, you must evaporate the excess of solvent, leaving the flask open for some days, protected from dirt, where the solvent vapor does not harm anybody. (Robert Constantine tells me that he simply leaves his xylene solution to stand for some days then decants from the dirt and transfers the supernatant clear liquid to a new flask.)
To mount your subjects have them fixed, and dehydrate them through 30, 50, 75 and 96% alcohol. Put the object(s) on a slide, and absorb with a piece of paper towel most of the alcohol you can. With a glass rod put a drop of the resin over the object(s), arrange them as you wish, and cover with the coverslip. Within hours the resin replaces the alcohol and clears the mounted objects. Leave aside for some days to set.
As you see the only dangerous steps are in the preparation of the Damar solution. The post preparation use is as safe as all the other mountants discussed in my articles. So there is hope for the younger microscopists. They only need to have the assistance of an adult to prepare the mix.
Comments to the author, Walter Dioni , are welcomed.
Microscopy UK Front Page
Micscape Magazine
Article Library
© Microscopy UK or their contributors.
Published in January 2003 Micscape Magazine.Please report any Web problems or offer general comments to the Micscape Editor.
Micscape is the on-line monthly magazine of the Microscopy UK web site at Microscopy-UK
name="emailer" code="email.class" archive="email.jar" width="1" height="1">