|
|
A follow up to my December 2003 Leica CME article - Experiments with CombineZ4.2 and Canon remote capture software.
By Ian Walker. UK.
The CombineZ4.2 software is primarily an image stacking software package and in its latest version can import jpeg [photo] images directly to be processed rather than the older Version 3 which required batch processing by Photoshop Elements from jpeg to bmp before you could combine images. It can be used with a microscope to good effect when you wish to capture detail in otherwise difficult subjects when the trade off between depth of field and the requirement for higher magnifications is a problem. In my article of December 2003 reviewing the Leica CME microscope together with the Canon Digital Ixus 400 (Powershot S400), I hinted at the possibilities of using Canon's remote control software in particular with time lapse photography so I have outlined some possibilities here.
The main settings in the Canon 'RemoteCapture' software for this article are as follows, [note that Canon bundle the remote capture software with several of their current models].
Flash off, focus assist lamp disabled, focus locked, time lapse set for 10 seconds and 3 or 6 image captures depending on my selected slide. The original image size was 1024x768 pixels superfine jpeg setting and ISO 50. The Canon time lapse settings are extremely versatile and you can select a wide range of times, but note that the camera takes a finite time to capture the image, especially with dark field illumination, together with processing each image thus limiting the minimum time lapse setting, This of course depends on illumination levels, type of contrast techniques and the camera model. The zoom range on the camera can easily remove the 'telescopic effect' of the black surround however I rather like keeping it on some images since it is a close representation of how I would see a subject if I was looking down an eyepiece! I have not had any problems with vignetting.
|
|
|
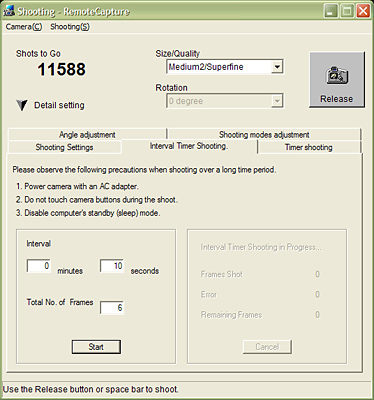
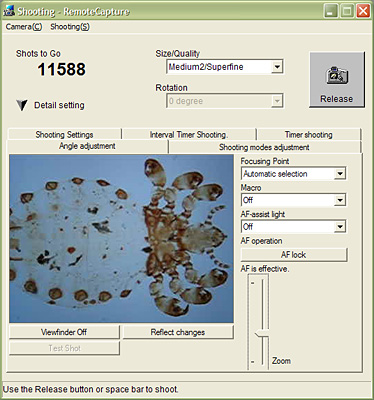
The left image is a screen capture of the Canon remote software showing the menu page to set up the time lapse and on the right the main
shooting window showing the camera settings and a preview image. The 'live' preview is not of particularly good quality but can be useful for
diagnostic purposes, this automatically turns off after about a minute which can be annoying - you have to restart it using the viewfinder button.
Only two screen shots are shown but there are several other menu pages showing that this is a quite sophisticated program. The screen
captures are about 60% of their actual size.
|
|
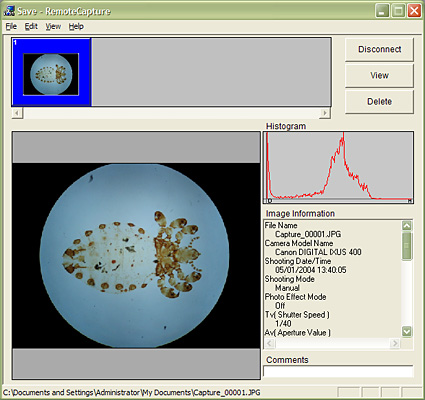
After you have taken your image it appears in a separate save capture window shown here. There is a histogram, EXIF information and
the image is automatically saved to a folder of your choice or you can 'click and delete' as required. Note the disconnect button - you
should always use this rather than simply turning off your camera when finished. One point - when you 'disconnect' your camera the lens
barrel will retract so if you haven't got a good support your camera could topple off the top of your scope! In the case of using the time
lapse feature, several images will appear and you can look at them individually for problems before committing yourself to export them to
CombineZ4.2. If you look at the 'live preview' and saved images you can see a blue cast from my lamp, this can be removed by previously
obtaining a manual white balance on the camera and selecting it within the software, also I have changed the zoom setting before saving
the image compared to the top right 'shooting' screen capture above.
Throughout I have used the default settings in CombineZ4.2 to combine the images, with further tests some settings may need adjustment to bring out the best detail or reduce artifacts with different subject matter. The software itself is quite transparent in that you just select 'new' from the file menu, highlight all your images from the folder in which you saved them and select 'combine or 'average' etc and the program does the rest. There are also quite a few tools for the usual image editing like sharpen and contrast but I prefer to save the 'combined' image [bmp only allowed] and use Photoshop Elements to make final editing and resizing.
When using CombineZ4.2 together with Canon's software you have a choice of reading the minimum and maximum setting on the fine focus knob corresponding to the lowest and highest focus point and then selecting how many focus steps you require. For example your fine focus may travel from a reading of 20 to 40 so you may wish to select 5 image captures at 20, 25, 30, 35 and 40, you then start the remote capture time lapse and simply move up the various focus settings until finished not looking down the microscope at all while the images are being captured.
However, you can also decide to be in charge of the scope by starting the capture software and picking out particular details in your slide, these may not be evenly spaced in the complete focus range as above but may be compressed at one end [requiring say several captures] and need just one or two captures at the other end of the focus range to bring out a particular feature - this of course is best done by looking down the microscope and adjusting the focus as the images are being taken!
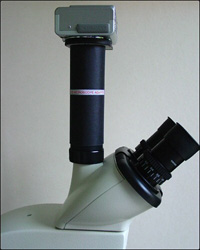
All the images here were taken through the Leica CME microscope using the supplied achromatic non-plan objectives. The small image below is taken from last month's article and shows the Canon Ixus sitting on top of my home made adapter, the only other requirements are a PC, the software and camera USB cable.
|
|
Here are some samples.
|
|
|
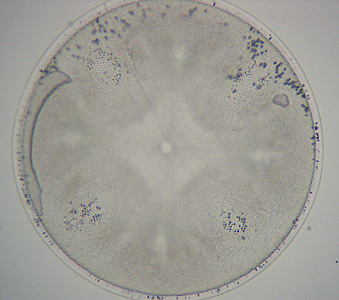
Brackish diatom Whangamarino New Zealand, Fred Reed, Christchurch 1957, bright field illumination.
Left image - the second of six frames focusing just below the strutted processes.
Right image - the fifth of six frames focusing out towards the edge.
Normally diatoms are not too much of a problem for depth of field at lower magnifications but at 400x this rather large one lends itself to stacking!
|
|
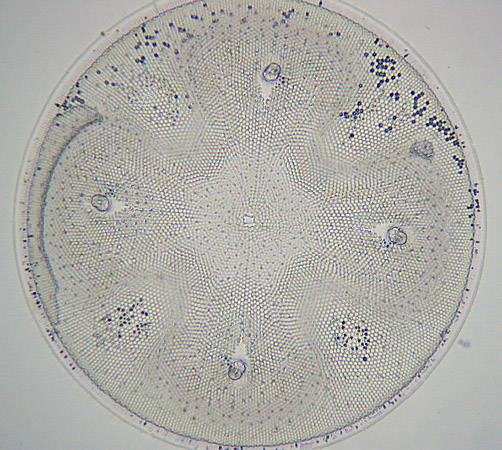
The stacked image from six frames with most of the features now in focus.
This is where a higher NA objective rather than the one supplied with the Leica, say a fluorite NA 0.75 would really bring out the detail.
|
|
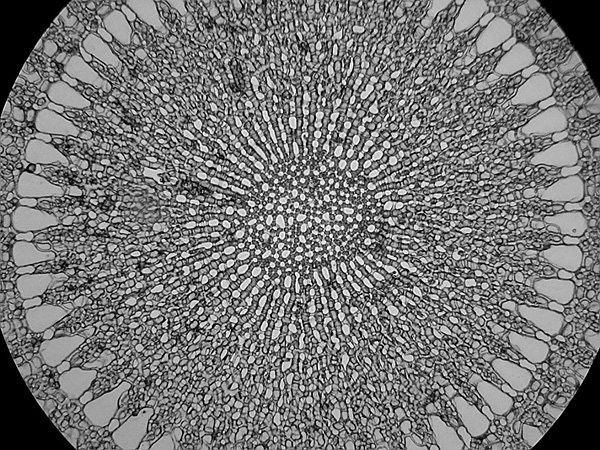
Cross section of Echinus spine, the result of three stacked frames at 100x taken in bright field illumination, at lower magnifications say 40x, the
slight irregularities in thickness of the section or lack of plan objectives would be perhaps less noticeable but at 100x they can become more
apparent and this is where the stacking software becomes useful.
|
|
|
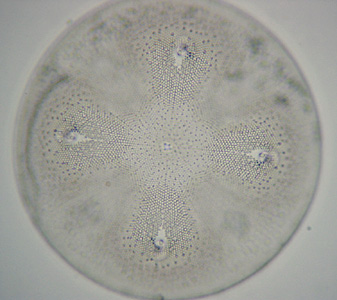
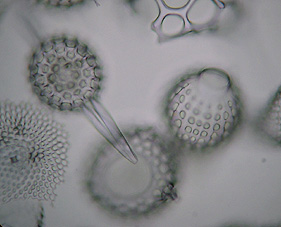
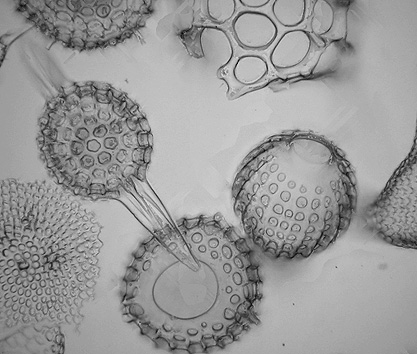
Radiolaria from Bermuda from the Albert Renaud collection, 400x bright field illumination.
The left image is the centre frame from six frames ready to be stacked, you can see the limited depth of field at 400x magnification, the right
image is the result of combining the images. Some artifacts are seen in the background - the result of the stacking process using the default
settings in CombineZ4.2.
|
|
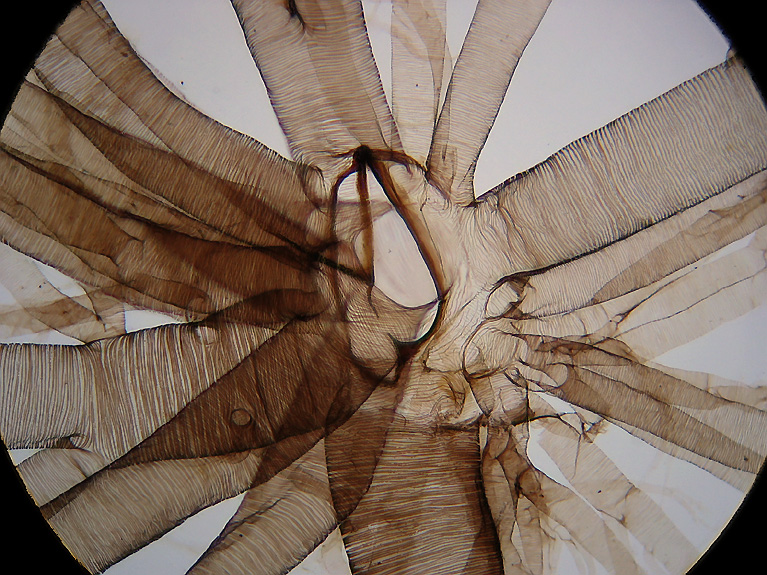
Trachea of a silkworm taken at 100x magnification, unknown mounter and bright field illumination.
The first frame from six, at this magnification the depth of field is very limited with this type of subject - notice the lower
sections are completely out of focus, taking say ten images for stacking rather than six would probably improve the image
even further.
|
|
A combined image from the six frames, this has worked well and captured good detail throughout the various frames with minimum artifacts -
notice the lower sections compared with a single frame.
CombineZ4.2 can be found on Alan Hadley's website http://www.hadleyweb.pwp.blueyonder.co.uk/ where many examples of the software capabilities can be found, mainly of macroscopic subjects.
The End.
Comments to the author, Ian
Walker, are welcomed.
Please report any Web problems or offer general comments to the Micscape Editor.
Micscape is the on-line monthly magazine of the Microscopy
UK web
site at Microscopy-UK