|
|
A voyage of discovery with the Leica CME student microscope and Canon Ixus 400 digital camera.
By Ian Walker. United Kingdom.
The Leica CME microscope.
First of all I should like to make a comment about Leica Microsystems U.K. head office who were helpful and friendly on my first contact with them. They were interested in my custom even though I was open that it was a private purchase and that I was an amateur microscopist. I was immediately put in touch with a North of England representative who was also helpful and informative and after clearing my cheque for the CME the Sales Manager personally brought it round to my home for inspection.... great service Leica.
|
|
|
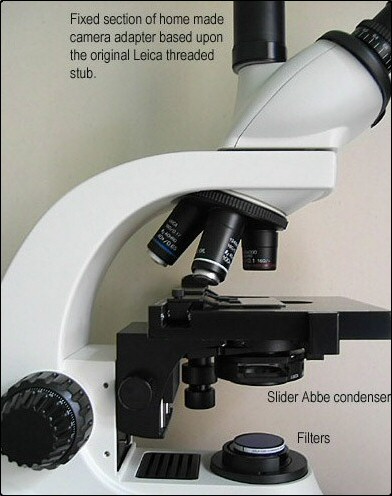
Fig 1A. Fig 1B.
Two pictures of the Leica CME showing the main body parts, on the left you can see my heat absorbing filter and blue filter sitting on top
of the lamp housing, the Leica filter sits below these and on the right you can see the red control on the base for varying the lamp volts.
My scope came fitted with standard E2 series achromats 4x NA 0.1, 10x NA 0.25, 40x NA 0.65 and the usual 100x NA 1.25 oil. At additional cost you can buy plan achromats in the same magnifications but no 20x which is a shame, also a series of plan phase achromats are available which includes a 20x. I especially like the large focus controls which are very comfortable to use. [See Fig. 1A]. The Abbe condenser housing is made of plastic with a rather crude diaphragm but seems to work OK, it's easily removable from the main body and is factory centred. One concern I have is Leica fitting a plug-in frosted blue filter to the underside of the condenser, creating a very diffused light path to the slide and objective - I have never seen any publication which recommends the placement of such a filter so near the condenser. The removal of the filter to the lamp assembly [which incidentally is a perfect fit in a cut-out on top of the lamp] created a much improved light cone more closely associated to critical illumination although not true critical because Leica only supply a field diaphragm as part of their upgrade to their Koehler illumination kit at extra cost. Tests with various field stops for use up to the 40x objective show little improvement to contrast, so I have made a generic stop sufficient to cope with the 4x objective whilst cutting out some stray light.
General comments on the objectives would be that the 4x is very good for such a cheap objective and tests show it has good flat field properties over a substantial proportion of the field of view. The 10x is competent but more curvature can be seen and the 40x I think is slightly below average on resolving power compared to previously owned NA 0.65 objectives. The 100x oil has not been tested to any degree. All give bright, neutral and pleasing images especially on botanical sections. Note that this scope is based around the industry standard 160 mm tube length so any DIN standard objectives of this type can be used; the Leica DME uses infinity objectives so you are tied into buying Leica's range.
The typical prices for the objectives are reasonable with the 40x plan phase at around Ł170 [add VAT in the U.K.] and the lower magnifications substantially less than this; the rest of the smaller accessories such as phase sliders are all in the Ł20-Ł30 price bracket. The main expense comes in adding polarization and video/35mm camera tube attachments which are in the Ł100-Ł300 range, hence building my own parts! Leica seems to have made a definite effort to make you buy into their camera attachments since the stub fitted to the trinocular head to accept their attachments is completely non-standard and will not directly accept the usual gear you may have accumulated over the years. My original plan was to write this article with respect to adding the Fuji S2 body but total frustration of being able to attach it somehow with the large collection of tubes and parts my brother and I possess have prevented this. Incidentally, some tests with temporary attachments to the Fuji S2 show that I would definitely NOT opt for a digital SLR back for photomicroscopy - strange artifacts seen within the viewfinder plus focussing difficulties all added up to not wanting to continue this route. Some images I did capture on the Fuji suggest it could be capable of giving very good results but the size and weight put me off further tests... enter the Canon Ixus 400 (S400 in the US), a little gem of a camera for experimenting with photomicrography because of its size and weight.
Note: I suspect a more favourable impression of adding a digital SLR back like the Fuji S2 would be in combination with larger scopes like the older Leitz Dialux, Zeiss standards and older Olympus ranges with standard parts for the trinocular head enabling easier experimentation but I still didn't feel comfortable peering down a viewfinder - if you have perfect parfocality between your binocular head and camera port you won't have to do this but I can sit in comfort with the Canon's remote control software rather than standing next to the camera to manually release the shutter etc. To be fair I did not buy the S2 for use with the microscope, its main use is for landscape work but it is interesting to at least try the combination. Fuji have a remote control software package for the S2 but at extra expense in the region of Ł100 (in the UK), the Canon software is bundled free with the camera.
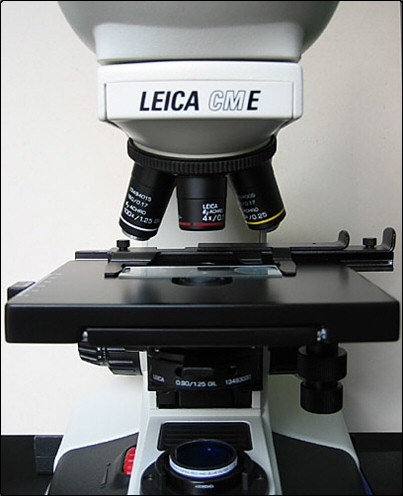
As for the rest of the scope, the stage is nice and large and the stage controls are very smooth aided by ball bearing trains, good paintwork throughout and an excellent slide holder which works by clamping the sides of the slide not a corner [see Fig 1B]. It is very friendly to your old antique slide collections and very usefully allows some angle adjustment on slides. The turret has a nice finger grip made of soft rubber and turns very smoothly.
|
|
|
Fig 2A. Fig 2B.
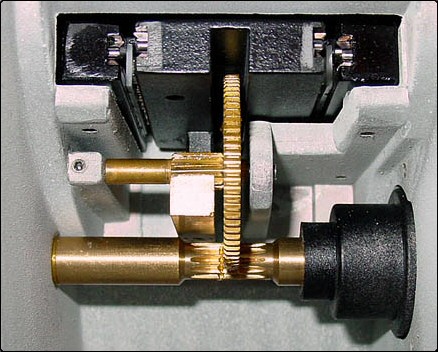
Fig 2A. a close-up of the main brass focus mechanism, the focus is aided by two ball bearing trains within a substantial casting creating a
positive and extremely smooth focus for coarse and fine adjustments, it may not have the engineering finish of the older Leitz series but it
works well - indeed the best I have used, Fig 2B. a general shot of the heavy base casting.
|
|
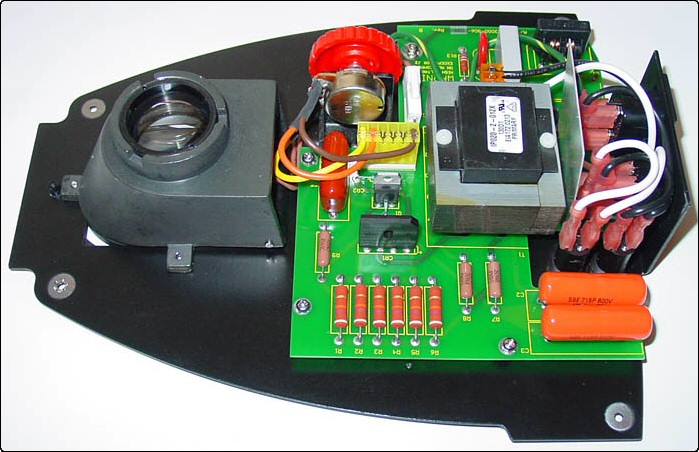
Fig 3.
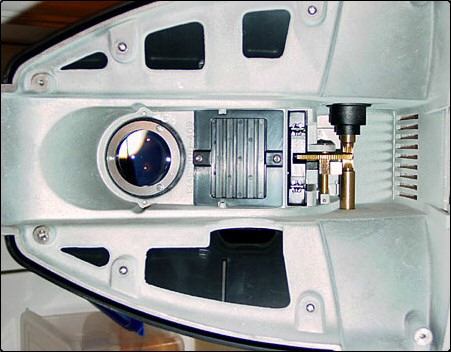
The detachable base section showing a well made variable power unit for the lamp based upon a standard transformer rather than
the DME's 'switch mode' power supply, the 6V halogen lamp can be removed without disassembly by a hinged door from the base.
|
|
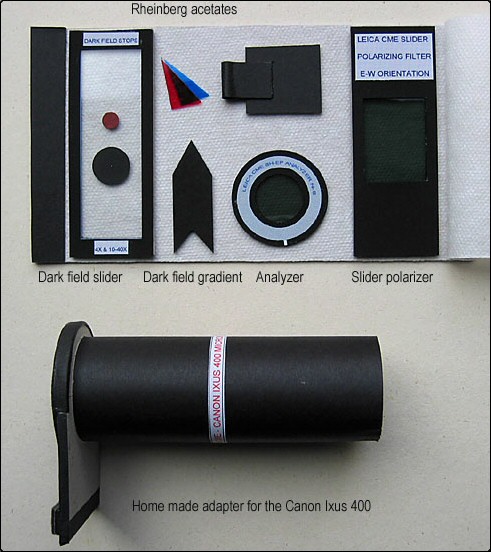
Fig 4.
A general shot of some of the home made accessories for the Leica CME so far; making these myself
has saved a considerable cost and is something I enjoy doing and is part of the fun of D.I.Y. microscopy.
One of the most attractive features of the Leica CME for me is the Abbe condenser with a holder underneath for Leica's accessories like phase sliders. This enables a lot of experimentation with making my own parts. The dark field slider I made is based upon a standard 3" by 1" glass slide with a surround made of thick card, the fit in the condenser is so good that exact alignment of the dark field stops occurs as you slide it in as seen through the eyepiece tube with eyepiece removed. The high extinction HN-22 polarizer comes from a free sample provided by a manufacturer and again is held in position by card. With this arrangement it is simple to add a Rheinberg colour ring and overlay over the top of the stops or experiment with all sorts of contrast techniques. The dark field gradient (the 'Mathias arrow' described by Walter Dioni) is also easy to use in the condenser slider slot and useful for adding various degrees of oblique illumination. The analyzer ring is from the same sample as the polarizer and fits beneath the trinocular head for relaxed viewing for polarization work but also is a good friction fit resting on one of the eyepiece rubber guards for quick checks to see if your slide is looking good under cross-polars. You can see a calibration mark which lines up with the internal casting in the limb. I calibrated the polarizer orientation and hence the analyzer by the use of biotite crystals. Probably because the scope is designed for schools and colleges, the trinocular head is not quick release by the normal thumb screw but held in by an Allen key, the thumb screw is an optional accessory!
|
|
|
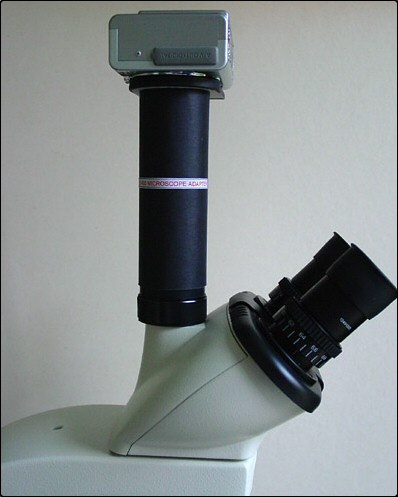
Fig 5A. Fig 5B.
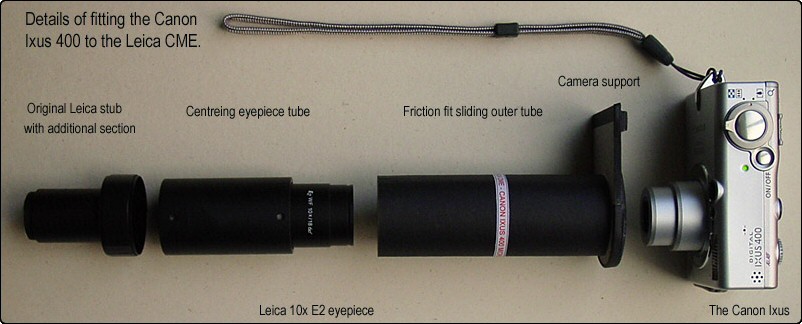
Fig 5A. Canon Ixus 400 in situ on the Leica CME, the main tube can be varied in height over the centring eyepiece tube [see below for details]. For
optimum lighting seen in the camera, the camera is held in place by a very close fit of the lens barrel inside the tube - Fig 5B. this is coated with low
friction plastic sheet to allow easy zoom and not damage the camera, note the outer zoom ring on the Canon turns but does not change its length while zooming.
|
|
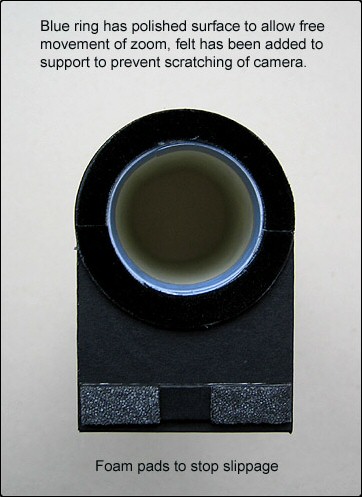
Fig 6.
The above parts are manufactured from card of different thicknesses, precision fitting is essential; without a circular card cutter the process
would be very difficult. The centring eyepiece tube is made from thick aluminium alloy and comes from an old adapter for video use, but this
has been modified as well to accept and centre the Leica eyepiece. With this setup I can get exact parfocality with the binocular view making
picture taking a pleasure especially with Canon's remote capture software, this is all made possible by the small size and low weight of the
Canon Ixus 400.
The Canon Ixus 400 digicam.
The images which you will see a bit later were taken with the Canon using the remote control software (via USB cable) at a medium resolution of 1600x1200, 50 A.S.A. and super-fine JPEG setting, the Ixus 400 cannot save in TIF or RAW format, resizing for this article has caused a little softening and 'jaggies'. Having used a Nikon 4500 [with correct adapter] previously with a Zeiss microscope fitted with plan-apochromats, I think the Canon stands up well to the Nikon especially since many of my images suffered from the 'ring artifacts' no matter how many methods I used to try and avoid them. Since the objectives on the Leica CME are very modest in comparison to the Zeiss I am pleased with the results, I was never quite happy with the Nikon-Zeiss combination even though the microscope optics are far superior to this set up - I always expected more and rarely achieved the results I thought the combination was capable of. The Canon remote control software allows you to take several pictures of the same subject with different settings on your scope like changing colour filters, rocking the fine focus to try picking out different detail etc this can be semi-automated by selecting say 30 second interval shooting on the capture software while you experiment, I've found it to be good fun and to me that's what its all about - see below.
In search of the 'perfect' microscope - an interesting story?
Most microscopists would probably wonder why I would sell both a complete Zeiss system with quality mechanics and high end optics plus a complete set of Zeiss accessories and the Nikon 4500? For many months before the Zeiss purchase, I spent hours looking on e-bay U.K., U.S.A. and Germany and second hand microscope columns for that 'perfect' microscope. After receiving the Zeiss, refurbishing and building up the system of plan-apo and fluorite optics, I became disillusioned; with my first scope (a LOMO) and 40x objective I was making detailed diatom drawings from strews and identifying them, playing around with polar techniques and making my own little attachments. Now with the Zeiss set-up I seemed to stop, the images were impressive but before I was experimenting with my modest set up, now there was no more to improve, I got bored with microscopy. For quite a few months the Zeiss sat in the bottom of my cabinet not moving and my Nikon returned to its normal job of taking macros. It's quite interesting that when I entered the Nikon Small World competition earlier this year I didn't use the Zeiss but another little monocular scope I had, made in China - I've still got that scope!
Probably the thing I like about the Leica CME is that it is flawed, it's not that 'perfect' microscope but I like the look of it, it's solid and the focus/stage controls operate beautifully and above all the design lends itself to me the opportunity for endless playing around with contrast techniques designed and built by myself. Probably for the first time since trying to capture an image down the microscope, what I am capturing on camera is a close [not exact] but a close copy of the image seen in the eyepiece. This is probably because the optics on both the scope and camera are well matched. I may find that upgrading to high NA objectives might make things worse so I have no intention of doing this but probably would consider one or two of Leica's plan phase achromats.
I think the same comparison can be made between the Nikon 4500 with its multitude of menus and manual exposure modes and the ultra simple auto Canon - I find the Canon more fun to use.
I am pleased to say that I am very happy with my present set up and both the Leica CME and Canon Ixus 400 are here to stay, back to the article....
Canon's remote control software, the following summarises some of the main features when used with the Ixus 400:
Live preview of the image on your PC (impossible with a digital SLR), the LCD panel on the camera is turned off when connected and saves battery life - the live preview is of reasonable quality but not essential for my use because of parfocality with binocular view but does allow visual checks on exposure etc.
Instant viewing of captured image with histogram and full EXIF information, you can delete if not satisfied, the images can be saved in a folder of your choice directly to your PC, not the memory card.
Remote release of shutter, control of focus with focus lock, control of optical zoom and digital zoom plus exposure compensation in 1/3rd degree steps.
Fully adjustable interval timer for time lapse, you could also use this whilst incrementing the fine focus for image stacking to create 3D images of difficult subjects like radiolaria.
Self timer with adjustable setting - minimum 1 second, white balance options including using a pre-saved custom setting.
This software is bundled with most cameras in the Canon range including the 'tiny Canons' - the Ixus range, the cheaper 'A' series and the expensive 'G' series.
Main features of the Canon Ixus 400:
Fully automatic camera, no user adjustment of aperture or shutter priority, this seems at first to be a poor candidate for microscopy but tests show the camera favours wide open aperture settings on the microscope - a typical setting would be f2.8 @ 1/60s for brightfield illumination, dark field illumination has also been very successful at slow shutter speeds.
4 MP sensor, max resolution is 2272x1704 pixels, 3x zoom f2.8-f4.9, movie mode with two resolutions [maximum 320x240 pixels].
Flash, macro and infinity settings all available a push button away - not menus, lithium ion battery and charger, compact flash, video out, USB connection.
Shutter speeds 15 seconds to 1/2000 second, high resolution 1.5" LCD monitor 118000 pixels, custom settings for exposure compensation, white balance and light metering.
Size 87x57x28 mm [w h d], weight of camera body 185 grams!
Finished in the new 'Cerabrite'® anti-staining ceramic-metal alloy; the camera is put together like a quality Swiss watch, the fit of the zoom elements is particularly impressive with virtually zero slack in the quietly moving parts.
Full details on Canon's website and an excellent in-depth review on the DPreview website, typical price in the Ł290+ range at the time of writing this article, including U.K. VAT.
What if I don't have a trinocular head on my microscope - is the Canon any use?
Since most microscopes have easily removable binocular heads you could mount the camera by adapting to a monocular vertical tube which are normally very cheap to buy second hand for the big brands, however failing that I did some early tests with a modified 35mm film canister and using one of the eyepieces on my trinocular head!
The type of case I used was a standard mottled matt black finish case for 35mm slide film, it just so happens the open end has a nice rounded off section to prevent scratching of the camera and the tube diameter fits beautifully over the Canon zoom lens, cut the closed end off carefully and you now have a nice little tube to fit over your eyepiece provided you have a rubber eyeguard which fit snugly inside the tube. You must support your camera by hand or mini tripod on your desk and select and leave an appropriate zoom setting but it will give you an idea of what the camera can do before committing yourself to further ventures. The high resolution bright LCD is very good for focussing and you can select active focussing over several areas or centre point focussing or do what I do which is to use infinity mode [mountain icon], lock the focus and use your microscope to accurately focus the image.
Some sample images.
|
|
|
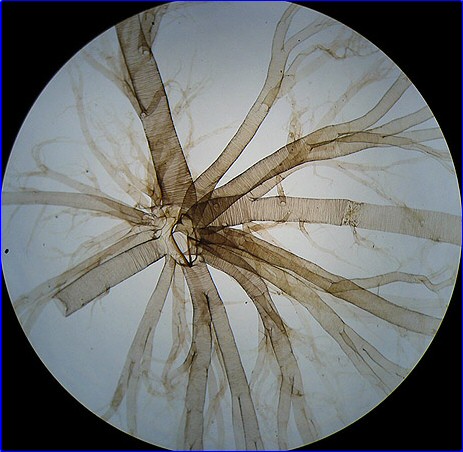
Fig 7. Fig 8.
Trachea of silkworm, 4x objective, unknown mounter. Section of Cideris Spine, 4x objective, mounted by A. C. Tipple.
Both the above taken at the minimum zoom setting showing sharp detailing around the edges and little colour fringing suggesting good alignment of camera
and optics, the left image shows some concentration of light towards the centre, it's the condenser causing this - it does not occur at typical zoom settings.
|
|
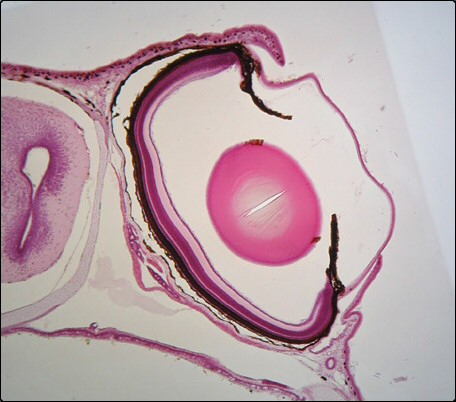
Fig 9.
Transverse section through a frog's eye, 4x objective, unknown mounter.
Modest zoom setting removes peripheral black edges, the slight softness to the image is as seen visually.
|
|
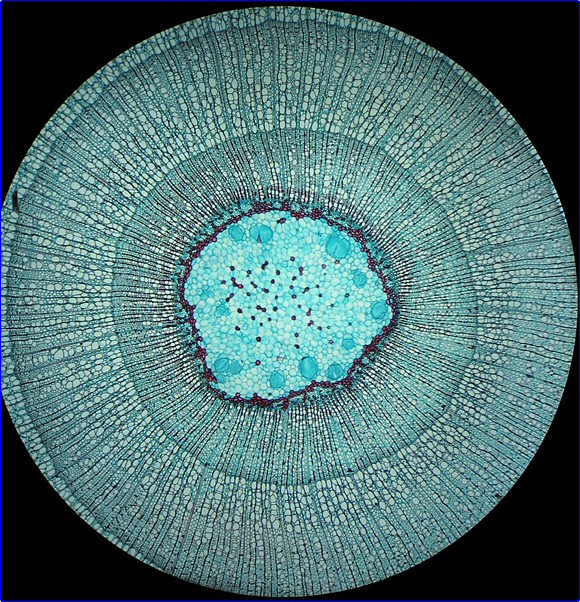
Fig 10.
Woody stem cross-section at 3 years old, 4x objective, a Brunel slide.
Because the edges are so sharp with no colour fringes, I rather like the effect of leaving the camera at minimum zoom especially with circular structures
like this plant section, the black background offsets the image nicely, notice the focus is even across the image again showing good
alignment of the home made adapter sections, the slight softening on the right of the section is as seen visually.
I hope reading this article might give you some ideas on experimenting with your own microscope and camera....
The End.
Comments to the author, Ian
Walker, are welcomed.
Related Micscape articles: the author reviews in November 2004 the Zeiss Axiostar microscope.
Please report any Web problems or offer general comments to the Micscape Editor.
Micscape is the on-line monthly magazine of the Microscopy
UK web
site at Microscopy-UK