
A Personal Review
By Ian Walker. UK.
[All images taken with the Canon G6 digital camera].
Introduction.
I have had the opportunity over the years to own or have had access to several microscopes including a number of LOMO variants, a JNOEC polarising scope with rotating stage and Motic student stand [both Chinese], a Zeiss standard 14 with a range of top quality plan-apos and fluorite objectives from the late 1960's and a Leica CME with modern achromatic objectives. Most of these were bought secondhand with the exception of the Leica and Motic which were ex-demonstration models and the JNOEC which was bought new.
The LOMO stands are still in the family, all the other microscopes have been sold off. There are several reasons for owning all these scopes; one is that I have an enquiring mind and love writing about scopes and sharing these thoughts since finding reviews on the Internet on any models from microscope manufacturers outside the contributors on Micscape is difficult. You will see some quite biased comments in news groups when people new to the hobby are asking advice about buying a scope...."only buy Zeiss or Leica etc." but have they tried and lived with models from other manufacturers? To really learn about scopes I think you need to use them for a while and with older scopes there is no better way than refurbishing them.
The older LOMO models are both easy to work on, compact and use and have surprisingly good mechanical engineering in many areas of their design, putting many modern scopes to shame including some of the 'big names'. You will find LOMO's use screws on virtually all the parts right down to some very tiny ones, extensive use of brass, steel and aluminium, brass dovetails [still the best method for sliding parts in my opinion] and less use of plastic. Two main points let the LOMO stands down; one is thick grease on their older models which seizes solid and poor setting up of the many stands you will find. LOMO's benefit from being well set up, lubricated and aligned [they are a bit like 'top-end' record turntables which need excellent alignment for the best results] even though LOMO's themselves hail from the bottom end of the market place. However, modern LOMO's (other than the basic Biolams or equivalent model) are in my view pricing themselves out of the market in the U.S. and mainland Europe with parts now becoming expensive and to my knowledge there is no longer an official UK importer for any LOMO stands or accessories. One of the biggest problems with the LOMO models I have used is getting a good image on a digicam since I have never owned their trinocular head and I have not been able to source a matched photo eyepiece so they remained (for me) for visual use only but with modern lubricants specially designed for microscopy they can hold their own with respect to smoothness of operation and remain good buys. I bought my stand for Ł38. Throughout this review I will not make any comparisons with the modern Nikon E series or Olympus microscopes since I have no knowledge of them, but if Nikon would like to lend me an E400 for a while I will happily report on my findings!!
The Motic I possessed was one of their basic models and I can't say I was particularly impressed with the mechanics but surprisingly it had a simple but very nice illumination which was both pleasing and gave relaxed viewing, but note if you buy these brand new expect a large drop in price if you sell on. Motic at present are selling some much higher specification stands with infinity optics and a good range of accessories, I certainly like the designs but they are way out of my price range.
The Zeiss standard 14 was a mixed bag since I had to do a lot of work on it with seized and nearly seized parts, problems with peeling paint used on the phase stops, damaged condenser iris [but repairable] etc etc. There were many rumours circulating of Zeiss objective problems of this vintage including delamination, soft and defective cement holding the glass elements etc and the room I had the scope in had very large temperature swings so I didn't trust its long term reliability. However you could obtain some very good visual images from the objectives I had [which fortunately I obtained at very reasonable prices] but I still had problems getting good images onto the camera. After bringing the scope back to excellent working order I decided for various reasons to sell it on and this is where the big names score since I lost no money at all and this was also the case with the Leica CME.
What about the Leica CME? Well I have made some comments throughout this article since the Zeiss and Leica are in the same price bracket but you can read more in my dedicated review of the Leica CME [see link at the end of this review]. What made me sell on? A number of factors but one was the cost of bringing it up to spec' with regards plan objectives and especially the photo attachments which are very expensive, I did make my own adapters but they became a little troublesome over time especially with accurate alignment but I did get some reasonably good images from the Leica CME/Canon Ixus 400 digicam combination, more so than the Zeiss Standard/Nikon Coolpix4500 using plan-apos.
This brings us up to date with the Zeiss Axiostar. Reasons for choosing the Zeiss are its flexibility with a large range of accessories and objectives plus good quality Köhler illumination as standard and it's the first time I would be trying out infinity objectives. This is not to say that Leica do not have a large range of attachments for the CME [DME] but there were some areas of its design I think were lacking. One of them was the dubious illumination, if you removed the essential diffused blue filter supplied with the scope fitted directly below the condenser [which I think goes against all the principles of lighting in microscopy] the view of the myriad reflections, distorted filament from the bulb and strange artifacts seen without this filter was unbelievable for a modern scope and I showed it to my brother who also couldn't believe it. The strange thing is that Leica managed to achieve a uniform and pleasant lighting from such a poor light source, which is fine I guess for the market it is aimed at, but being someone who likes 'sound' optical engineering practice I didn't like this at all. Other areas that started to annoy me were the poor fitting eyepieces, cheap looking condenser and the fact that Leica had gone out of their way to make all parts none standard so you must buy into all their accessories. The Leica stand by the way was made in India, I cannot find a plaque for the Zeiss to suggest where it is assembled but I have been talking with Zeiss UK recently where the new accessories I am buying for the stand are coming from Germany, however this does not mean they are manufactured there.
Design features.
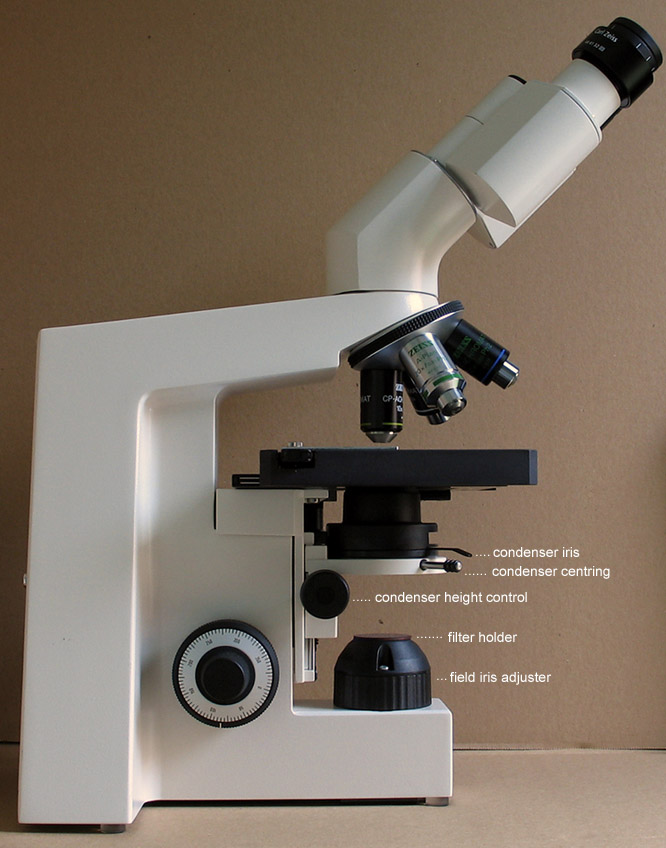
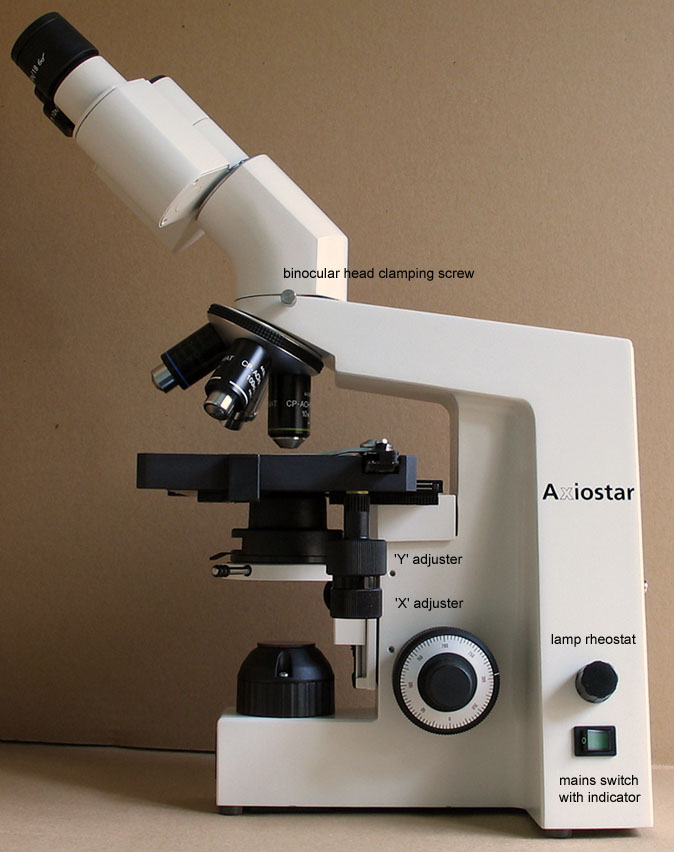
Fig 1a. and Fig 1b. (Click each image for a larger labelled version.)
Left and right hand sides to the Axiostar.
The binocular version measures 20 x 35 x 45 cm [w d h] and weighs 6.7 Kg.
I like the look of this scope compared to the Leica CME, DME and older Zeiss standards, the main components are well made, the paint finish is good and it is very stable, a useful point when doing photomicrography. Most of the controls are well placed and I particularly like the low coaxial coarse and fine focus since you can rest your hand on the table eliminating fatigue but I am not over keen having to bring my hand up from this position to adjust the X-Y stage controls since the drop down shaft is not long enough. This has been rectified on the Axiostar Plus which also has 'soft touch' controls rather than the rather hard knurled plastic controls on this model. One important feature often missing on modern scopes is a field iris essential for optimum contrast both visually and in photomicrography - it is only available on the Leica CME as an expensive option, the adjustment on the Axiostar is made with the large knurled plastic ring seen in the above Figs 1a. and Fig 1b. with a clip in filter tray for a blue or green [phase] filter available on top of the housing. I have an extra filter sitting on top of the Zeiss blue filter to improve the colour balance at lower rheostat settings as seen above. The turret is well finished [perhaps not as good as the chrome 'mirror finish' of the old days] but has a nice rubber grip and lightly damped ball bearing action. The binocular head is easily removed by the usual method and a trinocular head with photo tube can be used instead which can take a variety of photo accessories like Contax or Zeiss 35mm film cameras, video cameras and really useful dedicated tubes and optics designed especially for Sony digicams like the popular S70 and S75/S85. Zeiss has also produced some affordable phototubes with relay optics to work with the binocular head designed for the Canon 'G' series of digital cameras so I look forward to trying this with my Canon G6.
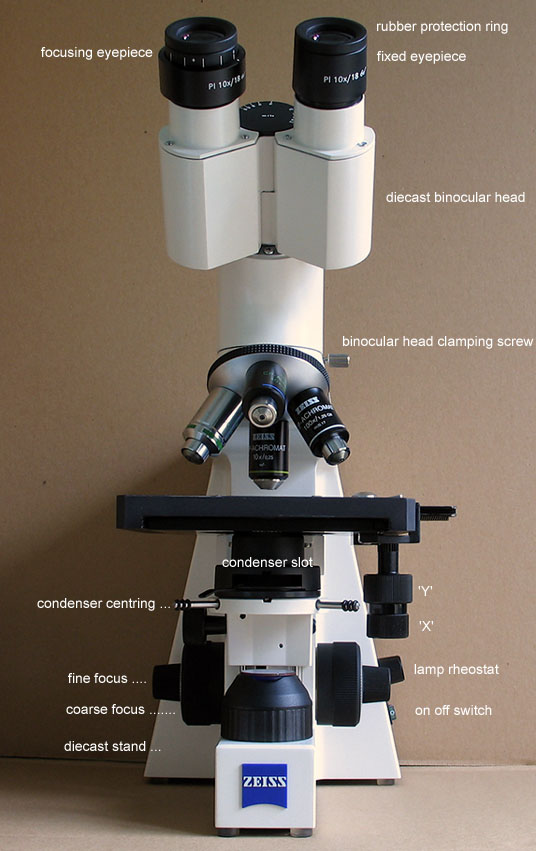
Fig 2.
Front View.
(Click image for a larger labelled version.)
Fig 2. shows a well organized scope with a small footprint and low slung coaxial controls for focusing. The focus is very good with a light action for the fine control with absolutely no play. This picture shows the slot in the Abbe condenser to take Zeiss phase and dark field sliders [click on the picture for a better view]. I really like this method (also found on the Leica CME) since accurate alignment of your own accessories is easily accomplished. You can also see the adjusters for centring the condenser with nice rubber grips courtesy of 'O' rings!
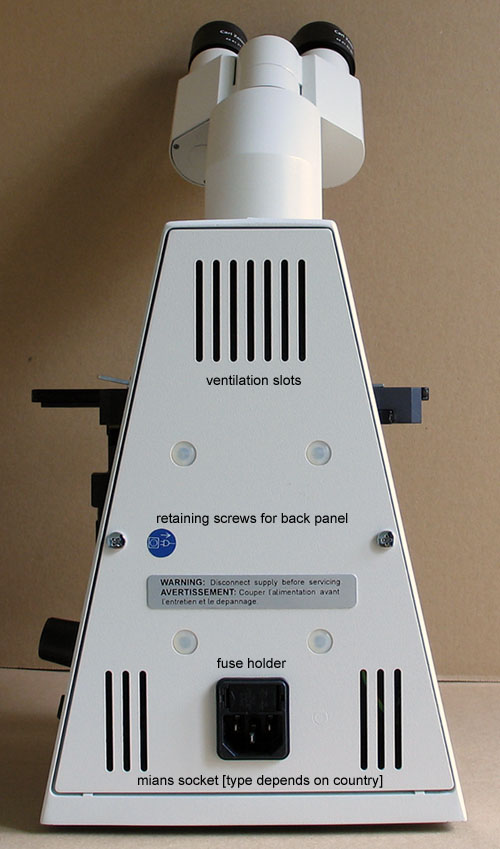
Fig 3.
Rear View.
(Click image for a larger labelled version.)
A standard 240 volt IEC socket for the UK allows easy removal of the mains lead [the power unit is auto sensing so the scope can be used throughout most countries without modification with respect to mains voltage, just the type of mains connector is changed]. The connector also contains a fuse so you don't have to open up the scope in the unlikely event of it blowing. This picture shows best the stable design. The scope is not overly heavy being transportable around the house without too much of a problem but it is a little bit difficult finding an easy place to pick it up due to its angular construction. Plenty of ventilation slots allows the scope to run cool at all times.
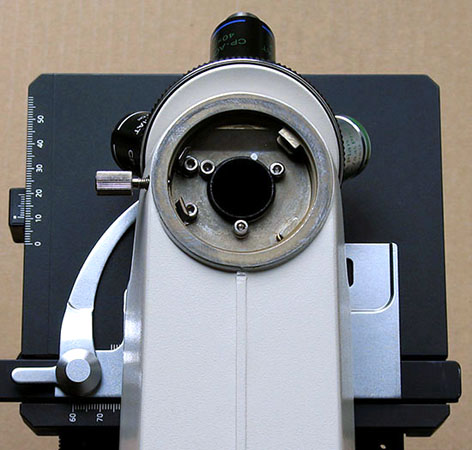
Fig 4.
Binocular head removed to show placement of my own analyzer attachment, the white spot is a convenient point for a calibration marker for N-S orientation.
The surface finish of the ring on which the binocular head sits is not up to the old Zeiss 14 standards which had a very well machined surface, however the binocular head still rotates smoothly. Although leaving the analyzer in situ [unless I am looking at rock sections under plane polarised light which requires just the lower polarizer in the light path] reduces available light this is not a problem since there is more than adequate light output from the 6 volt 20 watt halogen bulb. There is a slight advantage in leaving an analyzer in place since it behaves like a neutral density filter necessitating an increase in light intensity from the bulb taking it further away from the orange-yellow part of the spectrum when the rheostat is at its lower setting providing a more natural whiter background.
The large stage has a ceramic coating which prevents scratching. The 'X' adjuster is very smooth in operation but a bit to too easily moved by mistake but it has no back-lash. The 'Y' adjuster has to move the main bulk of the stage so is heavier in operation but again is smooth to operate. The vernier needed adjusting when I received it since it was scraping against the side of the stage slightly, this is an easy task by loosening two Allen bolts beneath the stage adjusting the spacing and then re-tightening. I can find no instructions in the manual on increasing or decreasing the tension for the stage controls like you could on the older Zeiss 'Standards' [1960-1970 vintage].
The slide holder is well made with the usual Zeiss mottled aluminium finish and the swing arm has just the right amount of tension for easy slide placement, the stage holder includes cut-outs to hold smaller slides like those found for rock and mineral sections as well as the standard 3" long slide.
Main parts and accessories.
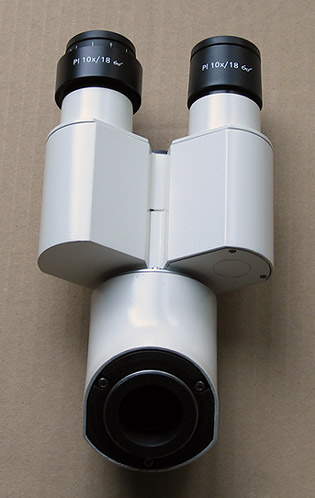
Fig 5. Binocular head.
The binocular head is of all metal diecast construction compared to plastic sections found on the Leica CME, inter-pupillary distance is easily achieved and the overall height of the scope can be varied by swinging the tubes in an upward direction rather than pointing down shown here. There are two sets of markings for inter-pupil distance for both height settings. The standard eyepieces that normally come supplied with the scope are 10/18 [10x] high eyepoint, note these are 30mm diameter as found on many stereo microscopes rather than the more common 23mm. The coatings used on all the optical surfaces looks very good and because they are large are easy to clean. The construction of the eyepieces apart from the optics is mainly plastic with a metal ring for the focusing eyepiece but the quality of material and markings is very good. The fit in the tubes is excellent compared to the sloppy fit of the more traditional eyepieces from Leica on the CME. Shaped rubber eyecups can be fitted to the eyepieces as an option rather than the rubber rings fitted as standard to prevent scratching the glass of spectacle wearers.
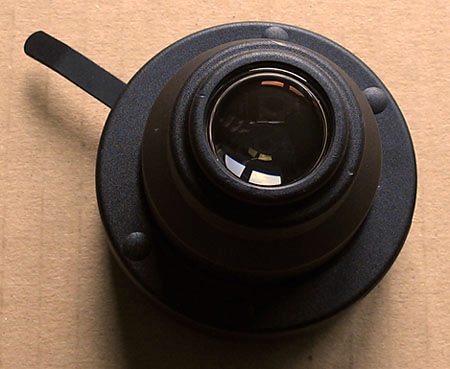
Fig 6. Abbe condenser, NA 0.9/1.25.
The Abbe condenser is suitable for all the Zeiss infinity range of Achromats from 4x to 100x, to use the 2.5x you must buy the swing in lens assembly which sits under the mount for the condenser. The construction of the body is mainly a high quality plastic surround on metal inner parts holding the optics, the base is thick metal for accurate placement in the centreable condenser mount, the overall finish is workmanlike rather than the older machined finishes of Zeiss. The diaphragm only has six blades [so did the Leica CME] but the action is smooth thanks to the long adjustment arm and I am pleased to say no grease or oil is used on the leaves of the diaphragm which attracts dust and eventually dries up and seizes [LOMO and the Zeiss 'standard']. Zeiss also supply higher specification condensers such as the achromatic-aplanatic for photographic use and for polarisation but these are expensive. Strangely these are listed for accessories for the Axiostar but not the Axiostar Plus but I think both are compatible, you would have to check with Zeiss.
The condenser is easily removed from its mount by loosening both centring adjusters and then pushing against the sprung mounted retaining pin but you have to be careful removing it since it only just clears the bottom of the stage with the carrier in the lowest position. On replacing it there is a guide screw which fits onto the underside of the condenser and matching cut-out on the topside of the condenser carrier enabling the best position for adding the phase or dark-field sliders.
The mechanism holding the condenser carrier in place allowing height adjustment seems to be well engineered but I had problems of the condenser carrier 'jumping' when returning from its uppermost position [dark-field] down to its normal position for bright-field. After some deliberation I found that a small Allen bolt on the right hand side of the condenser carrier adjusts the friction of the condenser height control and a tiny nylon screw acting on one of the steel guide rails affects the slack; after both were carefully adjusted I solved the problem and it is now working fine. [You will not find this in the manual].

Fig 7. Sliders for the Abbe condenser.
The phase 2 slider I think is a third party design and was supplied with my scope but it is not up to the quality of Zeiss phase sliders which look quite different in the pictures I have seen, however it works well enough, it can be used with the 20x and 40x phase objectives. The other two images are my home built dark-field and polarisation sliders, these are built from Perspex for its easily machined properties and lack of wear compared to some of my previous designs made from thick card. I am very pleased with the dark-field slider since I only need one slider and just place the required stop in the hole, all three stops using the same size locating ring underneath the stop. The slider with relevant stop also allows very fine adjustment for oblique lighting. This setup can provide a much cheaper alternative to the amateur for contrast techniques compared to buying Zeiss's own turret condenser for phase. With this setup I have opportunities for using all the common contrast techniques such as bright-field, crossed-polars, phase for 20x and 40x, dark-field for 4x to 40x with or without Rheinberg filters and continuously variable oblique lighting and the speed at which I can change from one to the other is a real plus point for convenience.
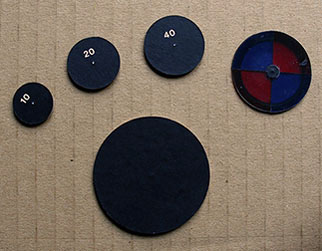
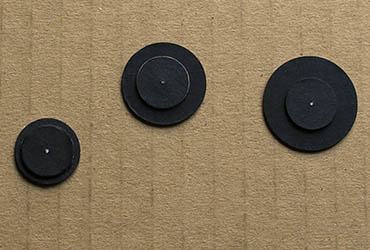
Fig 8a. and Fig 8b.
Fig 8a. shows 'stops' 10x to 40x for dark-field illumination and a Rheinberg filter made from colour acetates, the larger disk is a dust cap for the scope when the binocular head is removed. Fig 8b. details the underneath of the 'stops' showing the same locating ring size, all the 'stops' were made from high density card with a circular cutter. The E-W orientation of the polarizer was accurately aligned using biotite crystals which is detailed in my other articles, this then allows accurate alignment of the analyzer under the binocular head.
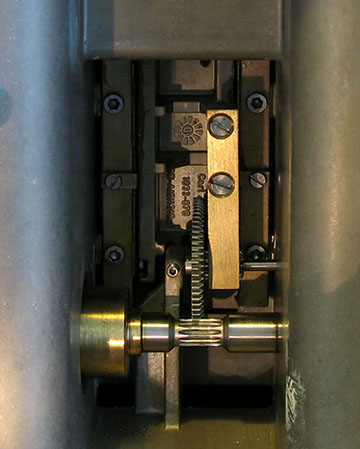
Fig 9.
With the rear panel removed [just two screws] you can see the main focus assembly, this sits well within the substantial aluminium diecast frame of the scope and is a mix of brass and well machined steel parts, I have no complaints here, the focus action is excellent and is aided by good 'feel' and large physical size of the controls.
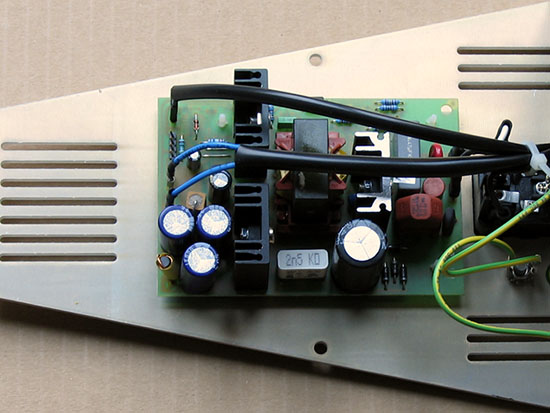
Fig 10.
With the rear panel swung down you can access the regulator circuit board for the halogen lamp, the construction and wiring is to a good standard with all connections to the board on plugs and sockets making repair if needed simpler. However, I was surprised to see that the board does not seem to be lacquered which prevents circuit board deterioration .
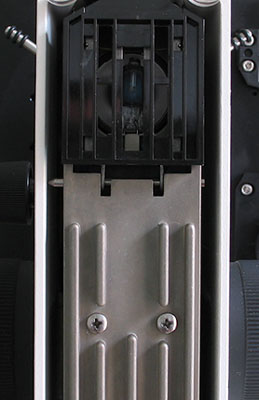
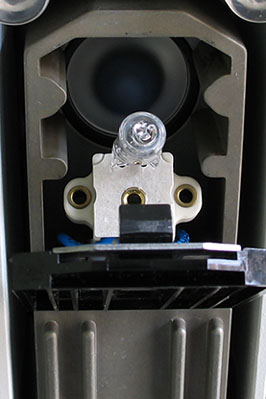
Fig 11a. and Fig 11b.
Fig 11a. shows part of the base with the lamp door in the usual closed position, note the substantial diecast section and Fig 11b. shows the door open, removing the halogen lamp from its ceramic base is easy and pre-centred so no adjustments required. Above the lamp is the good quality frosted glass situated before the collector lens a method Zeiss has been using for many years and it works well.
The Objectives.
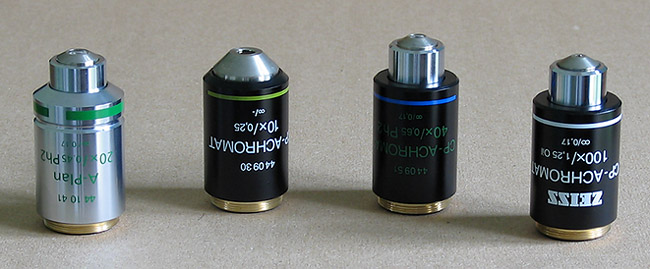
Fig 12.
Supplied with my Zeiss stand were the following objectives.
|
10x |
na 0.25 |
CP-Achromat |
|
20x |
na 0.45 |
A-Plan Phase II |
|
40x |
na 0.65 |
CP-Achromat Phase II |
|
100x |
na 1.25 |
CP-Achromat [oil] |
The Zeiss achromat range starts with the CP-achromats, next is the A-plan series, then the Achro-plans. The basic CP-achromats have a bright contrasty image and unless looking at critical histology sections I have found them to be pretty competent. The A-plan definitely seems to be better corrected at the edge of the field but there is a considerable cost difference between the two. Using phase contrast both 20x A-plan and the 40x CP-achromat give a very pleasing image. At present I do not know whether the Achro-plans provide any further improvements since I don't have any but the price of the series is substantially more than the above. Way above these in cost are the Fluorites and Plan Fluorites, the Fluorites can be used with more exotic contrast techniques due to their high NAs but only have fair field flatness whilst the Plan Fluorites speak for themselves.
Comparisons optically with the Leica CME objectives, I think they are both very good but Zeiss have the edge on build quality, feeling more substantial and better finished. The pricing of Leica E2 series and Zeiss CP-Achromats are similar and are good value considering their performance.
Manual.
Zeiss must be congratulated here, the manual is substantial (74 pages), well laid out with plenty of diagrams and contains many useful facts on setting up the scope for different contrast techniques, care and maintenance plus full details of the available accessories; this must be compared to the thin pamphlet in multiple languages that Leica offer with the CME.
Price versus performance.
You can check new prices on the Zeiss website linked below, my microscope was bought second hand from 'Abro microscopen' in the Netherlands and paid for in Euros, they have a large range of second hand Zeiss and other makes. Axiostars and the more modern Axiostar Plus occasionally come up on ebay in Germany and the U.S. The Axiostar Plus and Axiostar are very similar except for an extended drop down controls for the stage in the Plus, this model also adds a large optional ergonomic stand that can lift the base of the ground.
Having used the Zeiss Axiostar for some time now I am pleased with its performance both optically and mechanically and it will now become my scope of preference. At present I am waiting for a new 5x CP-Achromat objective, some accessories and a dedicated photo-tube specially designed for the Canon 'G' series of cameras from Zeiss UK, for the first time I will be using dedicated optics for photomicrography instead of my own home made adapters, I hope to discuss this in next month's article with comments on the 5x and some images using different objectives and contrast techniques from my slide collection.
Here are some typical prices for new Zeiss components from their on-line shop, UK residents must add V.A.T. unfortunately. With some D.I.Y. skills making your own sliders for dark-field and polarisation you can save on these accessories since all the major manufacturers including Zeiss tend to charge high prices especially for the polarisation parts which can be made for yourself at minimum cost. From the few prices second hand on eBay it is difficult to judge what a typical price would be since there have been some large variations but as always buying second hand scopes - buyer beware.
|
Axiostar Plus stand with Kohler illumination (requires head, objectives, condenser, eyepieces) |
Ł555.00 |
|
Binocular tube 45 degrees |
Ł142.00 |
|
Abbe condenser with slot |
Ł102.00 |
|
5x CP-Achromat objective |
Ł39.00 |
|
20x A-Plan objective |
Ł195.00 |
Links.
Click any of the highlighted text below to access further information.
![]() Carl
Zeiss website ('Microscopy and Imaging' home page). ('Zeiss'
logo courtesy of Carl Zeiss).
Carl
Zeiss website ('Microscopy and Imaging' home page). ('Zeiss'
logo courtesy of Carl Zeiss).
LOMO microscopes notes on refurbishment A previous article written by myself for Micscape magazine.
Leica CME microscope - a personal review A previous article written by myself for Micscape magazine.
The polarizing microscope A previous article written by myself for Micscape magazine which discusses some home made polarisation accessories for the old Zeiss standard microscope and then comparing it to the JNOEC polarizing microscope.
Abro microscopen website.
the end.
Comments to the author, Ian Walker, are welcomed.
Published in the November 2004 edition of Micscape.
Please report any Web problems or offer general comments to the Micscape Editor.
Micscape is the on-line
monthly magazine of the Microscopy UK web
site at
Microscopy-UK
© Onview.net Ltd, Microscopy-UK, and all contributors 1995 onwards. All rights reserved. Main site is at www.microscopy-uk.org.uk with full mirror at www.microscopy-uk.net .