|
A Glass “Cup” Sponge: Part 2 by Richard L. Howey, Wyoming, USA |
I probably should change the title to read in the plural, because I started looking at one of the smaller cup sponges and I now think that it is a different species from the one I wrote about in Part 1. I was looking at the sponge, which we’ll call GS2 (Glass Sponge #2) and I got quite excited. I had blithely assumed that my 4 specimens were all the same species and now I suspect that is not so; I love to be wrong about such matters. The other 2 specimens, I have yet to examine under the microscope; they are the smallest, so I suspect (but I am not making any dogmatic assertions), that they are the same species as GS2.
However, before we go to GS2, I want to add a footnote regarding the first cup sponge (obviously, now designated GS1). I extracted three of the long, projecting glass fibers and coiled them into a standard Petri dish. This afternoon, I finally got around to examining them and they simply looked like very long glass fibers until I came to a section on one which had small, thin projections terminating in tiny ovoids. Are they part of the sponge? Doubtful. Are they another opportunistic organism that has attached itself in a situation where it would have not only food but, considerable protection from the spiny structure of this sponge? This seems to me more likely but, could they be protozoa, bryozoa, or hydroids? Difficult to tell since they are dried, but I shall do a few tests and likely come to another wrong conclusion.
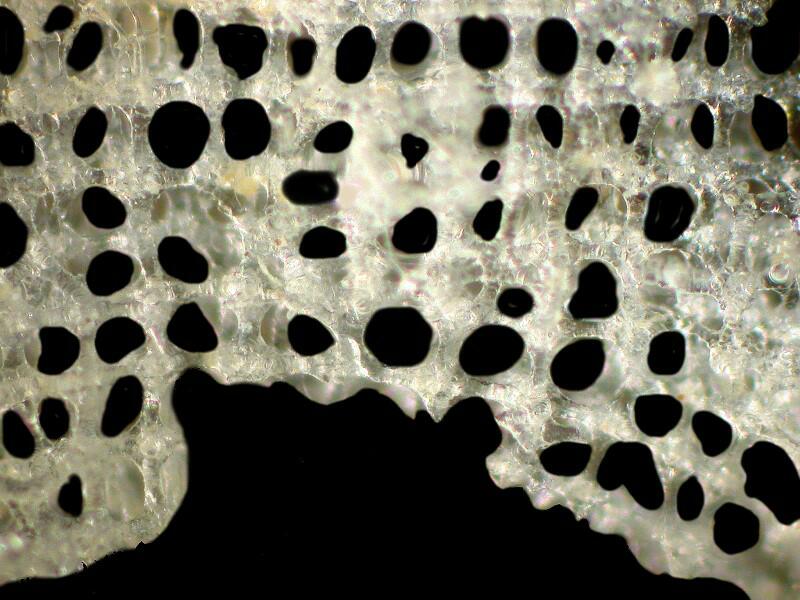
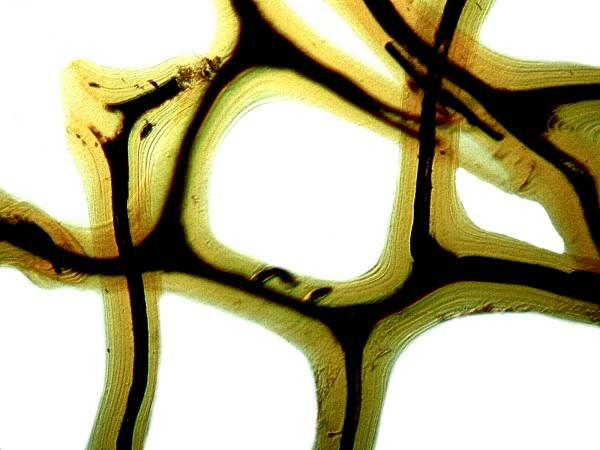
This afternoon, I took a brief look at the other 2 small specimens under a stereo microscope and I am now comfortable in saying they are the same species as GS2. Why do I think that GS1 is different from the other 3? It is almost immediately obvious when one looks at the surface skeletal lattice. First I’ll remind you what the lattice of GS1 looks like.
As you can see, the cross pieces are fused and solid, very plain and geometric with no frills.
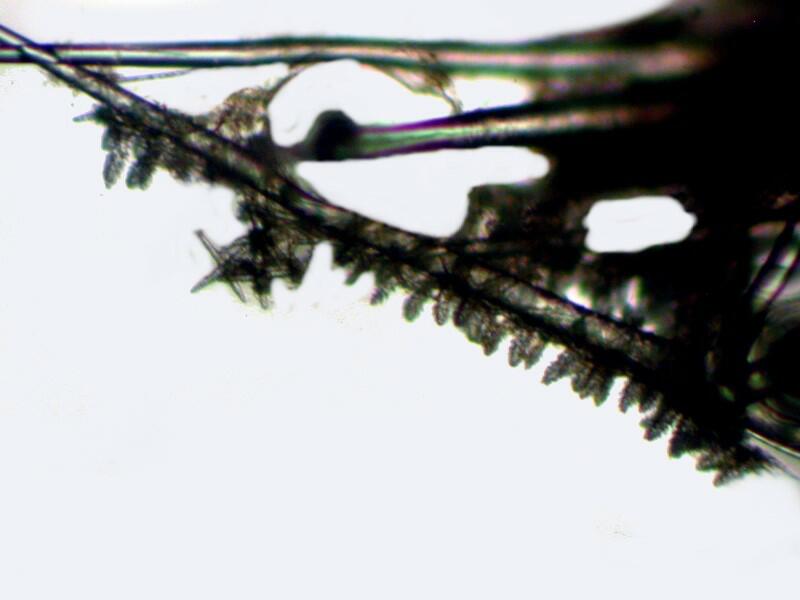
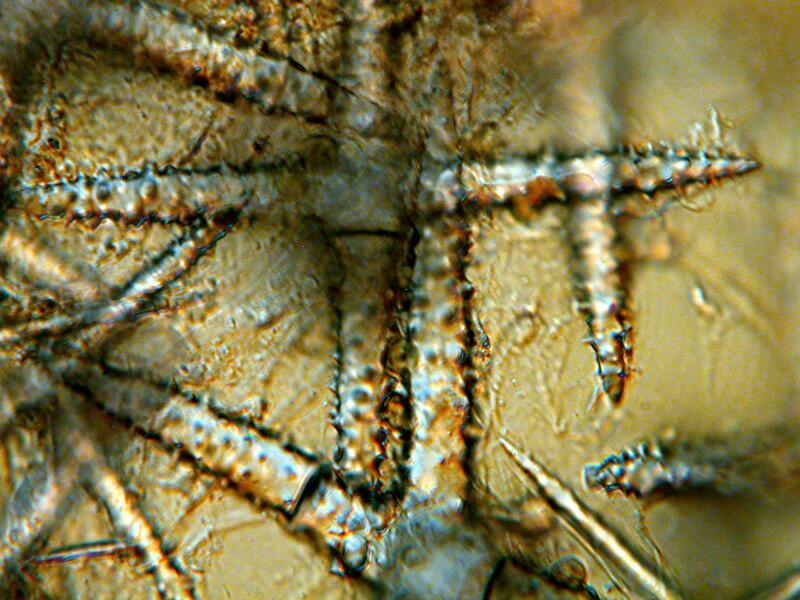
However, if we look at the lattice of GS2 (and the other 2 small specimens show the same structure), we see something quite different. There is an elaborately interwoven, frilly network.
Using a very fine pair of forceps, I broke off a few of these components to show them to you.
The difference is striking and even though at the macro level there are strong similarities between GS1 and GS2, even a cursory examination under a microscope directly reveals major morphological differences. Note, for example the longer spines and also the ratios of length to the overall size of the sponge are very different and there are other differences but, I want to turn to a closer investigation of this second small species of glass sponge of which we now agree, we have 3 specimens to vandalize.
Dismantling a glass sponge poses special problems and I will here repeat my warning from Part 1 for those of you have not yet read that article.
---------------------------------------------------------------------------------------
A Word Of Caution: These spicules are very fine, extremely sharp, made of glass, and are highly irritating if you get any of them embedded in your skin and very dangerous if you happen to have some of the material on your hands and rub your eyes. Also, a slight draft, deep breath, or especially a sneeze can easily cause this material to float into the air which is also not good, because you don’t want glass particles in your lungs. So, if you decide to work with glass sponges, please take proper precautions. Use forceps and dissecting needles when extracting or sorting the material and if you need to handle the sponge directly wear disposable rubber or nitrile (if you are allergic to latex) gloves. For best safety, also wear goggles and a small surgical mask over your mouth and nose. A procedure which can help reduce risk, if you have a fairly small specimen, is to immerse it in water and let it sit until it has absorbed sufficient fluid to be completely covered. Then, you can do an underwater dissection without the glass and dust powder floating up into the air.
With calcareous sponges, one can use a strong caustic such as Potassium hydroxide or Sodium hypochlorite (household bleach) and dissolve away nearly all of the organic material. By carrying out this process in stages and regulating the concentration of the caustic, you can halt the process by placing the sponge or section thereof in distilled water rinses. This allows you to observe the skeleton (or parts of it) while the spicules are still in place. In many cases, if the specimen is simply placed in and left in the caustic, there will be a complete disassociation and it will be difficult to understand how they are arranged in the intact organism. By proceeding in stages, you can obtain a series of perspectives which will aid in getting a better understanding of their positioning within the skeleton. Then, when you reach the point when you have completely disassociated the spicules from the organic material, you can begin to examine the individual spicule types. As an aside, you might be interested to know that fossilized specimens of both calcareous and siliceous spicules have been found but, it takes extensive practice and knowledge to find and isolate them.
If you wish to examine a calcareous sponge in terms of its organic form without the spicules, then you can take a small specimen (or a section of a larger one–preferably the former) and place it in 10% Hydrochloric acid to dissolve out the spicules. If you’re not in a hurry and/or don’t have access to Hydrochloric acid, you may substitute vinegar but, be sure to change it regularly since it loses its efficacy fairly quickly and if it sits long enough, you may find mold growing in it.
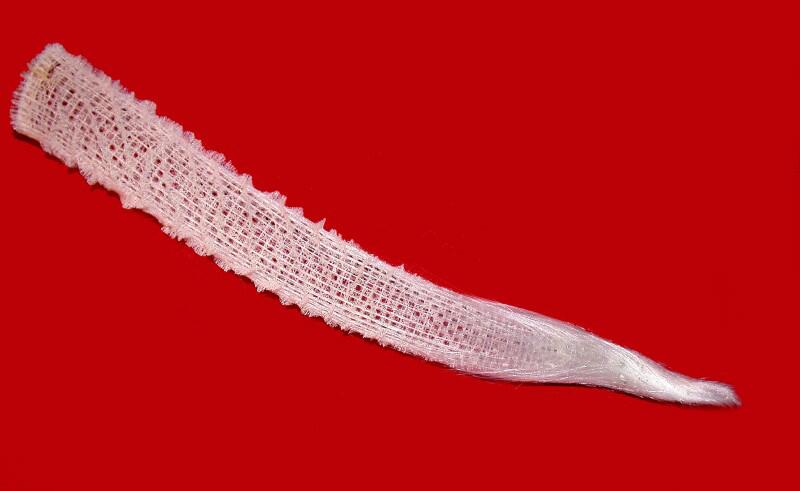
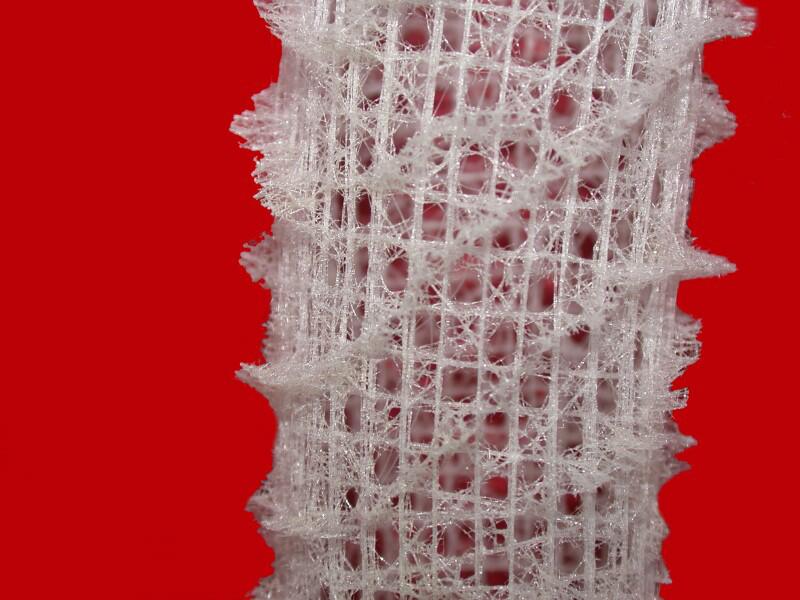
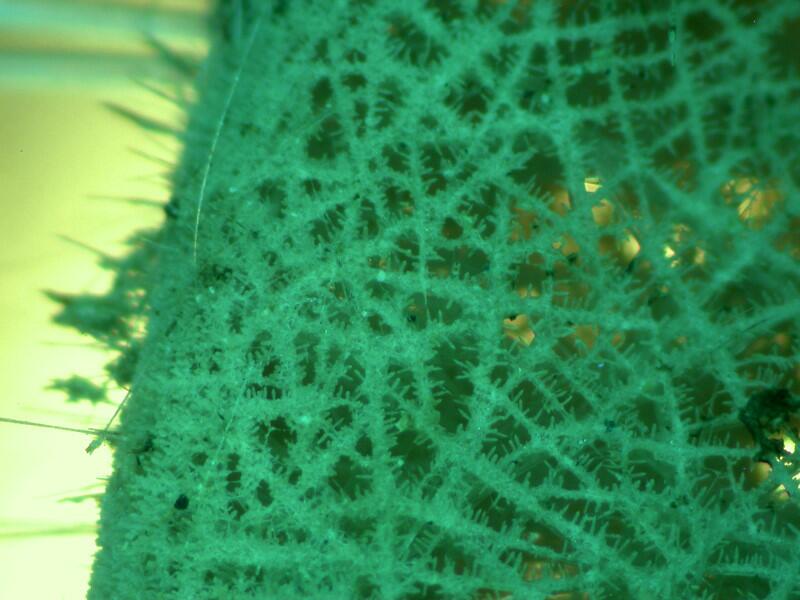
If you have a sponge with an organic skeleton (spongin) like a bath sponge, you can place it in acid to get rid of extraneous calcareous debris, since sponges provide shelter for forams, small mussels, bryozoans, and a wide variety of the small invertebrates. Here is an example of a cleaned bit of a spongin skeleton.
Glass sponges, however, pose a different set of challenges, some of which are considerably more difficult than others. When enormous numbers of spicules are fused together to form an elaborate skeleton, such as that of Euplectella, then the challenge of understanding the constitution of these structures is incredible. Here are 2 examples to illustrate that difficulty in Euplectella.
From my own vandalistic experiments, I discovered that these skeletons are not delicate, exceptionally fragile, nor especially brittle. They, in fact, possess an amazing flexibility which you can read about in my article re-counting my attempts to smash one.
The challenges in the cup sponges we are looking at are not quite so formidable, but are by no means insignificant. I decided to proceed by taking a small specimen and immersing it in distilled water to minimize the risks involved in hacking it into pieces. A sharp scalpel and micro-forceps will serve well initially to cut sections which can be readily examined with a stereo-microscope. It is useful to begin with a couple of relatively thick sections and then cut thinner and thinner ones–if the sponge will allow. Examine both sides of each section and try to get as clear a notion as possible of how the various types of spicules are arranged and especially keep an eye out for patterns while keeping 2 crucial considerations in mind: 1) with your scalpel and forceps, you have already inflicted considerable damage that may very well affect any patterned arrangements and 2) it is very likely that there are “rogue” spicules that don’t fit into any patterned arrangement and are simply “hanging out” like bored teenagers or soccer fans.
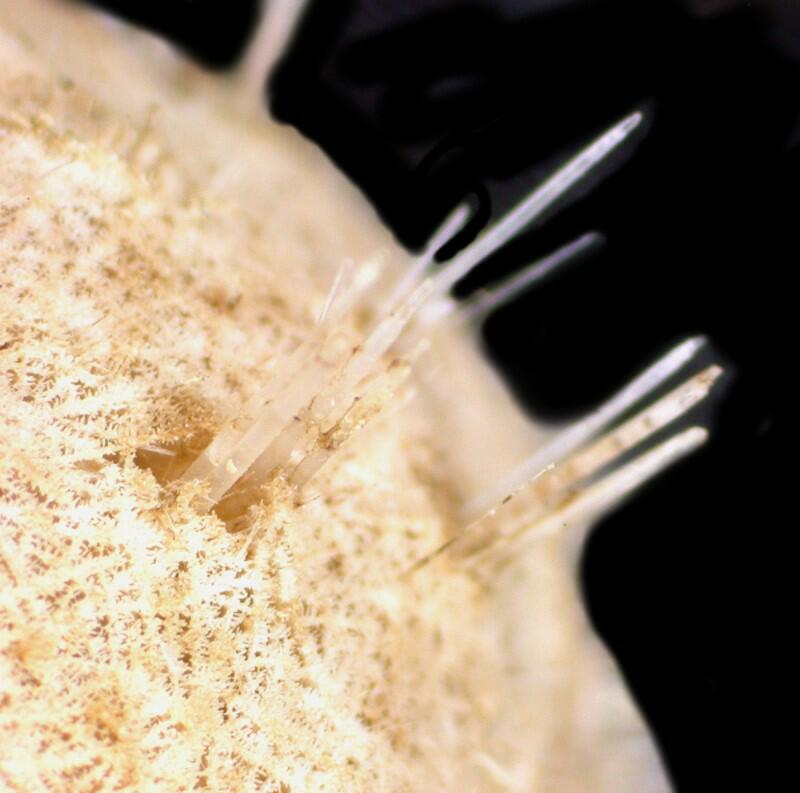
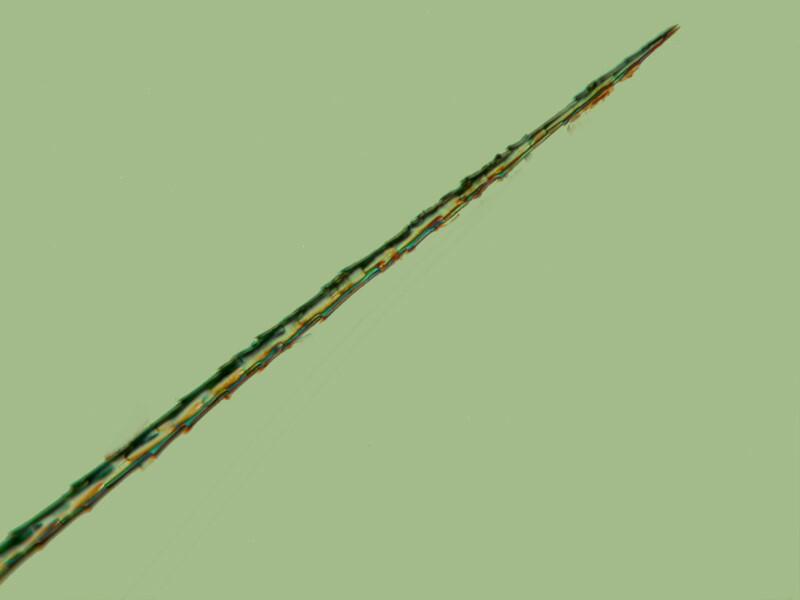
However, interesting surprises are always lurking in the wings. This afternoon, I discovered that these cup sponges don’t lend themselves to sectioning and one has to settle instead for clumps. I was examining a couple of small clumps and discovered 3 things which I hadn’t noticed before. Some of the long spines that project out beyond the perimeter of the cup have what appear to be a thin ridge running down along the spine and in several instances, it looked like the ridge would disappear for a space and then resume.
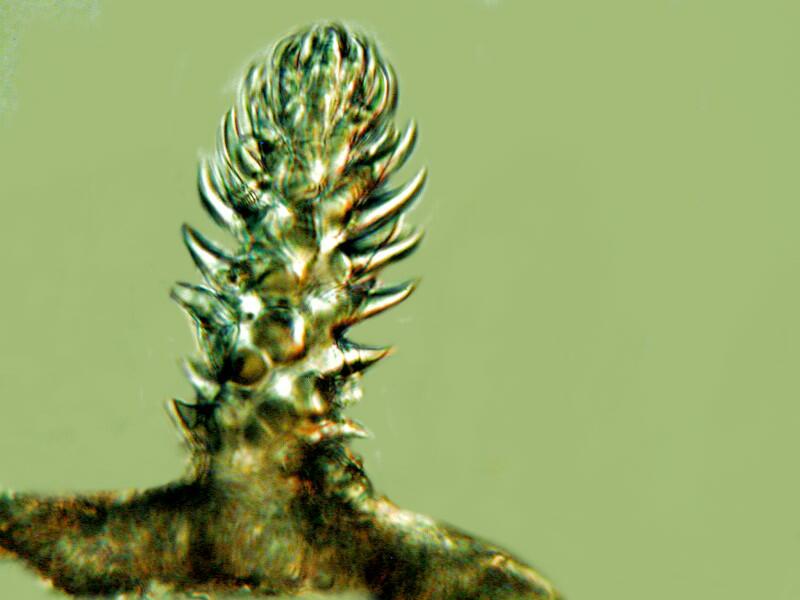
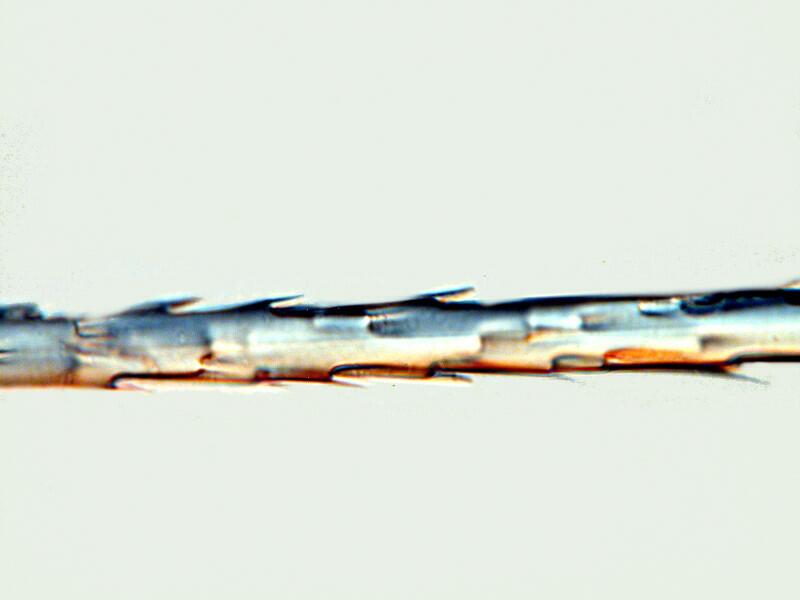
But, the real surprise came when looking at some relatively large spines and finding clusters of “Christmas tree” spicules along parts of their length.

I mentioned in Part 2 that I was puzzled as to where these “fuzzy” little spicules fit into the larger skeletal arrangement especially since they are quite abundant. Now I am doubly confused because I have also found in this vandalized mass/mess a floating “raft” of “Christmas tree” spicules apparently connected by organic material.
Remember this is a dried sponge and not one that has been cleaned and prepared, so as it was dried the organic material remained. I can, of course, place it in a caustic to dissolve out the organic material, but the end result is a group of disassociated spicules which are no help in understanding their position in the larger skeletal structure. So now, the trick is to try to take both a “fuzzy” spine section and a “raft” and treat them with a dilute solution of household bleach and try to carefully monitor the progress in order to stop complete disassociation. (You can also try a 3% solution of Hydrogen peroxide as an alternative.) This process will require trial and error to get to the stages where you are satisfied that you are getting to the parts you want to observe because the chemical treatment produces lots of small bubbles as the organic material is being dissolved away and these bubbles obscure your specimen. If you stop the process by transfer to distilled water and then discover that you have not yet achieved the state you desire, you can resume by placing the specimen back into a solution of bleach or peroxide.
The issue which interests me here is whether or not the “Christmas tree” spicules are attached to the spines by an organic matrix. (If so, where does that come from? How is it constructed? Or is it the case that their “base”–the 4-pronged “Christmas tree stand” is somehow anchored to the surface of the spine?)
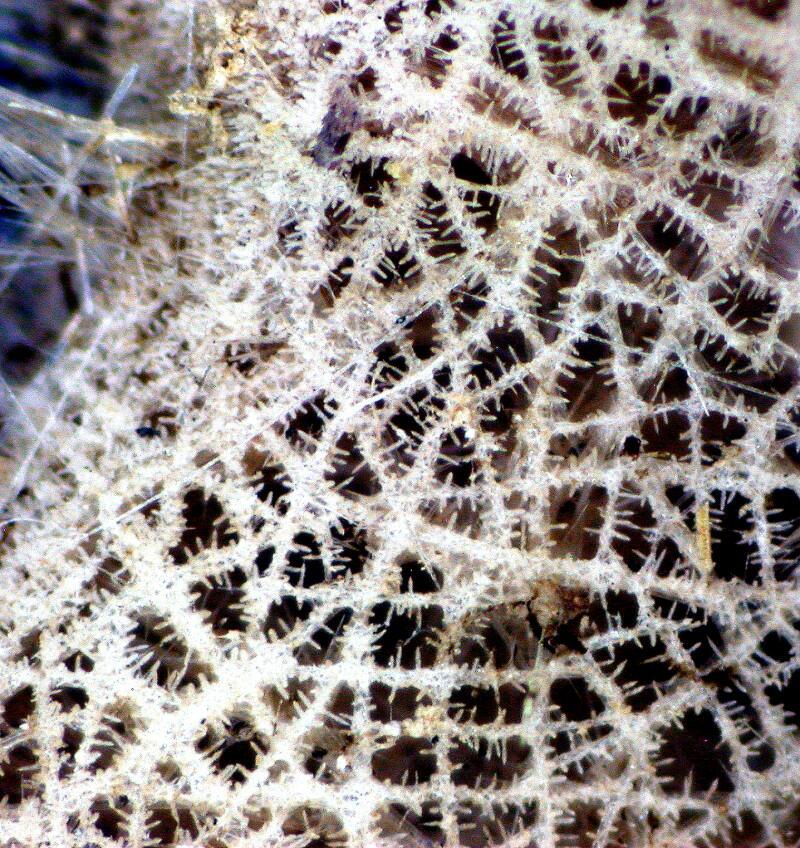
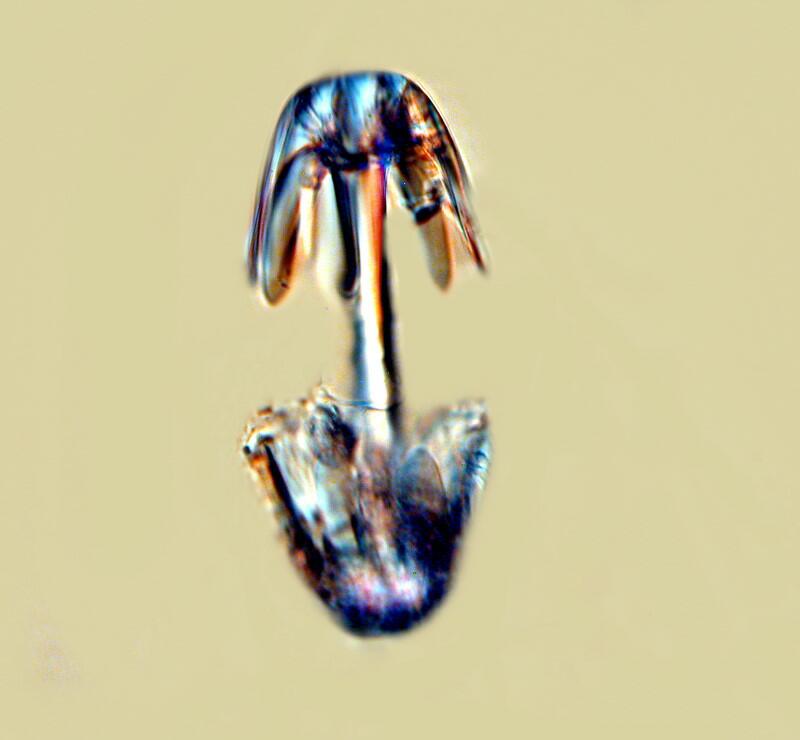
And the answer is–about to be revealed. This afternoon, I isolated a pentact which had a considerable number of “Christmas tree” spicules attached to it in several locations. I got some close-up images which give you a better idea of the “tree” apart from the “stand”. Seeing these up close may prompt you to think that a better name for them is “cactus” spicules.
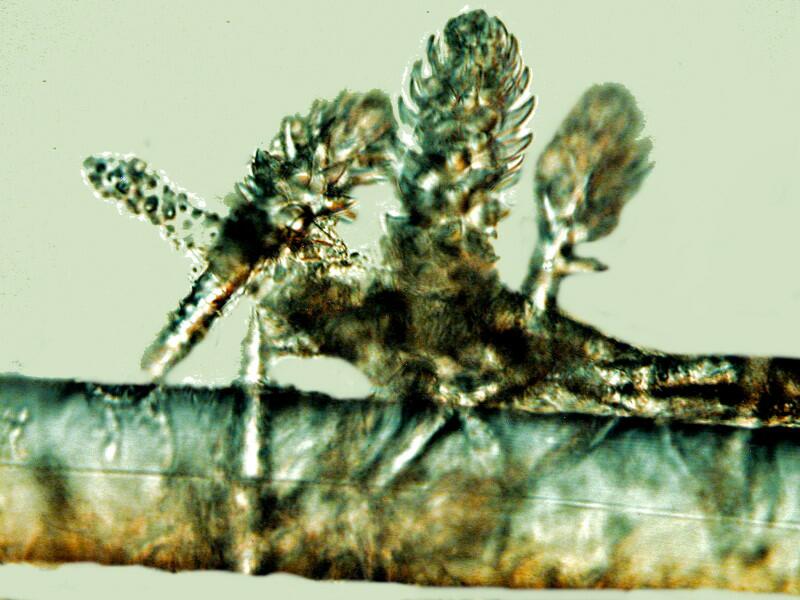
The bases or “stands”resting on the spicule were more difficult to photograph and it appeared that the axons curved to better fit onto the larger pentact. The “trees” were dense enough that the base axons criss-cross the section of the larger pentact.
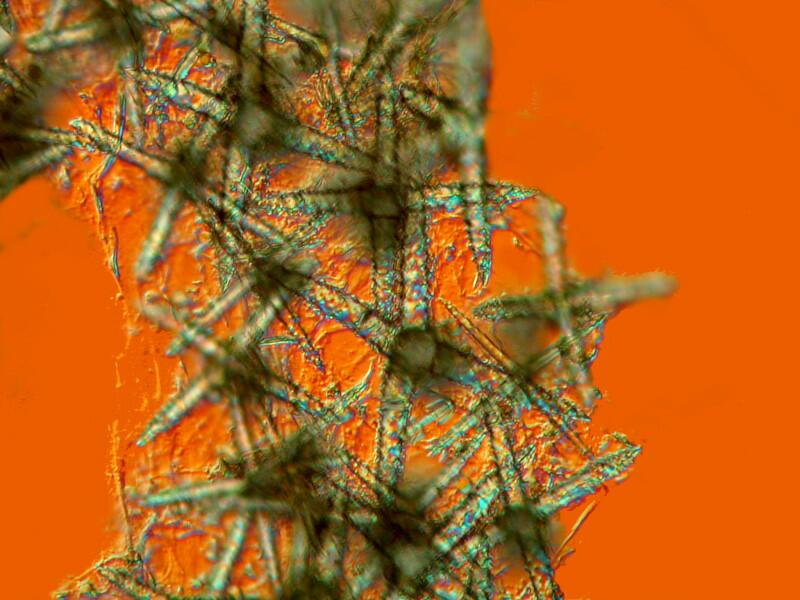
I took a second sample and added a drop of Clorox to the slide. Almost immediately, the “trees” began to separate from the larger pentact.

It also became clear that there was a thin membranous layer that was being dissolved by the bleach. So, it is now clear the “trees” are attached to the large spicules by means of this organic layer. This, however, simply raises more questions. As you can see the “trees” are fairly elaborate structures and from the specimens I’ve examined this far, there seems to be little variation in size. It is now also clear that these are not like barbs on a spine and are not outgrowths of the larger spicules. It seems to me very unlikely that there are special cells which manufacture the “trees” and then haul them over to the spicules, squirt out some organic adhesive, and then “plant” the “trees” on the larger pentact. “Curiouser and Curiouser,” as Alice would say or “Bloody weird” as one of my friends would say.
I disconnected some very, very thin needle-like spicule fragments which were so delicate that many of them would float on the surface of the water in the Petri dish. However, under relatively low magnification (60x), they appeared to have tiny spines at intervals along the surface. All of this hemming and hawing, qualification, and hesitancy is traceable back to the subtle trickery of Mother Nature. We deceive ourselves when we begin to think: “Hey, sponges are primitive creatures; how complex can their morphology be?” Now, admittedly, there is a lot of variation in their complexity from the relatively simple Asconoid type, which is like a small vase to the rather baffling subtlety and variety found in the glass sponges. At one point, I thought that perhaps these tiny spines might be the primitive beginnings of “tree” spicules, but that turns out not to be the case.
What I was able to determine after repeated examinations is that this spicule is a complex of very small, rectangular silica plates each with one or more sharp projections or “barbs”.
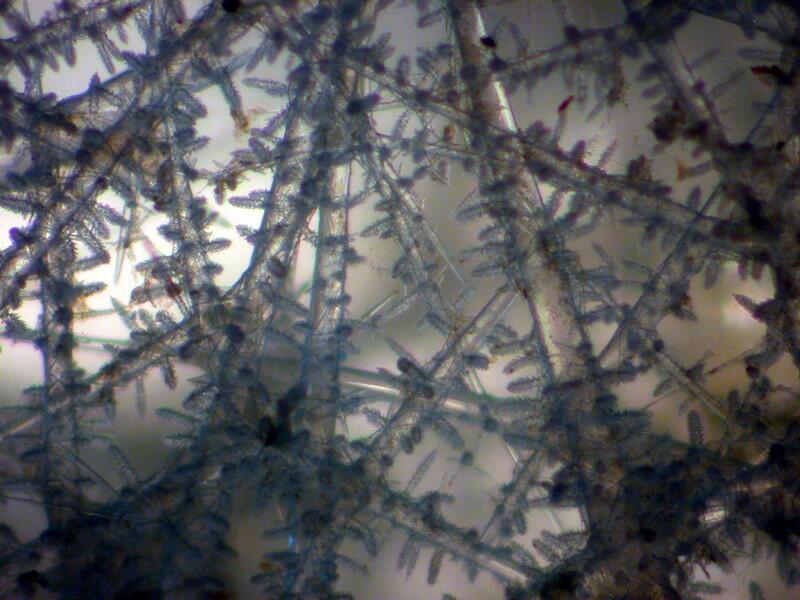
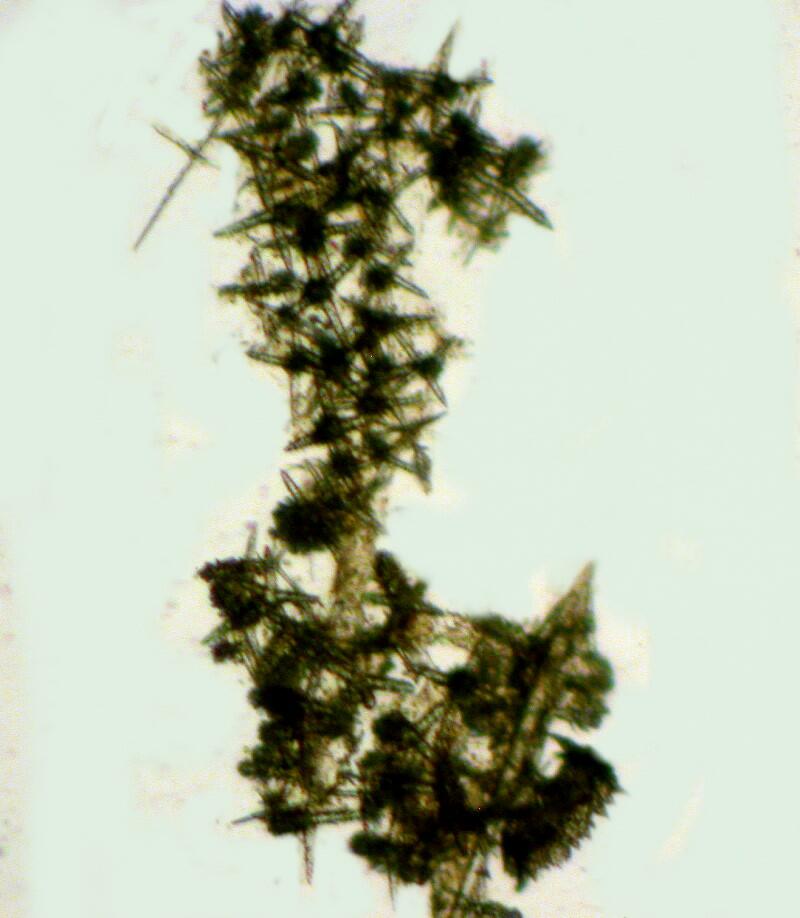
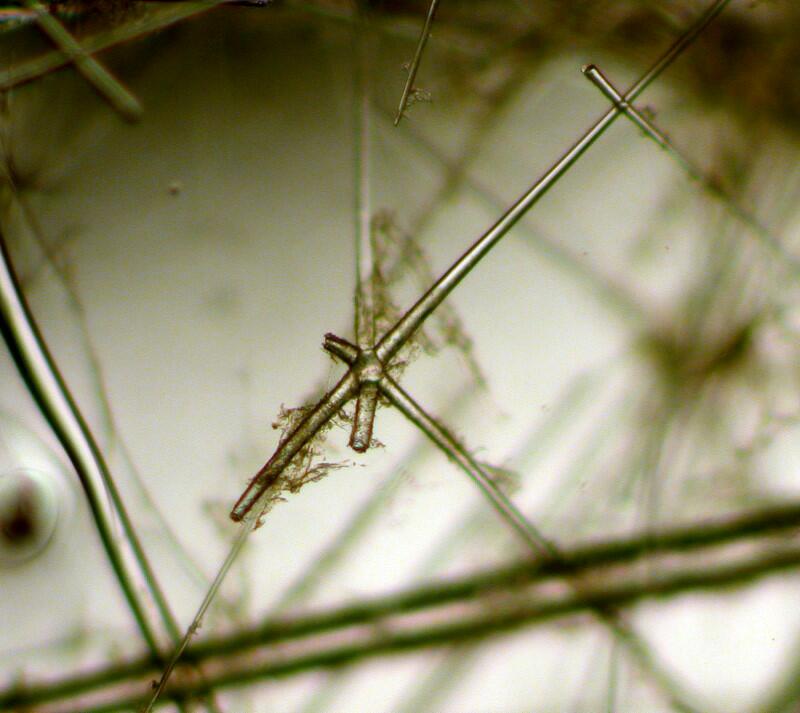
As I continue to examine chunks of the sponge which I cut away, I become more and more aware of how densely packed the spicules are and I am, as I dissect away portions of the matrix, discovering large hexacts in addition to the pentacts. In the spicule below, even though there is some breakage, you can still clearly see, by counting the projections, that initially there were 6 full length axons.
It is also interesting to note that in the “dumbbell” spicules, there are 6 “petals” at each end.

I am still unable to determine how these are positioned in the skeletal arrangement nor do I, at this point, have any inkling as to whether or not they actually connect with other spicules in any significant way.

From this image, however, one can observe 2 things: 1) the matrix surrounding them is very dense and 2) they vary considerably in size. Note that at the bottom left of the large “dumbbell” there is a very tiny one.
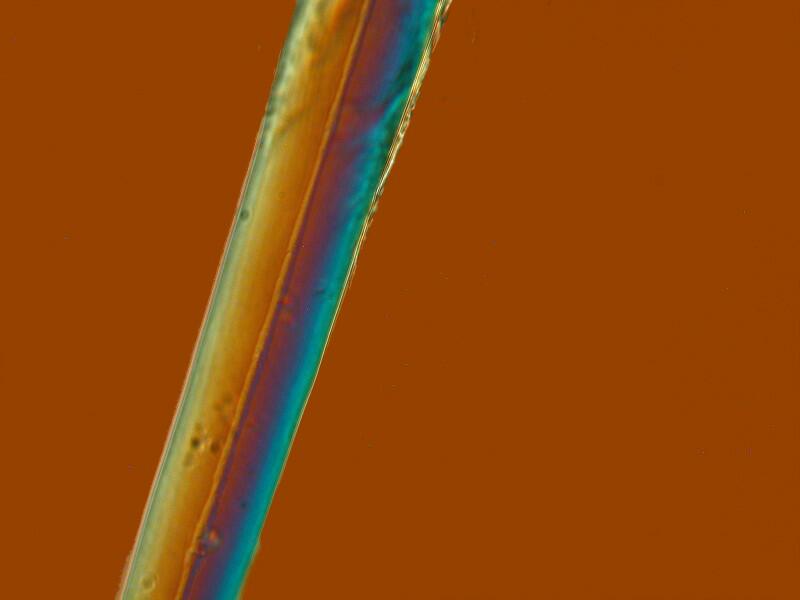
Siliceous spicules pose major problems both in terms of direct observation and imaging. If the Z-dimension (the thickness) isn’t too great, you may be able to simply place them in a drop of water and place a cover glass on them (a number 1.5 please, if you’re going to do critical microscopy). Then the question becomes: what kind of fluid do you place your spicules in. Remember, your lenses are glass, your slide is glass, your cover slip is glass, and your spicules are glass, so the light is going to go whizzing right through and with so little contrast, you may not be able to see much detail. In significant part, this comes down to the issue of Refractive Index (R.I.). I start out with distilled water and then if I find something that is of special interest but difficult to position for observation, I may transfer it to glycerine or a very viscous non-birefringent oil. This last is especially important if you are going to examine your specimens with DIC since that technique employs polarization, thus it is essential that the mounting medium not be birefringent. As you can see from my images, refraction poses a constant difficulty with these specimens and so investigating them requires patience and a willingness to experiment with different techniques.
My next attempt will likely involve treating a rehydrated sponge with appropriate chemical techniques to make the remaining organic material essentially transparent. Then, perhaps, I will be able to get a better idea of the “order”of these spicules.
There are several techniques which may prove helpful and I will try the major ones for a possible Part 3 if I do get any interesting results. In the meantime, I’ll continue to puzzle over these intriguing glass sculptures and I will leave you with 2 images which again show the extraordinary density of these sponges.
All comments to the author Richard Howey are welcomed.
Editor's note: Visit Richard Howey's new website at http://rhowey.googlepages.com/home where he plans to share aspects of his wide interests.
Microscopy UK Front
Page
Micscape
Magazine
Article
Library
Published in the January 2013 edition of Micscape Magazine.
Please report any Web problems or offer general comments to the Micscape Editor .
Micscape is the on-line monthly magazine of the Microscopy UK website at Microscopy-UK .
©
Onview.net Ltd, Microscopy-UK, and all contributors 1995
onwards. All rights reserved.
Main site is at
www.microscopy-uk.org.uk .