The central issue of these discussions has been how we can gather information about a micro-organism using a variety of light microscope techniques and then synthesize that data to achieve a deeper and enhanced understanding of the organism.
In this part, I want to begin with a discussion of the use of polarized light microscopy. You can buy pieces of Polaroid material quite inexpensively, but you need to be cautious as the quality varies significantly. A simple test can be used to help determine the quality of polarizers. Use a bright light with a distinct filament in the bulb and then hold up two pieces of the material and rotate one until you get "extinction", that is, minimum light transmission. If you see, around the area of the filament a magenta color, that is an indicator that this polarizing material is not of high quality.* [See Endnote] Obviously, if you are making fairly casual observation and using polarization only occasionally, you certainly won't want to spend several hundred dollars buying a manufacturer-compatible polarizer and analyzer. Nonetheless, if you are going to buy commercial material, it is well worthwhile getting reasonably good quality. Using old Polaroid sunglasses just won't do. It would be like reupholstering the leather interior of your Rolls with vinyl.
You will need to buy or cut two filters from bulk material. The first will be placed substage and is called the polarizer and the second is placed above the specimen plane and is referred to as the analyzer, even though they are made of identical material. Some microscopes have special slots in the body which allow for the insertion of an analyzer and, in large research microscopes, these are often rotary polarizers with a calibrated knob for making precise measurements that are of great importance in examining thin sections of minerals and crystals, among other items.
Ordinary light scatters in every direction, but when a beam of light is passed through a polarizer, something quite remarkable happensit is now aligned in one direction. The sheet of polarizing material consists of layers of crystals of iodo-sulphate quinone which are all aligned in the same direction. So if you have a polarizer oriented at zero degrees and rotate the analyzer to 90 degrees, the transmission of light is effectively blockedonly about 1-2% transmission with good material. In practical terms, this means that when the polarizer and analyzer are at 90 degrees relative to each other (or as the British, much more imaginatively describe the situationwhen you have crossed polars), then virtually no light passes through and you have a dark background. And this is where things start to get really interesting.
In the wonderfully mysterious realm of polarized light, there is a basic distinction between the ways in which specimens respond to polarization. The first kind of response isnothing, nada, zilchthe field remains dark and these types of specimens are called isotropic. The other types of specimens manifest significant effects on the light passing through them and this characteristic is called birefringence and such specimens are described as anisotropic. Light is one of the most delightfully bewildering phenomena in the entire cosmos.
It is impossible to determine in advance which sorts of specimens will be birefringent. Ordinary sugar crystals or table salt crystals form wonderful geometric shapes, but are isotropic and remain unresponsive under crossed polars. The crystals of magnesium sulfate (Epsom salts) are sometimes rather massive and clumpy, and, other times, quite feathery depending on the conditions under which they form, but, in either case, they certainly are birefringent and well worth examining. Two other fascinating crystals for polarization are: 1) Rochelle salts (potassium sodium tartrate and 2) Orange G.
1) Rochelle salts. These form marvelous squarish crystals, some of which, under crossed polars will reveal a classic Maltese cross. The frustrating thing about Rochelle salts is that they are hydrophilic (water-loving) and they extract moisture from the air in such an efficient manner, that they can remain uncrystallized on a slide for weeks or even months. You may help the crystallization process along by the use of gentle heat, but be forewarned; the use of heat will alter the sorts of crystallization that take place. An excellent exercise to demonstrate the relation between crystal form and temperature can be carried out using a solution of copper sulfate [Caution: Poisonous]. You can make a series of slides starting with room temperature and then increase the temperature for each successive slide. You will be able to observe significant differences in the patterns of crystallization. What would happen if you put a slide in the fridge and another in the freezer; I don't knowthe thought just occurred to me. An interesting experiment to pursue, but keep the slides in clearly marked, covered Petri dishes. We wouldn't want the Brussel sprouts contaminating our solution and ruining the experiment. 2) Orange G.
This is a common biological stain used primarily for contrast, but it has remarkable properties and is an excellent means of providing a microscopic light show to impress your friends, who will then shower you with money to support your researcheswell, it's a nice thought. Under crossed polars, Orange G shows lush growths rather like ferns and palms with especially prominent greens and oranges. Whenever I look at these crystals, I am reminded of the paintings of Henri Rousseau.
If you now rotate either the polarizer or the analyzer, you will observe that these remarkable crystals remain birefringent throughout the entire rotation and it is quite delightful to watch the color shifts. I generally dissolve the Orange G crystals in 70% alcohol, which speeds up the entire process of crystallization. You can then place a drop of solution on a slide, place it under the microscope with the polars crossed, and wait. At first, you see just a dark background, but, as the solution evaporates, you will see fronds of crystals advancing across your field of view. To watch the creation of these lovely crystals is a wonderful process which you can repeat again and again.
Isotropic specimens can also be shown up in color by means of the use of compensators to create a kind of optical staining. Special compensators are manufactured for petrographic microscopes, but these days one can buy 2x2 inch pieces of compensator materials, or you can cut your own filters from a thin sheet of mica or use layers of cellophane tape on a slide or even use a plastic Petri dish. Everybody thoroughly confused?
A compensator can be placed between the polarizer and the specimens, so, you can place your glass slide with the specimen on it in a plastic Petri dish and it will, in a fashion, act as a compensator. You will note that if you move the slide or the dish, you will get color shifts. The same will be true if you use a disk of mica below the stage and rotate it. Furthermore, each mica disk that you make will have variations in layering and thickness, so each will act slightly differently. Compensators can also be placed above the specimen and below the analyzer and, again, some large research instruments have slots for that purpose. As for the layers of cellophane tapewell, try it yourselfdon't' expect me to do all the work.
Ah, yes, Parameciawhat does all of this palaver have to do with Paramecia? As it turns out, something quite interesting. Take a clean slide, place a small drop of Paramecium culture on it, place a cover glass on the drop and then allow a bit of time for evaporation until the weight of the cover glass begins to slow them down, but not so as to completely stop their swimming. Cross the polars and watch. (By the way, most observations using contrast techniques should be carried out in your lab with minimal room light.) If the polars are at 90 degrees, you will see odd little flickers of light moving around and then, if you rotate the polarizer just slightly, so that you can see the outline of the Paramecia, you will observe that these little clusters of light are coming from within the Paramecia. What you are seeing are crystals of calcium oxalate which are apparently a metabolic waste product which Paramecia store. Calcium oxalate is birefrigent, as are many calcium salts, and so, the calcium carbonate spicules of echinoderms and soft corals and shells of foraminifera, are especially good subjects for polarization. Birefrigent crystals are also found in many plants, such as, rhubarb, dieffenbachia, and fuchsia.
What's most interesting about these calcium oxalate crystals in Paramecia is that other contrast techniques do not reveal them. Under polarization, the Paramecia look like miniature, swimming Christmas trees and were it not for this technique, we very likely wouldn't know about these tiny crystals.
A discouraging aspect of contrast methods for some amateurs is the expense, but there is a splendid and quite inexpensive technique waiting in the wingsRheinberg illumination. Julius Rheinberg developed this straightforward and elegant technique in the late 19th Century. All you need is a variety of colored sheets of plastic, a sheet or two of clear plastic, and some black construction paper. Oh yes, some fine scissors are also a help. Hopefully, you have a condenser with a swing-out filter holder or a slot for inserting a filter. If not, you can use cellophane tape to attach your filter to the bottom of the condenser, but this makes alignment a bit trickier. Nonetheless, it can be done.
The first thing you will need is the colored sheets of plastic. These can be purchased from a scientific supply house and in the U.S., Edmund Scientific supplies such sheets in a variety of sizes and colors and they are of good quality and produce good color saturation. If, however, you want to experiment a bit before investing in a book of filters, then you can purchase some inexpensive, colored plastic binders, such as those which students use to make their term papers look more appealing. Often these are quite thin and the colors are generally not very rich, so you may need to cut 2 or 3 pieces and stack them to get the color saturation you desire.
Rheinberg's earliest attempts were essentially variations on the darkfield technique in which he used a central colored stop mounted on a contrasting colored transparent disk. In its simplest form, the central disk determines the background color of the field and the outer ring provides the color for the specimens. At first, many microscopists were attracted to this technique largely on aesthetic grounds, but it was finally realized that this kind of optical staining could indeed provide supplementary information about the detail of various specimens. As other more elaborate (and more expensive) techniques, such as Nomarski DIC were developed, the Rheinberg technique was unfortunately largely eclipsed, except for a few steadfast amateurs. In the early part of the 20th Century, several companies manufactured sets of Rheinberg filters and black stops, but they soon disappeared and now, to my knowledge, no one makes themwhich leads me to a mini-tirade. This simple technique which provides both pleasing and informative results should be standardly available for virtually all optical microscopes.
Students and amateurs alike would find special excitement in the dazzling sorts of color contrasts which are achievable and, pedagogically, that could be a very valuable tool in stimulating the interest of many more students to pursue careers in the biological sciences or related fields. End of mini-tirade.
The accompanying diagram [See Figure 1] shows the most common sorts of Rheinberg filter configurations. As you change objectives, you will need to experiment with different sizes of center stops (either black or colored) and I do strongly urge you to experiment with this technique. And, if you find some interesting wrinkle and get some interesting results, write them up and share it with all the Micscapers.
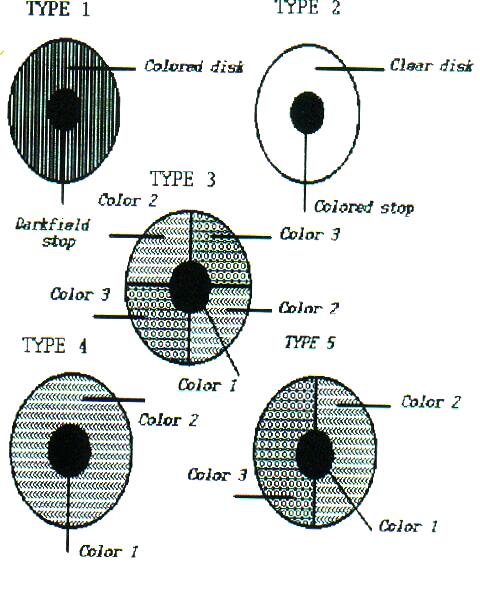
Figure 1. Rheinberg filter configurationsBefore I make an attempt to pull all of this together, I just want to mention the intriguing possibilities of some special staining techniques. I am not going to present the details of the techniques here for two reasons: 1) the protocols can be found in most good references on zoological micro-technique and 2) these techniques are complex and it is very difficult for amateurs to obtain the reagents needed to carry out these procedures. Again, my concern here is simply to show how a specialized technique can provide information that is generally not obtainable by other means. Consider, for example, the special silver staining methods for ciliates. Some versions of this method have been used for over a century. There are dry methods, wet methods, and the fairly recent method using Protargol, an organic silver compound. The dry methods are by far the simplest and basically involve allowing the ciliates to dry on a slide after impregnating them with silver using a dilute solution of silver nitrate [Caution: Caustic!], and then exposing the specimens to light in order to darken the silver crystals. Essentially this is a micro-photographic technique. The remarkable thing about these methods is that they reveal in ciliates what is called "the silverline system" and, to my knowledge, this is not visible by any other means.
Unfortunately, Paramecium is not an ideal candidate for silver staining. The techniques certainly work on them and one can indeed see the "silverline system", but there are other ciliates which provide much more satisfying results. Euplotes, Tetrahymena, and Blepharisma, when properly prepared, produce stunning results. [See Figure 2: Euplotes. The image clearly shows the basal granules and the "silver lines". At this magnification, the organism was too thick to be entirely in focus.] Clearly, not all ciliates are good candidates for the dry methods, since some will lyse and be distorted so badly that any semblance of the organism is lost.
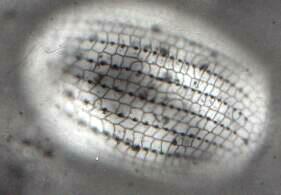
Figure 2. EuplotesThe wet techniques, though more complex, address a wider range of organisms and generally produce very good results. The Protargol methods are complicated, require special reagents, are time-consuming, but can produce beautiful results giving a striking demonstration of the silverline system.
A second rather complex histochemical technique is the Feulgen reaction using Schiff's reagent. This method will demonstrate DNA in the chromosomes and chromatin in the nuclei. [See Figure 3, a ciliate from the rumen of an ox. The image clearly shows the long macronucleus and a distinct micronucleus.] This is an especially interesting technique for protozoa which are either dividing or conjugating.
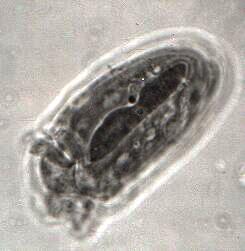
Figure 3. A ciliate from the rumen of an ox.Since it's unlikely that you can utilize either of these techniques, then why do I even mention them? The answer is that there are some biological supply houses that offer slides using these techniques and the quality of their preparations ranges from quite good to superb. Having such slides to examine can, once again, provide yet further information about an organism (such as, Paramecium) or types of organisms (such as, ciliates) which would otherwise probably not be available to you. Such slides are not inexpensiveabout $15-$20but if you sit down and read a protocol for Protargol staining, I think you will conclude that they are well worth it.
The last staining technique which I wish to mention is multiple staining. The most common type is the use of two stains, which differ significantly in color, to provide what is sometimes referred to as contrast staining or double staining. A classic example is the use of a purple or blue nuclear stain and bright contrasting red or orange cytoplasmic stain, such as, Orange G. In addition, there are a few techniques which employ three different stains, each designed to differentiate a distinct set of structures or provide contrast within an organism, cell, or tissue section. The best know of these is the Mallory triple stain techniqueagain beyond the reach of most amateurs, not for a lack of skill, but because of the difficulties and expense of obtaining the proper reagents. The biochemical and biophysical reactions which take place using staining techniques are enormously complex and not fully understood. Nevertheless, one can experience a great deal of fun, frustration, and delight from experimenting with various combinations of stains and reagents. If you get some good results, write them up and send them to MICSCAPE so that the rest of us, who are lazy, can benefit from your hard work. Again, you can often buy commercial slide preparations that utilize multiple staining techniques, and some of the most spectacular of these are botanical sections.
Conclusion
If we want to gain an understanding of an organism, such as, Paramecium, which is deeper than the two-dimensional textbook drawing, with the nucleus, cytostome, contractile vacuoles, and cilia all neatly labeled; then, by means of the careful use of optical contrast techniques and staining, we can obtain a wide range of information. To be sure, extensive observation of living organisms should always, if possible, be the foundation for trying to understand any organism.
Brightfield observations of Paramecia are only modestly informative. Each contrast or staining technique provides us with a new "glimpse", a new perspective of the organism and, gradually, we realize that we are dealing with a very large set of such possible perspectives. These perspectives must be integrated and interpreted in order to construct an ever-expanding composite conception of the organism. Also, it is important to note that this is an evolving picture or composite.
New technologies continue to provide new perspectives and new information which add to our understanding of an organism. In the last two decades there has been a veritable explosion of imaging techniquesatomic force microscopes, field ion microscopes, laser confocal microscopesand these coupled with earlier breakthroughs, such as, transmission and scanning electron microscopy, infrared microscopy, and even sonic microscopyhave produced many new dimensions of information. For those of us who are still aspiring to be millionaires and don't yet have access to these new technologies, there is a great consolation in knowing that the foundation of our knowledge about most micro-organisms still rests on optical microscopy.
Also there are an enormous number of organisms which the professionals have ignored or neglected in their search for "ideal" research organisms. This means that the amateur is still in a position to make significant contributions about organisms which have only been sporadically and casually observed. Furthermore, there are estimates ranging from hundreds of thousands to millions of micro-organisms which have not yet been observed and identified, so the odds are very good for the diligent amateur microscopist to encounter something undiscovered or previously ignored. Finally, there is the freedom to have fun. I have met professional biologists who are so professional that their sense of wonder and delight has disappeared. As amateurs, we don't have to earn our living by means of our researches and compete in the ghastly process of trying to obtain grants. Instead, we live in the happy situation of being able to discover the wonders, complexities, and mysteries of the other life forms with which we share this planet, for the sheer pleasure of it.
I am indebted to Mr. Nik Berrong of Rocky Mountain Microscope Corporationa superb technician, advisor, and friendfor this information regarding checking the quality of polarizing materials. Endnote
Comments to the author Richard Howey are welcomed.
The author's other articles on-line, can be found by typing 'Howey' in the search engine of the Article Library, link below.