Part I Part III
In the previous segment, we looked at some of the issues involved in trying to get an understanding of complex and fascinating organisms, such as, Paramecia. In this part, I want to examine some light microscope contrast techniques and consider what kinds of information these techniques can provide us. I don't intend to give technical, detailed accounts of these techniquesthere are many who have done that already and in a better and more comprehensive fashion than I could. Rather, I am interested in thinking about how the information that we acquire from these various techniques helps us construct a conceptual understanding or cognitive "image" of an organism.
Let's go back to darkfield for a minute [See Part I]. Darkfield is particularly spectacular, because every little speck will reflect light and your drop of water will take on an eerie night-time quality, like that which you see in deep sea cinematography, showing the thick "soup" of planktonic organisms flashing in the lights against a stark, black background. In viewing a Paramecium, you will have much more of a sense of the three-dimensionality of the organism as it swims and turns and reverses through the water. Furthermore, you will be able to see tiny glowing particles being swept into the gullet by the oral cilia. Such images serve to remind us that we are not just dealing with a flat two-dimensional world and, even more, that the added dimension enormously increases the complexity of our trying to understand the organism and its environment.
Diatoms, radiolaria, and many other types of objects should be viewed with darkfield illumination, since, sometimes, striking detail which one had not previously noticed comes leaping out at you and you are wonderfully surprised. I call this the "OH, WOW!" response, and I not infrequently find myself saying just that as I work at my microscopes. (Some think that Archimedes "Eureka!" is more elegant, but the Greek ""Eureka!" simply means "OH, WOW!"so there!) So, the message is twofold: 1) try darkfield illumination on a whole range of objects and 2) use it to give you another whole framework in which to think about what a Paramecium is like.
In the previous part, I also touched on oblique illumination, but, naturally, I would like to add a word or two hundred. Oblique illumination is side-lighting, a kind of shadowing, quite like the techniques of the artists who employed chiaroscuro and, one needs to remember, the results were only as good as the artist. As a microscopist, one has to learn the techniques, the rules, and then one has to be willing to experiment and alter the optical conditions in progressively subtle ways, until one finds oneself confronted with a view which allows one to say "Eureka! I've never see that before!"
Oblique illumination can also lend a degree of three-dimensionality to the image and by means of minute adjustments, interesting detail can become visible. I want to reiterate a point from Part I. If you have a turret phase condenser, then you can achieve a rather special sort of oblique illumination. By rotating the turret so that the system is out of phase, you will be able to produce a quite striking pseudo-Nomarski type of image. When I first began systematically studying, Lacrymaria olor about 15 years ago, I didn't have a good research microscope and a colleague of mine, a very fine cell biologist, finally agreed to let me use a Zeiss Universal with phase in his laboratory. It had a video camera attached and I wanted to tape some images for a lecture I was going to present. I had an old Nikon L-KE, but the images it produced were not very good, but I had discovered the trick about throwing the turret out of phase on my Nikon. One day when I was using the Zeiss and had shifted its image out of phase and projected it onto the video screen, my colleague, walked in and asked: "How did you get that image?" I showed him and we spent half an hour experimenting with the technique and fine-tuning the image when he said rather abruptly: "Well, let's go back to a real phase image." I worked another hour and then left, but returned because I had forgotten a book which was in the Zeiss room. As I walked in, I found my colleague sitting there experimenting with moving the turret out of phase. So, try it!
I have been talking about throwing things out of phase, what about phase contrast itself? I first heard of this technique when I was a high school lad working in the bacteriology preparation laboratories at the university. The chief preparator came into the lab one day and told me the department had just acquired "the ultimate light microscope." Did I want to see it? What kind of a question was that? I followed him down to one of the small research rooms. The moment I saw it, I decided I had to have one. It took me 25 years, but it was well worth the wait.
Phase contrast is wonderfully suited to the observation of low contrast specimens, such as, protozoa. There are annular rings in the condenser and phase rings in the objectives and these must be carefully aligned to achieve optimal contrast. The ring in the objective is fixed, but the rings in the condenser can be centered by means of adjustment screws. When light passes through the system, part of it goes directly through the specimen as in brightfield and part of it is retarded by a quarter of a wavelength. So, in very rough terms, what this means is that part of the light produces one image and part of the light produces another image which is deflected just enough to show quite fine detail which is not visible in brightfield. Now you can see details in living organisms which were visible before only by means of staining techniques, which usually involved killing the organisms. Phase images are an enormous advantage, because you are now in a position to view structures and behavioral processes in living, functioning organisms. It also means that you don't have to be concerned about artifacts resulting from staining techniques. The development of phase contrast was a major breakthrough in the history of light microscopy. The one significant drawback of phase is that it produces halos which are especially noticeable around the edges of large structures. If you are looking at a Paramecium, the minute, intracellular structure is readily visible, but if you look at the outline of the pellicle, you will see a halo. Nonetheless, even with this limitation, phase contrast is an invaluable technique.
What does this mean in terms of our observations of Paramecia?
1) We can see ciliary action much more clearly.
2) We can observe food particles being swept into the gullet.
3) We can see the macronucleus in a much clearer way.
4) With care, persistence, and luck, we can see the micronuclei.
5) The floral design of the contractile vacuole canals is much more evident and, again, with persistence one can locate the pore in the pellicle through which the contractile vacuole discharges excess water.
6) The food vacuoles are much more evident and if you watch carefully over a period of some time, you will be able to track the course of the movement of these vacuoles within the organism.
7) You will also be able to see a bundle of caudal cilia which is composed of cilia longer than the typical ones.
8) Visible just inside the edge of the Paramecium are the banks of trichocysts which line the entire interior of the pellicle. Remember that these are three-dimensional organisms and that there are thousands of trichocysts pointing upward at you, even though you can't see them from your vantage point of the moment.
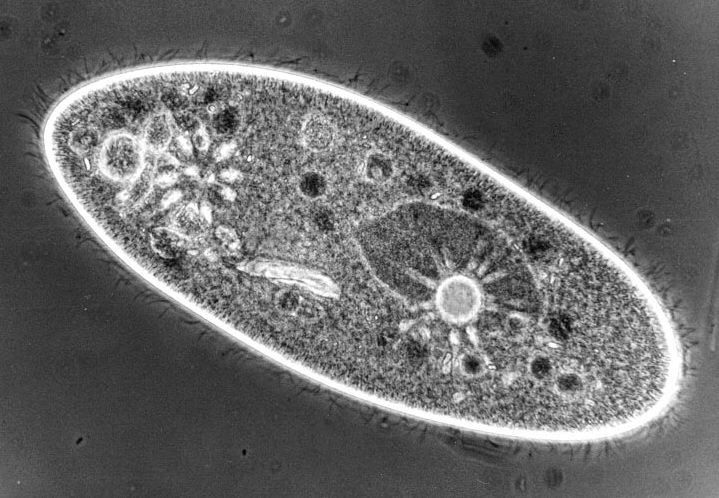
Paramecium image taken under phase contrast, which shows some of the features described above. Image by James Evarts. See James' Micscape article for details.If you are considering upgrading your system or purchasing another microscope, you should very seriously consider acquiring a phase instrument. In my view, it is foolhardy for an amateur to purchase a new microscope. For the amount of money that a new instrument costs, one can find a used instrument which is better and has more features for the same price. Many new microscopes are bright and shiny, look impressive, but you may, unfortunately, discover that you have invested a lot of money in paint and chrome. Some of these microscopes may seem to come with a lot of extras for the money and that, in itself, should make you wary.
There are, of course, precautions that you need to take in buying a used instrument as well.
1) Never be in a hurry. You may need to wait months to find just the instrument you want. In one instance, I waited three years for a particular kind of microscope to become available. On other occasions, I have made a call and found just what I wanted within days.
2) Learn all you can about any particular microscope you are thinking of buying. Even the very best manufacturers have limitations, design flaws, and production problems, so it's up to you to try to find out as much as you can. For example, some of the older Zeiss objectives have a tendency to delaminate, so before you ever buy such an objective, or any high quality lens for that matter, have a good microscope technician check it out for you. If you are considering purchasing a stereo microscope, again have a reliable independent expert check it out for you to make sure that the optical system is properly collimated. Trying to adjust prisms is NOT something that even an experienced amateur should attempt.
3) Learn the difference between standard, DIN, and infinity corrected objectives. If you buy a lens of the wrong type, it will not work on your system.
4) Be sure, also to check that you buy objectives for the proper tube length. For the Zetopan, a large research microscope and one of my favorites, Reichert manufactured objectives for three different tube lengths and each type requires a different sort of illuminator. Fortunately, they all operate from the same basic stand, but each type of lens must be matched with the appropriate illuminator
5) Always try to find objective and eyepieces which were manufactured for that instrument. Some dealers will substitute lenses from another manufacturer. In particular, watch out for "generic" lenses which ostensibly work on almost any instrument as these are usually of dubious quality.
6) Check the mechanical stage to make sure that it moves smoothly and evenly through its entire range.
7) Be especially careful in checking out the fine focus. Having the coarse focus adjusted or repaired is generally not an overly difficult undertaking, but the fine focus can be complex and expensive to repair.
8) Find out as much as you can about the availability of additional accessories for the particular instrument you are considering. For example, suppose you want to add a polarizer and analyzer. Are they available? Are they reasonable in price? Also take into account availability and price on items which you might want to add later, which you either can't afford now or aren't ready for yet.
To my mind, unless you are only going to work with one type of specimen and already have adequate equipment for that purpose, the best purchase you can make is a large, used, major brand research microscope which allows for the addition of a variety of accessories, especially since some of these accessories are specifically designed to provide additional types of contrast. You can get acceptable darkfield by making your own stops, but if you want really high contrast darkfield images, you will eventually want to invest in a special darkfield condenser. "Invest" here is a key word. How much you will want to invest in microscopes depends finally on the depth of your passion, your finances, and your ability to rationalize postponing such things as having new kitchen floor or having the trim on your house painted.
Brightfield, oblique, darkfield, and phase provide an excellent basic arsenal of techniques for making some very sophisticated observations and these methods along with Rheinberg (which I will discuss a bit later) can provide an amateur with years of pleasure and enlightenment. If, however, you become deeply infected with the passion of microscopy and decide that your 1974 Ford truck will last at least another 10 years, then if you're lucky and find just the right deal at the right time, you might invest in a Nomarski Differential Interference Contrast system (Nomarski or DIC, for short). In terms of optical microscopes, this is the Rolls-Royce of contrast systems. Like phase contrast, the light is divided so that there are essentially two images which are recombined to enhance contrast. This time, however, instead of rings in the condenser and objectives, special prisms, called Wollaston prisms, are used in the condenser along with an adjustable prism on a slider that fits into a slot in the head of the microscope. In addition, polarized light is employed for this technique. So, what does all of this mean in terms of what you see? First of all, unlike phase, there are no halos around the peripheries of specimens and, in some instances, this can be a critical advantage. Secondly, the depth of field is very thin, and what at first might seem a disadvantage, allows for what is described as "optical sectioning." In other words, you can focus on the upper surface of a Paramecium, and then proceed, layer by layer, to move through the body of the Paramecium. The views which you can get with this technique are "optical slices" of living organisms. The third great advantage of Nomarski contrast is a three-dimensional effect which, once again, gives a more "realistic" view of the organism. The fourth advantage is that with the use of the prisms and polarized light, one can achieve striking color contrast. This is sometimes referred to as "optical staining". Some purists argue that this optical staining technique produces "pretty" images, but they have no scientific importance since the highest contrast is produced in the area of the spectrum where there is little color differentiation. In many instances, this is true, but there are occasions when the color will enhance the contrast and the eye notices detail which might very well otherwise be overlooked. Furthermore, science and art need not be incompatible and I am convinced that there are times when aesthetic considerations can increase attentiveness in such a way that one sees "more". In any case, Nomarski DIC is an incredible breakthrough in optical contrast, but by no means a panacea. It is suitable only for certain types of specimens and the "thinness" of the depth of field makes it almost useless for some types of specimens.
How would this affect what we see when we observe a Paramecium? With DIC, it is more important than with other contrast techniques that you make an extensive series of observations by focussing up and down through the organism, since each view that you get is only a thin optical section. By means of such a series of views, you can obtain extensive, detailed information.
So, for Paramecium:
1) The cilia are optically shadowed in such a way that they have a three-dimensional appearance.
2) The macronucleus is distinct.
3) The trichocysts lining the edge of the pellicle are clearly visible.
4) One can observe the caudal tuft of cilia.
5) The contractile vacuoles are clearly visible and one can observe the contraction and refilling of the vacuoles.
6) The cytostome (mouth) with its dense cilia is clearly visible.
7) By focussing carefully on the pellicle, one can see the kineties which define the linear patters of the cilia.
For many micro-organisms, DIC, properly used, can provide a wealth of information.
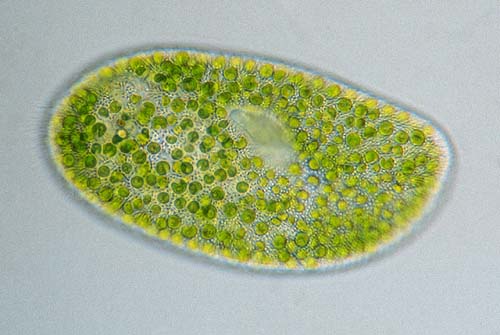
Paramecium bursaria in brightfield lighting.
Image by Wim van Egmond.Once again, I have taken on a task too large to cover in a single essay or even two, and so I am going to discuss one more technique here and then try to pull things together in a third (and, hopefully, final part).
What I am going to say now is for the advanced amateur who is willing to sell some of his or her Microsoft stock, so if you want to skip this, I quite understand. I am referring to fluorescence microscopy and we will take a brief, nay, a whirlwind tour of some major facets of these techniques. First, a major word of caution: mercury vapor lamps and halogen lamps must be treated with great care. These generate very intense illumination. In installing these types of bulbs, never touch the glass with your fingers as the residue of oils from your skin can cause the bulbs to explode when they get hot. Also you MUST monitor the hours of usage on mercury vapor lamps and not exceed the manufacturer's recommendation, otherwise, again the lamp could explode causing damage to you and your equipment. You must also use the proper filters and understand how the system works, otherwise you could suffer severe eye damage. This is definitely equipment that calls for some special training from someone other than a sales representative.
Is it worth all the bother? The answer to that question very much depends upon the kind of work you want to do and whether or not it's intensive and extensive enough to justify the time and expense. There are two basic types of fluorescence: 1) "natural" or auto-fluorescence and 2) secondary fluorescence which involves the use of special stains called fluorochromes. One of the most striking examples of auto-fluorescence is chlorophyll. With blue-violet fluorescence, chlorophyll shows up as a deep cherry red and is quite distinctive. Most instances of auto-fluorescence are rather weak, and, for that reason, and to show up structures which do not fluoresce at all by themselves, fluorochromes are standardly used. These dyes are substances, which at a certain range of wavelengths of light, "excite" in a such a way that they show up certain structures in a vivid fashion. Different fluorochromes respond to different wavelengths and by the use of special filters, one can fine-tune one's observations in remarkable ways.
Here again, a word of caution is in order. All powdered stains must be handled with care, but this is especially true with fluorochromes, since some of them are carcinogens (cancer-causing) and others are mutagens as well, that is, they can produce genetic mutations. Thus, these materials must be handled with great care when making up solutions. The good thing is that the solutions one uses are extremely dilute and, in that state, relatively harmless. Acridine Orange, which is the fluorochrome I use most, is applied in concentrations of 0.01% or less. This is a wonderfully versatile stain and can produce splendid results with Paramecia. Notice I qualify this a bit: I say "can" produce. Here we are working at a level of enormous complexity. The Paramecia are in pond water or a culture solution which has a variability in salts, pH, temperature, and atmospheric contaminants from chemicals in the laboratory. I have wondered whether altitude might be a factor in explaining some peculiar variations in results. I live at 7,200 feet above sea level which certainly has effects on humans, so why not other organisms? Some years ago, a young man came from the coastal region of California to interview for a position. No one had warned him that the altitude and the lesser amount of oxygen would increase the effects of alcohol. After one martini before dinner, he was only half coherent. I don't think he was accustomed to drinking much anyway and, because he was a bright fellow, he did end up getting the position. We might be tempted to say that such an example has no relevance, since humans are large, highly complex organisms and Paramecium lives in an environment such that altitude would have no effect, because the change in its environment would be so small.
Here we need to remind ourselves that Paramecia can react dramatically to extremely tiny amounts of chemical introduced into their environment. We do know that the combination of altitude and temperature effects the solubility of gases in water, so we should be careful not to assume that these factors don't play a role in the reaction of organisms to chemicals introduced into their habitats.
For example, we would not ordinarily think that light could trigger a reaction which could prove fatal. If we reflect, we know that ultraviolet radiation can produce lethal skin cancers, such as, melanoma. We also know that there are various chemicals that heighten the sensitivity of human and micro-organisms to light. In the realm of the micro-world, Acridine Orange, the fluorochrome which I mentioned above, is just such a photo-active substance. If you treat Paramecia with a 0.01% solution (which by micro-standards is very concentrated) and then observe the organisms under blue-violet fluorescence, the pigment is activated by the light in a fashion which is toxic and the Paramecia will survive for a few minutes at most. There are, of course, naturally- occurring photo-active pigments, the most familiar of which is chlorophyll. Another photo-active pigment which is especially interesting in this context is blepharismin which gives the protozoan Blepharisma its distinctive deep pink color. Its relevance here is that when activated, it can also become toxic. Specimens of Blepharisma on a slide, exposed to the intense light of an ordinary microscope illumination system, will begin to expire after a time as a consequence of a toxic reaction from their own pigmentation.
Acridine Orange when properly applied to Paramecia can produce a color display with these organisms swimming through the water exhibiting brilliant greens, reds, oranges, yellow and even the occasional blue. They create a "small local festival" to use a phrase which Sartre employed to describe Alexander Calder's mobiles. This stain is particularly valuable for clearly displaying macronuclei which was crucial when I was investigating autogamy in Lacrymaria olor.
When using incident fluorescence, one can combine it with various filters and transmitted light techniques to achieve some very helpful and subtle kinds of contrast. This afternoon, I was looking at a large ciliate called Frontonia which I had stained with Acridine Orange. By using transmitted light with a neutral density filter, I was able to get a very clear view of the specialized oral ciliature which with fluorescence only, is not visible and, with brightfield, is less distinctly visible.
I hope that it is becoming evident that each particular type of technique has its special advantages and disadvantages and the information which we can derive from any particular approach should, ideally always be integrated with information obtained from the use of a variety of other techniques.
In the next and last installment, I shall take a look at polarization, Rheinberg illumination, and a few special staining techniques. Then we shall return to the larger considerations of the processes of synthesis and interpretation of the data derived from this range of techniques.
Comments to the author Richard Howey are welcomed.
The author's other articles on-line, can be found by typing 'Howey' in the search engine of the Article Library, link below.
Acknowledgements: Thank you to James Evarts and Wim van Egmond for permission to use their images in this article.