|
Quick
'n easy flash photomicrography on a microscope with built-in lamp.
by David Walker, UK |
For many years I've been using tungsten lighting for photomicrography despite having what turned out to be the perfect flashgun for microscopy sitting in a drawer. It was only when trying out a Nikon D50 digital SLR which does not have mirror lock on a microscope, that I ventured into flash to circumvent potential problems with mirror / shutter vibrations. I'm now a total convert and rarely use tungsten for photomicrography anymore.
This is just a note to urge folk who haven't tried flash with a scope to have a go, especially if any of the following have posed problems with an existing photomicro' set-up: vibration or uncertainty as to whether it's occurring, white balance, even illumination at low mags, changing light intensity without changing white balance.
Flash, if not tried, can be perceived as difficult and expensive when it can be easier than tungsten and quite cheap; the older flashguns that predate the modern 'menu' driven models can with care be most suitable and are cheap secondhand. If my own experiences are typical, it can be beneficial to start trials with a consumer film or digital camera on a microscope using flash or run in parallel to tungsten, rather than going to flash later to solve potential problems. More on that later.
Using flash on a microscope with a mirror: A very easy set-up for an externally lit microscope with no DIY skills required was shown in a recent article. The mirror can be set so that it flips between two fixed angles, one points at the flashgun the other at the tungsten lamp. The changeover between light sources takes less than a second and much live work can also be photographed. There's also some very clever external tungsten / flash lighting combo's developed over the years by enthusiasts.
Using flash on a microscope with built in lighting: Many enthusiasts use flash on this type of microscope with a variety of designs being well established. Designs include a half-silvered glass plate or just a glass plate mounted at 45 degrees below condenser to receive either flash or built in lighting as required, or various ingenious ways of incorporating the flash and tungsten in the lighting train.
The
above designs would suit a permanent set-up but the design of many microscopes
with built-in light includes an even easier and obvious option; just sit the
flash on the microscope base in the light train. Many of the larger stands and
medium sized stands have plenty of room between the focussed condenser and base
lamp to take the flatter flashgun models. This method does of course block the built-in lighting, but a lot of
photomicro' can be of static subjects and it's only a few seconds work to put
the flashgun in place after the subject has been composed and focussed using
the microscope's illumination. Very often live subjects will be partly immobilised
for photography so doesn't rule out much live work apart from 'capture the moment'
type live studies (if the user reactions and camera are fast enough).
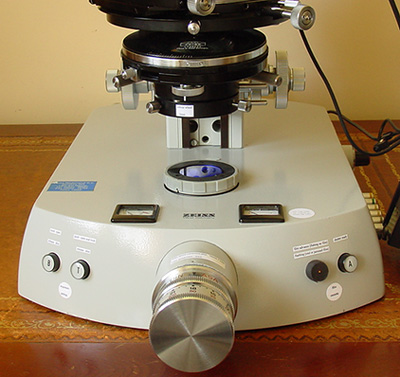
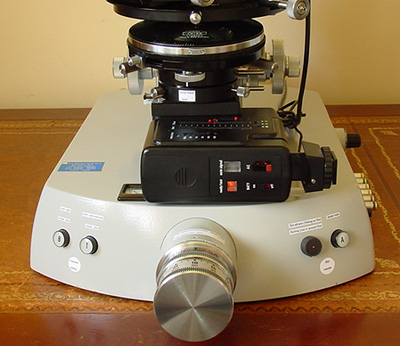
The
Zeiss Photomicroscope III with its ancillary condenser lens and filter tray
has less space than some stands between condenser and lamp base, but still
has sufficient gap for a flat flashgun like the SunPak 2400 to sit neatly
on the lamp base. The power level control of the flashgun, the only parameter
needed for exposure control is readily accessible. The flashgun can
be put in place and removed in seconds thus allowing direct tungsten
v flash exposures to be compared if desired. (Regular
readers of my rambles, flattering myself that I have some, may be wondering
where this Zeiss beastie appeared from having been a Biolam student microscope devotee ... well it's summat along the lines of -
it was time for an upgrade after 30 years with the Biolam, an unexpected tax
rebate and being made an offer I couldn't refuse ... but the Biolam is still
very much in use.)
|
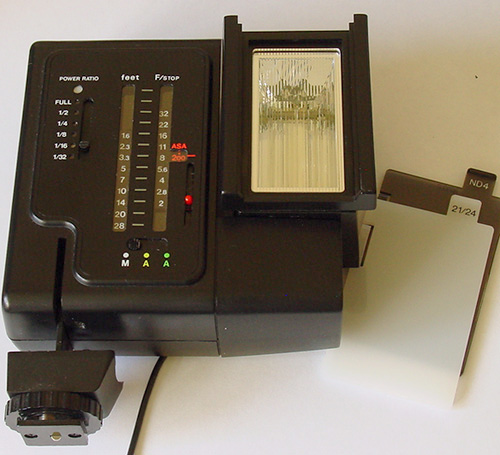
The SunPak 2400 right is one of the many older flashguns that
can be suitable for flash photomicrography. Features to look for
include: - A good range of power settings, this has six - from Full to 1/32 (set with slider far left in photo). - A slim profile and angled head so gun can lie flat with head pointing up (or a model with this as part of body if a slim profile). The SunPak 2400 is 5 cm high as shown with filter attachment. - Ideally a filter attachment and filters should be still available. The neutral density ND2 and ND4 filters and the 21/24 mm and 28 mm lens diffusers supplied extend the gun's versatility. Depending on flash head design and microscope condenser a diffuser may be needed to remove residual flash screen structure. - A modern flashgun may well work if slim enough and the menus remain accessible; the flash could be left on the flash power level menu. Safety note: The trigger voltages of flashguns not dedicated to the camera or recommended by the camera maker may be too high to directly sync with the camera and could fry a consumer digicams / DSLR's electronics. Gizmos are available to safely sync such flashguns with modern cameras, the 'Wein Safesync' is one. This can be seen as the small box on the hotshoe of the D50 below.
|
|
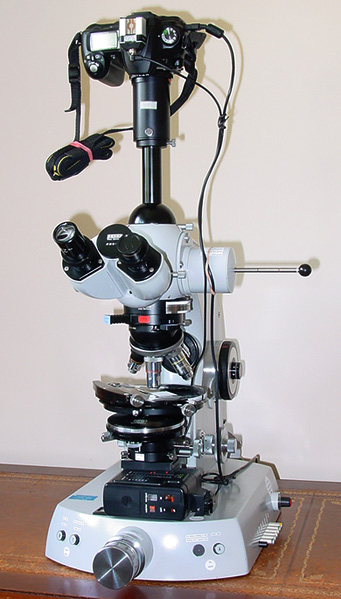
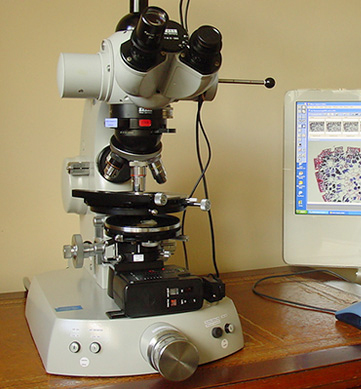
Above: A Nikon D50 DSLR sits on the spare port of the Photomic. The rod upper right on this model allows rapid change of the light path between top port and the built-in 35 mm film cassette. (I haven't tried it yet, but this set-up could also be used for flash work with built-in film by using the 'B' setting of the Photomic in a darkened room). The camera and image transfer is controlled remotely with Nikon Capture software.
Note on Nikon Capture software: At the time of my camera purchase, Nikon didn't include a full version of the Capture software, only a limited time demo. The software can still retail for Ł120 in the UK, more than a third of the D50 camera cost. For some time I resisted buying it, but offers with significant discounts do come up. Having finally succumbed and using it for some time, the software I would say is indispensable for photomicro' work if the PC can be suitably near the scope. 'Nikon Capture' software allows remote camera shutter release and shutter setting from the computer and direct transfer of the images within seconds to the PC, bypassing the memory card and allowing very quick assessment of the results. A laptop is a convenient computer to use, although in the author's room the desktop PC table is next to the scope table. I gather from some camera forum discussions that the software doesn't currently permit remote control of the mirror lock on the more expensive D200, although if using flash for photomicro', mirror lock wouldn't be vital.
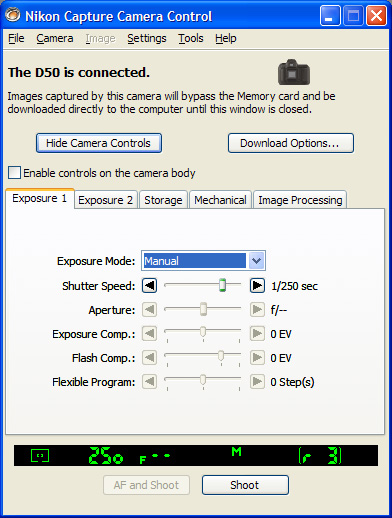
Left:
Nikon Capture control screen: The Nikon D50 doesn't meter without a lens on,
so the only controls enabled are the 'Shoot' button and shutter speed;
with flash the shutter can be left permanently on a flash sync speed with only
the flash power level required to control exposure. This is a benefit with DSLR's
like the D50 with lack of metering as you can quickly get to know what power
level suits the microscope set-up in use.
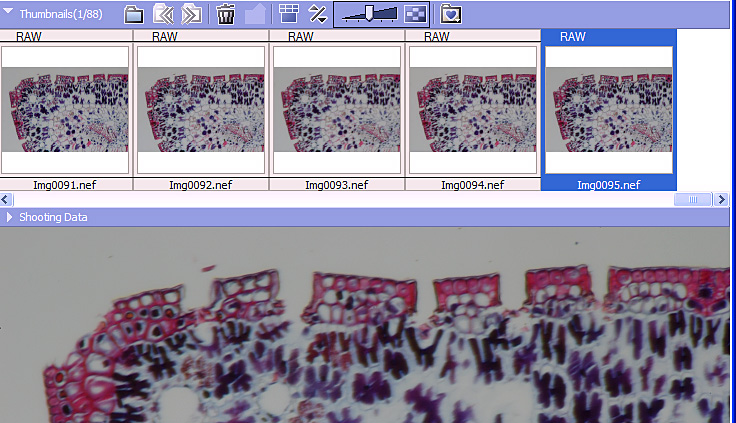
Right: Nikon Capture Editor: Images
are transferred automatically to thumbnails along top and each image can
be viewed on screen at mag desired. Clicking the thumbnails to give image in
main screen gives a quick comparison of sequential images allowing parameters
like critical microscope focus to be assessed.
Coming back to an earlier comment on using flash first or in parallel with tungsten for camera trials:
- If trialing an unfamiliar camera, especially film SLR or DSLR on a microscope using solely tungsten lighting (as the author was doing with the D50 and Photomic), too many parameters are being optimised at once with no absolute frame of reference. If the results aren't sharp, it can be hard to decide what is causing it: camera mirror / shutter vibration, camera-scope mechanical coupling, external vibration, shutter speed not in a 'sweet spot', focus errors either by eye with viewfinder or with parallax focussing set-up or combination of these factors.
- By running a flash set-up in parallel to tungsten studies immediately gives an absolute frame of reference in critical respects: shutter speed as long as at a flash sync is immaterial, the very short flash duration should rule out any contribution from shutter / mirror / mechanical vibration of set-up. So if the results aren't sharp it narrows down the cause to focus by eye or parallax problems. These can be addressed by comparing flash with tungsten as set-up variations are tried.
Even if the results look sharp with tungsten, is this as good as the camera-scope can deliver? By taking some flash shots, the contribution if any of residual vibrations can be assessed. There are ways of course of removing problems like vibration with tungsten lighting as many enthusiasts have shown and used, such as external shutters and various vibration decoupling techniques. But for initial trials, flash can be so easy to set-up and use that more complex methods can be left until later if desired (and flash can assess if they work).
-
There are other benefits of flash as well:
Consistent light colour balance
at all power levels. Adjusting the shutter speed to control exposure may take
the camera away from a 'sweet spot' if this is a factor in the set-up.
Controlling exposure by lamp intensity can shift colour balance significantly.
Controlling exposure with fixed lighting intensity requires a range of neutral
density filters.
- The large lit surface of a flash head coupled with a diffuser may give a more evenly lit field especially at mags where a built-in lamp can often struggle.
- Flash also enables DSLR's without camera mirror lock or off-lens metering to be very useable for photomicrography as others have also shown. Like many owners, DSLR selection may well be budget controlled and camera choice primarily governed by general photography requirements with photomicro' as a bonus. Part of the fun of microscopy can often be working around 'perceived' problems rather than necessarily using the more ideal set-up.
Comments to the
author
David
Walker
are welcomed.
Published in the July 2006 edition of Micscape.
Please report any Web problems or offer general comments to the Micscape Editor .
Micscape is the on-line monthly magazine of the Microscopy UK web site at Microscopy-UK
© Onview.net Ltd, Microscopy-UK, and all contributors 1995
onwards. All rights reserved.
Main site is
at www.microscopy-uk.org.uk
with full mirror
at www.microscopy-uk.net
.