Forays Into Fluorescence - 6
Trials of studying autofluorescence with a stereo microscope using blue or near UV LED excitation
by David Walker, UK
In earlier 'fluorescence forays', an area that particularly appealed was autofluorescence using deep blue excitation. A variety of subjects are known to respond well, e.g. live plant cell structures, dry mounted subjects such as leaves with spores, fungi, marine subjects and snail radula. The emissions were relatively bright for fluorescence on the set-up used and a typical consumer DSLR could readily cope with the imagery.
Many of these subjects were quite large for a compound microscope and wondered if a stereo microscope could be used for a wider view and greater depth of field. Professional fluorescence macroscopy / low power microscopy is widely practiced and very expensive dedicated models are available (e.g. the impressive Leica MacroFluo) which typically use objectives with high numerical apertures to maximise light gathering with special epi-fluorescence lighting units. However, on the compound microscope I found that an objective of 2.5X NA0.08 was usable for the brighter autofluorescing subjects with a consumer DSLR for imaging; this is an NA comparable to the max. of typical zoom stereos so seemed worth trying.
A small intense compact light source was required which was safe to use on a stereo, i.e. not a bulky mercury arc lamp in lamphouse! Inspired by the LED fluorescence system described by Laurent Delvoye (1), I successfully used a high intensity blue LED with a microscope eyepiece as focusing lens for on-axis epi-autofluorescence on a Zeiss Photomicroscope (see earlier article). The lighting unit is quite compact and gave an even beam a few centimeters in diameter. This design also seemed suited for off-axis illumination trials with a stereo microscope. Ely Silk has also discussed off-axis LED illumination designs on a compound microscope (2002, ref. 2) and described an LED lamp module with focussing lens.
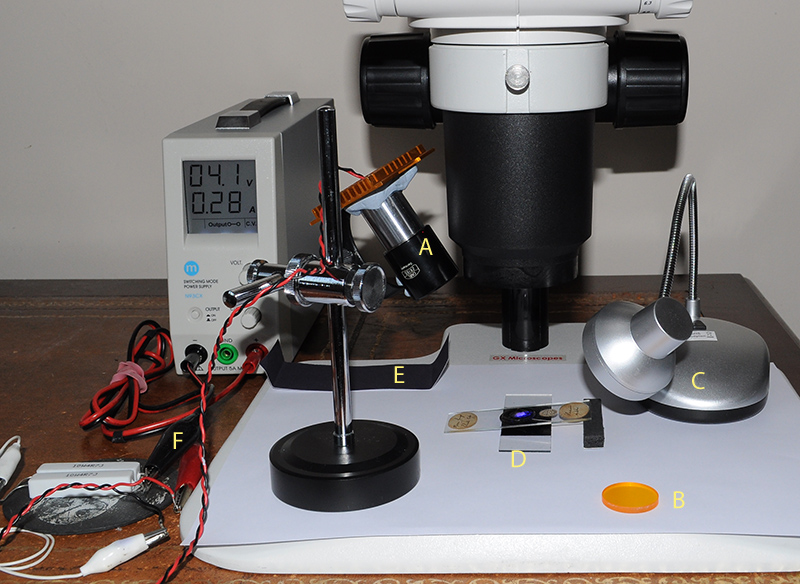
The present working set-up is shown below using a stereo microscope with 1-8X Greenough zoom optics, maker's stated max NA 0.10. A table summarising the optical components used for fluorescence is included; other combinations and specifications of LEDs, interference filter and blocking filter possibly already owned can be tried (but see safety notes below).
A - the blue and near UV LEDs were each mounted on a heatsink inserted when required into a microscope eyepiece (Zeiss 10x Kpl W). Also inserted was a suitable interference filter; by trial and error a filter was found to be vital in the last 'Foray' to narrow the broad tail of a deep blue LED, so a suitable filter was also adopted for the near UV LED. Since writing that article, I've read Ely Silk's valuable paper written in 2002 where he discussed and illustrated the potential need for an interference filter with some LED fluorescence setups (2).
B - the LED source with interference filter tightly controls the wavelength so that only a Schott dyed glass filter is needed to block reflected blue or near UV light. They exhibit a steep transition from near complete absorption to full transmission (see www.optical-filters.com); this permits a choice of filter close to the cut-off emission of the LED / interference filter. (In a compound microscope with dedicated fluorescence head, dichromatic mirrors are also typically used). The filter is inserted in the imaging field of the stereo, at a convenient point; in this case it was placed in the vertical photo port. If a trino port stereo isn't available, the camera and blocking filter could be fixed to one of the visual eyepieces for camera work (blocking the other eyepiece from visual use for safety as there's no blocking filter protection on this side).
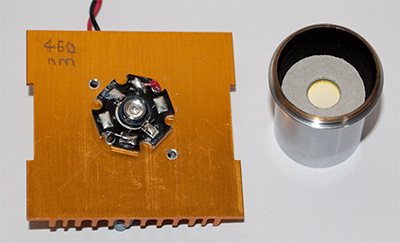
Eyepiece base sits over LED and acts as focussing lens. Optics removed right showing 10 mm diameter
interference filter inserted at stop, a card ring immobilises it.
C - a ten white LED with reflector desk lamp for initially setting up subject and for comparative incident white light imagery. (These are less than £10 on eBay, battery operated and ideal for normal incident stereo work as they give an even field of a few cm across where a dedicated lamp isn't owned.)
D - subject, in this case a prepared slide of dry mounted fern leaf, angled at ca. 6 degrees to left hand optical path for flat field (on this stereo the lefthand optical path is directed to vertical port for photo work). A slide painted matt black is placed underneath to prevent any fluorescence by the stereo base (or paper in this case).
E - card used as barrier and placed in front of subject when the blue LED is at full intensity.
F - variable power supply, 2 x 10W resistors for load, described in earlier article.
|
LED |
Interference filter |
Blocking filter (in photo port) |
|
Royal blue excitation |
460 nm ca. half bandwidth 20 nm |
Initially used a Schott OG530 but an OG515 was later used when found dropping band pass from 550 to 515 nm didn't allow any green light leakage from LED. Both from Knight Optical UK |
|
Near UV excitation |
400 nm ca. 35 nm half bandwidth |
Schott GG455, 455 nm long pass |
The outlay for the LED and filters was less than £50 for each wavelength, and no extra cost if the items have already been bought for compound microscope studies. The only adaptation needed to transfer to stereo use was a support found to hand for the LED lighting module (in this case a cheap stand formerly used for a magnifying glass).
Safety notes: The above design was setup for camera work only not visual; the extra controls of wavelength of an epi head with dichromatic mirrors used in professional systems is not present. All the setting up of subject and focussing is carried out with the white lamp. Suitable barriers around the subject prevent reflected blue or near UV reaching the eye; highly reflective areas of a subject (e.g. glass slide, cover slip) need particular care. A variable power supply is beneficial (if not vital) because all setting up of the excitation light can then be carried out at lowest power, with full power used only for the photography.
Each user would need to devise a safe working practice for their own set-up. I used card barriers to prevent direct viewing of the blue LED light (card 'E' in above image). The near UV LED emits enough light in the visible for a user to know where the beam is pointing but of course needs extra care. A sheet of plastic 420 nm UV blocking filter was supported in front allowing visible setting up.
Visual studies? In principle, the LED with interference and Schott blocking filter if chosen well, tightly control the lighting with no excitation light reaching the eyes. In this case, visual studies may be safe if a suitable blocking filter is placed in each eyepiece but it would be up to the user to devise a safe visual set-up, especially if the excitation wavelengths are short visible or near UV. The set-up is most certainly unsuitable for shorter wavelength UV studies either with camera or for visual (where conventional glass optics are unsuited anyway). Also see Disclaimer at foot.
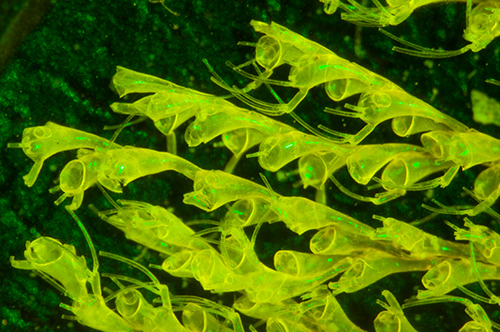
In use: Some subjects fluoresced brightly enough to allow the live view of the camera to be used for focussing and setting up. A Panasonic GF2 micro-four thirds camera seemed brighter in Live View than a Nikon D5000 DSLR. Below are a selection of objects previously studied under the compound typically with 2.5x to 6.3x objectives (i.e. total mag 30x to 80x), but now studied with a total mag of 10x to 30x under the stereo.
Importance of the interference filter: The two images below were taken of the same subject under blue light excitation without and with an interference filter in front of the LED to cut out the broad emission tail of LEDs.
Victorian dry mount by Russell of the polyzoa Bicellaria tuba without interference filter with deep blue 455 nm LED. Optical mag 28x. Both autofluorescence and reflected incident light are shown. Green light leaks through blocking filter (in this case 530 nm filter). Exposure 10 secs ISO 400. Nikon D5000 DSLR.

As above with interference filter. The green wash of reflected light is removed to retain the true autofluorescence. Note the now black background. Exposure 15 secs ISO 400. Both images out of camera.
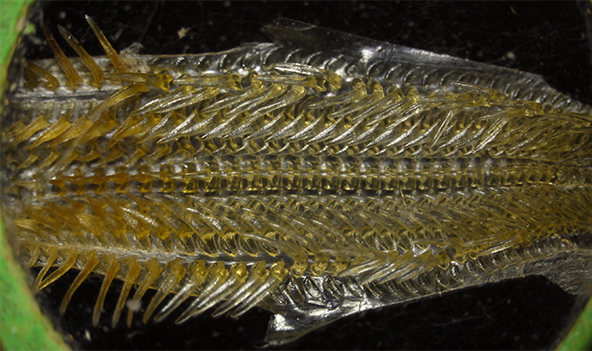
Victorian dry mount of cuttlefish palate, complete mount shown, length 7 mm. Visible white LED light (manual white balance). Optical mag 28X. The stereo allows the complete palate to be imaged, but in visible light the complex 3D structure isn't that clear. Exposure 1/6th sec ISO 200. Panasonic GF2 camera.
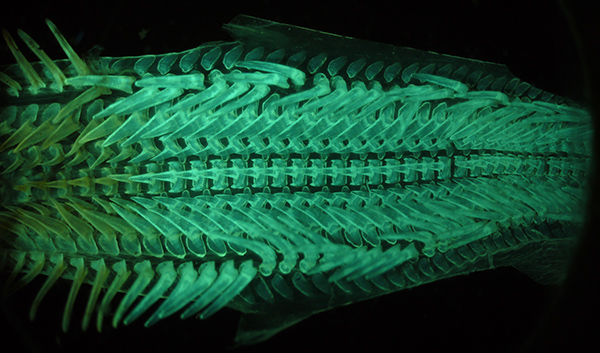
Subject as above. Autofluorescence under near UV lighting. Optical mag 28X. The autofluorescing subject is now self luminous which seems to give a clearer indication of the structure. Despite the simple excitation / blocking filter setup, the out of camera image shown is typically of high contrast and good tonal range. Exposure 1/6th sec ISO 200. Panasonic GF2 camera.
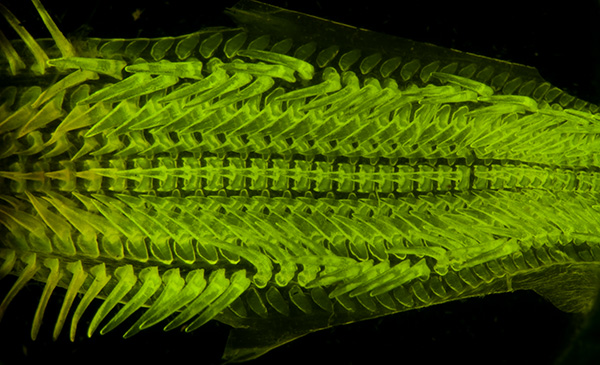
Subject as above. Autofluorescence under deep blue lighting. Optical mag 15X. Exposure 8 sec ISO 200. Nikon D5000. The projection distance is longer than for the small sensor Panasonic GF2, hence the longer exposures.
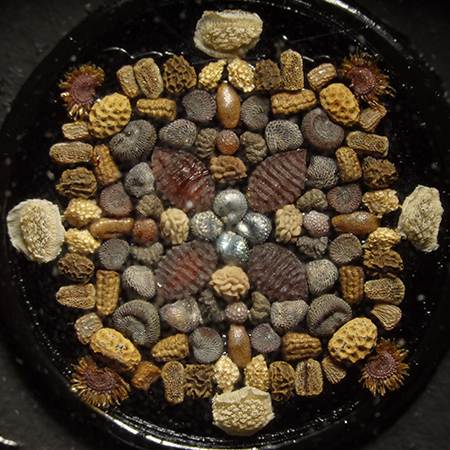
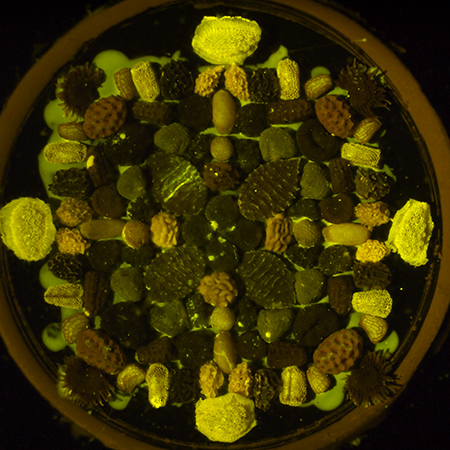
Watson Victorian slide of arranged seeds(?), field width 10 mm (label has fallen off). Total mag 13X. Left visible light, right - autofluorescence. Some seeds fluoresced, others didn't. The central silver specimens are black. The mountant also fluoresces. Righthand exposure 4 secs ISO 200. Panasonic GF2 camera.
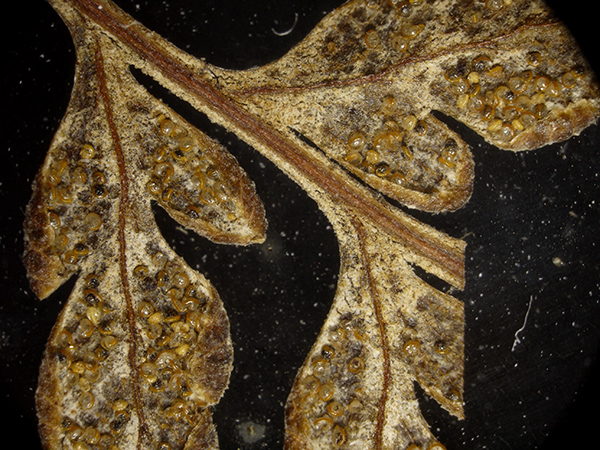
Victorian dry mounted silver back fern leaf (Gymnogramma peruviana), field width shown 10 mm, showing spore capsules, total mag 12.5X. Visible incident white light.
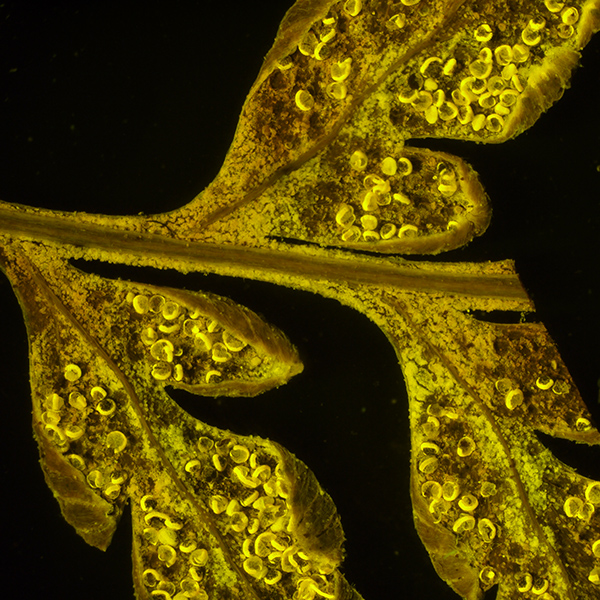
As above, autofluorescence with deep blue excitation (455 nm). Total mag 12.5X. Exposure 4 secs, ISO 200. Panasonic GF2 camera.
This is the lowest zoom setting (1.25X and hence lowest NA), allowing the entire subject to imaged, unlike under the compound microscope. This suggests that bright autofluorescing subjects can be imaged under a stereo using modest exposures on a consumer digicam.
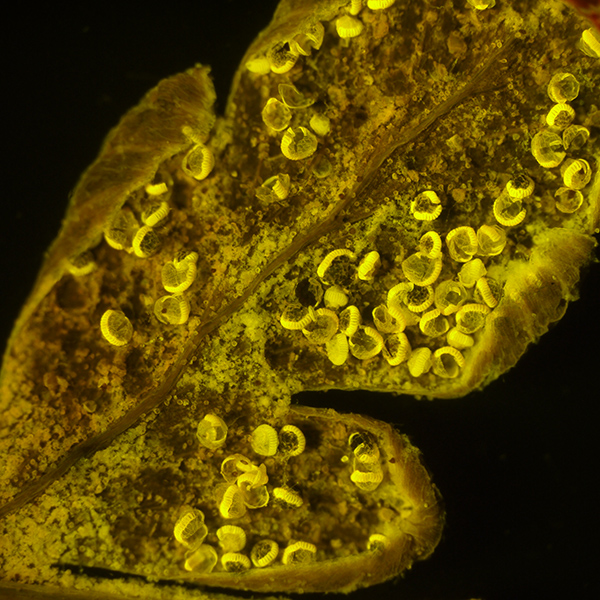
As above, at 28X total mag. Exposure 4 secs, ISO 200. Note the modest exposures even at higher mags on the stereo.
Little post processing is required, apart from minor tonal balance if required.
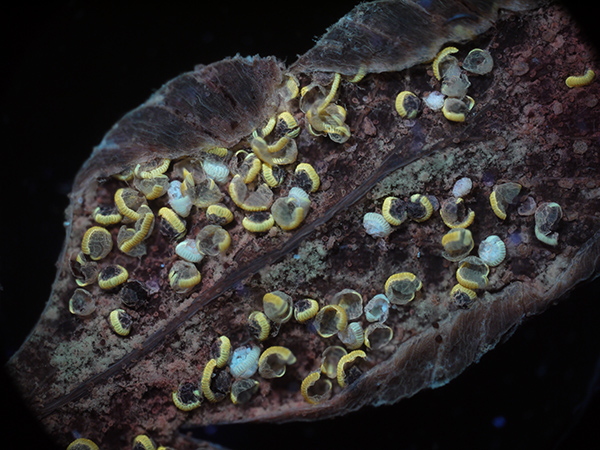
Same subject (different leaflet) but autofluorescence with near UV 400 nm excitation. Optical mag 39X. Exposure 1.6 secs ISO 200. Panasonic GF2 camera.

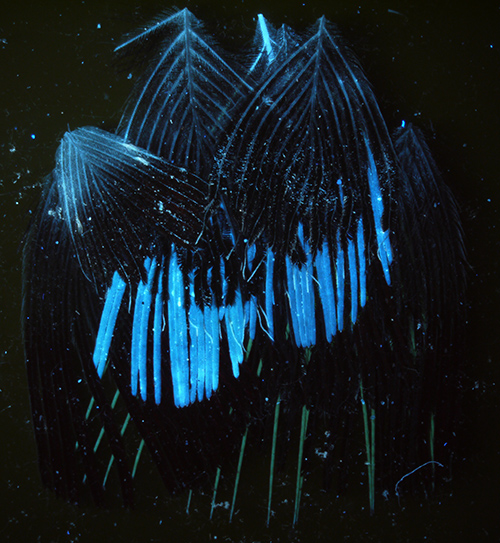
Victorian dry mount 'Feathers of birds', optical mag 19x, field width 5 mm. Left - incident white light, right - autofluorescence under near UV. Second exposure 2.5 secs ISO 200. Panasonic GF2 camera.
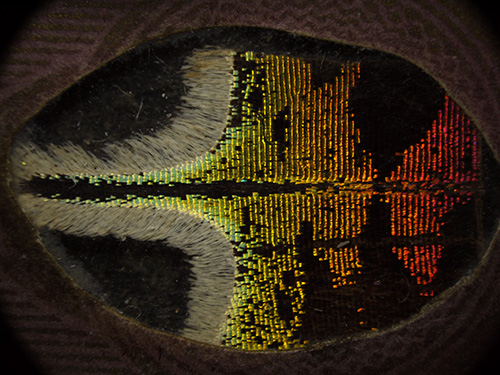
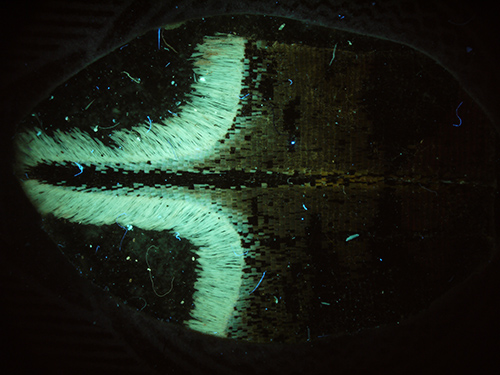
Victorian dry mount, part of lower wing, upper surface of Urania ripheus (Madagascan sunset moth). Optical mag 11x. Field width 16 mm.
Left - incident white light, right - autofluorescence under near UV. Second image exposure 1.6 secs ISO 200. Panasonic GF2 camera.
Comments: From trials to date, low power autofluorescence imagery with a none dedicated stereo microscope, modestly priced filters and a consumer digicam seems practical with suitable subjects. The wider field of view and depth of field complements the author's autofluorescence studies at low power on a compound microscope. Especially for subjects that may only autofluoresce in localised areas, such as butterfly wings, feathers and mixed mineral sands, as the stereo allows specific areas to be spotted for closer inspection under the compound microscope.
Some subjects autofluoresce so brightly, the very high power LEDs and attendant power supplies may not be required for stereo imaging studies given the excellent long exposure capabilities of modern consumer digital cameras. The newer modestly powered 5 or 10 mm encapsulated LEDs may be usable directly with a stereo, especially as they may have internal lensing good enough for direct use; but may still require a suitable interference filter to tighten the bandwidth.
Comments to David Walker are welcomed.
References
1) Laurent Delvoye, 'Fluorescence microscopy with super LEDs', Micscape, June 2009.
2) Ely Silk, 'LED fluorescence microscopy in theory and practice', The Citizen Scientist*, July 19th, 2002.
*Magazine of the Society of Amateur Scientists, website www.sas.org (at the time of writing, the site's magazine archive doesn't seem to be working for 2002).
Disclaimer: I have a safe setup and working protocol but any adopter must take appropriate precautions with their own equipment for safe use and do so at their own risk. Neither the author, nor OnView Ltd who owns Microscopy-UK and hosts Micscape articles, nor any other site contributor takes any responsibility for any injury to persons or damage to equipment caused by adopting or modifying any practices described. It is not advised to try these sort of experiments if not familiar with either the potential dangers of high power LEDs, especially those emitting in deep blue and near UV, or of correct ways of using filters to safely block high intensity light wavelengths. As remarked, the above set-up was devised for camera use only. Extra precautions may be needed for adapting to visual use.
Published in the July 2011 edition of Micscape.
Please report any Web problems or offer general comments to the Micscape Editor .
Micscape is the on-line monthly magazine of the Microscopy UK web site at Microscopy-UK
©
Onview.net Ltd, Microscopy-UK, and all contributors 1995
onwards. All rights reserved.
Main site is at
www.microscopy-uk.org.uk.