A REFRESHING DEVICE 

for Heat-Sensitive Critters

by Jean-Marie Cavanihac, France
Two requirements are necessary to make good microscopic observations or drawings, and also to take photographs: Use a powerful light source and take your time. However, electric light bulbs can be rated to 50 or even 100 watts on many modern microscopes. Part of the infra-red radiation emitted from bulbs is transmitted to the slide which overheats the subject. If the observations are lengthy, particularly for time-lapse sequences, the fried critters will not be very good actors in the video movies! Adding a blue ("day-light") filter to the illuminator holder is insufficient to stop infra-red rays.

Heating the subject is avoided if you work with a white LED illuminator, which has a high color temperature (i.e. cold light), even though the illuminator diameter is only 5mm. (See article about CMOS camera)

Last year in the south of France, summer temperatures were typically 30°C and even 32°C on some days. In my 'lab', the temperature reached about 28°C. When I was sorting planktonic organisms to transfer them to a slide using a stereo microscope, I noticed they were suffering because of the heat, which was made worse by the 12V/12W illumination bulb beneath the frosted glass plate. In the little 50 mm petri dish, the temperature reached 42°C after 20 minutes observation! If you use just a water drop on a slide, evaporation speed is accelerated and with marine samples, salt concentration increases which can also kill the critters. 
Well, we are now well into springtime, (a wet spring, alas...), but summer is coming soon (we hope!) and we have just time to prepare a useful accessory to improve our observations in future months.
This project describes how to make a refreshing/cooling device which can be placed under either Petri dishes or slides on a microscope stage to avoid temperature increases. A professional thermostated heating substage typically costs £1500 or $3000! A cooling substage is much more expensive. But we don't require for our purposes ultra-precise temperature regulation.
The components needed are as follows: (Also see diagram below and picture.)
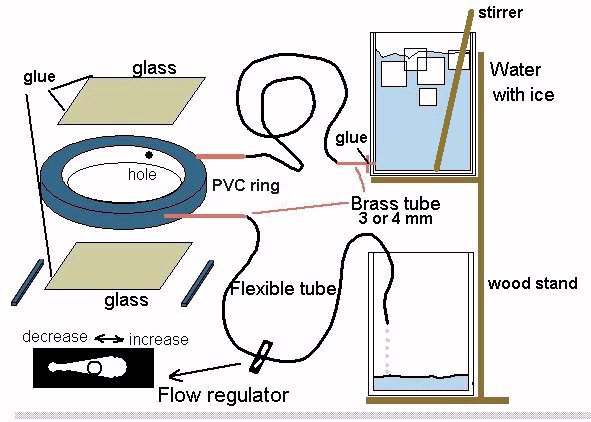
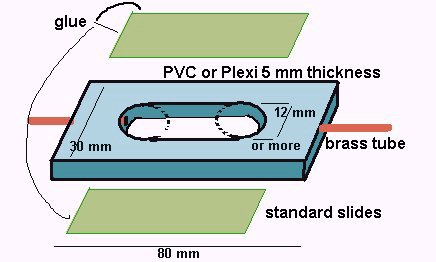
- Two glass plates 40 x 40 mm, 1 mm thick (no more), (used for professional mounts of 35 mm slide film).*

- PVC, aluminum or plastic ring, 6 to 8 mm thick*, inner diameter less than 40 mm, outside diameter more than 56 mm. Alternatively a square plate 1.4mm thick with >56mm diagonal. (See drawing below for a safety note!).

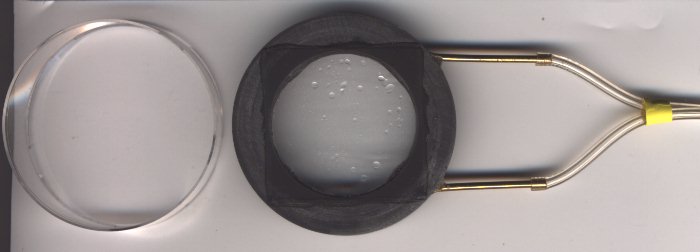
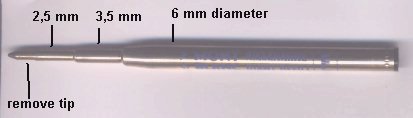
- 10 cm of brass tube, diameter 4 mm (see model shops) or two empty refills for a ball-point pen (see below).

- 1 metal or plastic washer, inside diameter equal to external brass tube diameter. 

- Two plastic bottles with large aperture (1/2 to 1 liter).

- One meter (or more) of flexible plastic tube with 4 mm inside diameter (e.g. like air pump tubing for aquariums).

- One piece of hard plastic (or hard wood at a pinch) 2 x 5 cm, 3 mm thick.

- Epoxy glue (two component). 

An empty refill for a ball-point pen provides three diameters of tube you can use.

Left hand picture show one glass plate, 1 mm thick.


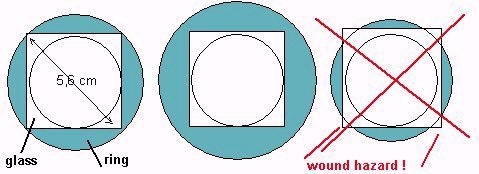
Ensure glass plates are not too large, to avoid protruding glass corners.


* (If the glass plates and plastic rings listed above are difficult to find, an alternative solution is to use a rectangular PVC, aluminum or plexiglass plate 5 mm thick and two ordinary slides. Drill two holes at least 12 mm diameter and join them by cutting with a thin fret saw blade or a file. Then glue the two slides either side (see drawing below). However, this device is less convenient to use with Petri dishes; see picture below.
Another way to make the chamber.
Drill two holes in the PVC ring as shown in the first diagram above; with diameter the same as the brass tube. Be careful when you are drilling because the hole axis is NOT perpendicular to the ring surface; mark before drilling with a pointed object to avoid skidding. Cut two 4 cm lengths of metal tube (use a saw with small teeth but NOT wire cutters which will crush the tube), insert them in each hole and glue them; ensure the glue doesn't penetrate inside tubes. 

Drill a hole at the bottom of one plastic bottle with a slightly smaller diameter than the brass tube and insert 2 cm of tube, forcing it a little; glue it with the washer on to strengthen assembly.

Let glue dry, then carefully glue the two glass plates, one on each side of the PVC ring. Avoid letting any trace of glue or fingerprints on the inside of the plates (you can't remove them when the glue has hardened!) Allow the glue to dry for one day. If your bonding is good you'll have an airtight chamber between the two plates which is only connected to the outside by the brass tubes. If necessary, remove any dried glue from the external faces of the glass plates with a cutter blade. 

On the piece of hard plastic, drill two holes; one the same size as the external diameter of flexible tube (e.g 6 mm) and the other 3 mm, 30 mm apart. With a file, make a triangular shaped cut-out as shown in the first diagram above. This is a flow regulator; by adjusting the flexible tube compression, it can stop or adjust water flow.

Cut 50 cm (or more...) of flexible tube, insert one end on the bottle's brass tube, the other end on one of the ring's brass tube. Insert another length on the second brass tube through the flow regulator.

Device with 50 mm diameter plastic Petri dish at left hand side 
The day before observations, place a plastic water bottle in the chiller compartment of your refrigerator to obtain pre-cooled water. I use a 2 liter plastic rectangular soda bottle. 

Place the modified bottle higher than the microscope stage, for example on a wooden stand, and push the flow regulator onto the flexible tube to clamp it. Fill this bottle with cooled water and add ice cubes. Then unclamp the flexible tube until water flows, thus filling the chamber in the PVC ring (avoiding bubbles!). The flow rate must be 1 - 2 drops per second. You can then start observations. Put the slide or Petri dish onto the upper glass plate (add a drop of water between them to improve thermal contact; this also avoids condensation and makes the slide adhere to the plate). You can also put a subject directly onto the 40 mm glass plate. 

When the second lower bottle is full (dependent on water flow... ), clamp tube, empty this bottle, add cooled water to the upper bottle (add ice as necessary) and so on.

To see experimental results GO TO PAGE 2


Comments to the author Jean-Marie Cavanihac are welcomed.

Microscopy UK Front Page
Micscape Magazine
Article Library


All drawings and photographs © Jean-Marie Cavanihac 2001

Published in the June 2001 edition of Micscape Magazine.

Please report any Web problems or offer general comments to the Micscape Editor,
via the contact on current Micscape Index. 

Micscape is the on-line monthly magazine of the Microscopy UK web
site at Microscopy-UK


  WIDTH=1


© Onview.net Ltd, Microscopy-UK, and all contributors 1995 onwards. All rights reserved. Main site is at www.microscopy-uk.org.uk with full mirror at www.microscopy-uk.net.