| The Poor Man's
Photomacroscope (pt4)
An Update By Paul James |
I'd not realised at the time of writing the third article of the series that my sentiments regarding the desire to contrive a more solid platform for a camera would have materialised so quickly. The irony in all this stems from the fact that I had already owned a suitably solid stand that could be adapted for the very purpose I'd mentioned, but I was at that time unaware of its potential. The stand in question was the Leitz Metallux 2 (?) (No.741220): A slight variation of the classic brightfield Ortholux. The infinity tube lens I'd employed in this series had in fact belonged to this Metallux stand, but I'd not considered the potential of utilising the latter until one day I noticed its shape in profile. Its very sturdy stature and larger than average form had me wondering if it was possible to increase the gap between its turret and stage. The more I thought about it the more convinced I was that it would not only be feasible, but sensibly practical too. So I threw caution to the wind and started mentally traipsing through the pro's and con's of conversion, though the one alteration that might offend some readers was the reshaping of its forefoot :-
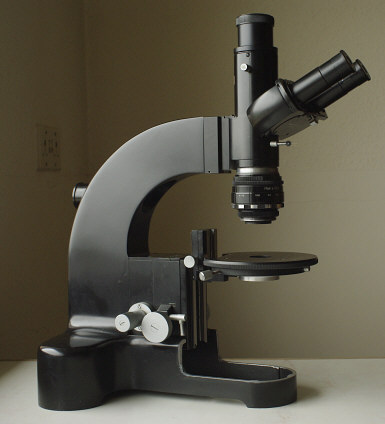 |
 |
| After conversion : The stage's upper limit | Lowest stage setting with converter in place |
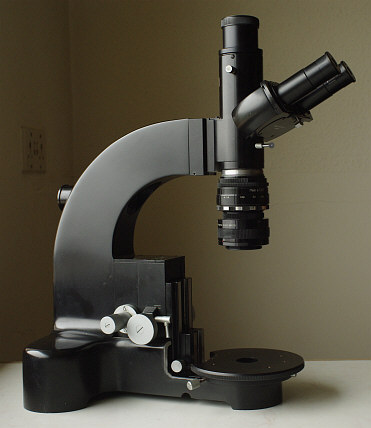
The stand's potential of becoming a photomacroscope was in no doubt in my mind's eye as it was capable of offering a very large gap between turret and stage by way of inverting the forked stage support which would open up the much needed room for any objective combinations, or provide room for bulkier specimens. It also had a very useful coarse focus locking lever rarely found on compound microscopes or low power stereo stands for that matter. Its fine focussing mechanism like that of any compound 'scope stand seemed initially too fine for the macro scene, but would soon reveal its usefulness when tweaking the focus of lenses of 50mm or less especially when employing the 'Live View' facilities of digital cameras. The stability of the camera gear was guaranteed by the virtue of being directly coupled to the stand's base via its massive limb : isolating it in effect from the focussing/specimen platform. And finally the actual conversion didn't seem too difficult, though it would incur an irreversible reduction in the height of the forefoot, a task made so much easier to contemplate because it did not house a 45 deg mirror assembly, since the Metallux stand is principally a reflective one. So the vacant forefoot's role was for support and stability only.
Getting Started.........attending to the forefoot
After accepting the need to alter the forefoot, I was confident that it could be reduced in height without compromising the stand's stability in any significant way. Yet this was an alteration I didn't enjoy as I'd never before engaged myself in such a drastic alteration to a microscope. Fortunately the task was straightforward elementary marking out, hacksawing, then filing........all told less than one hour's work. Its appearance after the job was finished I deemed acceptable, though I would need to make 2 small grooved push on 'shoes' each underpinning that part of the underfoot where the major change in shape occurs : its potential weak point. However the fact is that the stand's centre of gravity lies just aft of this point which puts the bulk of downforce onto the very stable and rigid back feet.
Inverting the stage's forked support and shaping the back edge of the circular stage
The stage's forked support, unlike that found on most conventional 'scopes, is effectively a 2 tiered device. It can slide up or down in its double grooved seating, which in turn is coupled to the coarse focus mechanism in the usual way. This provides a larger range of vertical motion than found in most brightfield stands, and therefore is of great value in this conversion. So by inverting the stage's forked support and refastening it to the stage from its newly presented upper surface, I could bring the stage's elevation into a more suitable range for macroscopic use. All I had to do was remove 3 screws and refasten them from the opposite side into the stage which of course was mounted on the opposite face of the fork ( also machined square to axis ). Countersinking each hole was necessary to ensure that each screw had its full bite of the stage.
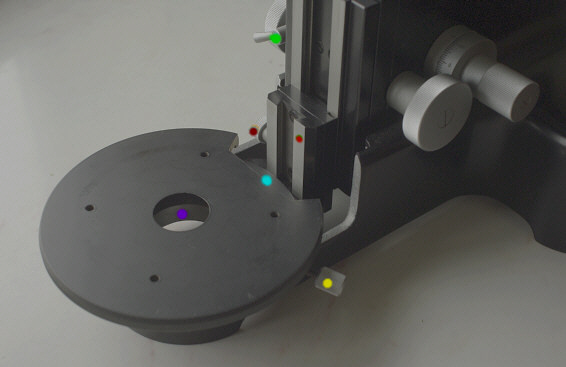 |
The potential obstruction between the back of the stage and the focus block was easily foreseen and simply resolved by shaping its back edge as illustrated above. But since the stage has both a rotating and centering facility, more metal was removed than strictly necessary in order to provide the elbow room for the stage to be tweaked in all directions, as well as yawing about 30 degrees either way. This proved to be a most welcome feature when framing the specimen on the camera's LCD screen. Fortunately when the stage was at its lowest elevation, its 2 centering thumb screws were still well clear of the bench's surface to allow comfortable manipulation.
The only minor flaw was the slight fouling of the coarse focus locking lever with that of the fork's clamping screw. I failed to visualise this beforehand but soon affected a cure by reducing the diameter of the clampng screw slightly and reknurling its periphery.
Since the stage would invariably be much higher than illustrated above when using brightfield illumination, a newly fashioned 45 deg mirror assembly would be needed to accurately register into the modified forefoot as and when required. In addition, one of Leitz's lamphouses of the period would slide into the rear of the base ala Ortholux style to provide the light source. Fortunately there is enough space in the Metallux's cavernous foot to rig up an optical system to suit most BF macro illumination requirements.
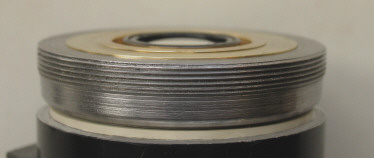
Finally........................... The Camera Objective Support Ring
This was the most critical task of conversion as the accurate alignment of the camera lens with the microscope's optical axis was essential. As luck would have it Leitz had provided an internal 30mm thread at the bottom of the exposed turret nosepiece against which the turret originally registered. So this dormant facility became a very convenient attachment point in this conversion..........the battle was half won already ! There was however only just enough room to do the job :-
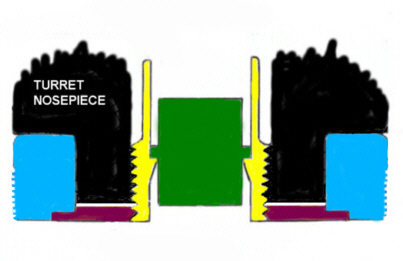 |
The rough sketch above illustrates the camera support ring in place encircling the turret nosepiece and shows how it is kept there. There are several ways of fixing a ring like this, but this method guaranteed both its accuracy, stability as well as siting it at the highest potential elevation above the stage. It had to be removable, yet sturdy and be part of an assembly which would support the internal tube lens too. So I elected to make a central main support ring which anchored itself into the 30mm thread of the nosepiece and extend just enough to allow a locking ring to trap the main camera lens support ring securely in place. This locking ring was fashioned with a circular rebate to mirror that of the main 49mm filter threaded ring, and its internal thread was conventionally mated to that of the main support ring . Importantly too was the need for the assemblage to have a flush lower facing so no damage to the camera lens could occur.
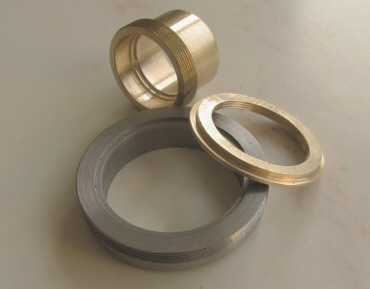 |
I employed a rather simple though unusual method of keeping the central ring body in place without the need of a locking nut which might potentially foul the top lens of the camera objective. This method which I have resorted to on the rare occasion utilises the natural seizing tendency of a male and female thread, each varying very slightly from the other in pitch. I therefore cut a thread of 32 tpi (threads per inch) on the outer face of the support ring body. This was the closest I could get from my lathe's gear box to the pitch of the metric thread of the turret housing.....but not quite. So I carefully cut the diameter of the thread on the central support ring , until by several trials it seized appropriately in the turret housing after 4-5 full turns, leaving just enough exposed thread for the locking ring to do its job.
Finally the need for a semi-compliant washer to act as an interfacing cushion between the ring and nosepiece proved necessary. So I machined up a scrap sheet of suitable plastic mounted on an arbour and finished it with parallel faces. Its presence increased the ring's reluctance to rotate when an objective was unscrewed from it.
 |
This conversion cost nothing as the parts were fashioned from scrap oddments. The work carried out, including the time spent mulling over the jobs in hand could have been squeezed into a single day, though in reality it took a little longer.
A summary of this adapted compound stand's features are :-
1) The assurance of focus stability by employment of the coarse focus lock, which together with the total dependability on the fine focus's stability, completely eliminates focus creepage. It couldn't be better.
2) The subtlies of the specimen's final adjustment in the FOV by lateral trimming of stage : especially when photo framing with a camera's 'live view' facility.
3) The stand's intrinsic stability and rigidity augurs well for multiple time exposures in time lapse photography, or for large depth of field imaging in conjunction with multi image stacking software applications using the calibrated fine focus in sequential increments for each exposure.
4) Its ability to support heavy camera gear with the added assurance of focus stability whilst adjusting camera's controls. No more bated breath moments !
6) The stand's sheer versatility : 30mm-3mm fields in BF or DF with camera objectives (with or without converters) from 80-20mm focal length by removal or addition of the infinity tube lens. Also capable of employing conventional microscope objectives of either infinity or 160/170 TL by reinstallation of the original turret which takes a minute or so, with or without tube lenses as deemed necessary. Of course in the absence of the original turret a simple adapter for a standard microscope objective could be fashioned to hang these optics from the 49mm filter thread.
Concluding Thoughts
Simply put ........It is a pleasure to use............. But its singular drawback is the lack of speedy convenience of operation when compared to its professional cousin. Since my hobby is simply a vehicle for exploration at my own pace with no production lines, no deadlines etc., I've absolutely no reason to fast forward through it all >>
The more familiar I become with this concept of DIY compound microscope adaptation the more I realise that my interest is slowly waning in the professional equivalents such as the Wild M420. For some individuals the ownership of such a stand is a reward in itself : I understand and respect that sentiment. But for me and no doubt other individuals there is the reward of making something happen by simple means, fueled by the imagination, whilst putting convention into perspective. Admittedly being able to facilitate some simple engineering broadens the option horizon considerably in matters of this nature, but the conversion could have been tackled in other ways without the lathe : but perhaps without the potential usefulness of reversibility ?
The Leitz Metallux stand, version 2 (?) (no.741220) seems to me to be an ideal stand for conversion into a photomacroscope. No doubt there are other suitable candidates for conversion.
And finally : If some readers have been offended by my seemingly ruthless approach to reshape the stand's forefoot etc., then I acknowledge that they may have a point. I do believe however that this stand, like hundreds more that industry has scrapped for a number of reasons, has a better chance of surviving into the future in its presently modified form by a potentially much larger user group than might have otherwise been the case.
| All comments welcome by the author Paul James |