|
Building a double gooseneck white LED illuminator for a stereomicroscope using modular coolant hose Richard I. Garber, Idaho, USA |
Times have changed. Two or three decades ago the most versatile incident-light illuminator for a stereomicroscope was a double gooseneck system with a pair of self-supporting fiber optics. The light source was a fan-cooled housing containing a powerful halogen lamp similar to those in 35mm slide projectors. One disadvantage was relatively short lamp life. A second was vibration from the cooling fan. A third was that positioning the goosenecks was a two handed operation, since moving one also shifted the other.
In the June 2006 issue of Micscape, Andrew Entwhistle described “An Inexpensive LED Cold Light” using a pair of LEDs on goosenecks that were meant to plug into the USB port and light the keyboard of a laptop computer. My approach is similar to his, but I started from different components.
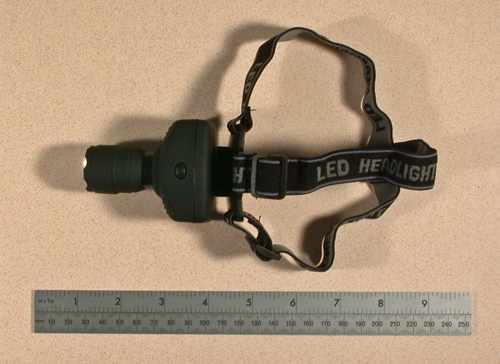
Recently on eBay I saw some inexpensive (~$5) white LED zoom headlamps (or torches) from China, as shown above, that were both compact and lightweight. They had a tilt mount and elastic headband. A pushbutton on the top cycled the lamp through off, high, low, and flashing. On the high setting their light output reportedly was 160 lumens. A plastic convex lens could be moved about 3/16-inch to broaden the beam from a spotlight to a floodlight. Power came from three AAA batteries in series, so they could be used in the field, or converted to run from inexpensive 4.5V-DC AC (mains) adapters. Mounting the lamps on the microscope body via individual goosenecks would be the best way to make them adjustable.
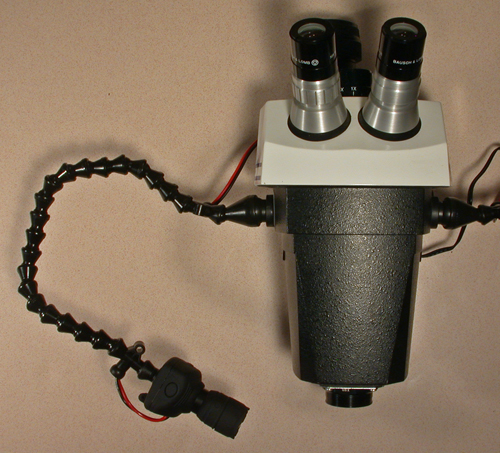
The image shown above details how I mounted a pair of them on my Bausch and Lomb StereoZoom 7 microscope pod, which is supported by a boom stand (not shown).
Modular coolant hose systems are versatile products built mainly from plastic ball and socket joints that snap together. There also are nozzles, mounts, and other miscellaneous parts. They are commonly used on lathes and mills in machine shops. I used the Loc-Line system from Lockwood Products. Loc-Line comes in three sizes with inside diameters of ¼, ½, or ¾ inches, and three colors (blue, black, and orange). You can buy it online from www.modularhose.com. Similar systems also are made by Cedarberg (Snap Loc), and Legrom (Vario).
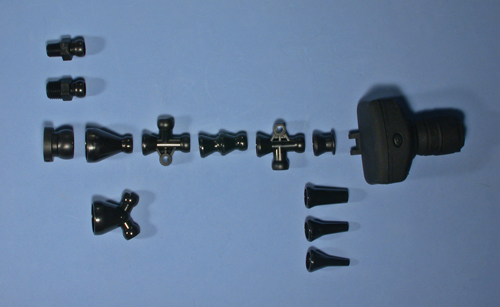
The image shown above is an exploded view of the modular hose components (and some alternatives) for one of my goosenecks. The required length and number of hose segments will vary depending on the mounting position and orientation. I have a 0.5X auxiliary lens, so my working distance is relatively long. Thus I used a foot of hose (20 segments) in each gooseneck. Using ¼ inch Loc-Line it takes ten hose segments to make a 180-degree bend with a minimum diameter of 2-1/2 inches. Tee fittings on both ends of the hose segments let the wiring enter and leave the gooseneck interior.
A ¼-inch Loc-line end cap and back cover of the headlamp both were drilled for a #6-32 screw and nut. A ½-inch fixed mount was glued to the microscope body with cyanoacrylate adhesive (Super Glue), and a straight reducer adapted it to fit other end of the ¼-inch hose components. (Before gluing, a circular spot on the microscope body was hand sanded to remove the heavy crackle-finish paint and expose bare metal). The back of the fixed mount originally looked like a honeycomb with six molded cavities. Those cavities were filled with quick-setting epoxy and then sanded flat to increase the glue joint area.
I had some trouble with snapping all these parts together, so I also bought a ¼-inch hose assembly pliers tool for $11. Not counting the pliers, the Loc-Line parts used for my setup cost approximately $40 plus shipping.
The battery holder on each headlamp was removed to reveal a small circuit board with their power connections. A hole was drilled in the bottom of the headlamp body for a zip cord that was soldered to the positive and negative terminals. The cord was fed through the coolant hose for connection to an AC operated power supply.
When fed from a 4.8 V AC adapter, on the high setting the current was 137mA, and on the low setting it was 34mA. While I have seen these headlamps optimistically advertised as being 3-watt, they actually draw just 2/3-watt.
Power could come from a $19 universal AC power adapter like the Enercell 273-315 from Radio Shack, which has DC voltages of 1.5, 3, 4.5, 6, 7.5, 9, or 12 volts and an output current of 300 mA. Instead I found less expensive $5 surplus 4.7V 850mA adapters at All Electronics in Van Nuys, California. I cut off the DC output plugs, soldered the connections to the other end of the zip cords, and wrapped both splices with vinyl electrical tape. Adapters or power supplies with 5 volt DC output also are widely available, but will require adding a series resistor to reduce the voltage slightly.
This headlamp uses an approximately 1.6mm square Cree brand LED chip which produce light with a slight bluish cast. I added yellow plastic filters to balance the color closer to white. My filters were cut from Avery brand #11902 Big Tab Pocket Insertable Plastic Dividers for three-ring notebooks, which I found at a local university bookstore. Other yellow sheet filters (or gels) are made by Rosco or Roscolux and may be found on eBay or at photo equipment suppliers.
The Loc-Line system includes several other mounting options, also shown in the second image. For ¼-inch hose there are end fittings with 1/8-inch or ¼-inch tapered pipe threads (NPT) (and also ¼-inch BPST, not shown). The ½-inch fixed mount also has a clearance hole for a ¼-inch bolt (or a 6-mm bolt). (There also is a ½-inch magnetic base).
Of course, there also are many different nozzles.
Right now I am reasonably satisfied with my double gooseneck illuminator. Eventually I might replace those headlamps with more powerful ones, as white LEDs continue getting less expensive.
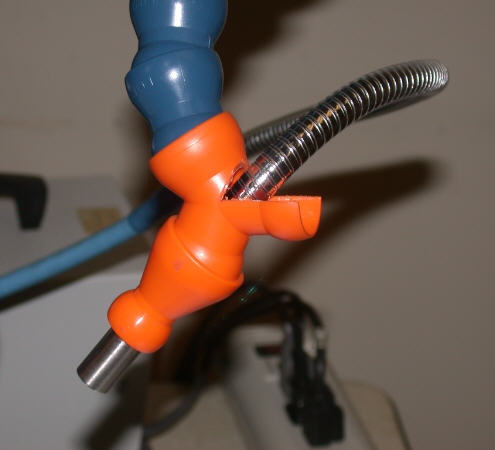
Larger diameter Loc-Line components can be used for supporting heavier objects like fiber optic illuminators. In the image shown above ¾-inch hose was used. One side of a Y-adapter fitting was saw cut, and a ½-inch reducer was attached to support the end of a fiber optic. I first encountered Loc-Line two decades ago when I bought a double-gooseneck fiber optic system advertised in an electronics magazine. He’d used a similar setup with ½-inch hose parts. Two hoses branched from another Y-adapter, above a threaded male NPT connector screwed into the cast-iron base borrowed from a tabletop microphone stand.
Some companies like CPM Delta 1 sell photographic support items built from Loc-Line. I own one of their products, a Grip-It Dual Arm Triple Clamp with Magnetic Base and Plate (currently sold for $70). The ends of those three arms consist of Mueller Electric Series 60 alligator clips pressed into ¼-inch Loc-Line hose nozzles. They are like a larger relative of the “third hand” or “helping hand” support jigs often sold for soldering. For example, see: Harbor Freight.
All comments to the author Richard Garber are welcomed.
Microscopy UK Front
Page
Micscape
Magazine
Article
Library
Published in the March 2012 edition of Micscape Magazine.
Please report any Web problems or offer general comments to the Micscape Editor .
Micscape is the on-line monthly magazine of the Microscopy UK website at Microscopy-UK .
© Onview.net Ltd, Microscopy-UK, and all contributors 1995 onwards. All rights reserved. Main site is at www.microscopy-uk.org.uk .