
|
Polarization With A Stereo-Dissecting Microscope by Richard L. Howey, Wyoming, USA |
Don’t Know Where, Don’t Know How, Don’t Know Why. I think maybe those lines are in some old popular song but, in any case, they apply here. It must now be a couple of decades ago when I bought a wonderful, simple device for polarization which sits on the stage of my trusty old Olympus SZ III stereo-zoom microscope.
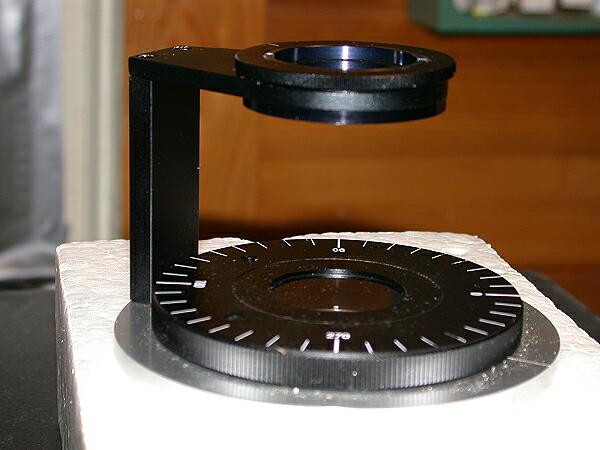
One day I was chatting with a friend of mine in Colorado, who is a first-rate microscopist and microscope technician and I was describing this handy accessory. He told me he had never seen or heard of anything quite like it, so I sent him the pictures above. I don’t know where I bought it; I don’t know how I came across it: I don’t know why I impulsively thought that it would be useful , but I did know that I wanted it. It is very well made and the polarizing material is of high quality. Both the bottom and the top rotate and the bottom is calibrated in 10 degree units. In short, it is a fine little item–simple, practical, portable, and, for me, it adds an extra dimension to viewing certain kinds of objects with my Olympus. Now comes the really extraordinary part; there is no manufacturer’s name, no serial number; in fact, no identification of any sort, which leads me to believe that it was made by some very clever Zen master. When my friend in Colorado got the photos, he immediately thought of having a master machinist he knows try to produce one for him. In our conversation, I expressed surprise that such a useful accessory is not widely available. He replied that this is the sort of implement that high-tech researchers wouldn’t be interested in because it wouldn’t cost enough, it would be too easy to use, and it wouldn’t help them get grants. Some people might think this view rather cynical; my own take on it, after being associated with universities for over 50 years, is that it is simply realistic. (I haven’t yet given up on trying to track down this wonderful little gizmo and if I succeed, I’ll let you know.)
The fact is that this accessory is extremely convenient to use and I use it frequently. It does, of course, only work with transmitted illumination; that is, your specimens must be thin enough to get sufficient light through them. If the polars are crossed at 90 degrees, then the specimen must have birefringent elements, otherwise you will simply have a black field of view. Some specimens are quite frustrating; one knows that they are birefringent from looking at them with a compound microscope that has a high intensity illuminator. However, one may want to create an image with a wider field of view using a stereo microscope. While the low watt incandescent bulb that comes with the Olympus substage illuminator is adequate for most purposes, there are times when one needs something more. Happily, several years ago, I was fortunate enough to find, at a reasonable price, a high intensity fiber optic illuminator which has, instead of the tube at the terminus, a ring about an inch and a half in diameter. I remove the substage mirror from the Olympus and put the ring in its place. However, in some instances, by rotating the analyzer to allow for greater light transmission, you may nonetheless produce some interesting contrast even in specimens that are not birefringent.
However, the real excitement comes when you find those crystals, plant sections, muscle fibers, etc. which are strongly birefringent. Here is an area where you can truly play and sometimes experience the exhilaration of creating micro-artworks. For some recommendations of substances you might want to experiment with, you might want to look at two articles which I published previously on Micscape.
However, as you might expect, I have some additional suggestions and comments.
There are a couple or five or more ESSENTIAL rules:
1) NEVER arbitrarily or randomly mix chemicals.
2) ALWAYS check the MSDS (Material Safety Data Sheets) which are online and pay special attention to warnings, incompatibles, and decomposition products. When you mix substances or heat them, they sometimes react in surprising and potentially dangerous ways.
3) If you wish to do melts, be especially cautious. Do not use an open flame such as a Bunsen burner or an alcohol lamp. Even most home labs contain some flammable reagents, such as, alcohols and other solvents which could ignite or explode. The best procedure for producing melts is to use a slide warming table with a calibrated thermostat.
4) For beginners, it is usually best to begin by dissolving solid materials in distilled water and then let them slowly evaporate on a slide which you can set inside a Petri dish to exclude dust. Begin with cold water and then later try making another sample with hot tap water which will contain small amounts of various minerals and these may enhance the results or detract from them. If you think the latter may be occurring, then you can heat a beaker of distilled water, but not to boiling. Temperature can influence the forms of crystallization in interesting and dramatic ways.
5) Be especially cautious if you are working with strong acids, alkalies, or oxidizers.
So, now that I’ve taken all the fun out of it, let me try to put some back. There is a wide variety of substances that can be used to produce lovely birefringent crystals fairly simply and safely if you use common sense. I usually have 3 or 4 bottles of Ascorbic Acid solution around. Don’t have any of the chemical? Grind up some Vitamin C tablets with a mortar and pestle and dissolve the resulting powder. My solutions are of different ages and different colors. As they age, they progressively take on a deeper brownish color even when kept in amber bottles. Some of them even have mold growing in them. I can hear you saying: “Yuck! Why don’t you throw them out?” Well, oddly enough these older solutions sometimes produce some especially interesting results and the hyphae of the molds sometimes seem to function as triggers or anchors for crystallization. Ascorbic acid in itself can produce remarkable crystals, but I am partial to mixing it with certain other substances.

For example, a bit of toothache medicine such as Anbesol, or a generic equivalent, mixed with Ascorbic Acid can produce some spectacular results.
One of the wonderful things about such slides is that the crystal formations will vary, sometimes dramatically, from place to place within a small area.
A recent, new experiment of mine involves the natural sweetener called Stevia and it is derived from a shrub found in China and Brazil and is now also grown in Indonesia. It is widely available on the Internet both in liquid and crystalline form in individual packets for your tea or coffee. I have been using the powdered form in solution and have been most impressed when I mixed it with a few other things. Here are some examples. I got some particularly nice results by mixing some Stevia with some ordinary baking soda (Sodium bicarbonate).
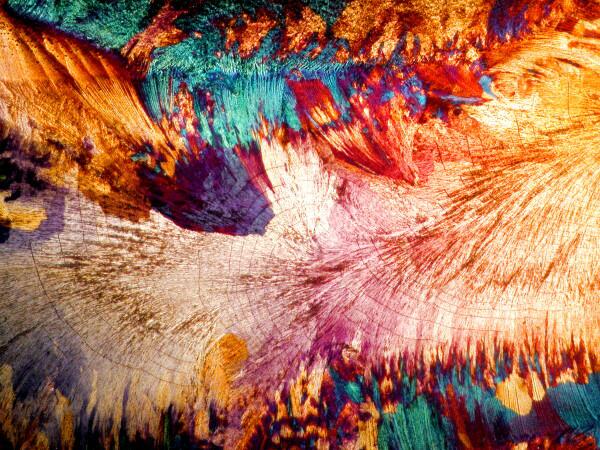
These demonstrate that using simple, ordinary materials can sometimes produce spectacular results. It’s not necessary to have a cabinet full of exotic (and sometimes highly dangerous) chemicals to get satisfying results.
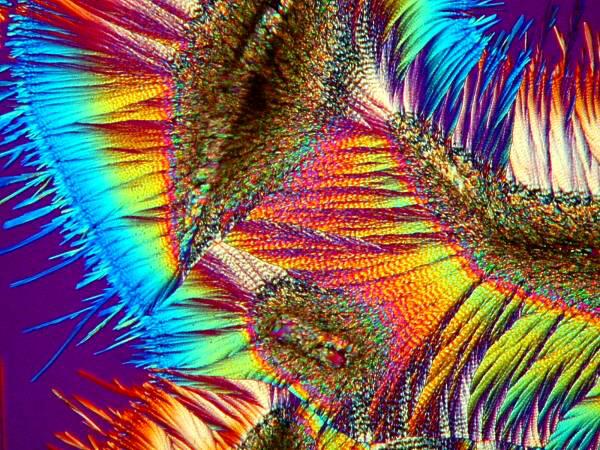
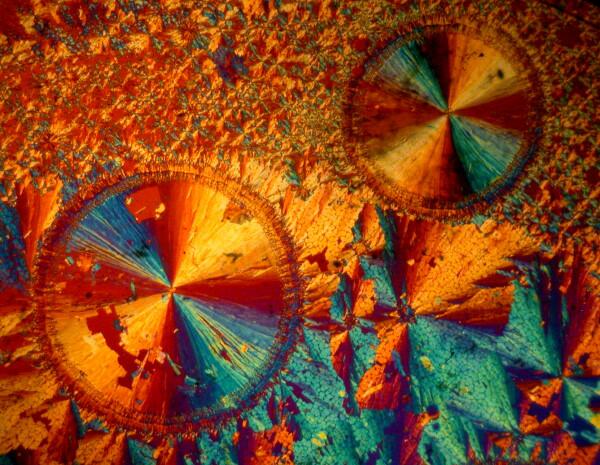
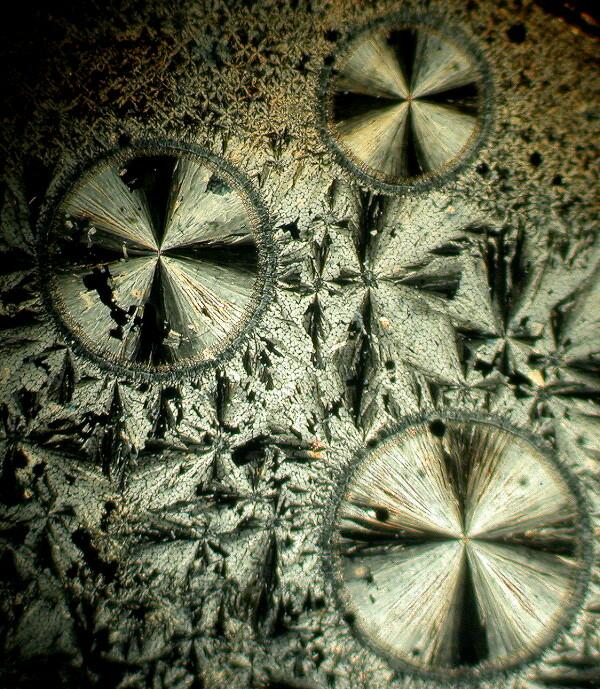
Last year, I bought a small set (8 slides) of 19th Century preparations of chemicals designed for observation with polarized light. The first 3 are actually all taken from a single slide of Salacin which is derived from willow barks and is related to aspirin. I had long wanted a slide of Salacin and was very glad to get this one. The first image was taken with the polars fully crossed.
The next image was obtained by using a small plastic Petri dish as a compensator. Notice how the colors are lighter and have shifted to pastel hues.
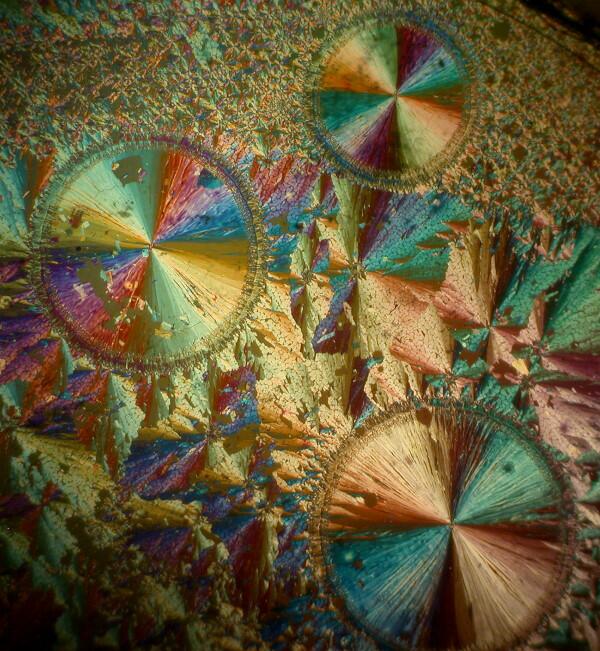
The third image was taken with the polars uncrossed and produced a dramatic series of black, white and grey contrasts.
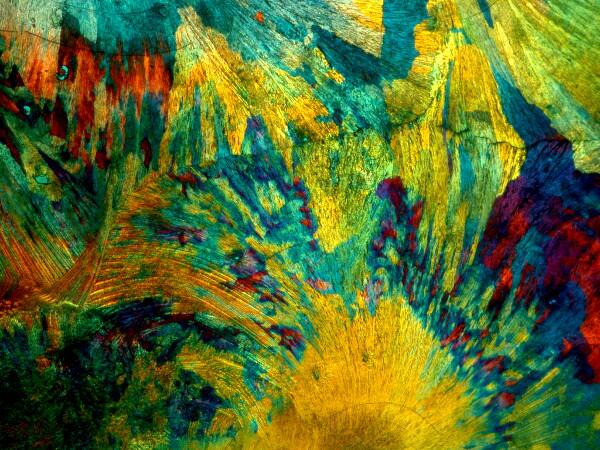
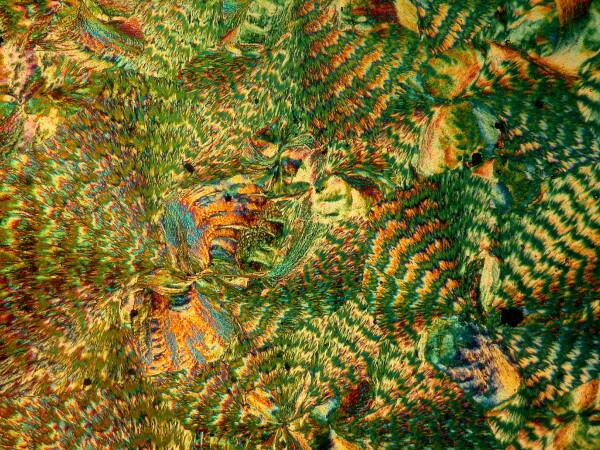
The last image from a 19th Century slide is of Palmitic Acid which is derived from the Brazil nut palm. The patterns are wonderfully intricate and colorful.
Remember that all of these images were taken with a stereo-dissecting microscope and that marvelous little polarizing accessory.
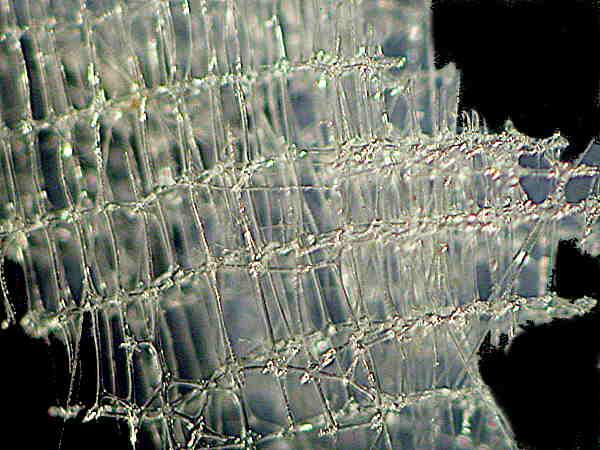
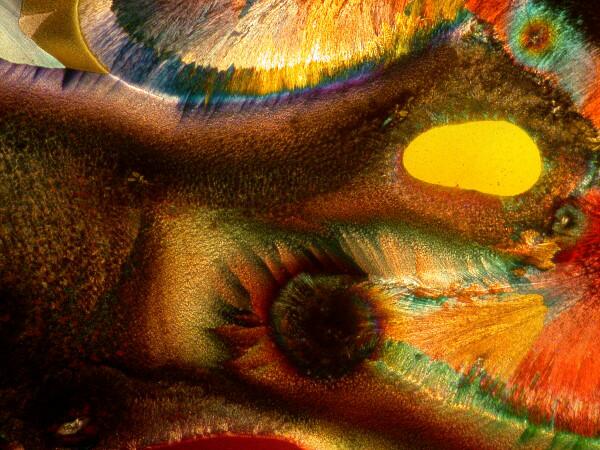
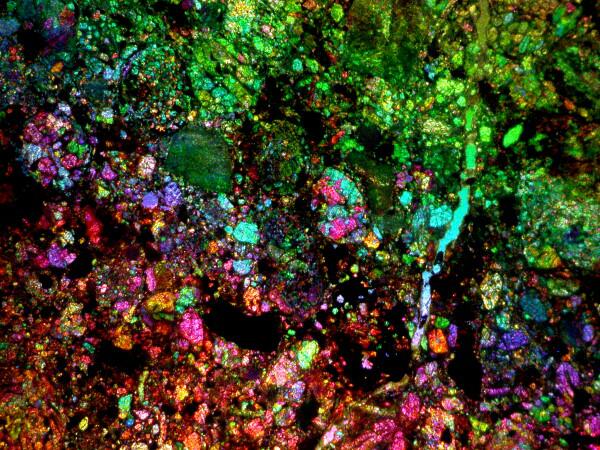
Finally, I’d like to show you 2 more images, the first from a very ancient bit of extraterrestrial matter and the second a 21st Century concoction that I produced last week. First, here is that thin section of a very colorful bit of a meteorite.
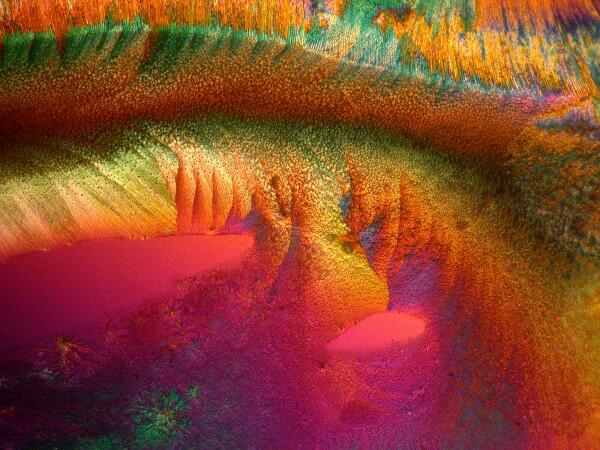
The 21st Century slide is one of arboraceous or dendritic silver. The technique is simple, but requires some caution because it uses silver nitrate which is a strong caustic and can be highly reactive with a variety of other chemicals–so, DON’T experiment with it randomly. This procedure is straightforward and safe enough if you are careful. First you need a bit of copper. You can shave some small shreds from a piece of copper wire or use a small piece of copper foil. Place the copper on a clean slide and add a drop of silver nitrate solution and within seconds a beautiful display of silver crystals will begin to form.

If one takes very tiny shreds of the copper and places them strategically on the slide, one can , with a bit of luck, get some intricate, small deposits which almost look like snowflakes.
If you don’t have or can’t locate or can’t afford one of these convenient accessories, there are still other options that will allow you to use polarized light with you stereo microscope.
Gadzooks! (There’s a word you don’t hear much anymore.)
I tracked down the manufacturer of this implement; it’s Kyowa in Japan, a company which has been making some quite good microscopes for about 40 years. As I recall, when I purchased my polarizer it was about $50. However, I still hadn’t found a distributor, so Google to the rescue. I found a website for a company in Canada which even had a photograph of this little wonder. I sent them 3 e-mails, but didn’t get a reply. So, I started calling some large microscope companies that handled both new and used instruments and accessories. After 5 calls, I finally found two possible sources; one in the U.S. and one in England. I called the one in the U.S. and the man who answered knew instantly what I was talking about, but cautioned me that it would be expensive, perhaps as much as $200. He said there wasn’t much demand for it and they hadn’t stocked it for some years, but that he would FAX Kyowa in Japan and get me a price. I e-mailed the English source–I haven’t the foggiest idea of how to make an international phone call; it’s all I can do to remember my own phone number. Two days later, I received an e-mail from the American company informing me that the cost of this nice little polarizing unit had escalated to $575 plus shipping!
Why, you might ask, was I going to all this bother when I already had a unit. The fact is that I wasn’t inquiring for myself, but for 2 friends who had expressed an interest in having this accessory. Two days later, I got a response from the English company telling me that their price, given the exchange rate at the time, was $420 plus shipping. Well, you can imagine my chagrin when I had to let my friends know that they would be better off by far, improvising and either making their own stands or pursuing an alternative. If you have access to the tools and a certain amount of skill, you could produce such a stand out of wood.
There is no rigid rule that it must be made out metal; in fact, one might even produce one out of pieces of plastic. When it comes to practical activities such as woodworking, I am severely retarded. In Junior High School, I had to take wood shop and, I loved working on a lathe, but what started out as lamp base ended up as a very weird pencil. I have a friend who is a whiz with such projects and I’m going to try to convince him to make two, one for himself and one as demo and then you can have him make you one out of walnut or ebony or teak and thereby contribute to the fund to send his 3 children to university.
If you can’t make or afford to purchase such a stand, then you can improvise by obtaining some polarizing material and cutting some disks. First, you’ll need a large disk that you can tape or attach to the underside of the microscope stage. Virtually all stereo-microscopes allow for the viewing head to be removed and then one can cut a small disk and insert it and replace the head. This creates one major problem; if the bottom disk (the polarizer ) is fixed, it can’t be rotated and to rotate the top disk (the analyzer), you would have to keep removing the viewing head to make any adjustments. You could put an analyzer in each eyepiece, but this is a poor compromise. A better approach is to buy a camera polarizing filter in glass, mounted in a plastic or metal ring. This can then be placed directly on the microscope stage and the slide can rest directly over the filter which can easily be rotated.
All of the above assumes that you have a stereo microscope with a trans-illuminated base and again if you don’t have such a base you will have once again to enlist your woodworking talents.
An interesting alternative can be found in the excellent article by Michael Much in Micscape. The relevant part of this to be found in the second half of the article.
All comments to the author Richard Howey are welcomed.
Editor's note: Visit Richard Howey's new website at http://rhowey.googlepages.com/home where he plans to share aspects of his wide interests.
Microscopy UK Front
Page
Micscape
Magazine
Article
Library
Please report any Web problems or offer general comments to the Micscape Editor .
Micscape is the on-line monthly magazine of the Microscopy UK website at Microscopy-UK .